
Chapter 40. Mailing with Windows Mail
In This Chapter:
- See how Windows Mail relates to Outlook Express
- Set up a Windows Mail email account
- Import data from Outlook or Outlook Express
- Create new email messages to send
- Send entire web pages to someone
- Receive and reply to email in Windows Mail
- Manage your message folders
- Create an email signature that gets read
- Manage spam and other junk email
Vista includes Windows Mail, a program that replaces Outlook Express found in previous Windows versions. As with Outlook Express, Windows Mail offers support for email and newsgroups—electronic bulletin boards where you can exchange ideas and files.
With Windows Calendar (refer to Chapter 20, “Dating with Windows Calendar”) and Windows Mail, you really don’t need a separate program such as Microsoft Outlook for your email and scheduling. The truth is, however, that Windows Mail is not an extremely sophisticated email program and Windows Calendar isn’t an extremely sophisticated scheduling program. It wasn’t Microsoft’s intent to make these programs everyone’s answer to scheduling and email; as with Outlook Express, the adequate (and free with previous versions of Windows) Windows Mail can handle day-to-day email tasks and will do the job without all the bells and whistles that a program such as Microsoft Outlook provides. (In addition, Windows Mail provides a newsreader and Outlook does not.)
In this chapter, you’ll learn how Windows Mail works to handle your email. You’ll set up your email account and send emails in no time. The next chapter shows you how to use Windows Mail to access newsgroups for information about various topics that interest you.
Introducing Windows Mail
To start Windows Mail, open your Start menu and select the Windows Mail option. Figure 40.1 shows the screen that awaits you after Windows Mail loads. Even if you have set up no email accounts, Microsoft stuck an email message in your Inbox to tell you a little about Windows Mail. (Depending on your version and release date of your specific Windows Vista system, you might see a slightly different email message from Microsoft.)
Figure 40.1. The Windows Mail screen offers a simple email interface.
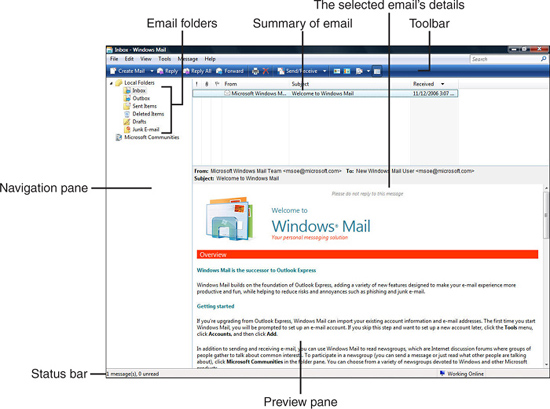
As with most email programs Windows Mail provides you with the following folders in the navigation pane:
- Inbox—Holds your incoming email.
- Outbox—Holds your outgoing mail; if you’re online, items don’t remain in your Outbox folder very long. As soon as you send an email message, it goes to your Outbox and Windows Mail begins sending the message. As soon as it sends the message, Windows Mail moves the email message from your Outbox folder to your Sent Items folder. If you’re not online, as might be the case when working on a laptop while traveling on a plane, you can send emails and Windows Mail stores them in your Outbox until you get to a live Internet connection. At that point, after you start Windows Mail, it sends those messages to their intended recipients.
- Sent Items—Holds email you’ve successfully sent previously.
- Deleted Items—Holds email you’ve deleted; until you empty your Deleted Items folder, you can undelete email messages. The Deleted Items folder works like your Recycle Bin and holds messages you want to delete.
- Drafts—Holds email you have started to write but not yet finished.
- Junk E-mail—Holds email you’ve received that you or a junk email filter has determined is possible spam (an unsolicited ad arriving in an email), or an email infected with spyware, or a virus that Windows Defender or an antivirus program you’ve installed detected as being a threat.
Did you Know?
To view all the items in a navigation pane folder, double-click the folder and the items will appear in the email summary area. You can move items from folder to folder and create your own folders to sort and store your messages.
Setting Up an Email Account
The first thing you have to do to use Windows Mail is set up an email account in the program. Most often, an email account falls into one of two categories:
- HTML-based email—A web-based email account such as Microsoft’s Hotmail or Google’s Gmail.
- POP3 email—A service-based email usually provided by your Internet service provider such as Microsoft’s MSN or AOL. In the past, a program such as Windows Mail or Outlook was required to access POP3-based email.
Both kinds of email accounts are set up in slightly different ways, depending on the service, but for Windows Mail, you can only set up an email account that offers a POP3 connection. Therefore, you’ll have a problem with Hotmail and some other web email services because many email programs, such as Windows Mail, require a POP3 email account to access the email there.
Many web-based email services such as Gmail provide you with a free POP3 connection to your web-based email account so that you can use Windows Mail to send and retrieve a Google account’s email. Surprisingly, however, Microsoft’s own Windows Mail won’t read Microsoft’s own Hotmail email because the free version of Hotmail doesn’t allow a POP3 connection.
By the Way
Microsoft assumes that if you get free Hotmail, you should use the Hotmail web-based interface to read ads that appear along the edges of your Hotmail screen at various times. If you pay to upgrade to Hotmail Plus, Microsoft adds a POP3 connection to your Hotmail account so that you can use Windows Mail to access your email.
A third kind of email account, IMAP, is available as well as a web-based and POP3 email account, but IMAP is generally limited to large corporate network computers like those you’d find at a large company’s headquarters or a university. The IT staff (IT stands for Information Technology, a name often used for a company’s computer support staff) for that organization can supply the details you need to configure Windows Mail for your mail account if you use an IMAP account.
Did you Know?
Windows Mail makes it easy to work with more than one email account. You can add one or more email accounts and you can send and receive from all your accounts from within Windows Mail. In addition, you can create separate folders to hold email messages sent to each account so that you can keep your accounts separate.
Before you set up a new email account in Windows Mail, you need the following information, most of which you know, but some of which you will probably have to obtain from your email account’s customer support website:
- Name you want others to see—Your first name and last name or a nickname you want others to see in the From field of the email messages you send. This field is commonly referred to as your display name, and if you choose to leave your display name blank, your email address will appear in the From field instead of your name.
- Email address—Your email address which generally follows the pattern, [email protected].
- Email server—Your email provider’s POP3 server value (see the note that follows this list), which generally follows the pattern of pop3.isp.com, where isp is your Internet service provider, or smtp.isp.com. The POP3 value is your email’s incoming server and the SMTP value is your email’s outgoing server. To be able to send and receive emails from your email account, you must have both these values. They usually have to be supplied by your ISP because many email providers don’t follow any naming standards for their email servers.
- Username—The username that you chose or were assigned when you received your email account from your email provider. This is the name that appears before @email.com, so [email protected]’s username would be MarilynWheeler.
- Password—The password that you chose or were assigned when you received your email account from your email provider.
By the Way
ISPs’ POP3 and SMTP information is readily available, and if you don’t know your email account’s POP3 and SMTP values that is information your email account provider will almost always make readily available on its customer support website and phone centers. The information is so often requested that it’s usually faster to go online and locate it on your ISP’s website than to call its help staff. Companies that provide email account service understand the importance of making it easy for you to find these values so that you can set up email programs such as Windows Mail.
Setting Up an Email Account in Windows Mail
As long as you use a POP3-based email account, or a web-based email account that offers POP3 access, such as Gmail, it’s simple to set up Windows Mail to send and receive your email. Windows Mail is a more structured way to manage your email than the Gmail website because Windows Mail runs on your own computer, and you’re not limited to an Internet connection speed when all you want to do is read and manage and sort and delete the email messages that you went online to send and receive.
To add a new email account to Windows Mail, follow these steps:
- Select Tools, Accounts to open the Internet Accounts window.
- Click Add.
- Select E-mail Account and click Next.
By the Way
You will see Directory Service as one of the kinds of accounts you can create in addition to an email and newsgroup account. A directory service is an address book for contacts and is often made available in a large organization.
- Type your display name, such as Marilyn Wheeler, and click Next.
- Type your email address, such as [email protected], and click Next to display the E-mail Server Names window.
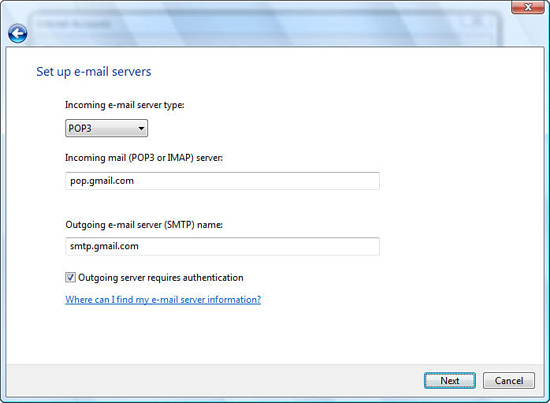
- Assuming that you are setting up a POP3-based email account, leave the Incoming Server setting as POP3 and type your email account’s POP3 server information in the top text box. Type your email account’s SMTP server information in the bottom text box. Click the My Server Requires Authentication option if your email account requires it, and your E-mail Server Names window should look like the one in Figure 40.2. Click Next to move to the Internet Mail Logon window.
Figure 40.2. Your email account’s provider will inform you of the POP3, SMTP, and authentication settings you must use.
- At the Internet Mail Logon window, enter your email username and password. Remember that your username will be the leftmost part of your email name, so [email protected]’s username would be Samantha-9-Pick. Type the password for your account in the Password field. Without these values, Windows Mail has no access to your email account. Keep the Remember Password option checked unless you share a computer and user account with someone else; in that case you should type your email account’s password every time you check email instead of leaving the option checked and letting Windows Mail enter the password for you. Click Next to move to the final email setup window.
- Click to check the option Do Not Download My E-Mail at This Time if you don’t want to download all email stored in your account at the time you set up Windows Mail to read your email. With the option checked, Windows Mail reads only new email that comes to your account and stores that email in your Windows Mail Inbox. Generally, most people want to download any current email in the account to Windows Mail and that is why the option defaults to being clear. Click Finish and, assuming that you entered all your email account correctly, Windows Mail goes to the Internet and retrieves any email waiting for you there.
Some Words About Importing Data
One of the things you’ll probably want to do is move contacts and possibly old email that you’ve received in the past into Windows Mail. There are so many options, depending on what you’ve used in the past for email, that to cover them all would be impossible. So, a brief overview of what you’ll go through will be helpful.
One of the nicest things about Windows Mail is that when you upgrade a computer from Windows XP to Windows Vista, Windows Mail imports all your Outlook Express contacts and email addresses (as well as newsgroups) so that you don’t have to do anything special after you install Vista. Windows Mail will already have all your contacts and email information and you’re ready to continue where you left off with Outlook Express.
If you have not used an email system on your current computer because it’s new, one of the things you’ll certainly want to do first is to get your past emails and contacts into Windows Mail. The contacts will include your names, email addresses, and other contact information you might have kept track of elsewhere or on another computer, such as a desktop where you use Outlook or Outlook Express.
It might be nice to keep Outlook on your desktop and use Windows Mail for your laptop’s email. By doing that, you save the cost of a second copy of Microsoft Outlook but you can still use Outlook’s contacts and even import its email messages into Windows Mail. You will need to select Outlook’s File, Import and Export command and export your Outlook Contacts to a CSV (comma-separated value) file and your email data to a PST personal folder file. These files might be large if you have lots of contacts and emails, so you might have to save the files onto a CD-ROM or perhaps burn a DVD. You need a way to get the files to your laptop. If you run a network between your laptop and the desktop on which you installed Outlook, you can store Outlook’s exported files in a Public folder and copy that folder to your laptop.
If you already have Outlook on the Windows Mail machine, you might not have the need or desire to use Windows Mail. Even though its interface is simpler than Outlook’s, you will lose functionality. Getting your contacts and email from another computer that uses Outlook, however, is a need that you might have.
By the Way
If you use Outlook Express on your desktop and have a new laptop that you didn’t upgrade, you’ll want to get your Outlook Express email and contacts to Windows Mail. From Outlook Express, you must select File, Export and export your OE messages to one file and your OE contacts to another file.
After you copy your exported contacts and messages to your laptop, select Windows Mail’s File, Import, Messages option. Then select the program that holds the email you want to import from using the Select Program dialog box shown in Figure 40.3.
Figure 40.3. You can import your Outlook or Outlook Express settings from a desktop to a new Vista laptop if you want to get your contacts and emails on your laptop.
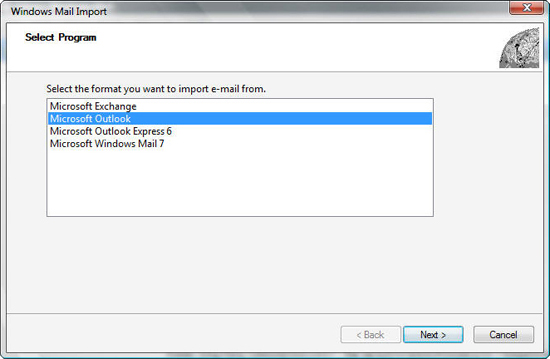
Given that Windows Mail is Microsoft’s product, Microsoft doesn’t offer options to import from non-Microsoft email programs. Select a program such as Microsoft Outlook or Microsoft Outlook Express 6 and click Next. Windows Mail leads you through a window or two where you locate the imported file (the one you exported from the other program and copied to your laptop). Select the items you want to import (such as the mail folders you want to import) and the import process begins. To import the contacts that you exported from Outlook as a CSV file, select File, Import, Windows Contacts, CSV; click Import and locate the file to import.
By the Way
This example has assumed an existing desktop and a new Vista laptop, but the same procedure holds if you’re transferring mail data from one desktop to another, too.
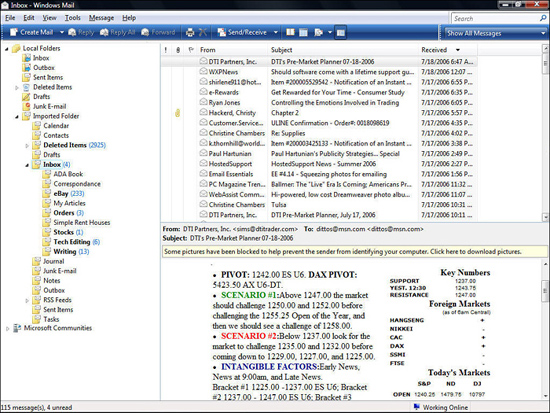
After you import Outlook or Outlook Express email and contacts into Windows Mail, a new folder hierarchy appears in the Windows Mail navigation pane, like the one in Figure 40.4. Windows Mail stores all imported folders in a new folder named Imported Folder. You can keep whatever imported folders you want to keep and remove those you don’t want to use with Windows Mail by right-clicking the folder and selecting Delete.
Figure 40.4. After Windows Mail imports your folders, you’ll see your familiar folders and their contents in a new folder named Imported Folder.
Did you Know?
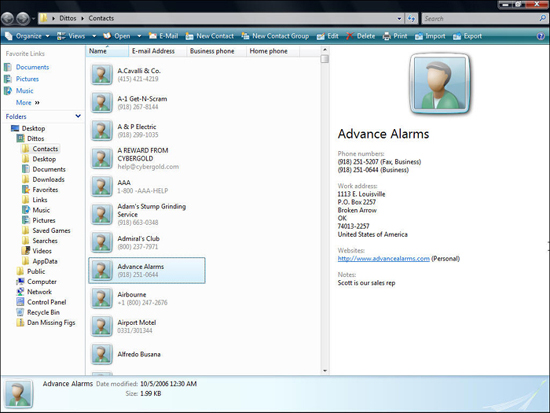
If you’ve used the Vista program called Windows Contacts and manually added contacts there or perhaps imported them from Outlook Express, you can import those contacts into Windows Mail as well. Even better, when you import contacts from Outlook or Outlook Express into Windows Mail, Vista also uses those same contacts for Windows Contacts, a program that does nothing but manage your contacts, as Figure 40.5 shows. Windows Contacts serves up your contacts to various Vista programs that can access those contacts.
Figure 40.5. The Windows Contacts program, which automatically updates when you update your Windows Mail contacts, makes your contacts available to other Vista programs, and acts as a standalone contact-management tool for you to manage names and addresses of associates, family, and friends.
Sending Mail with Windows Mail
Obviously you’ll use Windows Mail to send emails to others. The following steps show you how to send various forms of email to recipients. Windows Mail probably works exactly the way you expect it to if you’ve used other email programs in the past. Windows Mail has several options, but you can send email messages and files to others very easily without worrying too much about what else is under Windows Mail’s hood.
- Click Windows Mail’s Create Mail button to open the New Message window.
- Type your recipient’s email address in the To field or click the To button to select the recipient if the name appears in your Windows Mail contacts list.
- Use the Cc (Carbon copy) field to send copies of your message to another recipient. The recipient will know that the message was copied to him. If you enter an email address in the Bcc (Blind carbon copy) field, the To and Cc recipients will not know that the Bcc recipients got copies of the message.
Did you Know?
If you do not see the Bcc box, select View, All Headers, and the Bcc field will appear beneath your carbon copy field.
- Enter a subject line. Get in the habit of entering a subject so that your recipients can file your messages by subject.
- Press the Tab key or Shift+Tab to move from field to field. When you type the message in the message area, a scrollbar enables you to scroll through messages that don’t completely fit inside the window. Use the formatting toolbar above the message area to apply formatting, color, and even numbered and bulleted lists to your message. You must be careful, however, to make sure that your recipients have an email program capable of reading all the formatting that Windows Mail can produce. Unless you send plain text messages, your recipient might not be able to read your message clearly without Windows Mail or a fully compatible email program.
- If you want to attach one or more files to your message, select Insert, File and select a file from the Open dialog box that appears. (The Attach toolbar button, the one with the paper clip icon, also attaches a file to your email.)
- Windows Mail supports email formatting. You can change your font and other formatting details, create bulleted and numbered lists, and insert pictures and hyperlinks using the formatting toolbar above the message body area.
Did you Know?
Windows Mail supports spell-checking! Click the top toolbar’s spell-check button (the one with the letters ABC on it) to make sure that your message’s spelling is correct before sending your email.
- Your message might look something like the one in Figure 40.6. As you can see from the name in the To field, when you select one of your contacts, as opposed to typing an email address, Windows Mail fills in your recipient’s name as well. To send the message, click the Send button and the message goes on its way toward the recipients.
Figure 40.6. Your new email message is ready to send.

Sending email messages and attached files to the right recipients, as you can see, requires only that you know the person’s email address or locate that person’s email address from your list of email addresses in Windows Mail.
Did you Know?
You can send an email to multiple recipients (or multiple Cc- or multiple Bcc-filled recipients) by separating multiple email addresses with a semicolon.
Send Web Pages in Emails
You can send entire web pages to any recipient using Windows Mail. The reason you might do this is that you want someone to see something firsthand on a web page you just visited. By sending the page in an email, you act a little like your own RSS service, sending web content to specific people whose email address you know.
Before sending a web page with Windows Mail, make sure that Windows Mail is your default email program by opening the Control Panel’s Programs group and selecting Default Programs. Select the Set Your Default Programs option, choose Windows Mail, click the Set as Default option, and close the window.
By the Way
The default email program you set will be the one displayed at the top of your Start menu in the slot labeled E-mail. Outlook places your default web browser (usually Internet Explorer) and email program in the top two Start menu slots because of the frequency that most users run those two programs.
Follow these steps to use Windows Mail to send an entire web page to someone:
- Start Internet Explorer.
- Display the web page that you want to send to somebody. (You can send the page to your own email account for a test if you want to see how such an email arrives.)
- Click the arrow to the right of the toolbar’s Page button to display a drop-down list of options.
- Select Send Page by E-mail. When Vista confirms that you want to send the web page as an email, click Allow. (If you select Send Link by E-mail, Internet Explorer opens a new email message and inserts a hyperlink to the web page in the email.)
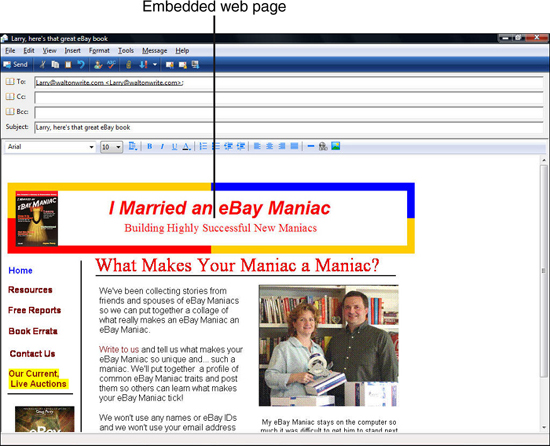
- The email window opens so that you can select a recipient and add copies to others if you like. You can see the web page in your message body, like the one shown in Figure 40.7. Now that’s quite a fancy email message!
Figure 40.7. Your recipient will see the web page you sent when viewing this email.
- Click the Send button to send the web page.
Watch Out!
Remember that your recipient must also use an email program, such as Windows Mail or Outlook Express, that can display formatted email as web-based HTML code; otherwise, the recipient will get garbage in the message. Your recipient will be able to read the mail’s text, but the email will be messed up because the recipient will see all the HTML formatting codes that are normally hidden.
Receiving Email in Windows Mail
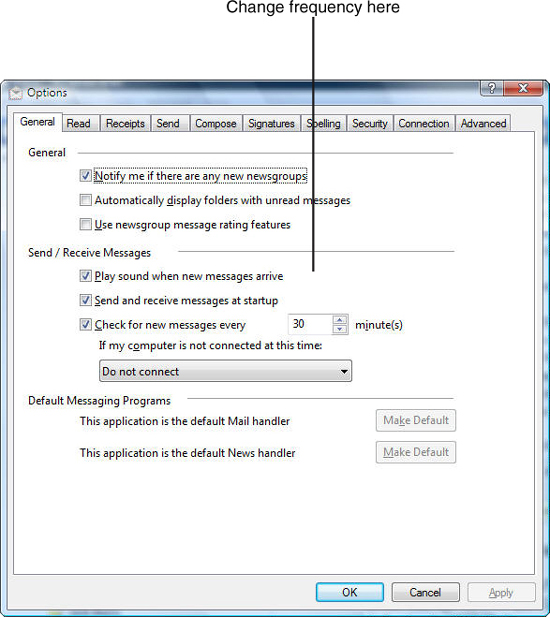
You can receive and organize the email that people send to you by taking advantage of Windows Mail’s folder structure. Windows Mail automatically checks for new email messages every 30 minutes, but you can change this frequency. To set the email check frequency so that Windows Mail checks every 5 minutes, select Tools, Options and click the General tab to display the page shown in Figure 40.8.
Figure 40.8. You can request that Windows Mail check for new email messages more often.
Even if Windows Mail hasn’t checked for emails, you can. Click the toolbar’s Send/Receive button to refresh your email account, send any emails that might be in your Outbox folder, and receive any emails that have been sent to you since your most recent send and receive action.
As you click the headers in the Inbox, a preview appears for that message in the lower pane. (Drag the center bar up or down to make more or less room for the headers.) If you double-click an Inbox item, a window opens so that you can view the message from a larger window without the other screen elements getting in the way.
Managing Email and Folders
Delete mail you do not want by selecting one or more message headers and dragging them to the Deleted Items icon. The Deleted Items area acts like the Windows Recycle Bin. Mail does not really go away until you delete items from the Deleted Items area by clicking the Deleted Items icon and removing unwanted mail. You can also delete mail by clicking the mail item and pressing the Delete key.
You can easily reply to an email message’s author, or to the entire group if you are one of several who was sent mail, by clicking the Reply or Reply All toolbar button. In addition, when reading email, you can compose a new message by clicking the toolbar’s Create Mail button.
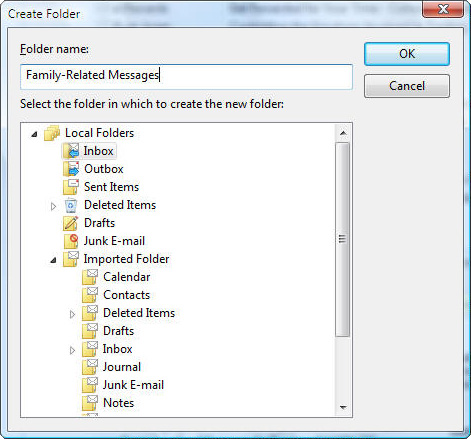
You can create new folders to store email that you want to keep for future reference. Select File, New, Folder to display the Create Folder window in Figure 40.9. Type a folder name in the Folder Name field and click the folder where you want to insert the new one. The new folder will be a subfolder of the one you click.
Figure 40.9. Create new folders so that you can organize your messages by subject.
If an email arrives with an attachment, you’ll see a paper clip icon to the left of the email’s From recipient in your Inbox. Figure 40.10 shows a series of emails, four of which have attachments. All have been read before except the top one from DTI Partners. The envelope icon to the left of a message’s sender’s name or email indicates whether you’ve read—indicated by an open envelope—or haven’t yet read that email.
Figure 40.10. A paper clip icon indicates that an email has a file attached to it.
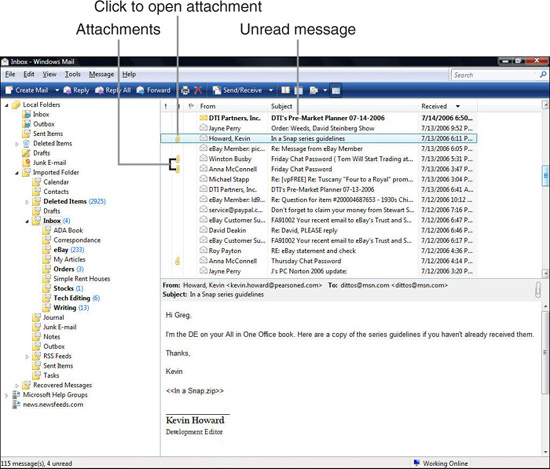
To open the attachment, click the email’s paper clip icon and click the filename. To save the attached file to your disk, click the email’s attachment paperclip, select Save Attachments, and enter a filename. Windows Mail stores the attachment to the folder you select.
Watch Out!
Don’t open attachments from unknown sources. Nasty viruses often arrive as email attachments. Even if someone you know sends you an email with an attachment, it doesn’t mean that the email is safe. Some Trojan programs hijack a user’s contacts list and, in the background, sends email to everyone in the contacts list from the computer owner’s email address without the owner knowing it’s happening. Keep your antivirus and spyware programs up-to-date because they should catch most of or all the problems you might have.
Your Blocked Senders and Junk Email Options
Windows Mail maintains a list of blocked senders. If you receive junk email or other email you no longer want to receive, right-click the message, select Junk E-mail, and select Add Sender to Blocked Senders List to add the email’s sender to your blocked emails. In the future, any emails you receive from that sender automatically go to your Junk E-mail folder. You should periodically click your Junk E-mail folder to view the mail there. Windows Mail’s Junk E-mail filter, although good, isn’t perfect and it sometimes happens that a valid email gets sent to your Junk E-mail folder by mistake.
You can ask Windows Mail’s help in cleaning up your Inbox by setting Windows Mail’s Junk E-mail filter to a higher-than-default setting. To do this, select Tools, Junk E-mail Options to open your Junk E-mail Options dialog box shown in Figure 40.11.
Figure 40.11. Select the level of junk email filtering that Windows Mail is to perform.
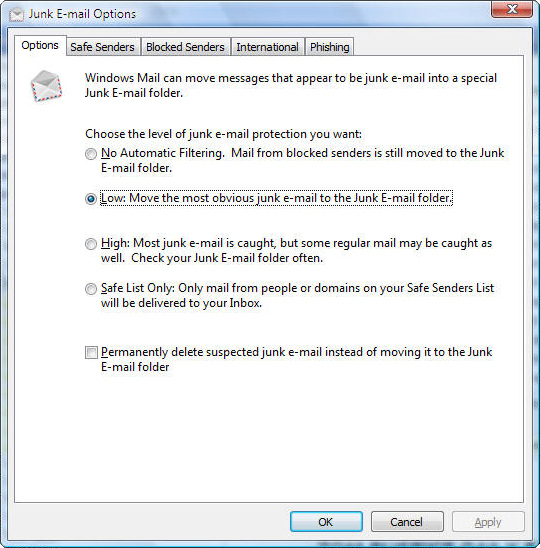
If you select the No Automatic Filtering option, Windows Mail sends only email you’ve requested to be blocked to your Junk E-mail folder. By raising the level of junk email filtering from Low to High, you greatly increase the number of emails that Windows Mail sends to your Junk E-mail folder, but it also sends some valid emails there by mistake. That is why it’s incumbent on you to check your Junk E-mail folder every day or two to make sure that you don’t miss a valid email.
If you select Safe List Only, Windows Mail sends all email you receive to your Junk E-mail folder except those emails sent by people in your Safe Senders list. You maintain the Safe Senders list by clicking the Junk E-Mail Options dialog box’s Safe Senders tab and adding new email addresses.
Did you Know?
All email addresses in your Windows Contacts folder are assumed safe and Windows Mail will not block any of their emails unless you click to uncheck the option labeled Also Trust E-mail from My Windows Contacts. If you click the option labeled Automatically Add People I E-mail to the Safe Senders List, Windows Mail monitors to whom you send emails. Windows Mails adds everyone you send an email to your Safe Senders list so that they won’t be blocked in the future.
If you receive an email that contains graphics and the sender is not part of your Safe Senders list, Windows Mail blocks the graphics and puts a red X inside a box to indicate that it is blocking the graphic image from view. Windows Mail does this because viruses and spyware software can arrive in an email disguised as a graphic image; by blocking the image, Windows Mail blocks that kind of danger from infecting your computer. Figure 40.12 shows such an email. The email is from Amazon.com, a trusted source that sends email with lots of graphics that are safe from such problems.
Figure 40.12. Windows Mail blocks pictures from unknown email recipients.
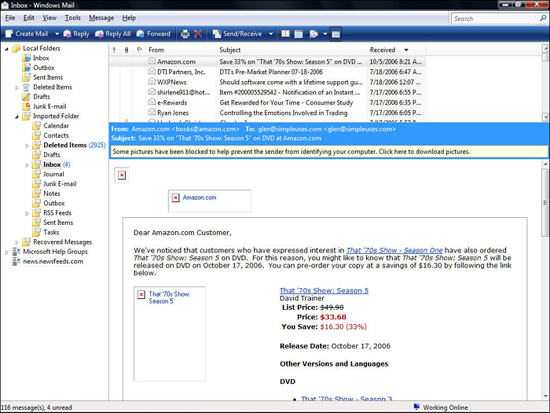
When you receive such an email, you can click the yellow information bar above the previewed email with the blocked pictures to request that Windows Mail load the pictures and display the email as the sender intended it to display. If you then add the sender to your Safe Senders list, Windows Mail never again blocks the graphic images that come inside emails from that sender.
Create an Email Signature
You can add a message to the bottom of every email you send by creating an email signature. If, for example, you routinely sell on eBay, you might want to direct all readers of your email to a list of your current auctions—an email signature could do just that. A business might require that all emails sent from the company’s domain include a privacy clause or perhaps an equal-opportunity employment clause, and an email signature is great for that purpose By creating a signature to appear automatically, the sender never has to worry about forgetting to type the message.
After you create a signature, every time you create a new email message, Windows Mail automatically adds your signature to the bottom of the email. You don’t need to do anything except send the email. To really catch the reader’s eye, you can highlight your email signature in color or format the signature to look the way you want it to look.
By the Way
For that rare email you might not want to send a signature with, you can delete the signature’s text before sending the email.
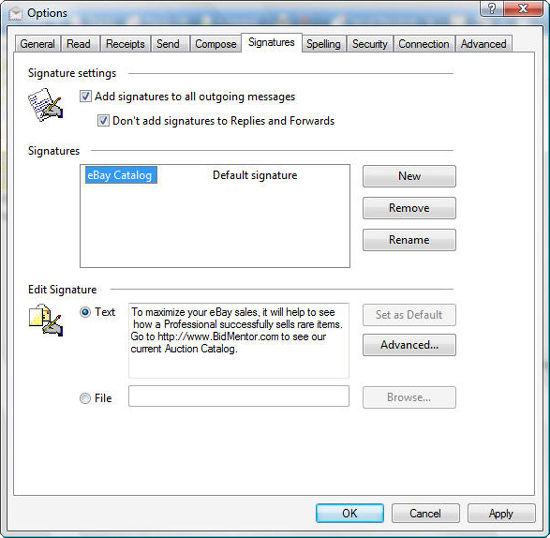
To add a signature, select Tools, Options and click to select the Signatures tab. Click the New button to type a new signature in the Edit Signature box. Click Rename to rename the signature something other than Windows Mail’s default name so that you can select the signature from a list of additional signatures you might add in the future. Click the Add Signatures to All Outgoing Messages to make sure that your new email signature appears at the bottom of every email you send. You can also make sure that your email signature appears at the bottom of every email you reply to or forward, assuming that you want your signature on such emails, by unchecking the Don’t Add Signatures to Replies and Forwards option. Figure 40.13 shows the creation of a signature. After you finish the signature, click OK to save it.
Figure 40.13. Create an email signature that you want to appear at the bottom of every email you send.
By the Way
The Advanced button displays a list of all email accounts currently set up in Windows Mail so that you can select which account’s email you want the signature test to appear on.
Did you Know?
If your goal for your signature is to get the email’s recipient to click a link, that’s great because if you include a hyperlink in a signature, Windows Mail turns that link’s text into an active and clickable link. Some senders find that formatting the entire signature text as a hyperlink is more likely to grab that click than an embedded hyperlink. You’ll have to test this to see which works best in your situation.
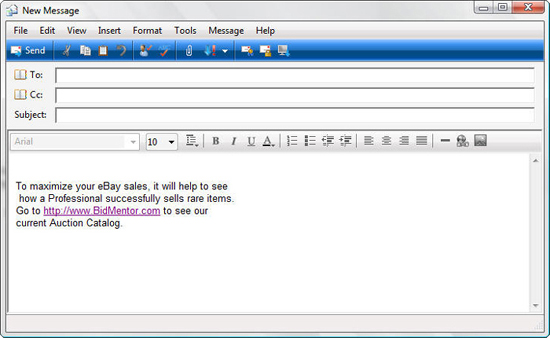
The next time you create a new email message, Windows Mail places your default signature at the bottom of the message. Figure 40.14 shows such a message.
Figure 40.14. Windows Mail does all the signature’s work by placing the signature at the bottom of every email you create.
Adding a few blank spaces above a signature or using a smaller signature font size helps to distinguish the signature from your email message.
Did you Know?
If you want a really fancy signature, such as one with a yellow background and perhaps a small picture, use your word processor or other web page creation program, such as Microsoft Publisher, to create a nicely formatted signature. Save the signature as an HTML file. You can use that file as your email signature in Windows Mail by clicking the File option on the Signatures dialog box and browsing to that HTML file. Select the HTML file and Windows Mail loads the HTML code and formats your signature accordingly.
Chapter Wrap-Up
This chapter explained how to use Windows Mail, Windows Vista’s free email program and newsgroup manager. Email is a major part of every Internet user’s life, and you’ll appreciate Windows Mail’s advanced support and email management simplicity. You can import all your existing email and contacts so that you’ll be ready to send emails to family and friends in no time.
If you want detailed information on a subject, you can search the Web for all kinds of data, but you’ll want to keep newsgroups in mind as another source. Windows Mail doesn’t do only mail well—it is also known as a newsreader client that enables you to access thousands of messages and files on subjects that interest you. In the next chapter, you’ll learn how to set up and use Windows Mail as a newsgroup reader.