In this chapter, you will learn to: | |
✓ | Restrict the type and amount of data in a field. |
✓ | Specify the format of data in a field. |
✓ | Restrict data by using validation rules. |
✓ | Create a simple or multi-column lookup list. |
✓ | Update information in a table. |
✓ | Delete information from a table. |
✓ | Prevent database problems. |
Depending on how much information you have and how organized you are, you might compare a database to an old shoebox or to a file cabinet, into which you toss items such as photographs, bills, receipts, and a variety of other paperwork for later retrieval. However, neither a shoebox nor a file cabinet restricts anything other than the physical size of what you can place in it or imposes any order on its content. It is up to you to decide what you store there and to organize it properly so that you can find it when you next need it.
When you create a database by using Microsoft Office Access 2007, you can set properties that restrict what can be entered and impose order on the database contents, thereby helping you to keep the database organized and useful. You would not, for example, want employees to enter text into a price field, or to enter a long text description in a field when a simple "yes" or "no" answer would work best.
To ensure the ongoing accuracy of a database, you can create and run action queries that quickly update information or delete selected records from a table. You could, for example, increase the price of all products in one category by a certain percentage, or remove all the elements of a specific product line. This type of updating is easy to do with an action query. Not only does using a query save time, but it helps to avoid errors.
In this chapter, you will restrict the type, amount, and format of data allowed in a field, and create a list from which a database user can choose a specific option. Then you will create and run an update query and a delete query.
See Also
Do you need only a quick refresher on the topics in this chapter? See the Quick Reference entries at the beginning of this book.
Important
Before you can use the practice files in this chapter, you need to install them from the book’s companion CD to their default location. See "Using the Book’s CD" at the beginning of this book for more information.
Troubleshooting
Graphics and operating system–related instructions in this book reflect the Windows Vista user interface. If your computer is running Microsoft Windows XP and you experience trouble following the instructions as written, please refer to the "Information for Readers Running Windows XP" section at the beginning of this book.
The Data Type setting restricts entries in a field to a specific type of data, such as text, numbers, or dates. If, for example, the data type is set to Number and you attempt to enter text, Access refuses the entry and displays a warning.
The field properties you can set to control input are:
Required
Allow Zero Length
Field Size
Input Mask
Validation Rule
The Required and Allow Zero Length properties are fairly obvious. If the Required property is set to Yes, the field can’t be left blank. However, Access differentiates between a blank field (which it refers to as a Null field) and a field that looks blank, but contains an empty string. If Allow Zero Length is set to Yes, you can enter an empty string (two quotation marks with nothing in between), which looks like a blank field, but it is classified as empty rather than Null. This differentiation might seem silly, but if you are using programming code to work with an Access database, you will find that some commands produce different results for Null fields than they do for empty fields.
The Field Size, Input Mask, and Validation Rule properties are more complex, so the exercises in this chapter will focus on them.
Tip
Each field property has many options. For more information, search for field property in Access Help.
In this exercise, you will add fields of the most common data types to a table, and then use the Data Type setting and Field Size property to restrict the data that can be entered into the table.
Note
USE the 01_FieldTest database. This practice file is located in the Chapter12 subfolder under SBS_Office2007.
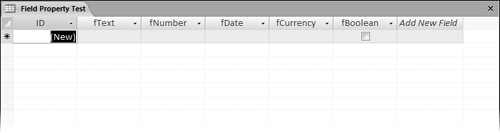
OPEN the 01_FieldTest database. Then display the Field Property Test table in Design view.
Click in the first available Field Name cell (below the automatically-generated ID field), type fText, and then press the
 key to move to the Data Type cell.
The data type defaults to Text.
In the second Field Name cell, type fNumber, and then press
.Click the Data Type arrow, and in the list, click Number.
Repeat Steps 2 and 3 to add the following fields:
Field
Data type
fDate
Date/Time
fCurrency
Currency
fBoolean
Yes/No
Click the fText field name to select it.
Access displays the properties of the selected field in the lower portion of the dialog box.
Repeat Step 5 to review the properties of each field, and then on the Quick Access Toolbar, click the Save button.
On the View toolbar, click the Datasheet View button.
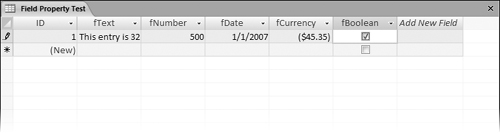
In the fText cell, type This entry is 32 characters long.
In the fNumber cell, type Five hundred.
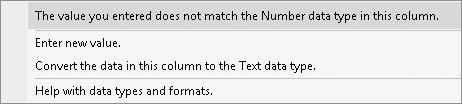
The data type for this field is Number. Access does not accept your text entry, and displays a warning offering you several options.
In the Microsoft Office Access message box, click Enter new value. Then replace Five Hundred with 500.
In the fDate cell, type date, and then press
.Access does not accept the unexpected data format.
In the Microsoft Office Access message box that appears, click Enter new value, type Jan 1, and then press
.The fDate field accepts almost any entry that can be recognized as a date, and displays it in the default date format. Depending on the default format on your computer, Jan 1 might be displayed as 1/1/2007, 1/1/07, or in some other format.
Tip
If you enter a month and day but no year in a date field, Access assumes the date is in the current year. If you enter a month, day, and two-digit year from 00 through 30, Access assumes the year is 2000 through 2030. If you enter a two-digit year that is greater than 30, Access assumes you mean 1931 through 1999.
In the fCurrency field, type the word currency, and then press
.Access does not accept the unexpected data format.
In the Microsoft Office Access message box that appears, click Enter new value, type –45.3456, and then press
.Access stores the number you entered but displays ($45.35), the default format for negative currency numbers.
Tip
Access uses the regional settings in the Windows Control Panel to determine the display format for date, time, currency, and other numbers. You can create custom formats to ensure that the correct currency symbol is always displayed with your values. Otherwise, the numbers won’t change, but the currency symbol might, for instance from dollars to pounds, pesos, or euros.
In the fBoolean field, enter 123. Then click anywhere in the field to toggle the check box between No (not checked) and Yes (checked), finishing with the field in the checked state.
This field won’t accept anything you type; you can switch only between two predefined values.
Tip
In Design view, you can open the Properties dialog box, and on the Lookup tab, set the Boolean field to display as a check box, text box, or combo box. You can set the Format property on the General tab to use True/False, Yes/No, or On/Off as the displayed values in this field (though the stored values will always be -1 and 0).