Once we have the data model ready, we need to customize the Microsoft CRM UI and OOB entities. Let's first create our solution called HR Module
and add the required entities to that solution.
Note
Refer to the solution in the Customizing Microsoft CRM 2011 for PTES section in Chapter 2, Customizing Microsoft Dynamics CRM 2011, to create a solution in Microsoft CRM 2011.
We need to customize the Microsoft CRM site map. We have options to modify the sitemap manually or using the site map editor tool that we used in Chapter 2, Customizing Microsoft Dynamics CRM 2011. We need to customize the site map based on the following table; follow Chapter 2, Customizing Microsoft Dynamics CRM 2011 to customize the site map:
|
Sr No |
Customization Detail |
|---|---|
|
1 |
Remove Left Navigation: Marketing, Service, Resource Center |
|
2 |
Rename Left Navigation: Sales to HR Module, Setting to Configuration |
|
3 |
Remove Left Navigation items under My Work: Queues, Articles, Announcements |
|
4 |
Remove all Left Navigation items under HR Module left navigation: except Lead, Accounts, and Contacts |
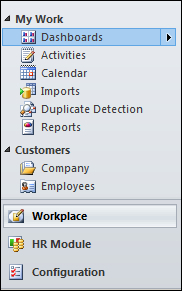
After customizing the site map, Microsoft CRM UI should look like the following screenshot:
After we have customized Microsoft CRM UI, we need to rename the entity and entity views. We also need to perform the following actions:
- Renaming OOB entities: We need to rename the lead, account, and contact entities to candidate, company, and employee. Open the entities in edit mode and rename them as described in Chapter 2, Customizing Microsoft Dynamics CRM 2011.
- Changing Translation labels: After renaming the OOB entities, we need to change the translation labels in Microsoft CRM. We need to convert
LeadtoCandidateandContacttoEmployee. Please refer to Chapter 2, Customizing Microsoft Dynamics CRM 2011, to change translation labels in Microsoft CRM.