Now we have e-mail integration configured, let's start customizing MS CRM 2011 for our PTES. We are using the Microsoft CRM 2011 on-premise deployment for this application. In the next section, we will customize application navigation of Microsoft CRM 2011.
Application navigation can
easily be controlled by customizing the site map in Microsoft CRM. We have two options to modify the site map: either we can manually export our solution and customize the site map, or we can use any custom site map editor tool. We are going to use SiteMap Editor for Microsoft CRM 2011 written by the Microsoft Dynamics CRM 2011 MVP, Tanguy Touzard. You can download SiteMap Editor from http://sitemapeditor.codeplex.com/.
Once we have downloaded this tool, we need to open SiteMapEditor.exe to create a connection to our CRM organization. Select the Create new connection option from the drop-down menu available in the bottom left-hand corner of the editor.
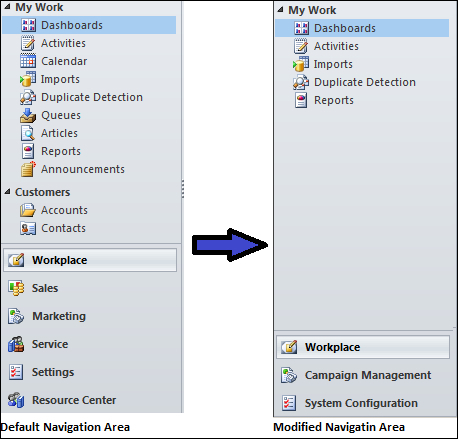
After connecting with our organization, we need to click on the Load SiteMap button in the SiteMap editor window to load the default site map. Once the default site map is loaded, we can remove the unwanted navigation sections from the site map.
Tip
We can also control site map navigation based on the security role. Please refer to rc.crm.dynamics.com/rc/regcont/en_us/live/articles/controlAccessToRC.aspx for more details.
To rename the left navigation sections, we need to select them and write a new label in the Title field, and hit the Save button. Once our modification is over, we can click on the Update SiteMap button to update the site map in Microsoft CRM. After modifying the site map, we need to refresh the Microsoft CRM home page to see the changes in the left navigation area.
Note
Note that you can refer to the SiteMap Editor documentation at http://sitemapeditor.codeplex.com/documentation.
There are many new enhancement features in Microsoft CRM 2011, and Solution is one of them. Solution is a collection of various components that can be created or customized. Using Solution, we can distribute our customization, custom assembly, and other components under a single unit. It is always recommended to include only those components in Solution that you have customized or created. While creating Solution, we need to make sure that we are including all the required dependencies; otherwise, we can face issues when we try to import this Solution into another environment. There are to types f Solution:
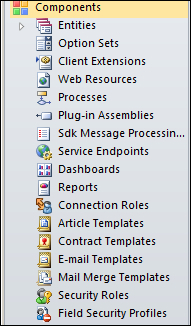
Every Microsoft CRM 2011 implementation contains one default, Unmanaged Solution. This contains all the components that were created during the installation of the Microsoft CRM application. When we create a new Solution, it is created in an unmanaged state. But when a Solution is complete and ready to be distributed, it can be exported as a Managed Solution. A Solution can contain the Components shown in the following screenshot:
If we need to import our Solution in a production environment, it is recommended to export it as a Managed Solution. If an Unmanaged Solution is imported to another environment, it can be modified easily. However, in Solution we can set up properties for the component so it won't allow the user to modify it if it is exported as a Managed Solution.
Managed Solutions can be uninstalled easily from the Microsoft CRM 2011 environment, but Unmanaged Solutions do not provide any facility to uninstall them. We need to manually delete its component if we need to uninstall it. While creating a Solution, we need to specify its publisher. The publisher represents an owner of the Solution.
We can create Solution in Microsoft CRM 2011 using the following steps:
- Select System Configuration (we have changed the Setting label to System Configuration now) from the Microsoft CRM home page's screen.
- Select Solution in the Customization area.
- Select New from the Solution toolbar and enter the following information:
Display Name
Project Training Enrollment System
Name
This will be created automatically based on Display Name
Publisher
Select the default publisher for NSCE from the publisher lookup
Version
1.0
Once the Solution is created, we can add the required component to it. We need to add the Account, Contact, and Marketing List entities to our Solution.
Perform the following steps to add the Account and Contact entities to our Solution:
- Select Entities from the left navigation pane in our Solution.
- Click on the Add Existing button in Solution; this will open a dialog box from which you can select the entities.
- Select Account, Contact, and Marketing list, and click on OK to add these entities to our Solution.
Once we have added the Account and Contact entities to our Solution, we can rename the entities and their attributes. Navigate to the Account entity from Component | Entities.
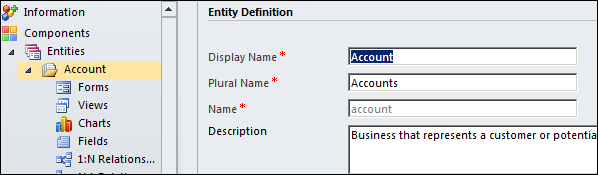
Change the following information in the Entity Definition section and click on the Save button from the Solution toolbar:
- Display Name: Institute
- Plural Name: Institutes
After saving, the Account entity name should be changed to Institute, and it should look like the following screenshot:

Once Account is renamed to Institute, we need to customize all the views to change their name properties. Navigate to Views and open the views one by one to change the view name. We need to perform the following steps to rename the views:
- Select the Active contact and select Edit from the More Actions drop-down menu. This will open the Active contact view in edit mode.
- Select View Properties from the common task section.
- Change the name of the view.
- Follow the previous steps to changes all the view names.
Now we need to change the name of the Fields property. Navigate to Fields from the Institute entity and change Display Name of the fields one by one based on the data model for Institute entity. For the data model, refer Appendix A, Data model. After customizing the fields, we need to modify the Institute form to place only those fields that are required to capture institute information.
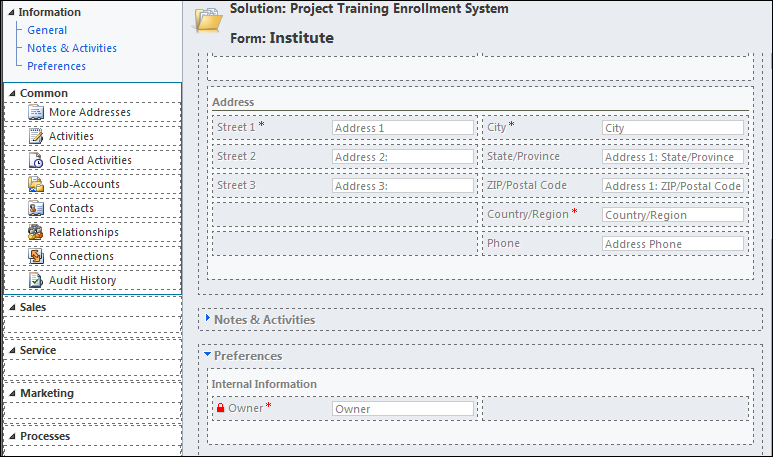
Navigate to Form under the Institute entity and open the Main form to remove unwanted fields and sections. We have to include all the fields in the data model table in the Institute form.
We have faced this requirement in many Microsoft CRM 4.0 implementations, where the user has asked to remove the unwanted left navigation pane from Microsoft CRM entity forms. In Microsoft CRM 4.0, there were two options to remove unwanted left navigation pane items:
- By setting Do Not Display in the relationship tab.
- By using JavaScript.
In Microsoft CRM 2011, apart from the preceding two options, we have one other option to remove them directly. Perform the following steps to remove the left-hand navigation area from the Institute form:
- Double-click on the left navigation pane to highlight it.
- Select the subitems under Sales and click on the Remove button from the ribbon toolbar.
- Remove all the subitems from the Sales, Marketing, Service, and Processes sections one by one.
- Click on Save.
- Click on Publish to publish the Institute form.
After making all these changes, the Institute form should like the following screenshot:
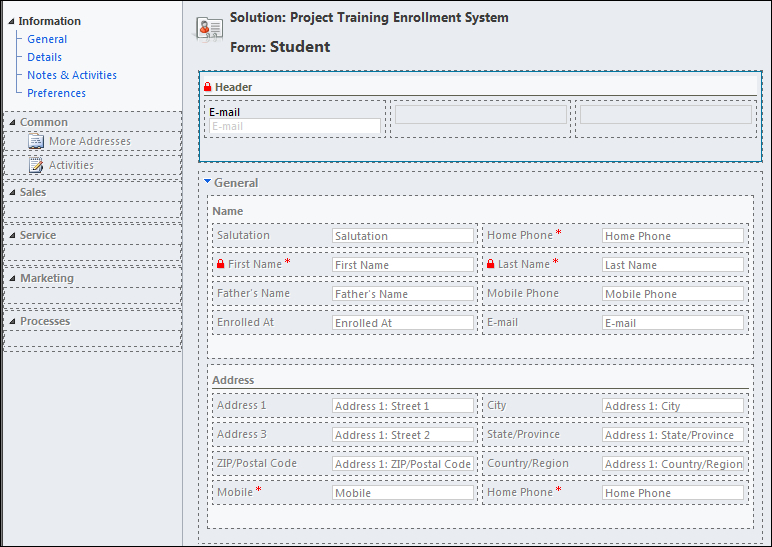
We need to follow all these steps to rename the Contact entity and its attribute, and we need to delete the left navigation pane items from the Contact form. We can remove the unwanted left navigation pane items one by one.
After changing the entities, fields, and view properties, we need to change various labels for the Account and Contact entities. We can do this by exporting the translation file from Microsoft CRM 2011. Perform the following steps to change the translations in Microsoft CRM 2011:
- Click on the Export Translations button from the Solution toolbar. This will open the file download dialog box.
- Save the ZIP folder to some location and extract the content from this folder.
- Open the
CrmTranslations.xmlfile in excel to edit it. - Select the Display Strings sheet and select the last column.
- Open the Find and Replace dialog box and replace Account with Institute and Contact with Student.
- Select the Localized Labels sheet, select the last column, and repeat the previous step.
- Save and close the file; compress that folder again and import it in Microsoft CRM 2011.
Once the customization
part is over, we need to migrate the existing data into Microsoft CRM 2011. Microsoft CRM 2011 Import Wizard now supports the import of multiple file types. We can import .xml,.csv, .txt, and .zip files. We cannot import individual files of more than 8 MB. If we need to import more than 8 MB, we can import ZIP files. We cannot import ZIP files bigger than 32MB. First we need export data import templates from Microsoft CRM 2011. Perform the following steps to export the data template for the Institute and Student entities:
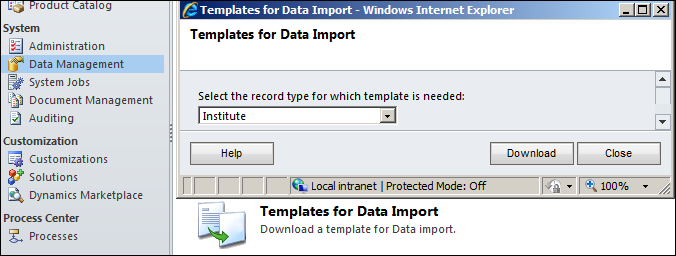
- Navigate to System Configuration and select Data Management.
- Click on Templates for Data Import.
- Select Institute as the record type and click on Download.
- We also need to download a template for the Student entity using the same method.
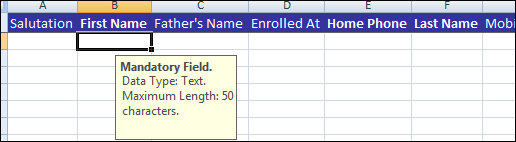
Once we have exported both entities' templates, we need to fill data in the exported template in the required format. We need to open the exported templates in Microsoft Excel. While entering the data, we need to make sure that we are filling the data in the proper format. When we open the template in Microsoft Excel, it will show field details in the tool tip.
Perform the following steps to import the data to the Student entity:
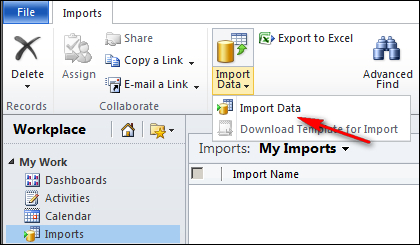
- Navigate to Imports under the My Work area.
- Click on the Import Data button on the application ribbon.
- Click on Browse and select the
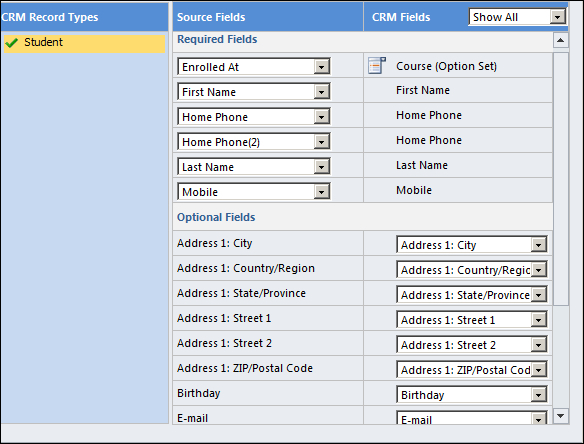
Student.xmlfile. - Click on Next; make sure all the fields are mapped accordingly.
- Click on Next and select No from the Allow Duplicate section.
- Click on Submit to submit the imported data.
- Click on Finish.
Navigate to Import under My work and check the My Import view to check the status of our import
Note
Please refer to http://msdn.microsoft.com/en-us/library/gg328321.aspx for more details on data import in Microsoft CRM 2011.