
Microsoft CRM 2011 provides a very rich OOB workflow UI designer that we can use to create our workflow, to implement our business logic. But if there is a complex requirement that cannot be implemented using the OOB workflow, we can create a custom workflow. We have two options to create a custom workflow; we can either write a custom workflow assembly or we can create a custom XAML workflow. In our sample application, we are going to write a custom workflow assembly. You can refer to http://technet.microsoft.com/en-us/library/gg309458.aspx to create a custom XAML workflow.
We can use Windows Workflow Foundation to create the custom workflow activities. Windows Workflow Foundation provides us with an activity library, which includes activities for control flow, sending and receiving messages, and doing work in parallel.
At present, the custom workflow assembly is supported only in on-premise versions, but very soon we are going to get a Microsoft CRM 2011 service update that will allow us to write the custom workflow for Microsoft CRM 2011 online as well.
Let's discuss the custom workflow concept:
- Workflow context: In the custom workflow, we need to override the
Executemethod that takesCodeActivityContextas a parameter. We can get a workflow context fromCodeActivityContext, which can later be used to create a service object and to get entity-specific conceptual information. We can use the following code to initiate the workflow context:IWorkflowContext context=executionContext.GetExtension<IWorkflowContext>(); IOrganizationServiceFactory serviceFactory = executionContext.GetExtension<IOrganizationServiceFactory>(); IOrganizationService service = serviceFactory.CreateOrganizationService(context.InitiatingUserId);
- Parameters: The workflow supports arguments that we can use, to send information in or out. We can use the following three types of arguments:
- In
- Out
- InOut
We can use the In argument to pass data to the workflow activity, and we can use the Out argument to send data from the workflow activity. The InOut argument can be used for both purposes. We can define an argument in our custom workflow activity by using properties of the
InArgument,OutArgument, andInOutArgumenttypes.We can declare an argument variable, as shown in the following code snippet:
[Input("Prompt for User")] [Default("datatype specific value")] public InArgument<Datatypeofinputparameter> Nameofinputvariable {get;set;} - Input: This is the display label that will be displayed to the user
- Default: We can specify a default value based on the input variable datatype
- InArgument: This is the property for the input argument
- Input variables:
The input variables are used to pass information to workflow assembly. The following examples are to declare the input variable for the different datatypes:
- String:
The following code snippet is an example for the string datatype:
[Input("Please Enter Student Name")] [Default("Name")] public InArgument<string> SName {get;set;} - Double:
The following code snippet is an example for the double datatype:
[Input("Enter Cost")]
public InArgument<double>Cost{get;set;}
- String:
- Output variables:
In the same way, we can declare an output argument, as shown in the following code snippet:
[Output("Prompt for output")]
public OutArgument<Datatypeofoutputparameter> Nameofoutputvariable {get;set;}
The following is an example for an output variable:
[Output("Total Cost")] public OutArgument<double>Totalcost {get;set;} - InOutArgument:
The InOutArgument parameter can be declared, as shown in the following code snippet:
[Input("Total Value")]
[Output("Total Value Result")]
public InOutArgument<decimal>TotalCost {get;set;}
Now we have a basic understanding of a custom workflow, so let's write our custom workflow to assign an issue.
Perform the following steps to create a custom workflow activity library:
- Start Visual Studio 2010 and go to File | New | Project | Visual C#.
- Go to Workflow | Activity Library and name it
Issueassignment.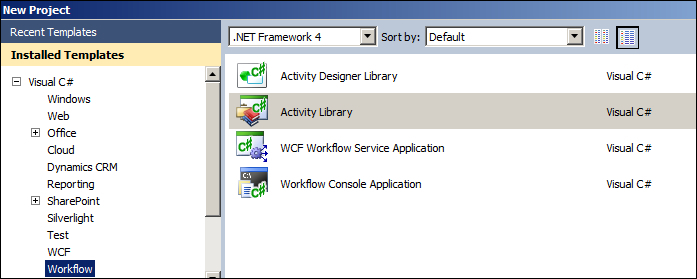
- Delete the
Activity.xamlfile under Solution Explorer. - Right-click on the
Projectfolder, select Add | New Item, and add a new class namedAssignIssue.cs. - Right-click on the
Projectfolder and select Property, and make sure .NET Framework 4 is selected under Target framework, as shown in the following screenshot: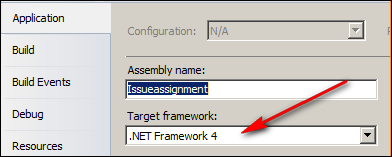
- Right-click on the
Projectfolder and select Add Reference... to add a reference for the following assemblies:Microsoft.Xrm.Sdk.Workflow; Microsoft.Xrm.Sdk; Microsoft.Crm.Sdk.Messages; System.Runtime.Serialization
- Go to the Signing tab and check the Sign the assembly checkbox.
- Open the
AssignIssue.csfile to start adding code.Add the following code snippet with the
usingdirective to your class:using Microsoft.Xrm.Sdk.Query; using System.Activities; using Microsoft.Xrm.Sdk.Workflow; using Microsoft.Xrm.Sdk; using Microsoft.Crm.Sdk.Messages;
We have the following three main requirements for our custom workflow:
- Find all the members of the team assigned to the current issue.
- Find the team member who has the fewest issues assigned.
- Assign an issue to the team member who has the fewest issues assigned.
We can't get team members from a single entity, so we need to write a query to join two entities to fetch team members, and then we can pass that query to the RetrieveMultiple method of the Iorganizaiton web service. We can join the systemuser and teammembership entities to fetch all the team members. To fetch the team members of a specified team, we should use the following code:
EntityCollection _Teammembers = null;
            Guid _UserId = Guid.Empty;
            EntityCollection col = new EntityCollection();
            QueryExpression _Query = new QueryExpression();
            _Query.EntityName = "systemuser";
        _Query.ColumnSet = new ColumnSet(new string[] { "systemuserid", "firstname" });
            LinkEntity _LinkEntity = new LinkEntity();
            _LinkEntity.LinkFromAttributeName = "systemuserid";
            _LinkEntity.LinkToAttributeName = "systemuserid";
            _LinkEntity.LinkFromEntityName = "systemuser";
            _LinkEntity.LinkToEntityName = "teammembership";
            _LinkEntity.JoinOperator = JoinOperator.Natural;
            _LinkEntity.LinkCriteria = new FilterExpression();
            _LinkEntity.LinkCriteria.AddCondition("teamid", ConditionOperator.Equal, TeamID);
            _Query.LinkEntities.Add(_LinkEntity);
_Teammembers = _Service.RetrieveMultiple(_Query);Once we have the entity collection of the team member, we can find the team member who has the fewest issues assigned, by looping through the entity collection. We need to apply two conditions to get a user. Our first condition will be to compare the owner ID of the issue, and another condition will be to check only for the project assigned in the issue record. As we need to check conditions other than the primary field, we need to use the RetrieveMultiple function to fetch user's record. Our code should be as follows:
Guid _LeastIssueAssignedUserID = Guid.Empty;
            int _IssueCount = 0;
            int _MinimumIssueCount = -1;
            foreach(Entity Memeber in _Teammember.Entities)
            {
                QueryExpression _Query = new QueryExpression();
                _Query.EntityName = "new_issue";
                _Query.ColumnSet = new ColumnSet();
                _Query.ColumnSet.AddColumn("new_name");
                _Query.Criteria = new FilterExpression();
                _Query.Criteria.FilterOperator = LogicalOperator.And;
                ConditionExpression condition1 = new ConditionExpression("ownerid",ConditionOperator.Equal,new Guid(Memeber.Attributes["systemuserid"].ToString()));
                ConditionExpression condition2 = new ConditionExpression("new_project", ConditionOperator.Equal, ProjectID);
                _Query.Criteria.Conditions.AddRange(condition1, condition2);
                EntityCollection Issues = _Service.RetrieveMultiple(_Query);
                //get Issue count
                _IssueCount = Issues.Entities.Count;

                if (_MinimumIssueCount == -1)
                {
                    _MinimumIssueCount = _IssueCount;
                    _LeastIssueAssignedUserID = new Guid(Memeber.Attributes["systemuserid"].ToString());
                 }
                if (_IssueCount<_MinimumIssueCount)
                {
                    _MinimumIssueCount = _IssueCount;
                    _LeastIssueAssignedUserID = new Guid(Memeber.Attributes["systemuserid"].ToString());
                }


}Once we have an user who has the fewest issues assigned, we can write an assign request to assign an issue to that user. We need to pass our assign request to the Execute method of the IOrganizaiton web service. Our code should be as follows:
AssignRequest _Request = new AssignRequest
            {               Assignee = new EntityReference("systemuser", MemberID),
                Target = new EntityReference("new_issue", IssueID)
            };

            AssignResponse _Response = (AssignResponse)_Service.Execute(_Request);
Now let's add the Execute method to our custom activity class. Use the following code for the Execute method. First we need to get the context for Microsoft CRM 2011 from the codeActivityContext object. Once we have the context, we can get entity information from this context. We need to retrieve our primary entity ID so that we can query an issue record based on that ID. We need to retrieve the project team assigned to this issue.
protected override void Execute(CodeActivityContext Execution)
        {
            IWorkflowContext context = Execution.GetExtension<IWorkflowContext>();
            IOrganizationServiceFactory serviceFactory =
            Execution.GetExtension<IOrganizationServiceFactory>();
            IOrganizationService service =serviceFactory.CreateOrganizationService(context.InitiatingUserId);
            Guid IssueID = context.PrimaryEntityId;
            Entity _Issue = (Entity)service.Retrieve("new_issue", IssueID, new ColumnSet(new string[] {"new_project","new_projectteam" }));
            Guid _LeastIssueAssignedUser=GetTeamUser(service, ((EntityReference)_Issue.Attributes["new_projectteam"]).Id, ((EntityReference)_Issue.Attributes["new_project"]).Id);
            AssignIssueToUser(_LeastIssueAssignedUser, IssueID, service);
}Now our code is complete. So let's build our assembly and register it.
Now we have our custom workflow in place, so let's design our workflow to assign an issue to a team member based on the number of issues assigned to him. Perform the following steps to create a workflow:
- Navigate to Setting | Processes | New.
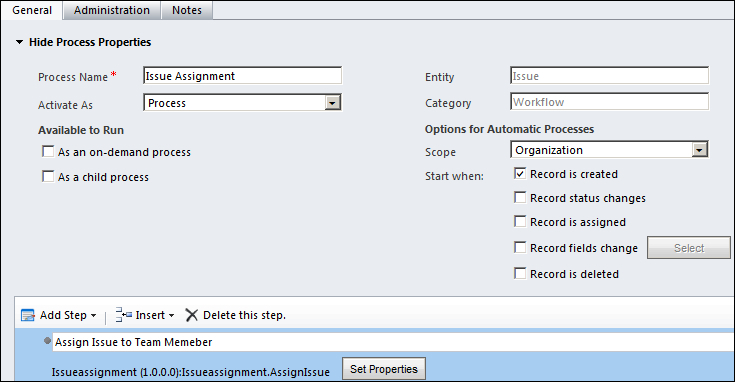
- Enter the following information on the workflow dialog box and click on OK:
- Process Name: Issue Assignment
- Entity: Issue
- Category: Workflow
- Type: New Blank Process
- Set Scope to Organization and set Start when to Record is created.
- Click on Add Step and select our custom workflow assembly.
Once done, our workflow should look like the following screenshot:
- Click on Save and Close and activate the workflow.