We need to customize and configure Microsoft CRM 2011 according to our sample application. We need to perform the following steps to customize Microsoft CRM 2011.
We need to customize the existing entities based on the data model. Refer to Appendix B, Hotel Management Data Model and Design, for more information. We need to create new Room and Food entities.
First, we need to create our Solution and include all the required entities in that Solution. Please refer to the previous chapters to create a Solution. Once we have our Solution, we need to customize the OOB entity fields. We also need to rename the entities and their views.
As we have already discussed how to rename entities and their views, we are not going to look at it again here. Please refer to Chapter 2, Customizing Microsoft Dynamics CRM 2011, for more on this type of customization.
While creating a new entity, we need to consider the points explained in the following sections.
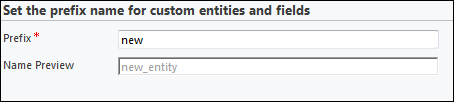
In Microsoft CRM 2011, we can use the custom prefix for our Custom entity and custom attributes. Using the custom prefix is important if you have an ISV partner; it will ensure that nobody creates an entity with the same name. You can use the custom prefix by modifying the default publisher, or you can create a new publisher with the custom prefix. Perform the following steps to modify the default publisher's prefix:
- Navigate to Settings | Customizations | Publishers.
- Select the default publisher from the list.
- Modify the Prefix field and change it to your custom prefix, and click on Save and Close.
- Navigate to Settings | Solutions, and click on Publish All Customizations.
While creating the Custom entity, we can define entity ownership. Entity ownership defines the type of operations that can be performed on that entity record. We have the following options to set ownership:
|
Ownership |
Description |
|---|---|
|
Organization |
Organization-owned entities are accessible to the whole organization, so it is not possible to share and assign organization-owned entity records. |
|
User or Team |
These entities can be owned either by individual users or by teams. These entities can be shared and assigned to other users or teams. Security is applied according to the business unit with which the current owner is associated. |
While creating a new Custom entity, we have different options to set for the Communication & Collaboration, Data Services, and Outlook & Mobile fields. We can set the following options for these fields:
|
Option |
Description |
|---|---|
|
Notes |
This is used to create a relationship with the Annotation entity. If this option is selected, it adds a Notes control in the entity form where we attach notes to the current entity record. We can also upload an attachment using this option. |
|
Activities |
This option is used to create a relationship with Activities entity. |
|
Connections |
We can select this option if we want to connect the current entity record with other entities. |
|
Sending e-mail |
We can select this option if we want to add the Send Direct E-mail button on the entity ribbon. |
|
Mail merge |
If this option is selected, we can use this entity to merge e-mails. |
|
Document management |
If this option is selected, we can track a document on SharePoint related to the current entity record. |
|
Queues |
If this option is selected, this entity can be used in queues. |
|
Duplicate detection |
If this option is selected, we can detect the duplicate record for this entity. |
|
Auditing |
If this option is selected, we can track changes in entity records. |
|
Mobile express |
If this option is selected, we can use this entity in Mobile Express. |
|
Reading pane in CRM for Microsoft Outlook |
If this option is selected, records of this entity will be displayed in the reading pane in Microsoft CRM 2011 for Outlook |
|
Offline capability for CRM for Microsoft Outlook |
If this option is selected, we can use this entity while in offline mode in Microsoft CRM 2011 for Outlook. |
Let's create our Room and Food entities; perform the following steps to create the Room entity:
- Navigate to Settings | Solutions and open the
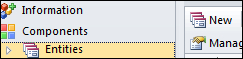
DevelopmentSolution (we have created a new Solution namedDevelopment). - Navigate to Entities under Components.
- Click on New from the entity ribbon:
- Enter the following information to create an entity:
General tab
Display Name
Room
Name
This will be configured automatically and will be referred using SDK
Ownership
User or Team
Areas that display this entity
Settings
Communication & Collaboration
Just select Connections and Duplicate detection for this field
Primary field tab
Display Name
Room no
Name
This will be configured automatically
- Click on Save to save the entity.
- Now we need to add new fields for the Room entity based on the previous data model.
Please follow the preceding steps to create the Food entity, and enter the following information for entity properties:
|
General tab | |
|---|---|
|
Display Name |
Food |
|
Name |
This will be configured automatically |
|
Ownership |
Organization |
|
Areas that display this entity |
Settings |
|
Communication & Collaboration |
Just select Duplicate detection |
|
Primary field tab | |
|
Keep the primary tab fields as default | |
After customizing entities' attributes based on our data models, let us customize our Custom entity forms.
We need to remove any unwanted fields from the entity form; we can just select the attribute and the remove button from the entity form ribbon to remove the fields from the entity form. The MS CRM entity form contains some fields that are in a locked state. But even if we don't want to use these fields, we can't remove them using supported methods. But we can hide those fields. Perform the following steps to hide the unwanted sections and fields from the entity fields:
- Open the entity form to customize it.
- Double-click on the field/section that we want to hide.
- Unselect the Visible by default checkbox in the Visibility section under the Display tab:

After removing and hiding the unwanted fields and sections, we also need to remove the unwanted left navigation section from the entity forms. Please refer to the previous chapters for how to remove unwanted left navigation items from entity forms.
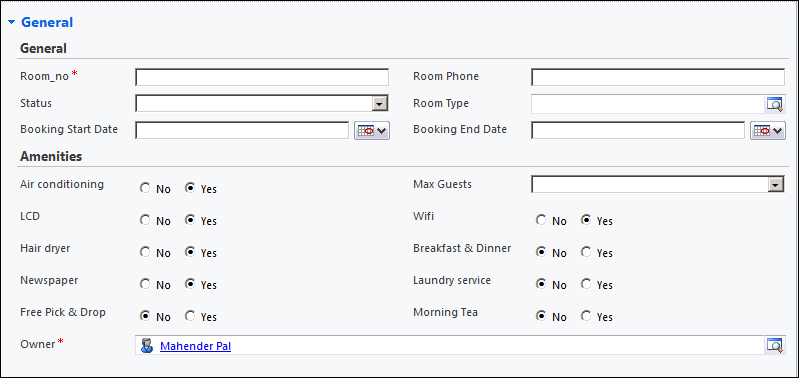
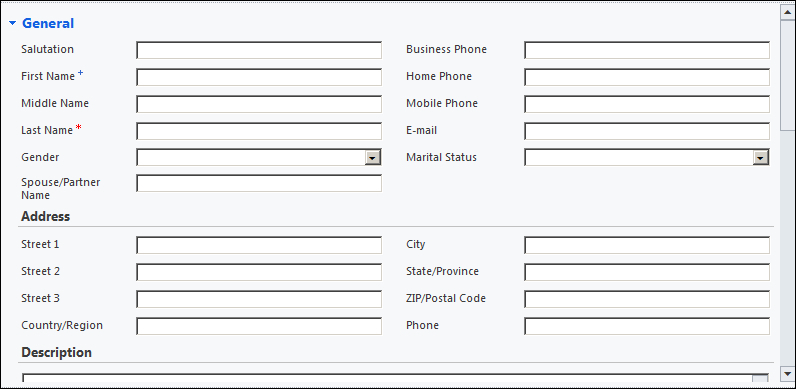
Once we have completed the previously mentioned changes, our entity forms should look like the following screenshot:
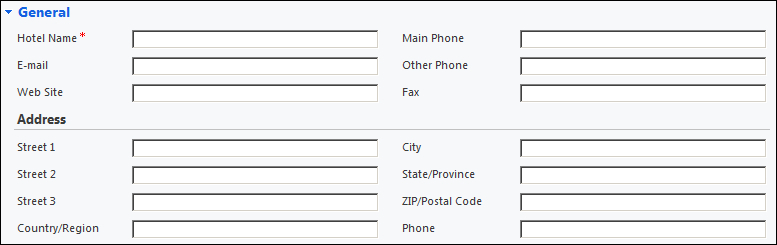
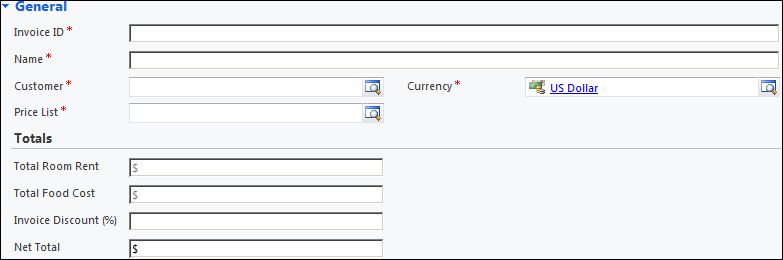
The Invoice entity contains many address fields for shipping and billing information, which are not required for our application. But as all these fields are in a locked state, we can't remove them from the entity form. But we can hide them using the OOB functionality. So follow the previous steps to hide those unwanted fields and sections.
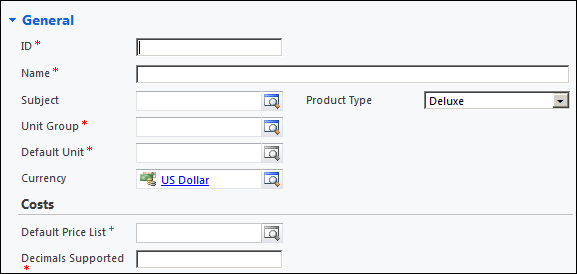
We need to hide the Name field from the Food entity; after that our form should look like the following screenshot:

Now we need to change the translation for the OOB entities. Refer Chapter 2, Customizing Microsoft Dynamics CRM 2011, to see how to change the translation labels in MS CRM. We need to rename Account to Hotel, Contact to Customer, and Invoice to Bill.
We need to customize the MS CRM site map to remove the unwanted left navigation section from the site map. We need to customize the site map based on the following table. Refer to Chapter 2, Customizing Microsoft Dynamics CRM 2011, to customize the site map.
|
Sr. No. |
Customization detail |
|---|---|
|
1 |
Remove the Sales, Marketing, Service, and Resource Center fields from the left navigation section |
|
2 |
Rename the left navigation; navigate to Workplace | Reservation, and then navigate to Settings | Configurations to rename the left navigation |
|
3 |
Create a navigation item for the Hotel, Customer, Bill, and Room entities (we can add/remove these items using SiteMap Editor easily) |
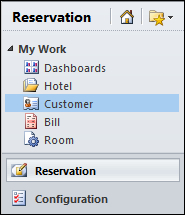
After customizing the site map, MS CRM UI should look like the following screenshot:
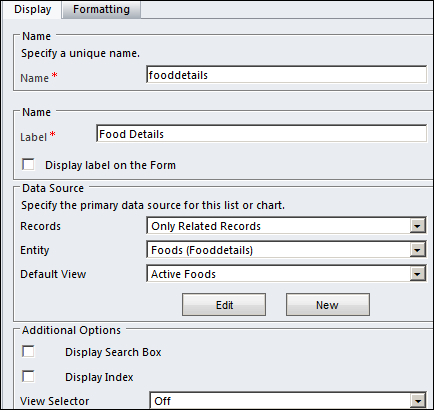
Microsoft CRM 2011 has new features to show an associated view in the entity form called sub-grid. In MS CRM 4.0, we used IFRAME to show an associated view in the entity form. But now, using just view-click we can add a sub-grid in the entity form. It is important to note that sub-grids are not associated views. A sub-grid allows us to filter a record set based on the data source selected to view the data. We can set the following data source for the sub-grid:
- Records: We can select this option if we want to see a related record or all entity records
- Entity: This is the name of the entity that we want to see in the sub-grid
- Default view: We can select the default view for the sub-grid
We can also set different additional options for the sub-grid:
- Display search box: We can select this option if we want to show a search textbox with the view
- Display index: We can select this option to display an alphabetical index with the view
- View selector: We can select this option if we want to allow the user to select a different view for the sub-grid
Perform the following steps to add a sub-grid on the customer form for food items:
- Navigate to Configuration | Solution.
- Open the
DevelopmentSolution. - Navigate to Entities | Customer.
- Open the Customer entity form.
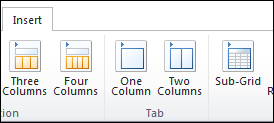
- Select the Insert tab and add a new section. Let's call it
Food Details. - Select the Food Details section and click on Sub-Grid under the Insert Tab.
- Select the sub-grid properties, as shown in the following screenshot:
- Click on Save and Close.
- Publish the Customer entity from the Solution ribbon.