In Microsoft CRM 2011, the workflow is called the process, and it supports Windows Workflow Foundation. A process is a way to implement business logic using the OOB process designer tool. In Microsoft CRM 2011, we have two categories:
- Dialog
- Workflow
Microsoft CRM 2011 has introduced a new interactive process called Dialogs, where we can take input from users and provide results based on the input value. Dialogs works in a synchronous manner. We have the following two options to run dialogs:
Input arguments are used to pass information from a parent dialog to a child dialog. You can only use input arguments with child dialogs. Thus, we can't add input arguments in a dialog that is configured to run as on-demand.
Variables are used to hold temporary value during dialog lifetime.
Like workflows, dialogs also contain steps that we can use to design the dialog process. Refer to the following screenshot:
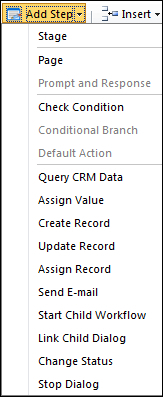
We have the following steps available in the Dialog Designer as shown in the preceding screenshot:
- Stage: This step is used to group steps
- Page: This step is the interface that is presented to the user
- Prompt and Response: Prompts are the questions that are presented to the user, and responses are where answers to those questions are captured
- Check Condition: This step is used to check the condition before running the next step
- Conditional Branch: This step is used to branch multiple conditions together
- Default Action: This step is used to specify the otherwise action
- Query CRM Data: This step is used to query Microsoft CRM's existing data
- Assign Value: This step is used to assign a value to the input argument or variables
- Create Record: This step is used to create an entity record
- Update Record: This step is used to update an existing record
- Assign Record: This step is used to change the owner of an entity record
- Send E-mail: This step is used to send an e-mail
- Start Child Workflow: This step is used to used to initiate a child workflow
- Link Child Dialog: This step is used to used to link child dialog with current dialog
- Change Status: This step is used to change the status of a record
- Stop Dialog: This step is used to stop the dialog
Let's create a dialog to get salary information from the candidate. Use the following instructions to create this dialog:
- Navigate to Configuration | Process Center | Process.
- Click on New to create new dialog.
- Fill the following information:
- Process Name: Get Candidate Information
- Entity: Candidate
- Category: Dialog
- Type: New Blank Process
- Elect to run the process as an on-demand process.
- Add a new Stage step from the Add Step list and label it with
Get Information From User. - Highlight the Stage step and select the Page step from the Add Step list.
- Enter
Page to Get user Informationin the Page Label field. - Highlight the Page step and select the Prompt and Response option from Add Step list.
- Enter
Get Current CTCin the Prompt and Response label and click on Set Properties. - Enter
May I know your Current CTCand add values for Salutation and First Name from Candidate entity using Dynamic Values section under Form Assistant. - Select
Single Linefor Response Type. - Select
Floatfor Data Type. - Click on Save and Close.
The following screenshot is of a Prompt and Response dialog:
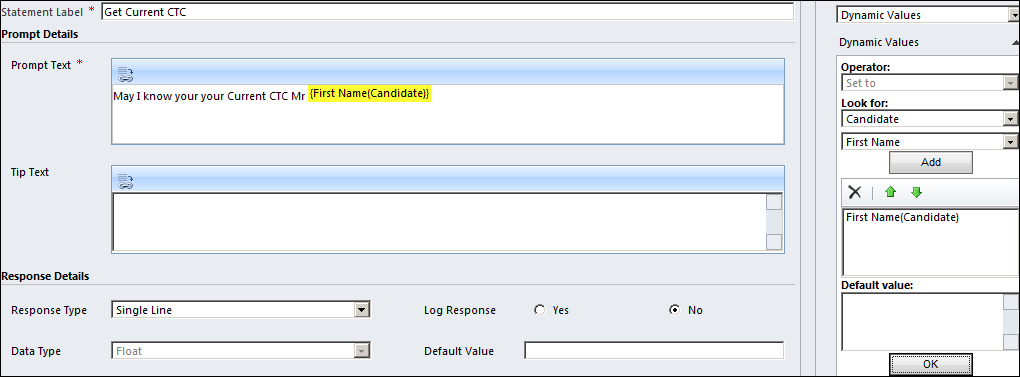
We need to create a prompt for our dialog variable, so we create the Prompt and Response dialog using the following steps:
- To get the expected CTC, we set the following variables:
- Statement Label:
Get Expected CTC - Prompt Text:
What is your Expected CTC - Response Type:
Single Line - Data Type:
Float
- Statement Label:
- To check whether relocation is required or not:
- Statement Label:
Relocation Required - Prompt Text:
Do you need Relocation - Response Type: Optionset (picklist)
- Data Type: Integer
- Provide Values: Define values
- Add two values:
- Statement Label:
- To get the notice period:
- Statement Label:
Notice Period - Prompt Text:
What is your notice period - Response Type:
Single Line - Data Type:
Text
- Statement Label:
After setting all variables for Prompt and Response, our stage should look like the following screenshot:
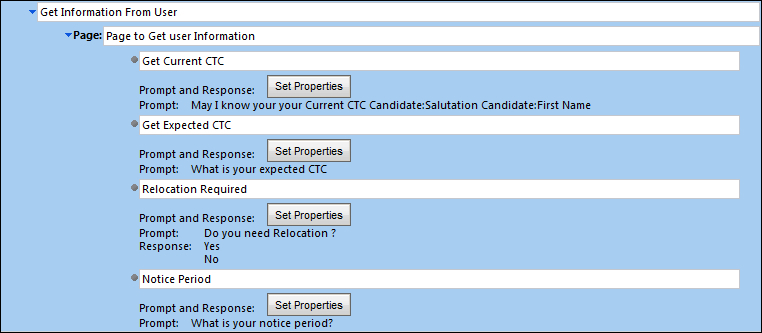
Now that we have collected all variable information, let's create steps to update the candidate entity record. Use the following steps to create an updated candidate record:
- Add a new stage using Add Step.
- Enter
Update Candidate record with variable valuesin Stage label field. - Select the Stage step and add the Update step option from the Add Step list.
- Click on Set Properties.
- Select the Current CTC field and select Get Current CTC from the Look for dropdown.
- Click on the Add button and on OK to set response text in the Current CTC field.
- Follow the preceding steps to set all variable values in their respective fields.
After setting variable response text for the fields, the Current Salary Information section should look like the following screenshot:

- Add the Change Status step from Add Step.
- Set Status to
Contacted. - Activate dialog using the Activity button from the toolbar.
Now that our dialog is ready, we need to activate it; click on Activate on the dialog toolbar.
Workflows enable you to automate the business process. We can run workflows for multiple entities or a specific entity. OOB Workflow Designer provides us with the functionality to apply different checks before executing any sequence. We can initiate a workflow using different options; it could be an on-demand workflow that we can start manually or we can set a workflow to run automatically based on a specific action. We can also use the workflow as a child workflow of another workflow.
Execution of workflows is dependent on an asynchronous service; this service is used by Microsoft CRM to execute long-running operations. So, we need to make sure this service is up and running if we are going to implement workflows.
To start a workflow, we can make any one of the following selections:
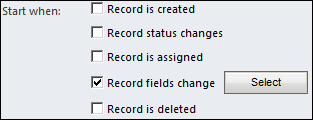
We can configure workflows to start when:
- Record is created: This option is used to run workflows when a new record is created
- Record status changes: This option is used to run workflows when the record state changes, for example, when a record is activated or deactivated
- Record is assigned: This option is used when the owner of the record is changed
- Record fields change: This option is used when the value of the selected fields is changed
- Record is deleted: This option is used when the record is deleted