Now we have customized Microsoft CRM 2011, so let's create a plugin to implement our custom business logic. Microsoft CRM 2011 provides us with the functionality to implement our custom business logic in terms of a .NET assembly. We can consume Microsoft CRM APIs in .NET to access Microsoft CRM context information and impose our business logic.
We can register a plugin on specific events, and it will execute an event framework based on the message pipeline execution model. We can register the plugin in the following modes:
- Asynchronous mode
- Synchronous mode
So the event pipeline executes a plugin in asynchronous mode or synchronous mode. If the plugin is registered in asynchronous mode, it is queued by Microsoft CRM 2011 Asynchronous Service and executed in background mode at a later time. But on the other hand, if the plugin is registered in synchronous mode, it is executed at that moment only. Asynchronous plugins are best suited for long-running jobs whereas synchronous plugins are best suited for where we need a response immediately. In Microsoft CRM 2011, synchronous plugins are now part of the database transaction, which means that if our plugin is running in synchronous mode and if an exception occurs, it will be passed to the platform. Because of this, the entire transaction will be rolled back to its earlier state. So any registered plugin that is being executed under the database transaction and that passes an exception to the platform cancels the core operation. Apart from a rollback of the core operation, it also cancels the execution of any pre or post event registered plugin, and any workflow that is triggered by the same event that the plugin was registered with.
We can register a plugin to run before or after core platform operations. Pre-event plugins are registered before the core operation and are best suited for the requirements where we want to execute our business logic before the core platform operation. After pre-event, core operation is executed by platform.
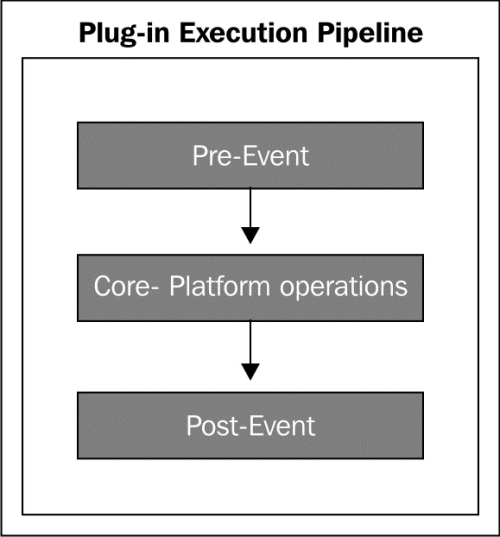
Once the core operation is completed, Post-Event is executed. We need to register the plugin to the CRM platform on an entity-specific event. We can get an entity-specific message from message-entity support for the plugins file that comes as a part of CRM SDK.
Tip
Note that you can download the latest SDK of Microsoft CRM 2011 from http://www.microsoft.com/en-us/download/details.aspx?id=24004.
In order to register a non-isolated plugin, the CRM user should have membership of the deployment administrator group. The deployment administrator group is a special group of Microsoft CRM users who have complete and unrestricted access to perform deployment manager tasks on all the organizations and servers in a Microsoft CRM deployment.
In order to register a plugin, the current Microsoft CRM user should have the following privileges:
prvCreatePluginAssemblyprvCreatePluginTypeprvCreateSdkMessageProcessingSteppreCreateSdkMessageProcessingStepImageprvCreateSdkMessageProcessingStepSecureConfig
To register a plugin in sandbox mode, the current Microsoft CRM user must have the System Administrator role, but membership of the Deployment Administrator group is not required.
Tip
Note that Microsoft Dynamics CRM 2011 supports the execution of plugins in an isolated environment (sandbox). In this isolated environment, a plugin can make use of the full power of the Microsoft Dynamics CRM SDK to access the organization web service, but access to other resources such as the filesystem, system event log, certain network protocols, and registry is not allowed in the sandbox. To get more details on sandbox mode, visit http://msdn.microsoft.com/en-us/library/gg334752.aspx.
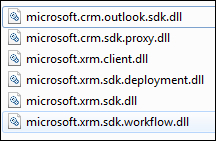
While developing the plugin we need to add a reference of MS CRM 2011 plugin assemblies. These assemblies comes as part of the Microsoft CRM 2011 SDK. The following screenshot shows the main assemblies used in a plugin project:
IPluginexecutioncontext is a way to get contextual information passed to a plugin during execution time. It contains information such as calling user information, execution pipeline, and entity message on which plugin executes, and entity input/output property bag and so on.
Pre and post-entity images are a snapshot of the entity before and after core platform operations respectively. While registering a plugin, we can register images and define a set of attributes that we want to be part of the plugin image.
We can write the plugin assembly in Visual Studio using C# or VB.NET. We are going to use C# for our plugin sample code and then can register it using Plugin Registration Tool, or through code. Microsoft CRM 2011 also provides a developer toolkit to make MS CRM development easy, so we are going to see how to use Developer Toolkit to develop and deploy plugins.
Let's write our first business logic. We are going to write a very simple plugin on our Food entity. We are not using a name (default primary) for the Food entity. We will set the selected menu item text and its cost in the Name field on creation of the Food entity, so that the customer will have an idea of what they ordered and how much it cost them.
We need to write a function to fetch option set field's text value based on its index value. We can get a value selected by the option set from the entity input property bag.
Perform the following steps to create a plugin package for our application:
- Open Visual Studio 2010.
- Navigate to File | New Project.
- Select Dynamics CRM 2011 Package.
- Name it as
HotelManagementSystem_Plugins.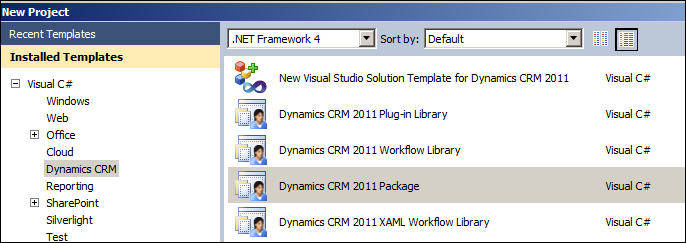
- You will get a prompt dialog box to enter information to connect to the CRM server, such as the server name and port, authentication to connect to the CRM server.
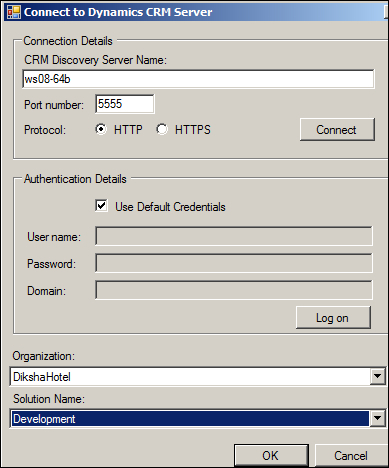
We are using default credentials to connect to the CRM server. If you don't want to use default credentials, you can uncheck this checkbox and enter different user credentials.
- Right-click on Project Solution under Solution Explorer and navigate to Add | New Project.
- Select MS CRM 2011 Plug-in Library and name it
PluginAssemblies, and click on OK.
We have created a plugin assembly project. We now need to add a plugin to our entity. Perform the following steps to add a plugin to the Food entity:
- Right-click on PluginAssemblies and select Properties.
- Go to the Signing tab, select the Sign the assembly checkbox, and close the property dialog box.
- Navigate to the View menu and select CRM Explorer if it is not already visible.
- Expand Entities under CRM Explorer.
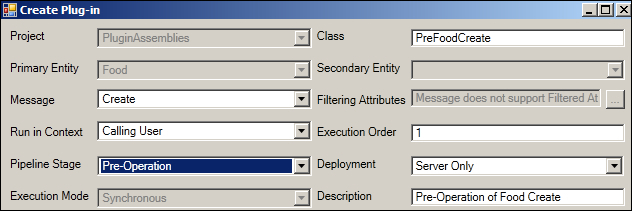
- Right-click on the Food entity and select Create Plug-in; Visual Studio will prompt a dialog box to enter the following plugin registration information:
- Message: This field contains the description about the event on which we want to trigger our plugin
- Run in Context: This is the system account that will own the data changes made by the plugin
- Pipeline Stage: The pipeline in which the plugin will run
- Execution Mode: The plugin will run in asynchronous or synchronous mode
- Class: This is the name of the class file for the plugin
- Secondary Entity: It is used when a plugin is triggered for an event requiring two entities like those of the SetRelated message
- Filtering Attributes: We can select entity attributes; changing those will cause the plugin to be executed
- Execution Order: If we have two plugins registered on the same event, we can specify their rank, which should fire first
- Deployment: This field defines where we want to deploy the plugin; we have options, such as on the server, on the Microsoft Dynamics CRM for Outlook with offline access, or both
- Description: This field gives a description about the plugin
- We need to select the following information in the Create Plug-in dialog box:
- Message: Create
- Pipeline: Pre-Operation
Keep all the other options as default.
After we have added the plugin, a PreFoodCreate.cs file will be created. Double-click on PreFoodCreate.cs to edit it. We will get the following code that is generated by Developers Toolkit.
We need to edit this file to implement our business logic. This is a common code developed by the toolkit. Common code will be changed accordingly based on the event registration information entered by us.
namespaceHotelManagementSystem_Plugins.PluginAssemblies
{
using System;
usingSystem.ServiceModel;
usingMicrosoft.Xrm.Sdk;
usingMicrosoft.Xrm.Sdk.Messages;
usingMicrosoft.Xrm.Sdk.Metadata;
publicclassPreFoodCreate : Plugin
    {
publicPreFoodCreate()
            : base(typeof(PreFoodCreate))
        {
base.RegisteredEvents.Add(newTuple<int, string, string, Action<LocalPluginContext>>(20, "Create", "new_food", newAction<LocalPluginContext>(ExecutePreFoodCreate)));
        }
    }
}
Tip
Downloading the example code
You can download the example code files for all Packt books you have purchased from your account at http://www.packtpub.com. If you purchased this book elsewhere, you can visit http://www.packtpub.com/support and register to have the files e-mailed directly to you.
You can register
for more events here if this plugin is not specific to an individual entity and message combination. You may also need to update your RegisterFile.crmregisterin plugin registration file to reflect any change.
For improved performance, Microsoft Dynamics CRM caches plugin instances.
The plugin's Execute method should be written to be stateless, as the constructor is not called for every invocation of the plugin. Also, multiple system threads execute the plugin at the same time. All per invocation state information is stored in the context. This means that you should not use global variables in plugins.
protectedvoidExecutePreFoodCreate(LocalPluginContextlocalContext)
       {
if (localContext == null)
            {
thrownewArgumentNullException("localContext");
            }
// TODO: Implement your custom Plug-in business logic
        }
To implement our business logic, we need the Microsoft CRM service context that we can obtain from the local context. Once we have a context, we can fetch our entity and it's attribute from the entity property bag. In our plugin, we are going to fetch a selected option set value from the new_menu field and also the cost for the food item, to store it in the Name field of the Food entity. We need to write another function to retrieve the text of the option set based on its selected value. We need to use the RetrieveAttributeRequest class to retrieve the option set data. Once we have the option set, we can compare the option set's value and get the option set's text. Our function should look as follows:
return _SelectedText;}publicstringRetrieveOptionSetValue(IOrganizationService service, stringoptionsetName, intoptionsetValue)
        {
string _SelectedText  = string.Empty;
try
            {
RetrieveAttributeRequest _Request = newRetrieveAttributeRequest
                {
EntityLogicalName = "new_food",
LogicalName = "new_menu",
RetrieveAsIfPublished = true
                };
//Execute Request
RetrieveAttributeResponse _Response =(RetrieveAttributeResponse)service.Execute(_Request);
PicklistAttributeMetadata _PicklistAttributeMetadata =(PicklistAttributeMetadata)_Response.AttributeMetadata;
OptionMetadata[] OptionsetArry = _PicklistAttributeMetadata.OptionSet.Options.ToArray();
foreach (OptionMetadata _OptionsetinOptionsetArry)
                {
if (_Optionset.Value == optionsetValue)
                        {

                        _SelectedText = _Optionset.Label.UserLocalizedLabel.Label;
                        }
                }
            }
catch (Exception)
            {
throw;
            }
    }
Please check the PreFoodCreate.cs file under Chapter4CodeHotelManagementSystem_PluginsPluginAssemblies for full code. We need to create another plugin prior to updating the Food entity. Follow the previous steps to create an Update plugin on the Food entity. We need to use the same code to handle the updated event as well. Please refer to the PreFoodUpdate.cs file for full code under the Chapter 4 folder.
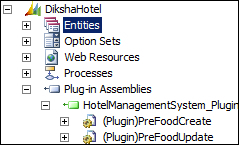
Now our plugin assemblies are ready, so let's register them. Perform the following steps to register the plugin:
- Right-click on Solution and select Deploy.
- It will register the Create and Update plugins on the Food entity.
We can check through CRM Explorer, and it should look like the following screenshot:
Now we need to write two other plugins for our billing calculation. We need to write the following two plugins on the Bill entity:
- We need a plugin on the Bill Item entity that will calculate the quantity of the bill items based on the check-in and check-out date of customer.
- We need to write a plugin on the Bill entity to calculate the food item bill for the current customer. We also need to calculate the net total based on the cost of the food items and the room rent.
Perform the following steps to create a plugin on the Bill item:
- Right-click on the Bill Item entity on CRM Explorer and select Create Plug-in.
- Enter the information shown in the following screenshot in the Create Plug-in dialog box:
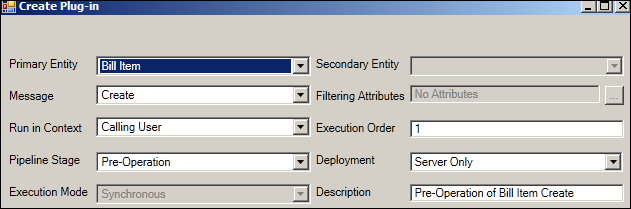
- Click on OK to close the Create Plug-in dialog box.
Developer Toolkit will generate the PreBillItemCreate.cs file. We can open PreBillItemCreate.cs by double-clicking on this file. This file will contain the main function to calculate the number of days based on the current customer's check-in and check-out date. In the following code snippet, we have used the fetch query to get check-in and check-out dates. We have used FetchXML to get the check-in and check-out dates for the current customer.
Tip
Note that FetchXML is a query language that is used in Microsoft Dynamics CRM. You can get more details from http://technet.microsoft.com/en-us/library/gg328332.aspx on FetchXML.
We need to write another function where the Food Item code of the current invoice customer based on the invoice ID will be fetched. The following function is used to get the number of days:
privateintGetNumberofDays(IOrganizationService service, GuidInvoiceId)
        {DateTime _CheckDate = DateTime.MinValue;
DateTime _CheckoutDate = DateTime.MaxValue;
int Duration = 0;
//get checkin checkout date of the customer based on invoice id
FetchXmlToQueryExpressionRequest Fetch = newFetchXmlToQueryExpressionRequest();
Fetch.FetchXml = "<fetch version='1.0' output-format='xml-platform' mapping='logical' distinct='true'>" +
"<entity name='contact'>" +
"<attribute name='new_checkin'/>" +
"<attribute name='new_checkout'/>" +
"<attribute name='contactid'/>" +
"<order attribute='new_checkout' descending='true'/>"+
"<link-entity name='invoice' from='customerid' to='contactid' alias='aa'>" +
"<filter type='and'>" +
"<condition attribute='invoiceid' operator='eq' uiname='sds' uitype='invoice' value='" + InvoiceId + "'/>" +
"</filter></link-entity></entity></fetch>";
FetchXmlToQueryExpressionResponseresp = (FetchXmlToQueryExpressionResponse)service.Execute(Fetch);
QueryExpressionqueryExpression = resp.Query;
EntityCollection result = service.RetrieveMultiple(queryExpression);
if (result.Entities.Count> 0)
            {Entity _Customer = (Entity)result.Entities[0];
if (_Customer.Attributes.Contains("new_checkin") && _Customer.Attributes.Contains("new_checkout")){
                _CheckDate = ((DateTime)_Customer.Attributes["new_checkin"]).Date;
                    _CheckoutDate = ((DateTime)_Customer.Attributes["new_checkout"]).Date;
                    Duration = DateDiff(_CheckDate,_CheckoutDate);
return Duration;}Else{
thrownewInvalidPluginExecutionException("Checkin or Checkout date is not specified for customer");
                }}

return Duration;
        }
In the preceding code,
we have used InvalidPluginExecutionException, which is used to show an exception message to the user in Microsoft CRM. Once we have the check-in and check-out date, we can calculate the days' difference between these dates to get the number of days. The following function is used to get the number of days between two passed dates:
privateintDateDiff(DateTime Min, DateTime Max)
        {
//get date difference
TimeSpan _TimeSpan = Max - Min;
return _TimeSpan.Days;

        }
Please refer to PreBillItemCreate.cs under Chapter4CodeHotelManagementSystem_PluginsPluginAssemblies for the full code.
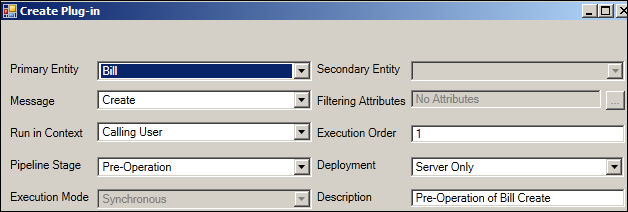
We need to write a plugin on the Bill entity to calculate the food item bill based on the current customer. We also need to calculate the net total based on the cost of the food items and the room rent. In the Bill entity, we have created a custom field to store the food cost and room rent amount. Once we have both, we will store the net total in another custom field created in the Bill entity.
Right-click on the Bill entity in CRM Explorer and select Create Plug-in.
We need to fill in the information as shown in the following screenshot:
Developer Toolkit
will generate a PreBillCreate.cs file for us. First we need to get an ID for the current customer; after that, based on the customer ID, we can calculate the total food cost for that customer.
The following function is used to get the calculated value for the total food cost based on the customer ID:
privateDecimalGetFoodTotal(Guidcustomerid,IOrganizationService service)
        {Decimal _Total = 0;
DataCollection<Entity> _Fooditems = null;
try
            {QueryExpression _Query = newQueryExpression{EntityName = "new_food",
ColumnSet = newColumnSet("new_cost"),
                    Criteria ={
FilterOperator = LogicalOperator.And,
Conditions ={
newConditionExpression{
AttributeName="new_fooddetailsid",
                        Operator=ConditionOperator.Equal,
                        Values={ customerid}
                                }}}};

 _Fooditems = service.RetrieveMultiple(_Query).Entities;
if (_Fooditems.Count> 0)
                {for (inti = 0; i< _Fooditems.Count; i++)
                    {EntityFooditem = (Entity)_Fooditems[i];
if (Fooditem.Attributes.Contains("new_cost")){
                        _Total = _Total + ((Money)Fooditem.Attributes["new_cost"]).Value;}}}}

catch (Exception Ex)
            {thrownewInvalidPluginExecutionException(Ex.Message);}return _Total;}
In the preceding code, we have used the QueryExpression class, which is used to query Microsoft CRM entities. You can refer to http://technet.microsoft.com/en-us/library/gg334688.aspx for more details on query expression.
Please refer to PreBillCreate.cs under Chapter4CodeHotelManagementSystem_PluginsPluginAssemblies for full code.
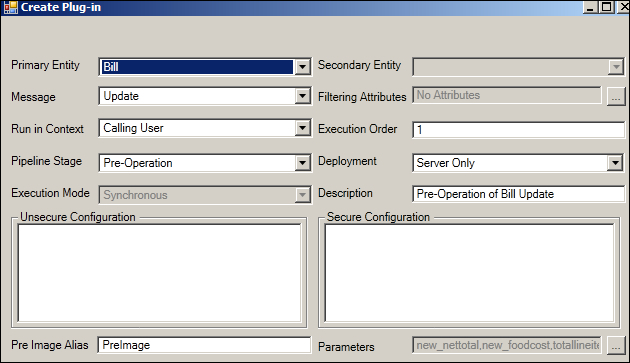
We also need to register an Update plugin on the Bill entity so that we are able to get the correct total on the invoice when the bill items are added to the bill.
Follow the same steps to create an Update plugin on the Bill entity and fill in the information, as shown in the following screenshot. As we are writing an Update plugin, we need to register Pre Image Alias for our plugin, because in the case of the Update plugin, we will be able to get only the modified fields' value in the entity property bag. So if we want to get a field value even if it is not modified by the user, we need to register Pre Image Alias.
Double-click on PreBillUpdate.cs to open it in edit mode. In our Update plugin, instead of reading values from the entity property bag, we need to fetch the field's values from our preImageentity object. We can refer to an entity attribute in the same way that we refer to an entity object. Once we have calculated the value of the net total, we can inject that value
into the entity property bag to store it in the CRM database.
protectedvoidExecutePreBillUpdate(LocalPluginContextlocalContext)
        {if (localContext == null){
thrownewArgumentNullException("localContext");}
IPluginExecutionContext context = localContext.PluginExecutionContext;
EntitypreImageEntity = (context.PreEntityImages != null&&context.PreEntityImages.Contains("PreImage")) ? context.PreEntityImages["PreImage"] : null;
Entity entity = null;
if (context.InputParameters.Contains("Target") &&
context.InputParameters["Target"] isEntity)
            {
entity = (Entity)context.InputParameters["Target"];}
IOrganizationService service = localContext.OrganizationService;
Decimal _NetTotal = 0;
Decimal _FoodTotal = 0;
Decimal _RoomRent = 0;
Decimal _Percentage = 0;
Decimal _PercentageAmount = 0;
try
            {if (preImageEntity.Attributes.Contains("totallineitemamount")){
_RoomRent = ((Money)preImageEntity.Attributes["totallineitemamount"]).Value;}

if (preImageEntity.Attributes.Contains("new_foodcost"))
                {_FoodTotal = ((Money)preImageEntity.Attributes["new_foodcost"]).Value;}
if (preImageEntity.Attributes.Contains("discountpercentage")){

_Percentage = ((Money)preImageEntity.Attributes["discountpercentage"]).Value;}
 _NetTotal = _FoodTotal + _RoomRent;
if (_Percentage > 0){
_PercentageAmount = (_NetTotal * _Percentage) / 100;
                 _NetTotal = _NetTotal - _PercentageAmount;
                }

entity.Attributes.Add("new_nettotal", newMoney(_NetTotal));}
catch(Exception Ex)
            {thrownewInvalidPluginExecutionException(Ex.InnerException.Message);}}
Now our plugin project is ready. Right-click on Solution to register all our plugins.
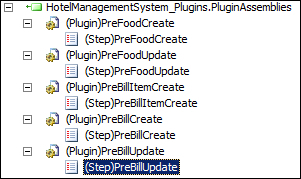
After registering the plugin, we should be able to see all of our plugins in Plug-in Assemblies in CRM Explorer. It should look like the following screenshot:
Now we can connect to our organization and test plugins.