
Bing Maps provides us a different set of tools that we can use to create a map application. We have options to use Bing Maps Ajax Control, Rest API, and Bing Maps Silverlight Control, to create a rich map application. Bing Maps also provides a tool for mobile application development. We can select a Bing Maps tool based on our application type. To develop a Bing Maps application, we need to create a developer account first. After creating a developer account, we need to register our application, where we will use the Bing Maps developer key.
Tip
Please refer to http://www.bingmapsportal.com/ to create a Bing Maps developer account.
Now let's create our sample application in Silverlight. To develop Silverlight applications we need to install the following tools first:
- Microsoft Silverlight 4 Tools for Visual Studio 2010 Runtime
- Bing Maps Silverlight Control SDK v1.0.1
Tip
You can download Bing Maps Silverlight Control SDK from http://www.microsoft.com/en-in/download/details.aspx?id=2949.
Once we have installed the tools mentioned, we can start our development. Use the following tools to create a Silverlight application in Visual Studio 2010:
- Open Visual Studio 2010.
- Select File from the main menu.
- Select New, and then Project from the menu.
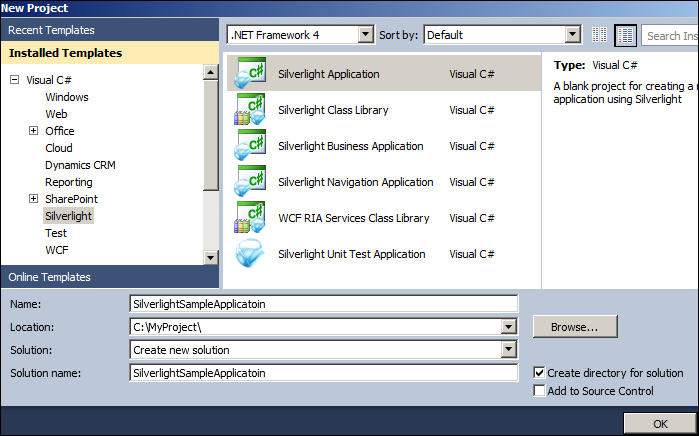
- In the New Project dialog box, select Silverlight.
- Select Silverlight Application from the available templates and then click on OK.
After carrying out these steps, we will see the following screen:
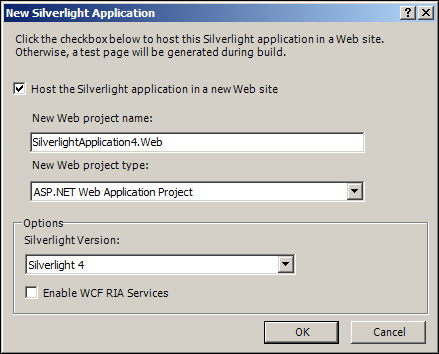
We will get another dialog box to host our Silverlight application; it will contain information about the web project name and its type. We can select the Silverlight Version option here. Please keep this as the default setting. This dialog box is as shown in the following screenshot:
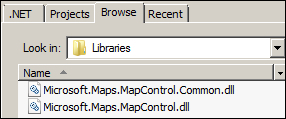
Once our application is created, we need to add a reference to the Silverlight SDK. Use the following steps to add a reference; make sure you have installed Silverlight Control SDK:
- Right-click on the Reference folder and select Add Reference.
- Browse to
c:Programe Files (x86) Bing Maps Silverlight ControlV1Libraries. - Select both the libraries to add our Silverlight application as shown in the following screenshot:
In our application, we are going to use the SOAP endpoint to connect Microsoft CRM 2011. We are now going to use the SilverCrmSoap library, which will have a built-in function that we can use to query the Microsoft CRM 2011 database. We need to add a reference of this library to our Silverlight application. This library can be downloaded from CodePlex.
Tip
Please download SilverCrmSoap from http://silvercrmsoap.codeplex.com/.
Now let's create classes for our application. Let's first design our class to hold our account information; we need to store the basic account information such as account name, account number, and address. We will be using this basic information to show under the tooltip when the user will move the mouse over the pushpins. We need to fetch the account's basic information to display in the tooltip with the account's latitude and longitude to draw pushpins.
Use the following steps to create an accounts class:
- Right-click on our application in Solution Explorer.
- Go to Add | New Folder and name it
Model. - Right-click on the
Modelfolder and go to Add | New Item. - Name it
Accounts.cs. - Once we have added the
Accounts.csclass, we need to add properties and methods to store the account information. You can find the code for theAccounts.csfile underChapter5CodeSilverlightSampleApplicationSilverlightSampleApplicationModel.
After adding a class to hold the account information, we need a class to connect with the Microsoft CRM 2011 application. We need to write methods to authenticate the current user; for this we can use the existing silverlightutility.cs file. This class contains all the methods that we require, such as the function to get the SOAP server URL, the function to get the Microsoft CRM 2011 server URL and the function to get the Microsoft CRM 2011 context information. This class can be found at sdksamplecodecssilverlightsoapforsilverlightsoapforsilverlightsample. We can add this class to our Silverlight application. You can find this class under Chapter5CodeSilverlightSampleApplicationSilverlightSampleApplicationModel.
Now we need to create a class where we need to write functions to get the current CRM user and to get all accounts related to the current CRM user. So let's add a new class to our application and name it CrmUtility.cs. This class will contain methods to fetch data from Microsoft CRM.
This first method
we will write in this class is to get the current user ID. We can use the WhoAMI class here. We will create an object of the OrganizationRequest class, which is a base class for all organization web service requests. We can pass an instance of a request class to the Execute method. Our method should look like the following code snippet:
publicvoidGetCurrentUserID()
{
try
{
this._d.BeginInvoke(delegate()
{
OrganizationRequestrequest = newOrganizationRequest()
{
RequestName = "WhoAmI"
};
IOrganizationService service = SilverlightUtility.GetSoapService();
service.BeginExecute(request, newAsyncCallback(GetCurrentUserID_Callback), service);
});
}
catch (Exception Ex)
{
throw Ex;
}

        }
privatevoidGetCurrentUserID_Callback(IAsyncResult result)
{
try
{
this._d.BeginInvoke(delegate()
{
OrganizationResponse response = ((IOrganizationService)result.AsyncState).EndExecute(result);
_currentUserID = (Guid)response["UserId"];
this.Count = this.Count - 1;
});

}
catch (Exception ex)
{
throw ex;
}
}
In the preceding
record, we are checking for a response from the query and setting the Count flag that we used to trigger the property change event. Once we have the current user ID, we can fetch all accounts related to the current user. We can query the account entity and compare the owner ID with the current user ID. We also need to check the account state so that we can only fetch active accounts to be shown on the dashboard. Our function should look like the following code snippet:
publicvoidGetCurrentUserAccounts()
{
QueryExpressionquery = null;
string[] _AccountColumnToFetch= newstring[]
{
"name", "accountid", "accountnumber", "address1_latitude", "address1_longitude", "address1_postalcode", "address1_city", "address1_stateorprovince"
};

query = newQueryExpression()
{
EntityName = "account",
ColumnSet = newColumnSet()
{
Columns = newObservableCollection<string>(_AccountColumnToFetch)
},
Criteria = newFilterExpression
{
FilterOperator = LogicalOperator.And,
Conditions ={newConditionExpression
{
AttributeName =   "address1_latitude",
    Operator = ConditionOperator.NotNull
},
newConditionExpression
{
AttributeName = "address1_longitude",
Operator = ConditionOperator.NotNull
},
newConditionExpression()
{
AttributeName = "statecode",
Operator = ConditionOperator.Equal,
Values = { 0 } // State = Active
},
newConditionExpression()
{
AttributeName = "ownerid",
Operator = ConditionOperator.Equal,
Values ={
this._currentUserID
}
 },
}
},
};
query.PageInfo = newPagingInfo
{
Count = MaxRecordsToReturn, PageNumber = 1, PagingCookie = null };
OrganizationRequest request = newOrganizationRequest()
{
RequestName = "RetrieveMultiple"
};
request["Query"] = query;
IOrganizationService service = SilverlightUtility.GetSoapService();
service.BeginExecute(request, newAsyncCallback(RetrieveNearestRecords_Callback), service);
}
In the
preceding code, we have used the PageInfo class to set the page properties that will help us deal with a large dataset. We have used the following properties for the PageInfo class:
Count: This property is used to fetch the number of recordsPageNumber: This property is used to set which page we want to process firstPagingCookie: This property is used to increase the performance of the application in the case of large datasets
We need to handle the callback for the GetCurrentUserAccounts function. You can find the full code under Chapter5CodeSilverlightSampleApplicationSilverlightSampleApplicationModelCrmUtility.cs.
Once we
have the accounts, we need a function to show the pushpins for the collected accounts. We need to create an object of the Pushpin class, and then we can add the account's latitude and longitude, to show them in the Bing Map. Our function should look like the following code snippet:
publicvoidShowAccountSearchPushpins()
{
try{
{
MapLayer _CurrentAccountlayer = (MapLayer)this._map.FindName("layerAccounts");
_CurrentAccountlayer.Children.Clear();
for (inti = 0; i<this._accounts.Count; i++)
{
   Pushpin _pushpinCurrentAcc = newPushpin();
_pushpinCurrentAcc.Name = this._accounts[i].AccountID.ToString();
Location _LocationCurrentAcc = newLocation()
{
   Latitude = this._accounts[i].Latitude,
Longitude = this._accounts[i].Longitude
};
_pushpinCurrentAcc.Location = _LocationCurrentAcc;
StringBuilder _accountInfoprimary = newStringBuilder();
                    _accountInfoprimary.Append("Account Number :"+ this._accounts[i].ANumber + "
");
                    _accountInfoprimary.Append("Account Name :" + this._accounts[i].AName + "
");
ToolTiptt = AddToolTip(_accountInfoprimary.ToString());
ToolTipService.SetToolTip(_pushpinCurrentAcc, tt);
this._map.Children.Add(_pushpinCurrentAcc);
}
 }
catch (Exception ex)
            {
   throw ex;
    }
  }
We have added all the required classes to our application. Now let's add a page to show the current CRM user accounts in Bing Map. Add a new folder called View, which will contain the main screen to show the account pushpins. Use the following steps to add a Silverlight page to
the View folder:
- Right-click on the
Viewfolder and go to Add | New Item. - Select Silverlight Page and name it
MyAccounts.xamlas shown in the following screenshot: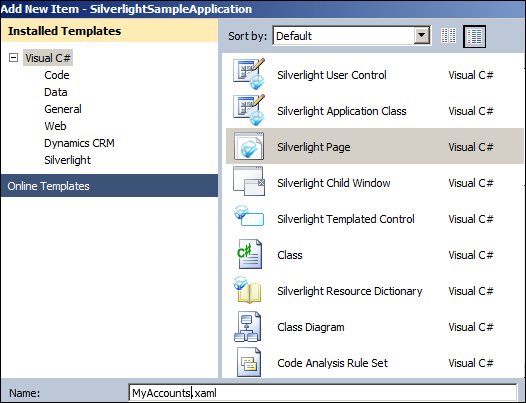
Now that we have added our Silverlight page, let's add a Map Control function in our Account page. Double-click on MyAccounts.xaml. We need to edit our user control file to add our Map Control function. After editing the user control file, our code should look like the following code snippet:
navigation:Pagex:Class="SilverlightSampleApplication.View.MyAccounts"
xmlns="http://schemas.microsoft.com/winfx/2006/xaml/presentation"xmlns:x="http://schemas.microsoft.com/winfx/2006/xaml"
xmlns:d="http://schemas.microsoft.com/expression/blend/2008"
xmlns:mc="http://schemas.openxmlformats.org/markup-compatibility/2006"
mc:Ignorable="d"
xmlns:m="clr-namespace:Microsoft.Maps.MapControl;assembly=Microsoft.Maps.MapControl"
xmlns:navigation="clr-namespace:System.Windows.Controls;assembly=System.Windows.Controls.Navigation"
d:DesignWidth="640"d:DesignHeight="480" Title="MyAccounts Page">
<Grid x:Name="LayoutRoot">
<m:Map Name="MyMap"CredentialsProvider="Our Bing Maps Key" Loaded="MyMap_Loaded">
<m:MapLayer x:Name="layerAccounts"></m:MapLayer></m:Map></Grid></navigation:Page>
After modifying user control, if we will try to view our user control, it should look like the following screenshot:
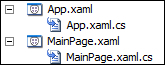
When we create our Silverlight application, we get a default Silverlight page with the App.xaml and MainPage.xaml files, as shown in the following screenshot:
We can use the App.xaml file to store the global resources for our application. We are going to store our crmutility object in the App.xaml.cs file. Open the App.xaml.cs file to edit and declare a public crmutlity class object, as follows:
public partial class App : Application
    {
publicCrmUtility _crmutility = new CrmUtility();
public App()
        {
this.Startup += this.Application_Startup;
this.Exit += this.Application_Exit;
this.UnhandledException += this.Application_UnhandledException;
         }
InitializeComponent();
}
Now let's
edit our MainPage.xaml page; we will use this page to display a message to the CRM user till our application loads the account related to the current CRM user. We need to add a Frame and a TextBlock entity in our MainPage.xaml page. Open the MainPage.xaml file and edit the user control XAML file as shown in the following code snippet:
<UserControlx:Class="SilverlightSampleApplication.MainPage"
 xmlns="http://schemas.microsoft.com/winfx/2006/xaml/presentation"
xmlns:x="http://schemas.microsoft.com/winfx/2006/xaml"
xmlns:d="http://schemas.microsoft.com/expression/blend/2008"
 xmlns:mc="http://schemas.openxmlformats.org/markup-compatibility/2006"
mc:Ignorable="d" Loaded="MyMap_Loaded"
d:DesignHeight="300"d:DesignWidth="400" xmlns:sdk="http://schemas.microsoft.com/winfx/2006/xaml/presentation/sdk">
<Grid x:Name="LayoutRoot" Background="White">
<Grid.RowDefinitions>
<RowDefinition Height="*" />
<RowDefinition Height="Auto" />
<RowDefinition Height="Auto" />
<RowDefinition Height="*" />
</Grid.RowDefinitions>
<TextBlockx:Name="WaitMessage" Visibility="Visible" Text="Please wait while we load your Accounts..."FontSize="24"Grid.Row="1"HorizontalAlignment="Center" Margin="10" />
<sdk:Frame Name="Frm" Visibility="Visible"Grid.Row="0"Grid.RowSpan="4"/>
</Grid>
</UserControl>
In MainPage.xaml.cs we need to create an object of our crmutility class; first we will get the currently logged in CRM user. Once we have that user, we will fetch all accounts related to that
user and show the account pushpins in the Silverlight page.
namespaceSilverlightSampleApplication
{
publicpartialclassMainPage : UserControl
    {
Appapp = (App)Application.Current;
CrmUtility _crmUtility;
publicMainPage()
        {
InitializeComponent();
_crmUtility = newCrmUtility(this.Dispatcher);
app._crmutility = this._crmUtility;
_crmUtility.PropertyChanged += (s, e) =>
{
if (e.PropertyName == "Ready")
{
this.WaitMessage.Visibility = Visibility.Collapsed;
this.Frm.Navigate(newUri("/View/MyAccounts.xaml", UriKind.Relative));
}
};
}
privatevoidMyMap_Loaded(object sender, RoutedEventArgs e)
{
_crmUtility.GetCurrentUserID();
}
}
}