
Once you have established your Reason sounds to play on an FL Studio channel as per the previous recipe, the inevitable question that comes up is, "Can I put these Reason sounds on the FL Studio Mixer?" The answer is yes, and is another reason why using Reason ReWired is super creative. However, you will not be using an FX slot in the normal way we send channels to the FL Studio Mixer (there is no option on an FL Studio MIDI out channel to send it to an FX slot). We will have to connect our Reason sound modules to the Reason hardware device; they will then show up on the FL Studio Mixer slots where we can further process the sound!
We do not need to do anything special in Reason besides having its hardware device showing. This is not a problem because the Reason hardware device cannot be deleted and will always be showing at the top of the Reason rack. You must have your sound modules in Reason connected to FL Studio MIDI out channels as per the previous recipe.
In our example, we will again be working with the Reason NN-XT Advanced Sampler. Let's see how to send the audio output of your Reason sound modules into the FL Studio Mixer using the following steps:
- Open your Reason software and then press Tab to turn your Reason rack around.
- Click-and-drag the left audio output of your Reason sound module into output 3 on your Reason hardware device. Alternatively, you can also right-click on the left audio output of the NN-XT module, hover over Hardware Interface II, and select Output 3, as shown in the following screenshot:
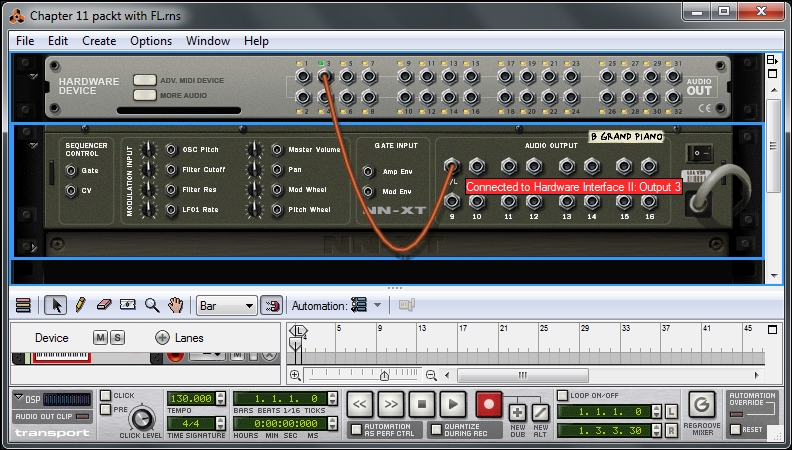
Fig 11.6
- Your NN-XT sound module will now be sent to mixer slot 1 on the FL Studio Mixer, as shown in the following screenshot:
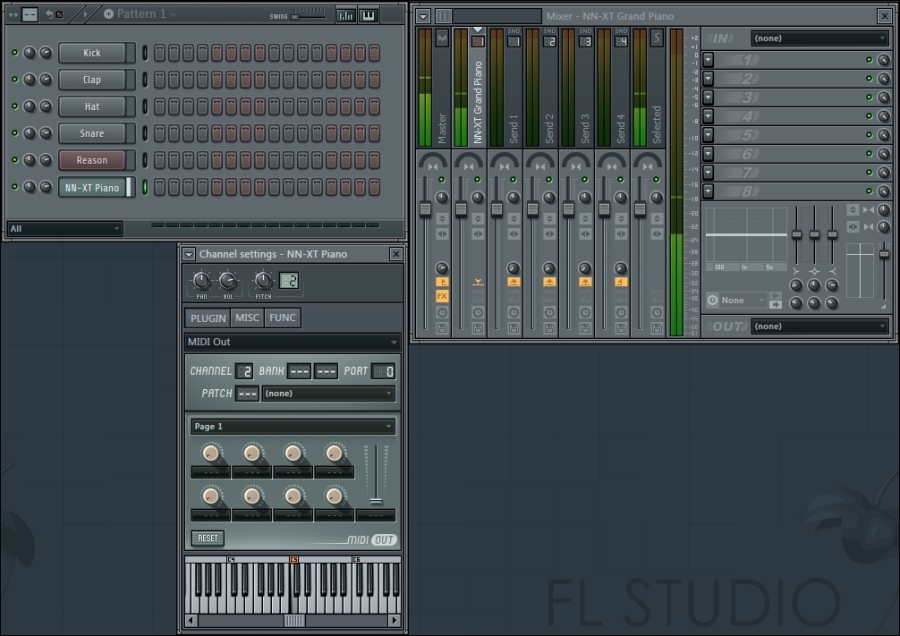
Fig 11.7
You never want to send any Reason output to output 1 or output 2 on the Reason hardware interface/device. Outputs 1 and 2 on the Reason hardware device are dedicated as the automatic main stereo output for HARDWARE DEVICE so that FL Studio is accessible.
In the previous example, with the NN-XT, sending it to output 3 on the Reason hardware device will, in turn, make it show up on FL Studio insert slot 1. We can clearly see this in the preceding screenshot. We have also renamed our MIDI out channel to read NN-XT Piano and the Insert mixer slot to read NN-XT Grand Piano.
The process needs to be repeated if you want to include additional Reason instruments to the FL Studio Mixer. If you send a Reason sound module to output 4, it will show up as track 2 of FL Studio Mixer; if you send a Reason sound module to output 5, it will show up as track 3 of FL Studio Mixer; and so on.
It will always be two slots behind with regard to HARDWARE DEVICE and the FL Studio insert slots. Once you have your Reason modules sent to the HARDWARE DEVICE outputs, you can save both Reason and FL Studio as a template.
Please be mindful of the volume of your Reason sound module, the volume of the MIDI out channel in the step sequencer, and the volume on your FL Studio Mixer. They are all related. The level of your Reason instruments may look like a lower value on the peak meter display on each mixer slot compared to regular sounds in FL Studio. The best advice is to use your ears. You may also want to start with a suitable drum sequence using wave samples from your FL Studio Browser in order to make sure your Reason instruments will be mixed at a suitable level. Using a reference CD of a high-quality music production sample always works.
Using send tracks on Reason instruments in the FL Studio Mixer is a great tool. Sending a little bit of reverb or delay produces awesome results. If you are familiar with utilizing Reason as a standalone DAW, you can still add effects inside Reason or use a mixer inside Reason before sending it through HARDWARE DEVICE.
- The Using send tracks in the mixer recipe in Chapter 6, Using the FL Studio Mixer and Recording Audio
- The Adding effects and your effect chain recipe in Chapter 6, Using the FL Studio Mixer and Recording Audio
- The Getting the best out of your mixer recipe in Chapter 6, Using the FL Studio Mixer and Recording Audio
- The Humanizing with the OFS knob recipe in Chapter 9, Humanizing Your Song
- The Creating automation clips recipe in Chapter 10, Recording Automation