10.5. Deployment
I think one of the biggest and most valuable changes in ASP.NET 4.0 is the new deployment functionality. VS2010 makes it easier than ever before deploy your ASP.NET application.
VS2010 allows you to do the following:
Perform transformations on Web.config for different build configurations
Create web packages (zip files that contain your application, database, and settings in a single file)
Install your application and all its settings with just one click (one-click publishing)
Automating your deployment processes is a smart move, because it reduces mistakes, saves you time, and creates a repeatable and self-documented process.
10.5.1. Web.config Transformation
Many developers use the Web.config file to hold application-specific settings, such as database connection strings. The trouble with Web.config is that when you deploy your applications, you normally have to change these settings. VS2010 offers the ability to create a build configuration that allows you to modify the contents of the Web.config file for different build configurations. Note you can also use this feature on Web.config files in subfolders.
VS2010 actually uses this functionality already when you switch between debug and release modes. Let's take a look at this now:
Create a new ASP.NET web application called Chapter10.WebConfigTransformation.
Click the Show All Files option in Solution Explorer.
Expand Web.config. Note how Web.config has two files nested beneath it: Web.Debug.config and Web.Release.config
Open Web.Release.config. It will have code similar to the following (shortened for brevity):
<configuration xmlns:xdt="http://schemas.microsoft.com/XML-Document-Transform">
  <system.web>
    <compilation xdt:Transform="RemoveAttributes(debug)" />
  </system.web>
</configuration>
This is a simple transformation that is used to remove debug attributes when the application is built in release mode.
10.5.2. Creating a New Deployment Configuration
I will now walk you through creating your own transformation. Let's imagine you have a server allocated for user acceptance testing (UAT) and you need to change an individual setting when your application is moved from your development machine to the user-acceptance machine.
The first thing you need to do is create a new build configuration, so go to the build configuration manager. On the main menu, select Build
 Configuration Manager.
Click the drop-down menu labeled "Active solution configuration," and select <New>.
Enter the name UAT.
Select the "Copy settings from Release" drop-down menu option.
Make sure the "Create new project configurations" check box is selected, and click OK.
Open Web.config, and add a new appSettings key called RunMode:
<?xml version="1.0"?>
<appSettings>
  <add key="RunMode" value="Default" />
</appSettings>
Now open Web.UAC.config, and replace the code with the following:
<?xml version="1.0"?>
<configuration xmlns:xdt="http://schemas.microsoft.com/XML-Document-Transform">

  <appSettings>
    <add key="RunMode" xdt:Transform="Replace" xdt:Locator="Match(key)"
         value="User acceptance testing" />
  </appSettings>
<system.web>
    <compilation xdt:Transform="RemoveAttributes(debug)" />

  </system.web>
</configuration>
If you run your project now, you will not see the results of this transformation. This is because transformations are part of your build process and will occur only when you publish your application or use the MSBuild utility with certain options. This does seem a bit of shame, because it would have been nice to easily test transformations by changing the build mode.
The easiest way to see the transformations is to publish the project:
Right-click the project, and select Publish.
10.5.3. Transforming Web.config from the Command Line
You can also transform Web.config from the command line:
Open the Visual Studio command prompt.
Change the path to your current project directory, and enter the following command:
MSBuild Chapter10.WebConfigTransformation.csproj /t:TransformWebConfig /p:Configuration=UAC
If you now take a look at the ~/obj/UAC/TransformWebConfig folder of your application, you will find the default Web.config file has had the transformation applied to it.
10.5.4. Web.config Transformation Options
I just demonstrated a very simple replace; VS2010 also allows you to carry out much more complex changes. VS2010 offers three options to locate the item you want to change (you can find the full details at http://msdn.microsoft.com/en-us/library/dd465326%28VS.100%29.aspx):
Match on a node attribute value
xdt:Transform="Replace" xdt:Locator="Match(name)"
Match on an XPath expression
xdt:Locator="XPath(//system.web)"
Match on a value
xdt:Locator="Condition(@name='MyDb')"
The following actions can be performed on Web.config settings:
Replacing:
xdt:Transform="Replace"
Inserting:
xdt:Transform="Insert"
xdt:Transform="InsertAfter(/configuration/system.web/authorization/
allow[@roles=Authors])"
xdt:Transform="InsertBefore(/configuration/system.web/authorization/
deny[@users='Alex'])"
Deleting:
xdt:Transform="RemoveAll"
Removing:
xdt:Transform="RemoveAttributes(debug,batch)"
Setting individual attributes:
xdt:Transform="SetAttributes(batch)"
10.5.5. Web Packages
Deploying an ASP.NET application is often more complex than simply copying files to a remote server. Applications often need specific IIS settings, GAC components, COM DLLs, and so on. VS2010 allows you to wrap up your application in a package that contains all this functionality. The following can be included in a web package:
The application's pages, controls, images, CSS, media, and so on (duh!)
GAC assemblies
COM components
IIS settings
SQL databases
Security certificates
Web packages are created by the MsDeploy tool and contain your application's content and additional information that describes its setup requirements.
Once you have created your web package, you can deploy it in three main ways:
Manually, by using IIS's management features and selecting Import Application
By entering the following in the command line:
MSBuild "MyProjectname.csproj" /T:Package /P:Configuration=UAC
Using the deployment API
Let's look at how you specify the items your web package should include. Either right-click your project and select the Package/Publish Settings or open the project's Properties window and select the Package/Publish tab (Figure 10-2).
Figure 10.2. Package/Publish settings
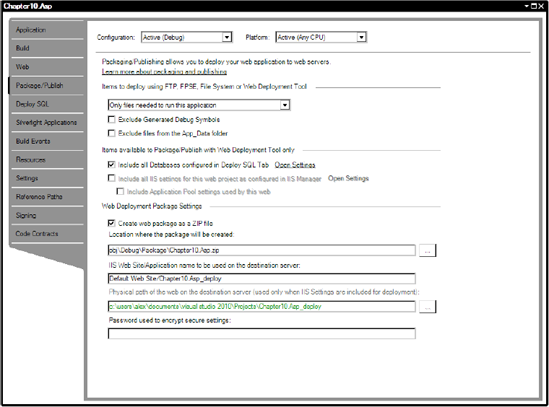
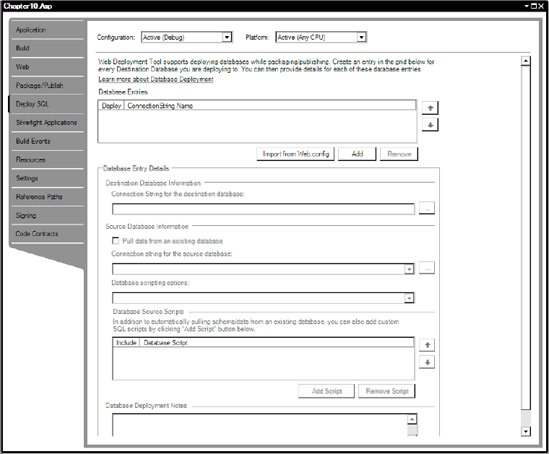
The IIS settings option (disabled at the time of writing) allows you to specify IIS settings should you require. VS2010 also contains support for deploying SQL databases and running SQL scripts, which are configured on the Deploy SQL tab (Figure 10-3).
Figure 10.3. Deploy SQL settings
When you have configured these settings to your liking, right-click your project, and select the Package option. VS2010 will then create your package at ~/obj/YOURBUILDCONFIGNAME/Package. Note that MSDeploy is even nice enough to create a command script that will deploy your application.
10.5.6. One-Click Publishing
One-click publishing uses IIS remote management services to allow you to publish your application to a remote server with one click. One-click publishing deploys only those files that have changed, so it is very efficient. To use one-click publishing, you will need a host that supports one-click publishing (at the time of writing, Discount ASP or OrcsWeb), or, if deploying to your own server, you'll need to have IIS remote management services enabled (http://technet.microsoft.com/en-us/library/cc731771(WS.10).aspx). One-click publishing is available only for projects in the VS2010 format.
Before you can use one-click publishing, you need to configure a number of settings. Right-click your project, and select the Publish option. You will see a screen similar to Figure 10-4.
Figure 10.4. One-click publishing profile settings
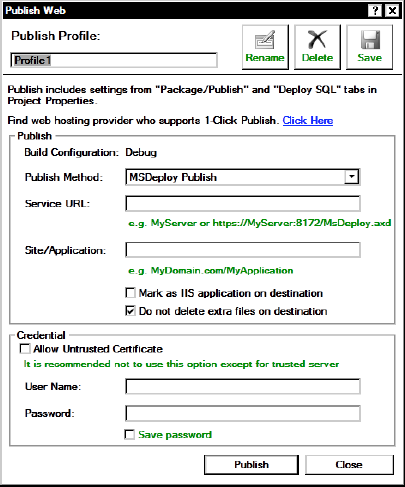
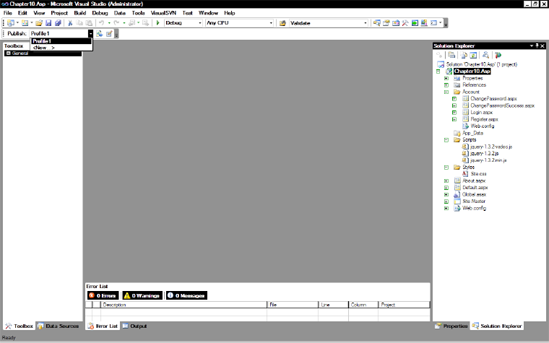
Fill in the details as shown (using MSDeploy Publish as the Publish Method setting), and click Close. Once you've completed these details, you can publish your application by selecting the publish profile you want to use from the drop-down menu (on the top-left side of the VS2010 screen) and clicking the Publish button (Figure 10-5). If this toolbar is not showing, right-click the toolbar, and select Web One Click Publish. VS2010 allows a single project to contain up to 50 different one-click publishing profiles.
Figure 10.5. Initiating one-click publishing