
15.3. Windows 7 Integration
Windows 7 has some great new UI features such as jump lists, taskbar overlays, and progress indicators. WPF 4.0 allows you to add these features to your applications. It is also worth noting that in this release WPF dialogs now have the same feel of Vista and Windows 7 (depending what they are running on).
15.3.1. Jump Lists
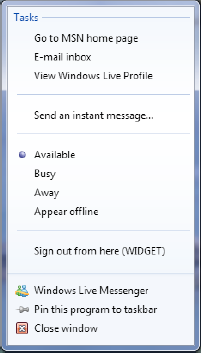
Jump lists, which allow you to easily perform common tasks, are activated by right-clicking an application on the taskbar. Figure 15-18 shows the jump list for Windows Live Messenger.
Figure 15.18. Jump list in Windows 7
Like most things in WPF/Silverlight, jump lists can be created programmatically and declaratively. The following code shows how to create a jump list to open Internet Explorer and Notepad that you would define in your MainWindow.xaml:
using System.Windows.Shell;

...

JumpList appJumpList = new JumpList();

//Configure a JumpTask
JumpTask jumpTask1 = new JumpTask();
jumpTask1.ApplicationPath = @"C:Program Files (x86)Internet Exploreriexplore.exe";
jumpTask1.IconResourcePath = @"C:Program Files (x86)Internet Exploreriexplore.exe";

jumpTask1.Title = "IE";
jumpTask1.Description = "Open IE";

JumpTask jumpTask2 = new JumpTask();
jumpTask2.ApplicationPath = @"C:WindowsSystem32
otepad.exe";
jumpTask2.IconResourcePath = @"C:WindowsSystem32
otepad.exe";

jumpTask2.Title = "Notepad";
jumpTask2.Description = "Open Notepad";

appJumpList.JumpItems.Add(jumpTask1);
appJumpList.JumpItems.Add(jumpTask2);

JumpList.SetJumpList(App.Current, appJumpList);
15.3.2. Taskbar
Windows 7 applications can communicate progress and application status via the taskbar. For example, Figure 15-19 shows IE indicating download progress.
Figure 15.19. IE indicating download progress
WPF 4.0 Windows 7 taskbar APIs give you control over the following:
Progress bar overlay (refer to Figure 15-19).
Icon overlay through the Overlay property (e.g., a small picture).
Thumbnail window (a window that pops up showing a mini-view of the application's window). Note that you can pick which bit of the window is shown using the ThumbnailClipMargin property.
Let's take a look at how to work with the progress bar. The progress bar allows you to specify a double value between 0 and 1 to indicate your application's progress with the ProgressValue property. You can also indicate different types of status by specifying the ProgressState property. This has five different settings that change the color of the bar:
Error (red)
Indeterminate (green)
None (not shown)
Normal (green)
Paused (yellow)
You will now see how to work with this by setting a progress bar at 50 percent for the application:
Create a new WPF application called Chapter15.ProgressBar.
Open MainWindow.xaml.cs, and add the following using statement:
using System.Windows.Shell;
Amend the code to the following:
public MainWindow()
{
    InitializeComponent();
    this.Loaded += new RoutedEventHandler(MainWindow_Loaded);
}

void MainWindow_Loaded(object sender, RoutedEventArgs e)
{

    TaskbarItemInfo taskBarItemInfo = new TaskbarItemInfo();

    taskBarItemInfo.ProgressState = TaskbarItemProgressState.Normal;
    this.TaskbarItemInfo = taskBarItemInfo;
    taskBarItemInfo.ProgressValue = 0.5d;

}
If you now run your application, you should find the progress bar at 50 percent.