
2.1. General Improvements
VS2010 contains some long-awaited changes, including the following:
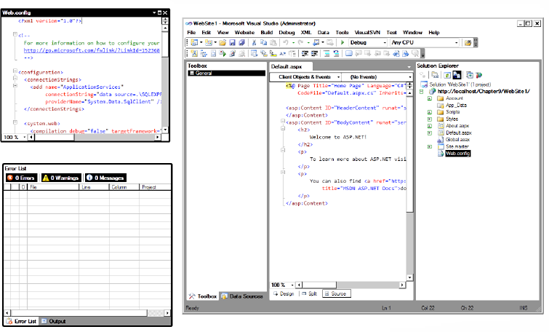
There is now support for multiple monitors and the ability to drag windows outside the IDE (see Figure 2-1).
IntelliSense is now two to five times quicker than previous versions.
Figure 2.1. VS2010 allows you to drag windows outside the IDE.
2.1.1. Improved Multitargeting Support
When a new version of Visual Studio/.NET is released, it can take time to upgrade and test existing applications. This can prevent you from taking advantage of features such as IDE enhancements if you are not ready to upgrade your application yet. VS2010 contains improved support for targeting previous versions of the framework.
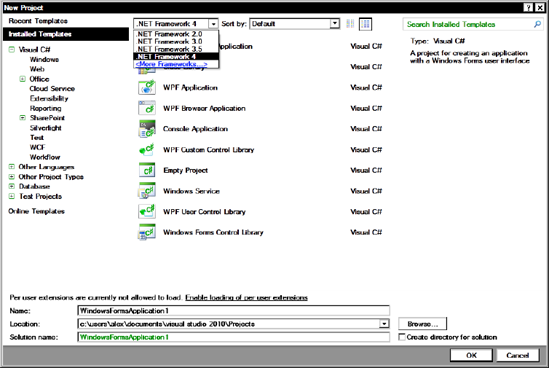
As per previous studio releases, the New Project dialog contains a drop-down menu that allows you to select the version of the framework that you are targeting when creating an application (see Figure 2-2). When you make a selection, Visual Studio will filter the project types you can create to those available in that version of the framework. Note that you can also select the framework version you are targeting in the project properties.
Figure 2.2. Select the version of the .NET Framework to target from the drop-down menu.
In VS2010 the Toolbox and Properties windows are filtered to display functionality available in the targeted framework version. Previously, some properties that were not available in the targeted framework would still be exposed. VS2010 will even try to display the correct version of third-party components for the targeting framework version.
VS2010 emulates what is available in previous framework versions through reference assemblies. These assemblies contain metadata that describes functionality available in previous versions. VS2010 itself uses the .NET 4.0 Framework, so when adding multitargeting support the team decided against running a previous framework version inside the same process. When your application is compiled to guarantee application compatibility, previous compiler versions are used.
|

2.1.2. IntelliSense
IntelliSense will now perform partial string matching. For example, if you were to type the word build, Visual Studio would display both the StringBuilder and UrlBuilder options. This can be very useful if you cannot remember the exact property or type name.
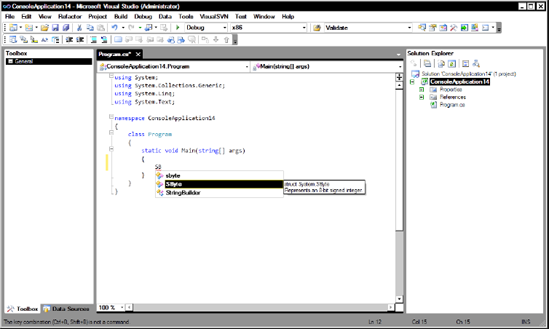
IntelliSense also supports lookups based on capitalization. Because all .NET types are Pascal case, you can simply enter just the uppercase letters of the type. For example, entering SB would return the type StringBuilder, among others with the same Pascal casing (as shown in Figure 2-3). IntelliSense performance has also been improved, particularly for JavaScript libraries.
Figure 2.3. IntelliSense supports partial string matching.
2.1.3. Add References
Adding a reference to a project was previously very slow. In VS2010 it is now lightening quick. When the Add Reference dialog first displays, the focus is set to the Projects tab while separate threads load up the .NET and COM tabs.
2.1.4. Web Development (Code-Optimized Profile)
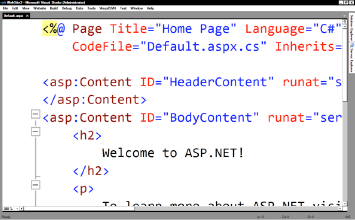
VS2010 contains some environment profiles, including the Web Development (code-optimized) profile shown in Figure 2-4. This profile is optimized for code and hides design features. You can select the code-optimized profile when you first load Visual Studio or by selecting Tools ![]() Import, and then selecting Export Settings.
Import, and then selecting Export Settings.
Figure 2.4. VS2010 contains environmental profiles, such as the Web Development (code-optimized) profile.

2.1.5. Zoom
As much of the IDE is written in WPF, it was easy for Microsoft to add functionality such as the ability to zoom into the code editor (as shown in Figure 2-5). To zoom into the code editor window, simply press Ctrl and use the mouse wheel to increase and decrease the zoom level. You can utilize this feature in presentations/code reviews or to zoom out to help you navigate a lengthy piece of code.
Figure 2.5. VS2010 includes the ability to zoom into the code editor window.
2.1.6. Highlight References
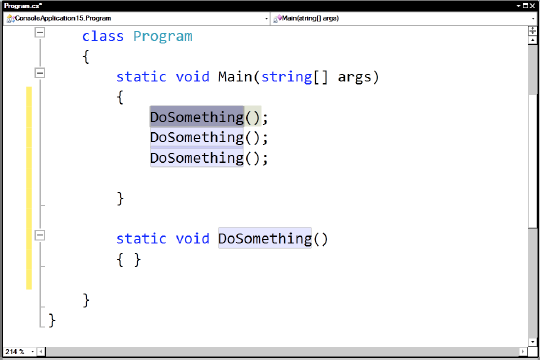
Highlight References allows you to quickly navigate through different instances of the same method call within a file. For example, if you want to navigate through all calls to the ToString() method, then click once anywhere on the ToString() method text (note that you don't have to highlight the text), and you will find that the IDE marks all the other ToString() calls in the same file with a light-gray background, as shown in Figure 2-6. You can then navigate to the next ToString() method by pressing Ctrl+Shift+Down or Ctrl+Shift+Up to return to the previous instance.
Figure 2.6. Highlight References allows you to quickly move between calls to the same method.
2.1.7. Navigate To
Sometimes when you need to find a specific piece of code, it can be much quicker to use the search functionality than to trawl through Solution Explorer. VS2010 improves on the existing search and search-in-files functionality with the Navigate To window.
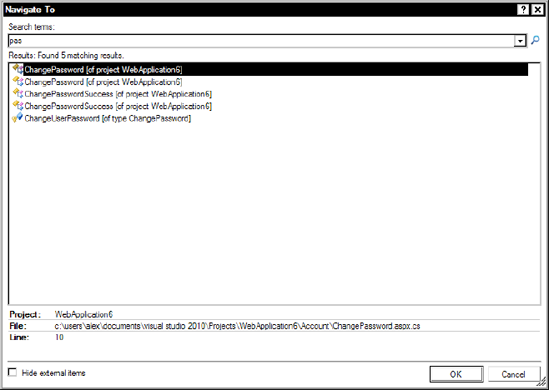
To bring up the Navigate To window, simply press Ctrl+comma or select Navigate To on the Edit menu. You can then enter a phrase you want to search for in your solution, and Navigate To will immediately filter results as you type, as shown in Figure 2-7. You can then click these results to be taken directly to the results location. Navigate To will perform partial and in-string matches, and also supports Pascal casing searches (e.g., typing BT would return a class called BigTiger ).
Navigate To supports all the commonly used file types, including C#, Visual Basic (VB), and XML, and is much quicker and easier to navigate than previous search methods.
Figure 2.7. Search files in your project with the Navigate To window.
2.1.8. Box Selection
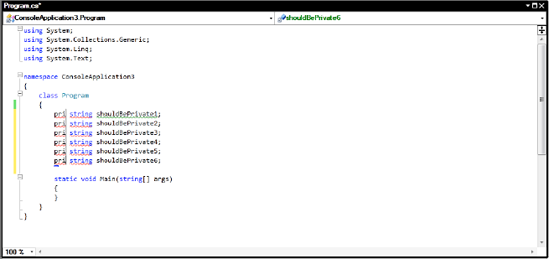
Box selection is one of my favorite new features. It allows you to quickly perform the same change on many lines of code. To use box selection, place the cursor where you want to make the change, and then hold down Shift+Alt in combination with the arrow keys to create a "box" where the change will be applied. Finally, enter your change and it will be applied to all the selected lines.
Box selection could, for example, be used to refactor a number of class variables' access levels from private to public in one edit, as shown in Figure 2-8.
Figure 2.8. Quickly make changes to multiple lines of code with box selection.
2.1.9. Call Hierarchy
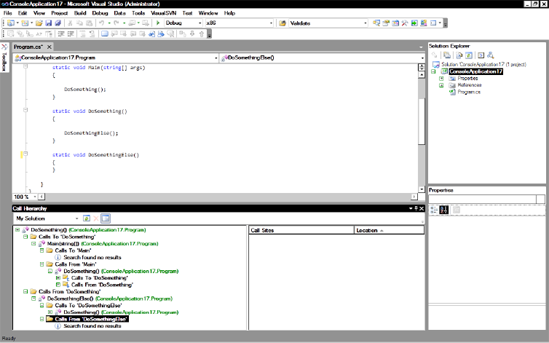
The Call Hierarchy window allows you to see all calls made to a particular method and all calls from the method. Call hierarchy is recursive. To open the Call Hierarchy window, right-click a method, property, or constructor and select View Call Hierarchy. The Call Hierarchy window will then open, displaying calls to and from the method (see Figure 2-9). Note that you can filter the Call Hierarchy window by solution, project, and document.
Figure 2.9. See calls made to and from a particular method with the Call Hierarchy window.
2.1.10. Code Generation
A great feature in VS2008 is that you can enter a new method name that doesn't exist and have the IDE create a stub of it for you (to do this, enter a method name that doesn't exist, press Ctrl+. and select the "Generate method stub..." option). VS2010 expands on this functionality and allows you to create classes, structs, interfaces, and enums in a similar manner. This is a great feature when you are starting the development of an application, and is particularly suitable for TDD-style development. Let's try this out now.
Create a new console application.
Enter the following code:
Zebra MyZebra = new Zebra();
Either click the smart tag beneath the Z in zebra or press Ctrl+. (the easier ay) to bring up the menu (as shown in Figure 2-10).
Figure 2.10. There are new options available in VS2010 for generating classes and method stubs.

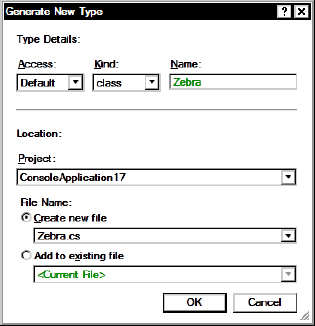
The Generate New Type screen (shown in Figure 2-11) will appear, allowing you to specify a number of options, including the access level, file name, and item to create. Select Class on the Kind drop-down menu and change the access level to Internal.
Figure 2.11. Generate New Type allows you greater control over what is created.
Visual Studio will then generate a new Zebra internal class.
2.1.11. Consume-First Mode
IntelliSense is a great feature, but can sometimes get in your way. For example, imagine an application where you have a class called TigerCage and you now want to create a Tiger class. If you want to use VS2010's new class generation features and you start typing Tiger, then Visual Studio's IntelliSense will jump in and smugly change your code to TigerCage.
To resolve this issue, IntelliSense now operates in two modes: default and consume-first. Consume-first mode prevents IntelliSense from automatically completing a type or member that has not yet been defined. To switch to consume-first mode, press Ctrl+Alt+Space. You can press Ctrl+Alt+Space again to switch back to default mode.
NOTE
IntelliSense is now programmed to switch automatically to consume-first mode in common cases where it is known to be problematic.
2.1.12. Breakpoints
VS2010 allows you to export/import and label breakpoints. You can use this feature to share a collection of breakpoints with a colleague or quickly return to a previous debugging setup. Note that the exported file holds the breakpoint location by line number, so if you modify your code and import breakpoints, they will no longer be positioned correctly.
Individual breakpoints can be exported by right-clicking on them and then selecting the Export option. Or you can export all breakpoints (or those matching a specific search criteria) by opening the Breakpoints window (Debug ![]() Windows
Windows ![]() Breakpoints) and selecting the "Export all breakpoints" option. Breakpoints can be imported in the Breakpoints window.
Breakpoints) and selecting the "Export all breakpoints" option. Breakpoints can be imported in the Breakpoints window.
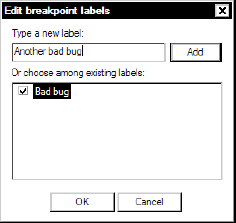
VS2010 allows you to apply a label to a breakpoint, as shown in Figure 2-12. This may be useful to associate it with a particular issue or with grouping in the Breakpoints window. To label a breakpoint, right-click one and select the "Edit labels" option. VS2010 will then give you the option of entering a new label for the breakpoint or reusing an existing one.
Figure 2.12. Labelling a breakpoint
2.1.13. Toolbox
If you start typing a letter, the toolbox will jump to items containing the letter typed. You can also tab through to the next item that matches.
2.1.14. Code Snippets
Previous versions of Visual Studio contained a feature called snippets, which allowed you to save blocks of code for later insertion, preventing you from having to retype (or remember) them. VS2010 contains a number of new snippets (in particular for ASP.NET) and allows you to easily create your own. Although you can create your own snippets in VS2008, it isn't an easy process without the use of third-party applications (e.g., Snippet Editor; http://msmvps.com/blogs/bill/archive/2007/11/06/snippet-editor-2008-release.aspx).
This changes, however, in VS2010 and is now very easy. There are two types of snippet:
Expansion (the snippet is inserted at the cursor)
SurroundsWith (wraps around existing code)
Let's take a look at this now and create a code file header snippet:
Add a new XML file to your project called verHeader.snippet (snippets always have the extension .snippet).
Right-click the editor window and select Insert Snippet
 Snippet. VS2010 will then create a basic XML snippet template.
Modify the Title tag to read "Code File Header."
Modify the Author tag to your name.
Modify the Shortcut tag (this is the trigger word that activates the snippet) to "codehead."
Enter a description for the snippet, such as "Adds a header to a code file."
We now need to alter the Literal section. Literals allow you to define editable values that are inserted into your snippet. We want the user to enter his or her own name in the author section, so change the ID value to Author and enter your name as the Default tag.
The Code section contains what will be added when the snippet is inserted. Modify it to look like the following:
<Code Language="CSharp">
      <![CDATA[
      ***********************************
      Author: $Author$
      Date:
      Version:
      Purpose:
      ***********************************
     ]]>
</Code>
Your finished snippet should end up looking like the following:
<CodeSnippet Format="1.0.0"
 xmlns="http://schemas.microsoft.com/VisualStudio/2005/CodeSnippet">
  <Header>
    <Title>Code File Header</Title>
    <Author>Alex Mackey</Author>
    <Shortcut>codehead</Shortcut>
    <Description>Adds a header to a code file</Description>
    <SnippetTypes>
      <SnippetType>Expansion</SnippetType>
    </SnippetTypes>
  </Header>
<Snippet>
<Declarations>
<Literal>
<ID>Author</ID>
<Default>Alex Mackey</Default>
</Literal>
</Declarations>
<Code Language="CSharp">
<![CDATA[
***********************************
Author: $Author$
Date:
Version:
Purpose:
***********************************
]]>
</Code>
</Snippet>
</CodeSnippet>2.1.14.1. Loading the Snippet into Visual Studio
Before we can use our snippet, we need to load it into Visual Studio. Because snippets are pretty useful, you will probably want to create more than one. Follow these steps to create a new directory somewhere on your computer called MySnippets.
Copy the verHeader.snippet file in your solution to the snippets directory you just created.
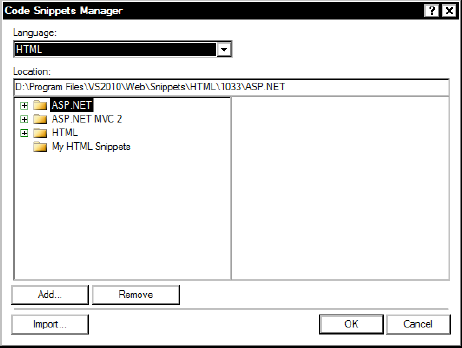
On the main menu, go to Tools
 Code Snippets Manager, and you should see a screen similar to Figure 2-13.
Select Import.
That's it; your snippet is ready to use. You can now use this snippet by typing codehead.
Figure 2.13. Code Snippets Manager
|
2.1.14.2. Using Snippets
There are a number of ways to add snippets to your code. No doubt the quickest way is to use a trigger word (such as textbox in an ASP.NET application). However, sometimes you may not know the trigger word to use. In that case you can pick the word from the Snippet dialog.
To open the Snippet dialog, right-click the editor and select Insert Snippet. You can then choose from either the ASP.NET or HTML snippets. You can also press Ctrl+K and then Ctrl+X to bring up the Insert Snippet enhancement, which allows you to navigate through the snippets using the keyboard.
2.1.15. Creating Custom Start Pages
VS2010 allows you to customize the start page that is displayed when the IDE first loads. You could use this feature to display items such as current bugs, last night's build status, and so on. On my Windows 7 machine, this directory is held at the following path: C:UsersalexDocumentsVisual Studio 10StartPages.
Perform a simple modification, such as altering some of the text content.
Save the file with a new file name, such as CustomStartPage.xaml, in the same directory.
Before you can use your new start page, you have to select it in the Visual Studio options. Go to Tools ![]() Options, and then select the Startup node. Select the new custom start page from the Custom Start Page drop-down menu.
Options, and then select the Startup node. Select the new custom start page from the Custom Start Page drop-down menu.
Close Visual Studio and reopen it. Your new start page should now appear the next time Visual Studio is loaded.