
14.18. Data Binding
Few applications do not have to work with data. Silverlight offers a rich binding model that makes it very easy to work with data. Let's create a simple example to bind data to a text box:
Add a new folder called DataBinding to the example project.
Right-click, and select Add
 New Item
  Silverlight UserControl. Call it DataBindingTest.
In the XAML, you need to add a namespace reference to the assemblies you're going to use. Add the following line in the UserControl tag of DataBindingTest.xaml:
xmlns:Data="clr-namespace:System.Windows.Controls;
assembly=System.Windows.Controls.Data"
In the layout <root> tag, add the following:
<StackPanel Orientation="Vertical">
  <TextBlock>Bound programmatically:</TextBlock>
  <TextBox x:Name="txtBoundProgrammatically" Width="300" Height="20"></TextBox>

  <TextBlock>Bound declaratively:</TextBlock>
  <TextBox x:Name="txtDeclaration" Width="300" Text="{Binding Title, Mode=OneWay}"
           Height="20" ></TextBox>
</StackPanel>
Open ~/DataBinding/DataBindingTest.xaml.cs, and add the following using directive:
using System.Windows.Data;
You need something to bind the controls to. You will create a class called Movie that will have two properties: Title and Length. Add the Movie class to the DataBindingTest.xaml.cs code:
public class Movie : System.ComponentModel.INotifyPropertyChanged
{
    // implement the required event for the interface
    public event System.ComponentModel.PropertyChangedEventHandler PropertyChanged;
    private string _title;
    private string _length;

    public string Title
    {
        get
        {
            return _title;
        }

        set
        {
            _title = value;
            //Tell Silverlight Title property has changed
            NotifyChanged("Title");
        }

    }

    public string Length
    {
        get
        {
            return _length;
        }
set
        {
            _length = value;
            //Tell Silverlight Length property has changed
            NotifyChanged("Length");
        }

    }

    //This procedure raises the event property changed
    //so Silverlight knows when a value has changed
    public void NotifyChanged(string PropertyName)
    {
        if (PropertyChanged != null)
        {
            PropertyChanged(
                           this,
                           new System.ComponentModel.PropertyChangedEventArgs(
                             PropertyName
                           )
                         );
        }
    }
}
Change the DataBindingTest class code to the following:
public partial class DataBindingTest : UserControl
{
    public List<Movie> MoviesList = new List<Movie>();

    public DataBindingTest()
    {
        InitializeComponent();
        this.Loaded += new RoutedEventHandler(DataBindingTest_Loaded);
    }

    void DataBindingTest_Loaded(object sender, RoutedEventArgs e)
    {
        //Create items for binding
        PopulateItems();

        //Create binding programmatically
        CreateBinding_programmatically();

        //Set binding declaratively
        txtDeclaration.DataContext = MoviesList [0];
    }
public void PopulateItems()
    {
        //Create a list of items
        Movie Movie1 = new Movie();
        Movie Movie2 = new Movie();
        Movie Movie3 = new Movie();

        Movie1.Title = "Terminator";
        Movie1.Length = "120";

        Movie2.Title = "Conan the barbarian";
        Movie2.Length = "124";

        Movie3.Title = "Robocop";
        Movie3.Length = "130";


MoviesList.Add(Movie1);
        MoviesList.Add(Movie2);
        MoviesList.Add(Movie3);
    }

    public void CreateBinding_programmatically()
    {
        //Creates a binding programmatically
        Binding NewBinding = new Binding("Now");
        NewBinding.Source = System.DateTime.Now;
        NewBinding.Mode = BindingMode.OneWay;
        txtBoundProgrammatically.SetBinding(TextBox.TextProperty, NewBinding);
    }
}
Add the following code to the MainMenu_Loaded() method in MainMenu.xaml.cs:
this.cmdDataBind.Click += new RoutedEventHandler(cmdDataBind_Click);
Press F5 to run the application. You should see two text boxes: the first displays the current time and date, and the other displays "The Terminator" (item 0 in MoviesList).
So, what have you done here? First, you created a binding programmatically:
//Creates a binding programmatically
public void CreateBinding_programmatically()
{
    //Creates a binding programmatically
    Binding NewBinding = new Binding("Now");
NewBinding.Source = System.DateTime.Now;
NewBinding.Mode = BindingMode.OneWay;
txtBoundProgrammatically.SetBinding(TextBox.TextProperty, NewBinding);
}Then, you set the source (value) to today's date and linked the binding to the txtBoundProgrammatically text box. To bind the TextBox txtDeclaration declaratively, first set the data context with the following code:
txtDeclaration.DataContext = MoviesList[0];
Then set the Text property of the text box as follows:
<TextBox x:Name="txtDeclaration" Width="300" Text="{Binding Title, Mode=OneWay}"
         Height="20" ></TextBox>
14.18.1. Data Binding Modes
In the preceding example, you bound a TextBox to the Title property of Movie and defined the binding mode as one way:
<TextBox x:Name="txtDeclaration" Width="300" Text="{Binding Title, Mode=OneWay}"
         Height="20" ></TextBox>
Silverlight offers three binding modes:
OneTime: This is the lightweight option and should be used if the value will never change from what it is initialized as.
OneWay: If the item the object is bound to is changed, the bound property will be updated as well. If you change the bound property, it will not affect the object it is bound to.
TwoWay: This is like OneWay binding, but any changes to the bound property will also alter the bound object.
14.18.2. Data Binding and Dependency Properties
As mentioned earlier, data binding uses dependency properties to maintain the relationship between the object and data source. If you change an item that is data bound, then any other controls bound to the data item will change as well. Let's create an example to demonstrate this:
Open ~/DataBinding/DataBindingTest.xaml.
Add the following XAML after the TextBox that has the x:name set to txtDeclaration:
<TextBlock>Change an object in list:</TextBlock>
<Button x:Name="cmdChangeTitle" Width="100" Height="20"
Content="Change Title"></Button>
Open DataBindingTest.xaml.cs, and add a click event handler:
this.cmdChangeTitle.Click+=new RoutedEventHandler(cmdChangeTitle_Click);
Press F5 to run the application. Click the button to change the movie title. The text box that was bound to this item will then change.
Note that the contents of the text box that is bound was automatically updated when you changed the class it was bound to.
14.18.3. Two-Way Binding
You will now create an example to demonstrate two-way data binding:
Open DataBindingTest.xaml.
Add the following XAML after the cmdChangeTitle button (note that the binding mode is set to TwoWay now):
<TextBlock>Two way binding:</TextBlock>
<TextBox x:Name="txtTwoWay" Width="300" Text="{Binding Title, Mode=TwoWay}"
         Height="20" >
</TextBox>
Open DataBindingTest.xaml.cs. In DataBindingTest_Loaded(), add the following code (after the call to PopulateItems()) to bind the text box txtTwoWay to the first item in the movie list:
//Set up two-way binding
txtTwoWay.DataContext = MoviesList[0];
Press F5 to run your application.
Click the Data Binding button, and select the text box labeled txtTwoWay.
Change the text to The Terminator 2.
Click another text box.
Notice how all the other items bound to this movie were updated. The other bound items were updated in the example when the focus changed to another control. But you don't even need to change the item's focus because Silverlight will update other bound properties automatically after about 20 seconds.
14.18.4. Binding a ListBox
Open DataBindingTest.xaml, and add the following XAML (note the use of the DisplayMemberPath property, which tells it which item to bind to, in this case Title):
<TextBlock>List of items:</TextBlock>
<ListBox x:Name="lstItems" Width="300" DisplayMemberPath="Title" Height="100"></ListBox>
Open DataBindingTest.xaml.cs. In DataBindingTest_Loaded(), after the call to PopulateItems(), add the following:
//Bind list box
lstItems.ItemsSource = MoviesList;
Press F5 to run the application. You should see a list box populated with the movies in the list.
14.18.5. Binding a DataTemplate
Silverlight supports templating for data-bound items. Let's see a simple example of templating:
Open DataBindingTest.xaml, and add the following after the ListBox lstItems:
<TextBlock>List of items with data template:</TextBlock>
<ListBox x:Name="lstItemsWithTemplate" Width="300"  Height="100">
  <ListBox.ItemTemplate>
    <DataTemplate>
      <StackPanel Orientation="Horizontal">
        <TextBlock Text="{Binding Title}"></TextBlock>
        <TextBlock Text="{Binding Length}"></TextBlock>
      </StackPanel>
    </DataTemplate>
  </ListBox.ItemTemplate>
</ListBox>
In DataBindingTest_Loaded(), bind lstItemsWithTemplate:
//Bind list box with template
lstItemsWithTemplate.ItemsSource = MoviesList;
You should now see a list box with the movie's title and length displayed.
14.18.6. Binding a DataGrid
One of the most-used controls in ASP.NET is undoubtedly the DataGrid control. Silverlight has its own version of DataGrid that contains some great built-in functionality such as the following:
Column ordering
Two-way data binding
Column resizing
Column positioning
Highlighting selected rows
Let's look at the DataGrid control in Silverlight:
Open DataBindingTest.xaml, and drag a data grid from the Toolbox to beneath the ListBox lstItemsWithTemplate:
<Data:DataGrid x:Name="dgSimple"></Data:DataGrid>
In DataBindingTest_Loaded(), somewhere after the call to PopulateItems(), bind the DataGrid to the list of movies:
dgSimple.ItemsSource = MoviesList;
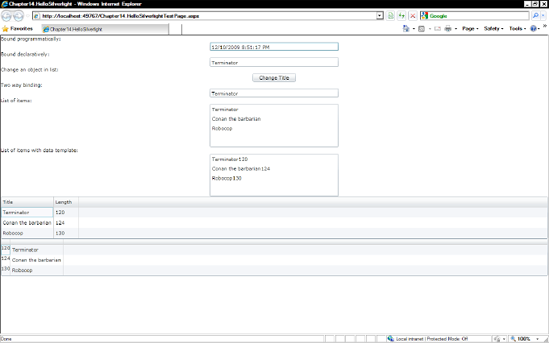
Press F5 to run the application, and click the Data Binding button. You should see a screen like Figure 14-11.
Figure 14.11. Silverlight DataGrid
In the previous example, you let Silverlight automatically determine the columns that would be bound in the DataGrid. Normally, however, you will want more control over how the data is displayed—for which you will use DataTemplates. Let's modify the DataGrid to use a template:
Open DataBindingTest.xaml, and add the following code beneath the dgSimple DataGrid:
<Data:DataGrid x:Name="dgSpecify" AutoGenerateColumns="False">
  <Data:DataGrid.Columns>
    <Data:DataGridTemplateColumn>
      <Data:DataGridTemplateColumn.CellTemplate>
        <DataTemplate>
          <TextBlock Text="{Binding Length}" />
        </DataTemplate>
      </Data:DataGridTemplateColumn.CellTemplate>
    </Data:DataGridTemplateColumn>

    <Data:DataGridTextColumn Binding="{Binding Title, Mode=TwoWay}">
    </Data:DataGridTextColumn>

  </Data:DataGrid.Columns>
</Data:DataGrid>
Open DataBindingTest.xaml.cs. In DataBindingTest_Loaded(), add the following after the call to PopulateItems():
dgSpecify.ItemsSource = MoviesList;
Note that you switched the order of the columns around (not very creative, but you get the idea).