
13.7. Creating the MVC Application
In the example, you will create an MVC site for Bob, who owns a movie theater. Bob has a movie theater imaginatively called Bob's Movie Theatre. Bob's movie site will display lists of films, a detail page for each film, and also the skeleton of an administration interface.
1. In Visual Studio, select File
New Project.
4. Expand the C# node, and click Web.
5. Choose ASP.NET MVC 2 Web Application. Give the project the name Chapter13.BobsMoviesMVC, and click OK.
6. Visual Studio will ask you whether you want create a unit test project; click Yes.
7. Visual Studio will now create your ASP.NET MVC project.
13.7.1. Project Structure
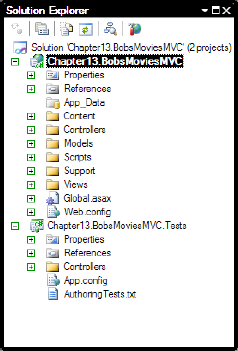
Visual Studio has divided the project into a number of directories (see Figure 13-2):
Figure 13.2. MVC project structure
When your application gets bigger, you might want to separate your model and controllers into another project, but you will keep with this structure in the example.
Take a look through the directories:
The Content directory contains any noncode files such as images and CSS.
The Controllers directory contains all the classes that are managing the interaction between the view and model.
The Models directory contains classes that interact with the underlying database. Models can be created in a number of different ways, and there is no one answer for what constitutes a model. For example, the Models directory might contain items such as LinqToSQL, EF, NHibernate, classes, and so on. In a real-world project, you would probably want your model to be in a different project to facilitate reuse, and so on.
The Scripts directory includes commonly used JavaScript libraries (ASP.NET AJAX and jQuery). As you will see, ASP.NET MVC works very well with JavaScript.
The Views directory is where the UI is contained. Within the directory is a Shared directory that contains the master page file for laying out your application.
13.7.2. Changing the Layout of MVC Pages
The default ASP.NET MVC project contains a master page at ~/Views/Shared/Site.Master.
In this chapter, you will use the jQuery libraries, so let's add a reference to it in the master page. Add the following in the header tag:
<script type="text/javascript" src="../../Scripts/jquery-1.3.2.js">
</script>
You won't win any design awards with this, so you might be interested in the gallery of free MVC design templates at http://www.asp.net/MVC/Gallery/default.aspx?supportsjs=true.
13.7.3. Creating the Model
Bob's business revolves around films, so you will need a way of storing this data. In the example, you will utilize the Entity Framework (EF) because it is very easy to get up and running. Please refer to Chapter 8 for further details of the Entity Framework.
First you have to connect to sample data:
In Visual Studio, select View
 Server Explorer.
Select Microsoft SQL Server when Visual Studio asks you to choose a data source.
Enter the connection details to where you restored/created the example database.
Click OK.
13.7.3.1. Creating EF Entities
Now that you have a database connection, you need to create the EF classes:
Right-click the Models directory, and select Add New Item.
Select "Generate from database."
Select the connection you created earlier, or enter new connection details.
Set the model namespace as Chapter13.BoxMoviesMVC.Model.
Open BobsMovies.designer.cs.
By default, Visual Studio will generate a context class with the same name as the example database. Expand the region where it says Contexts, and rename the existing context class and its constructors to TheatreEntities.
13.7.3.2. Repository Pattern
When you query the model, you are using EF, which accesses the database. This can pose an issue if you want to write unit tests because you have to ensure that the database is set up the same each time. Querying a database can also slow down large unit tests. An alternative is to use a repository pattern. For more information, please refer to http://martinfowler.com/eaaCatalog/repository.html. The repository pattern allows you to use a technique called dependency injection that allows you to give it a different mechanism to retrieve data.
NOTE
For more information on patterns, I highly recommend the very readable Head First Design Patterns by Eric and Elisabeth Freeman et al., published by O'Reilly.
Let's see this in action:
Right-click the Models folder, and select Add New Item
 Class. Call the class IFilmRepository, and enter the following code:
namespace Chapter13.BobsMoviesMVC.Models
{
    public interface IFilmRepository
    {
        bool Add(Film film);
        void Delete(int ID);
        IEnumerable<Film> GetAll();
        Film GetFilm(int ID);
        void Save();
        bool Update(Film film);
    }

}
Add another class called FilmRepository, and add the following code:
using System;
using System.Collections.Generic;
using System.Linq;
using System.Web;

namespace Chapter13.BobsMoviesMVC.Models
{
    public class FilmRepository : BobsMoviesMVC.Models.IFilmRepository
    {
        private BobsMoviesMVC.Models.TheatreEntities dbContext =
          new BobsMoviesMVC.Models.TheatreEntities();

        public IEnumerable<Film> GetAll()
        {
            return dbContext.Films;

        }

        public Film GetFilm(int ID)
        {
            return dbContext.Films.Single(f => f.FilmID == ID);
        }

        public bool Add(Film film)
        {
            if (film.GetErrors().Count == 0)
{
                dbContext.Films.AddObject(film);
                Save();
                return true;
            }
            else
            {
                return false;
            }

        }

        public bool Update(Film film)
        {
            if (film.GetErrors().Count == 0)
            {
                var ExistingFilm =
                  dbContext.Films.Single(f => f.FilmID == film.FilmID);
                ExistingFilm.Title = film.Title;
                ExistingFilm.Description = film.Description;
                ExistingFilm.Length = film.Length;

                Save();
                return true;
            }
            else
            {
                return false;
            }
        }

        public void Delete(int ID)
        {
            dbContext.Films.DeleteObject(dbContext.Films.Single(f => f.FilmID == ID));
            Save();
        }

        public void Save()
        {
            dbContext.SaveChanges();
        }
    }
}
13.7.3.3. Creating Validation for the Data Model
Usually you will want to validate data before saving it to the database (or you should). In this simple example, you will want to ensure that film entries have a title before inserting them into the database.
One method of creating validation rules, as suggested in Wrox's Professional ASP.NET MVC, is using partial classes (an excellent ASP.NET MVC introduction). You will utilize a very similar method suggested in that book because it is easy to understand and very effective.
Enter the following code:
public class Error
{
    public string Description { get; set; }
    public string Property { get; set; }
}
Enter the following code:
using System;
using System.Collections.Generic;
using System.Linq;
using System.Web;

namespace Chapter13.BobsMoviesMVC.Models
{
    public partial class Film
    {
        public bool IsValid()
        {
            if (this.GetErrors().Count == 0)
            {
                return true;
            }
            else
            {
                return false;
            }
        }

        public List<Error> GetErrors()
        {
            List<Error> Errors = new List<Error>();

            if (String.IsNullOrEmpty(this.Title)) {
                Errors.Add(
                new Error { Description = "Title cannot be blank", Property = "Title" });
            }
            return Errors;
        }
    }
}
13.7.4. Creating a Controller
You have now completed the model that you will utilize shortly, so let's create a simple view.
You first need to create a controller class for the application to handle incoming users' requests.
Make sure that the option to create action methods for create, update, and delete scenarios is unchecked (you will create them in this example, but this is a useful option to quickly put an application together). Click Add.
Replace the method Index() with the following code:
public ActionResult Index()
{
    ViewData["Message"] = "Hello and welcome to MVC!";
    return View();
}
13.7.5. Adding a View
Let's add a view now:
In the Views folder, add a new folder called Film.
Right-click the ~/Views/Film directory you just created, and select Add
 View.
View.Name the view Index. Make sure that the option to select a master page is selected. This will create the view at ~/Views/Film/Index.aspx.
You will now modify this page to make navigating around the example easier. Open the view file ~/Views/Home/Index.aspx.
Replace the Content tag with the following code:
<asp:Content ID="indexContent" ContentPlaceHolderID="MainContent" runat="server">
  <%= TempData["Message"] %>

   <a href="Film">Example 1 - Hello MVC</a> <br />
   <a href="Film/All">Example 2 - All Films</a> <br />
   <a href="Film/Detail/1">Example 3 - Film Detail</a> <br />
   <a href="Film/Edit/1">Example 4 -  Edit Strongly Typed</a> <br />
   <a href="Film/EditJSON/1">Example 5 - Edit using JSON</a> <br />

</asp:Content>
NOTE
You will learn other ways to create HTML shortly.
13.7.6. Running the Application
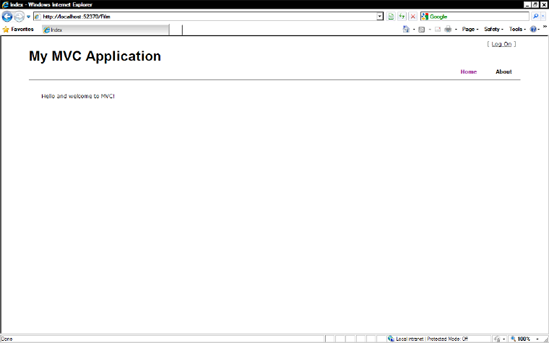
Press F5 to run the application, and accept the option to modify Web.config to allow debugging. The home page will open with all the links on it. Click the link labeled Example 1—Hello MVC. You should be taken to a page with the message "Hello and welcome to MVC!" (see Figure 13-3).
Figure 13.3. Hello page
Exciting stuff (OK, not really). Let's recap what you did here:
You defined a Film controller that would handle requests to URLs containing Film.
Inside the controller you created an action called Index to be called when the user enters a URL such as ~/Film/ or ~/Film/Index.
Inside the Index action, you set the ViewData Message property to "Hello MVC!".
When the user requested a URL containing Film, the request was routed to the Film controller.
The Film controller then passed this request to method Index() in FilmController.cs.
The Index() method set the ViewData Message property to "Hello and welcome to MVC!".
This view was then displayed to the user.
Notice that you did not have to link the Film controller and ~/Views/Film/Index.aspx page. ASP.NET MVC inferred this relationship because you followed a naming convention. By following this convention, you avoid having to write additional code.
13.7.7. A Closer Look at Routing
Let's look at this process in more detail. Figure 13-4 shows how a request in ASP.NET MVC is processed.
Figure 13.4. Simplified MVC routing process
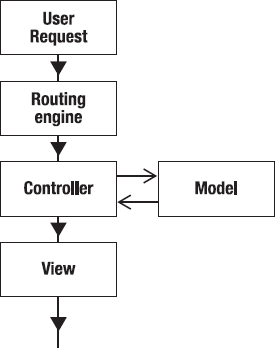
A typical MVC URL might be something like www.myshop.com/Product/Detail/1. This URL would be handled as follows:
The request is received and sent to the ASP.NET MVC routing engine.
The routing engine looks at the URL and compares it with its mapping rules (you will look at these shortly, but for now know that they are defined in Global.asax).
The default ASP.NET MVC rules say the first part of the URL indicates which controller class will deal with this request (in this case, Product).
The Detail action receives the (optional) parameter 1.
This parameter would then be used to retrieve a product from the application's model.
The model would then pass the individual product to the controller class, which would then return it to the view.
The view would then be rendered to the user.
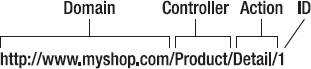
Figure 13-5 shows how a URL is divided up and processed with MVC's default rule set:
Figure 13.5. How MVC separates URLs
13.7.8. Returning Views
In the first example, you returned a view that matched the action name (Index). Views don't necessarily have to match the URL, although it is not a bad idea because it makes your intention clearer and reduces how much code you have to write.
If you wanted to return the Index view you just created when the user navigates to an arbitrary address such as ~/Film/IWillAlsoReturnIndex, you can do this with the following code:
public ActionResult IWillAlsoReturnIndex()
{
    ViewData["Message"] = "I am using Index view";
    return View("Index");
}
13.7.9. ViewData and TempData
So, what is this ViewData thing you just used? You can think of ViewData as a place to store objects that you will use in your view. For example, you might store a Film class in ViewData and then bind to its properties. The syntax used to access items from ViewData is similar to working with ViewState.
Many developers don't like using ViewData because it is not strongly typed and involves some tedious casting operations when working with objects. My recommendation is to avoid using it as much as possible. You will shortly look at a better way of binding data to a page.
Related to ViewData is TempData. TempData is similar except data added to it will be saved for only one post. TempData can be useful for storing and displaying items such as error messages that you don't want to maintain between posts. TempData is another controversial area that some developers dislike because they think it is not in keeping with MVC's ideals.