14.7. Creating a New Silverlight Project
Get started creating a new Silverlight project:
Open Visual Studio.
Select File
 New Project.
Select Silverlight Application.
Call your project Chapter14.HelloSilverlight.
Make sure the "Host the Silverlight application in a new Web site" option is selected (this will be essential later).
Click OK.
Visual Studio will now create a Silverlight solution for you to use.
14.7.1. Project Structure
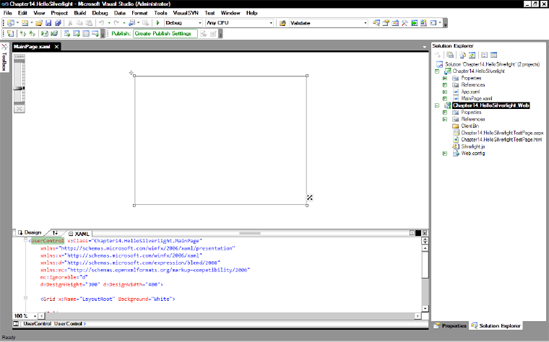
Visual Studio has created two projects (see Figure 14-4):
Chapter14.HelloSilverlight
Chapter14.HelloSilverlight.Web
Why two projects?
Chapter14.HelloSilverlight.Web acts as a host or test harness for the application.
Chapter14.HelloSilverlight contains the Silverlight code.
In the future, you might not want to create a separate hosting project. If so, don't check the "Add a new ASP.NET web project" option. If you do this, then Visual Studio will dynamically generate a page to display your Silverlight application when run (see Figure 14-4).
Figure 14.4. Silverlight default project setup
14.7.2. Hi Yo, Silver!
Let's create a Hello World (or Hi yo Silver) application:
Open the file ~MainPage.xaml.
By default, MainPage.xaml will contain a Grid tag like the following:
<Grid x:Name="LayoutRoot" Background="White"> </Grid>
Silverlight and WPF allow you to nest tags inside one another. Enter the following between the Grid tags:
<TextBlock>Hi yo Silver</TextBlock>
You should now have something like the following:
<UserControl x:Class="Chapter14.HelloSilverlight.MainPage"
    xmlns="http://schemas.microsoft.com/winfx/2006/xaml/presentation"
    xmlns:x="http://schemas.microsoft.com/winfx/2006/xaml"
    xmlns:d="http://schemas.microsoft.com/expression/blend/2008"
    xmlns:mc="http://schemas.openxmlformats.org/markup-compatibility/2006"
    mc:Ignorable="d"
    d:DesignHeight="300" d:DesignWidth="400">

    <Grid x:Name="LayoutRoot" Background="White">
        <TextBlock>Hi yo Silver</TextBlock>
    </Grid>
</UserControl>
Press F5 to run your application. You should see "Hi yo Silver" displayed on a page.
14.7.2.1. Understanding the Basics
Let's run through the lines of code to understand what they do. The following line tells the compiler which class to inherit from. (It is similar to ASP.NET's inherits property in an .aspx or .ascx file.)
x:Class="Chapter14.HelloSilverlight.MainPage"
The lines beginning with xmlns import a number of WPF- and Silverlight-related namespaces (such as a using or imports statement).
The following line creates a TextBlock on the page and sets the text to Hi yo Silver:
<TextBlock>Hi yo Silver</TextBlock>
NOTE
Hi yo, Silver!" was a line said by the Lone Ranger as he rode away on his horse. It was on a TV/radio series that I am too young to remember, but it was the only silver-related reference I could think of.
Note the line xmlns:x. The x is a prefix you can use to refer to this namespace. You then use this prefix in the line x:name, which is similar in function to ASP.NET's ID property.
14.7.2.2. Adding Content
Content can be added either declaratively or programmatically. If you wanted to create the previous example programmatically, you could do so in MainPage.xaml.cs in the constructor as follows:
TextBlock TextBlock = new TextBlock();
TextBlock.Text = "Hi yo Silver";
LayoutRoot.Children.Add(TextBlock);
Note that the TextBlock control is added as a child element to the LayoutRoot control. Elements in a XAML page are maintained in a hierarchy like HTML's document object model (DOM). The Children property is similar to ASP.NET's Controls property.
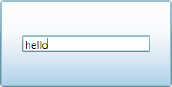
This hierarchy allows you to do some strange things such as nesting text boxes inside buttons that wouldn't be possible with Windows forms. I can't wait to see some of the appalling uses this feature will no doubt be used for. Let's create an example to demonstrate this now (Figure 14-5):
<Button Width="200" Height="100">
  <TextBox Width="150" Height="20"></TextBox>
</Button>
Figure 14.5. Text box inside a button