
1.2. Understanding SharePoint Designer Basics
In this section, I discuss some basic concepts and terminology about Web site designing from the SharePoint Designer perspective, helping you feel more comfortable as you read the rest of this book. Most of the concepts surrounding SharePoint Designer are based on FrontPage technology, so if you're already familiar with FrontPage 2003, this might just emphasize your knowledge about SharePoint Designer.
1.2.1. Meeting the requirements
Although the basic SharePoint Designer setup is fairly simple and doesn't require much user interaction, you might want to have these prerequisites set up on your computer before you install SharePoint Designer so that all its features are readily available to you:
.NET Framework 2.0
.NET Framework 3.0
You can download these from the Microsoft Web site at www.microsoft.com/downloads.
Having these tools downloaded to your computer prior to installing SharePoint Designer ensures that you can properly use the elaborate ASP.NET 2.0 features of SharePoint Designer. But you can also download them after installing SharePoint Designer.
Prior to installing SharePoint Designer, you also need to ensure that your machine meets these basic system requirements:
Processor: 700 megahertz (MHz) processor or higher
Memory: 512 megabyte (MB) RAM or higher
Hard drive: 1.5 gigabyte (GB); a portion of this disk space is freed after installation if you remove the original download package from the hard drive.
Drive: CD-ROM or DVD drive
Display: 1024 × 768 or higher resolution monitor
Operating system: Microsoft Windows XP with Service Pack (SP) 2, Windows Server 2003 with SP1, or later operating system
If you work with SharePoint Designer on SharePoint sites, then you need to have a Web server set up for WSS or MOSS.
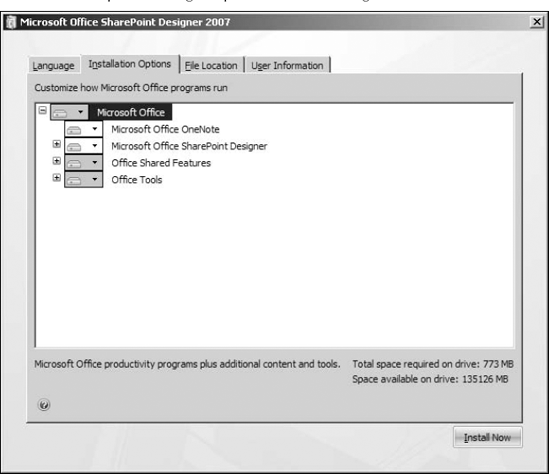
The setup process for SharePoint Designer is fairly simple and is similar to the Office 2007 setup process. The Setup Wizard allows you to choose to either set up the basic installation by using the Install Now button or customize the setup using the Customize button. The Customize button, as shown in Figure 1.1, allows you to change the installation directory for SharePoint Designer and pick features that you want to install during setup.
Figure 1.1. Customization options during setup for SharePoint Designer
After you install SharePoint Designer on your computer, choose Start ![]() Control Panel
Control Panel ![]() Add or Remove Programs to change (add or remove features), repair, or remove SharePoint Designer. On Windows Vista machines, this is accessible by choosing Start
Add or Remove Programs to change (add or remove features), repair, or remove SharePoint Designer. On Windows Vista machines, this is accessible by choosing Start ![]() Control Panel
Control Panel ![]() Programs and Features. The first time you open SharePoint Designer, you're asked whether you want to make SharePoint Designer your default program for Web site development. If you choose to use SharePoint Designer as the default program, it's set up so that Web content (HTML or ASP.NET pages, style sheets, etc.) on your computer opens with SharePoint Designer.
Programs and Features. The first time you open SharePoint Designer, you're asked whether you want to make SharePoint Designer your default program for Web site development. If you choose to use SharePoint Designer as the default program, it's set up so that Web content (HTML or ASP.NET pages, style sheets, etc.) on your computer opens with SharePoint Designer.
|

The SharePoint Designer setup can also be configured using Office policy templates, which allow administrators to control the features available within SharePoint Designer to their users.
NOTE
The Microsoft support article at the following Web site provides information about how administrators can use Microsoft Office templates with Microsoft Office 2007 programs (including SharePoint Designer): http://support.microsoft.com/kb/924617.
After your SharePoint Designer setup is complete, you might also want to install the SharePoint Designer Service Pack (SP) 1 from the Microsoft Web site at www.microsoft.com/downloads.
1.2.2. Understanding the structure of Web pages and Web sites
The structure of Web pages in general is pretty flexible and spans to the imagination of a Web site designer. As a designer, you have the power to decide how you want to lay out your Web pages. SharePoint Designer provides you with templates that you can use for starting up.
From the SharePoint Designer perspective, it's important to understand that a Web page essentially has a Design view and a Code view. The Code view shows the code (HTML, JavaScript, ASP.NET code, etc.) of the Web page and allows direct modification by using features such as IntelliSense and auto code completion. When you click the Design view tab of a Web page, SharePoint Designer renders the code associated with the Web page into a WYSIWYG format that assists in designing and previewing the page layout. Some files, such as style sheets, don't need a Design view, so only a Code view is displayed for them.
SharePoint Designer's complex rendering logic also renders ASP.NET 2.0 controls, the master page application, and the style sheet application on Web pages. While rendering Web pages for the Design view, SharePoint Designer also stores the properties and attributes of the tags and controls present in the code of the Web page. These properties are then presented in the various task panes for modification.
I now take you through the steps for creating a simple Web site and then adding some content to that Web site.
One important thing to understand while using SharePoint Designer to create Web pages is that Web pages by nature reside inside Web sites. Although you can save your Web pages wherever you want on your computer, it's always best that you create a folder for your Web site and store all Web pages and other content inside that folder. Such a folder is called the root folder of your Web site. Creating a root folder assists you in better management of Web pages and other content that you create during the course of building a Web site:
Create a root folder for your Web site at the location of your choice on your computer. This ensures that you remember the location where your Web pages and content are stored. Ensure that your root folder is empty.
Click Browse, which is next to the Specify the location of the Web site dropdown menu. Using the New Web Site Location dialog box, specify the location of the root folder that you created in step 1.
Click OK. SharePoint Designer opens your Web site at the root folder and automatically places a default.htm file (because you selected the One Page Web Site template) inside the root folder. The folder is now listed in the Folder List task pane (which can be toggled on or off by pressing Alt+F1), which is displayed in the left corner of the SharePoint Designer window by default.
After following these steps, the icon for your root folder inside Windows Explorer changes to a folder icon with a globe on it, indicating that it's a Web site (a disk-based Web site). SharePoint Designer Web sites are basically one of two types:
Disk-based: The content of this Web site resides inside a folder on your local computer. You work on the disk-based Web site locally and then publish the content you create locally to a Web server–based location that might reside either on your local computer (if your computer is a Web server itself) or a remote Web server computer (a site-hosting service provider, for example). The folder icon with a globe on it (an fpdbw.ico file stored in the _vti_pvt folder) indicates this type of Web site.
Server-based: The content of this Web site is located on a remote Web server and is accessible to the SharePoint Designer client for modification by using a remote-authoring mechanism, such as FPSE, SharePoint, FTP, or WebDAV. SharePoint Designer now allows for remote authoring (also called live editing) of server-based FTP and WebDAV sites. SharePoint sites also fall into this category of Web sites.
When you open the root folder of your Web site, SharePoint Designer has created a number of other files and folders inside the root folder.
NOTE
Many of these files and folders are hidden by default, so you have to enable the viewing of hidden folders in Windows Explorer by choosing Tools ![]() Folder Options
Folder Options ![]() View. Click the Show hidden files and folders radio button in the Advanced Settings list.
View. Click the Show hidden files and folders radio button in the Advanced Settings list.
The two folders that result from the previous steps are the _vti_cnf and the _vti_pvt folders. The reason for having these folders is that they provide the underlying infrastructure files for many features that SharePoint Designer exposes. For example, in the _vti_pvt folder is a file called structure.cnf. This file stores the navigation structure of the Web site, which can be created by using the Navigation pane in SharePoint Designer. So, essentially, if someone deletes this file or folder using Windows Explorer, the navigation structure of your Web site is lost, and any Web components based on the navigation structure are useless.
NOTE
The folders that have the prefix _vti_ aren't displayed in SharePoint Designer. So, if you want to hide the contents of a folder from being edited using the SharePoint Designer interface, you can do so by adding the _vti_ prefix to it.
The other important thing to understand about these folders is that they're used for the FPSE-based features of SharePoint Designer. Also, a number of other folders — such as _derived, _overlay, and _themes — are created in the root folder when you use FPSE features. If you delete these folders, any FPSE-based components that depend on these folders and the files inside them stop working.