23.2. Publishing Web Sites
SharePoint Designer offers a robust and extensive Web content publishing mechanism that allows you to move content to and from a variety of Web server types. Whether your remote Web site location is an FTP, WebDAV, or FPSE site or just a local folder on the file system, publishing interfaces using SharePoint Designer look fairly similar. You can choose to either publish content from a remote to local Web site, a local to remote Web site, or just synchronize contents between two Web site locations.
To publish content, simply choose File ![]() Publish Site or use the Remote Web Site pane in SharePoint Designer. After you specify the location of the remote Web site by using the Remote Web Site Properties dialog box, you're taken to the Publishing pane. It's here that you can choose to either move files to and from one location to another or publish the complete Web site. You can also choose the direction of the publishing in this pane.
Publish Site or use the Remote Web Site pane in SharePoint Designer. After you specify the location of the remote Web site by using the Remote Web Site Properties dialog box, you're taken to the Publishing pane. It's here that you can choose to either move files to and from one location to another or publish the complete Web site. You can also choose the direction of the publishing in this pane.
23.2.1. Using the Publishing pane
To see the active Publishing pane of SharePoint Designer, you first need to specify the remote location for the publishing operation. If you've never used the publishing interface in SharePoint Designer before, when you choose File ![]() Publish Site, you're taken to the Remote Web Site Properties dialog box. Otherwise, SharePoint Designer tries to open the last opened remote Web site location in the Publishing pane. To use the Publishing pane, follow these steps:
Publish Site, you're taken to the Remote Web Site Properties dialog box. Otherwise, SharePoint Designer tries to open the last opened remote Web site location in the Publishing pane. To use the Publishing pane, follow these steps:
In SharePoint Designer, open the Web site from where you want to publish content.
Choose your remote Web server type, type the location of the remote Web site in this box, and then click OK. SharePoint Designer tries to connect to the remote site and, if successful, opens the Publishing pane. If a Web site doesn't exist at the location you typed, SharePoint Designer tries to create a Web site at this location.
The Publishing pane, as shown in Figure 23.5, has three main sections: the left section shows the local Web site (the Web site that's currently open in SharePoint Designer); the right section shows the remote Web site (which you specified in the Remote Web Site Properties dialog box); and the bottom section shows the status of the publishing operation and the direction of the publishing.
Figure 23.5. The Publishing pane in SharePoint Designer
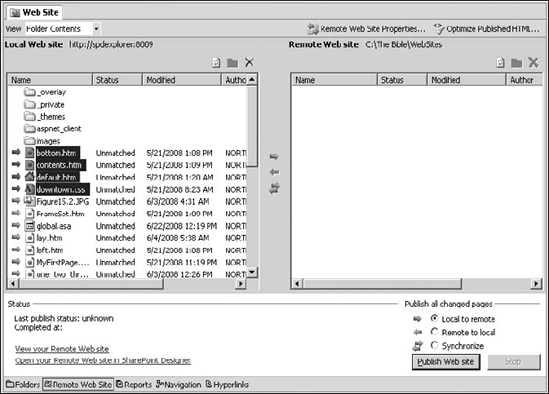
There are multiple ways you can use the left and right sections of the Publishing pane for moving content:
You can choose files and folders in either section and then click the blue arrows between the sections to move the files.
You can choose the files and folders in either section and then right-click on Publish Selected Files to publish them.
You can use the bottom section to specify the direction of the publishing operation: The Local to remote option publishes from the left section to the right section; the Remote to local option publishes from the right section to the left section; and the Synchronize option compares metadata information about files to determine the most updated versions and synchronizes the content on the local and remote Web sites.
In the top-left corner of the Publishing pane is the View dropdown, which allows you to choose from a set of views indicating the files that need publishing. Also, just above the left and right sections, you should see the Refresh and Delete buttons, which can be used to refresh the folder lists and delete files and folders, respectively.
NOTE
If you don't want to publish a file or a selection of files, you can use the Don't Publish menu option (accessible by right-clicking a file and then choosing Don't Publish from the popup menu) to disable publishing for selected files.
23.2.2. Setting remote Web site properties
When publishing content to existing Web sites, SharePoint Designer compares the metadata information about the files to determine whether the file should be replaced on the destination Web site. The Publishing tab, as shown in Figure 23.6, in the Remote Web Site Properties dialog box allows you to specify a number of settings that SharePoint Designer should consider while determining the files that need to be republished.
The Publishing tab has the following sections that help you configure the publishing mechanism in SharePoint Designer:
Publish: Allows you to choose whether SharePoint Designer should publish the complete Web site or changed content only. The Include subsites check box allows you to specify whether you want to include subsites in the publishing.
Changes: Allows you to specify how SharePoint Designer determines whether a page has changed. If you select Determine changes by comparing the source and destination sites, SharePoint compares the metadata information of the file on the source and destination sites to find out if the file has changed. If you select Use source file timestamps to determine changes since last publish, SharePoint Designer compares the file's last publish timestamp and the modified timestamp to determine whether it should be published again.
Logging: SharePoint Designer can be set to generate a publishing log file that shows the actions taken during the publishing process. You can use the log file as a report of the publishing process. Once the publishing completes, the bottom section in the Publishing pane shows the link to view the publishing log file.
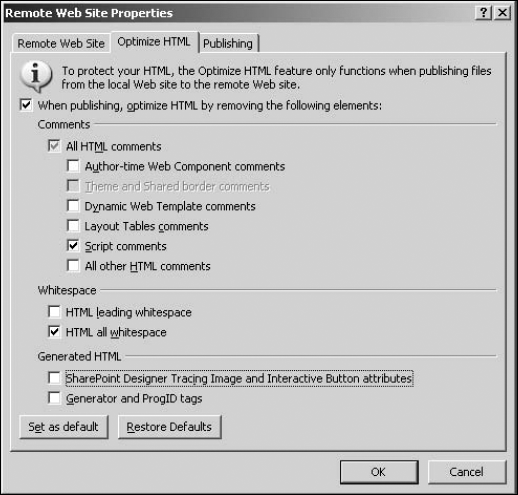
The Remote Web Site Properties dialog box also has an Optimize HTML tab, as shown in Figure 23.7, which allows you to specify if SharePoint Designer should remove certain elements and HTML comments that are inserted on the Web pages when using SharePoint Designer components.
Figure 23.6. The Publishing tab in the Remote Web Site Properties dialog box
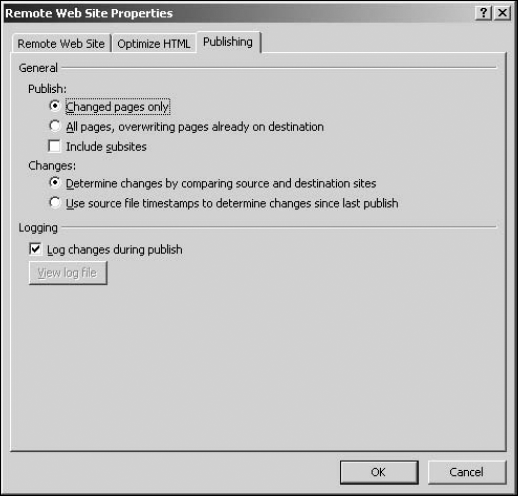
Figure 23.7. The Optimize HTML tab in the Remote Web Site Properties dialog box