
15.4. Exploring SharePoint Data Sources
The focus now shifts to understanding the functions of SharePoint Designer when working with SharePoint sites. As discussed earlier in this chapter, the SharePoint Designer interface is primarily designed to provide easy access to all the data sources exposed by SharePoint. Also, as discussed previously, there are a large number of data sources that you can use when working with SharePoint sites.
NOTE
Unless specified, a SharePoint site in this section refers to both MOSS and WSS v3 sites. There are some SharePoint Designer features that are MOSS-specific and are noted when encountered.
15.4.1. Configuring data retrieval services
SharePoint implements a mechanism that allows data source controls to interact with a large number of data sources by using Simple Object Access Protocol (SOAP) and XML Web services. These services are called data retrieval services and are installed with SharePoint. You can control some functions of the data retrieval services by using the Operation section of the SharePoint Central Administration Web site. To access these settings, open the SharePoint Central Administration Web site by choosing Start ![]() Administrative Tools
Administrative Tools ![]() SharePoint 3.0 Central Administration on a SharePoint Web server and then choose Operations
SharePoint 3.0 Central Administration on a SharePoint Web server and then choose Operations ![]() Data Retrieval Service. This takes you to a Web page containing the settings for the data retrieval services, as shown in Figure 15.8.
Data Retrieval Service. This takes you to a Web page containing the settings for the data retrieval services, as shown in Figure 15.8.
While the default settings work for most SharePoint Designer operations, you might want to consider changing the following settings depending on your Web application:
Update Support: To enable support for update queries when working with data sources in SharePoint Designer, click the Enable update query support check box.
Data Source Time-out: This setting controls the duration after which the data retrieval service times out if it doesn't hear back from the data source it's trying to connect to. If you're trying to connect to a data source — for example, a Web service that takes a long time to respond — you might want to increase this setting. The time-out value is specified in seconds.
Figure 15.8. The Data Retrieval Settings page in the SharePoint Central Administration
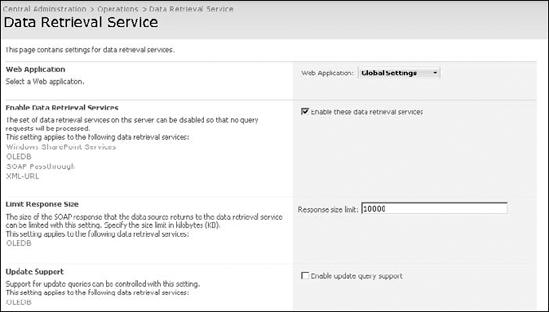
These properties can also be controlled using the stsadm command-line tool for SharePoint.
15.4.2. Creating SharePoint connection files
Unlike non-SharePoint sites, where the connection strings are stored in a web.config file inside the root content location of the Web site, connections to data sources in SharePoint sites are stored in a special document library that's hidden in the SharePoint user interface. This document library, called FPDataSources, is primarily used to store connections that have been created in SharePoint Designer. Unlike other document libraries you create in SharePoint, this document library doesn't have any views because, essentially, you don't need them.
The system of connections is also very different when compared to non-SharePoint sites. Rather than having connection strings, the FPDataSources library hosts XML files that each represents a single connection created with the Data Source Library task pane. To understand this better, I take you through the steps for creating a connection by using the Data Source Library task pane.
15.4.2.1. Connecting to XML Web services
For this exercise, you establish a connection to an XML Web service that SharePoint installs called alerts.asmx (SharePoint uses this Web service for its alerts functionality). Also, it's assumed that you're working with a SharePoint site that uses the Team Site template. Follow these steps:
Open a SharePoint site in SharePoint Designer.
Choose Data View
 Manage Data Sources to open the Data Source Library task pane.
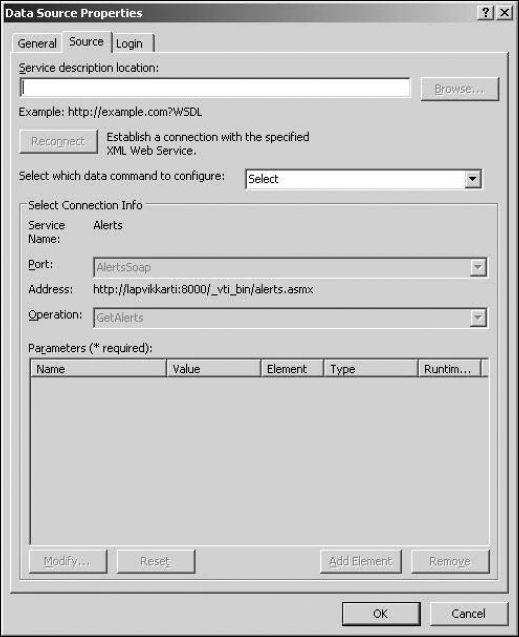
Under the XML Web Services section, click Connect to a web service. The Data Source Properties dialog box, as shown in Figure 15.9, opens. You can use this dialog box to specify settings for the connection to the alerts.asmx XML Web service.
In the Data Source Properties dialog box, click the General tab.
In the Name text field, type a name for this connection, and in the Description text field, type a description for this connection.
Click the Login tab and then select the authentication mechanism that applies to your SharePoint site. If you want to connect anonymously, click the Don't attempt to authenticate radio button.
Click the Source tab. This is where you specify the settings for the XML Web service to which you want to connect.
In the Service description location text field, type the location of the alerts.asmx Web service. This is usually http://servername/_vti_bin/alerts.asmx.
Click Connect Now to let SharePoint Designer establish a connection to the Web service. If your SharePoint site is configured correctly and you have access to the alerts.asmx Web service, SharePoint Designer automatically populates the Select Connection Info section.
Leave the defaults for the Port and Operations text fields and then click OK. The GetAlerts operation (also called Web method) doesn't require any parameters. For Web methods that have required or optional parameters, the Parameters (* required) list shows all the available parameters and allows you to set values for these parameters. The first thing you see is that the newly created connection is listed under the XML Web services section inside the Data Source Library. If you click the connection, a dropdown menu appears that now has many more options, which are discussed later in this chapter.
Click Show Data to see the preview of the data exposed by the connection in the Data Source Details task pane.
You can now look at the actual connection file that you created in this process. Using the Folder List task pane, expand the _catalogs folder. You see the FPDataSources document library, among others. Inside this FPDataSources library is an XML file corresponding to the connection that you just created. Double-click the file to open it in the Code view. As shown in Figure 15.10, this XML file is a connection file in the Universal Data Connection (UDC) format.
Figure 15.9. The Data Source Properties dialog box for connecting to XML Web services
If you look closely, you see that all the settings for the connection that you chose in the Data Source Properties dialog box in the previous steps — for example, name, description, URL of the XML Web service, etc. — are saved in this XML file by using a format that can be understood by the SharePoint Data Retrieval Web Services.
Figure 15.10. A sample Universal Data Connection (UDC) connection file
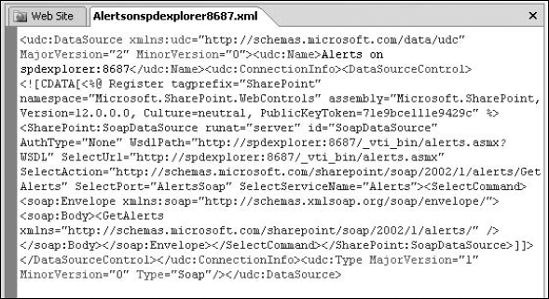
The interesting one to look at is the following excerpt from the code of the UDC connection file, which includes the name of the Web service, port, and Web method you used to define your connection:
<SharePoint:SoapDataSource runat="server" id="SoapDataSource"
   AuthType="None" WsdlPath="http://servername/_vti_bin/alerts.
   asmx?WSDL" SelectUrl="http://servername/_vti_bin/alerts.asmx"
   SelectAction="http://schemas.microsoft.com/sharepoint/
   soap/2002/1/alerts/GetAlerts" SelectPort="AlertsSoap" SelectServi
   ceName="Alerts"><SelectCommand><soap:Envelope xmlns:soap="http://
   schemas.xmlsoap.org/soap/envelope/"><soap:Body><GetAlerts
   xmlns="http://schemas.microsoft.com/sharepoint/soap/2002/1/
   alerts/" /></soap:Body></soap:Envelope></SelectCommand></
   SharePoint:SoapDataSource>
Understanding the nature of UDC files is important because if the SharePoint Designer user interface misbehaves for a particular data source, you can directly modify the XML UDC file to achieve the desired results.
|
If you right-click on the FPDataSources library and then choose Properties from the popup menu, you can see the properties for this library in the Document Library Properties dialog box. Click the Settings tab to see that the Hide from browsers check box is selected. If you deselect this check box, this document library appears in the list of document libraries in the SharePoint user interface. However, because this document library doesn't have any views, you're taken to the settings page for the document library.
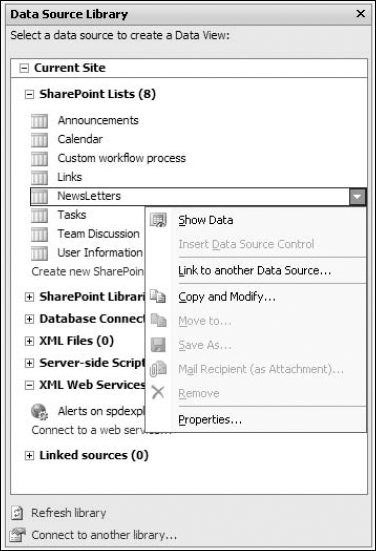
Inside the Data Source Library, clicking the data connection displays an actions dropdown menu that allows you to work with the data connection you just created. As shown in Figure 15.11, the dropdown menu has the following menu options:
Show Data: Like non-SharePoint sites, for data connections in SharePoint sites, this menu option takes you to the Data Source Details task pane, where you can see a preview of the data from the data connection and then create views and forms depending on the data connection you're working with.
Insert Data Source Control: If you have an active Web page open in SharePoint Designer, this menu option allows you to add a data source control to the Web page. The data source control that you choose depends on the type of data connection. A SoapDataSource data source control is used for an XML Web service data connection, while an SPDataSource data source control is used for a SharePoint list or document library. I discuss these controls in later chapters.
Link to another Data Source: This menu option provides a way to link this data source to another by using Linked Data Sources, as discussed later in this chapter.
Copy and Modify: This menu option allows you to copy the existing data connection and modify properties for it. It opens the Data Source Properties dialog box corresponding to the data connection and allows setting properties for a copy of it.
Move to: If you're connected to a Data Source Library on another SharePoint site by using the Connect to another library link at the bottom of the Data Source Library task pane, you can use this menu option to move the data connection to the other Data Source Library.
Save As: This option allows you to save the XML data connection file associated with the connection to a location of your choice.
Mail Recipient (as Attachment): This allows you to send the XML data connection file to someone — for example, a fellow author — via e-mail.
Remove: This allows you to delete the data connection.
Properties: This displays the Data Source Properties dialog box for modifying the properties of the existing data connection.
Figure 15.11. The Data Source Library dropdown actions menu
15.4.2.2. Connecting to databases
Now that you understand the underlying concepts behind data connections for SharePoint-based data sources, you can work with some of them. Start by creating a connection for the most commonly used data source, Databases. As with any other data source, you can create a connection to a database by using the Data Source Library task pane. Follow these steps:
Click the Connect to a database link in the Data Source Library. This displays a Data Source Properties dialog box that's now redesigned for a Database connection.
Click the General tab to set the name and description of the data connection.
Click the Source tab and then click Configure Database Connection. The Configure Database Connection dialog box, as shown in Figure 15.12, opens.
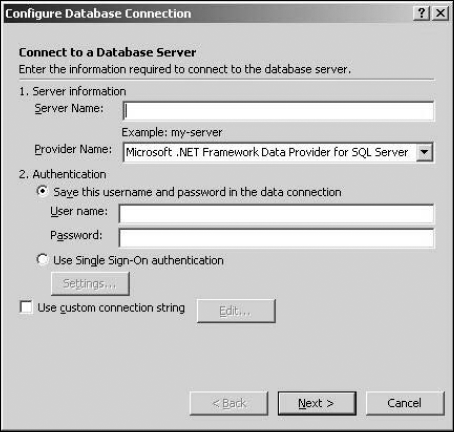
In the Server Name text field, type the name of the database server to which you want to connect. As mentioned earlier in this chapter, SharePoint only supports OLEDB connections.
Type the username and password to successfully authenticate to the database.
Click Next. The message "The selected authentication option saves the username and password as clear text in the data connection. Other authors of this web site can access this information." appears. As indicated previously, the username and password are stored as text in the UDC data connection file.
Click OK. SharePoint Designer tries to establish a connection with the database you specified. If this succeeds, you proceed to the next step; otherwise, an error message indicating the cause of the failure appears. If the connection to the database is established, the Configure Database Connection dialog box, as shown in Figure 15.13, opens, with the interface enabled for you to select the object (for example, table, view, etc.) to which you want to connect.
Figure 15.12. The Configure Database Connection dialog box
NOTE
You can use an HTTP network tracing tool, such as Fiddler, to determine the response received from the server when SharePoint Designer tries to establish a connection to the database. If there's a failure, Fiddler shows you an HTTP 500 error (red in color) with a body having a SOAP message indicating the error response from SharePoint.
Figure 15.13. The Configure Database Connection dialog box with the list of databases and objects
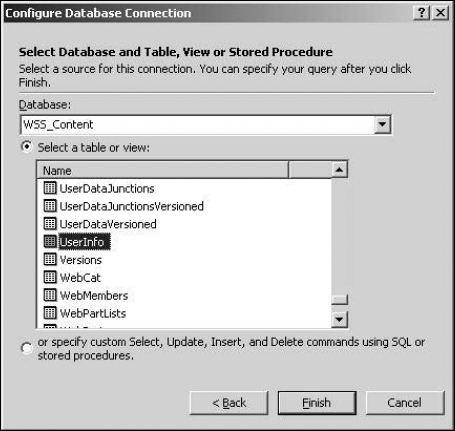
In the Database dropdown menu, choose the name of the database the connection is for. Selecting the database retrieves the list of tables and views in the Select a table or view list.
Using the Select a table or view list, select the table or view you want to use for this data connection.

You can use the "or specify custom Select, Update, Insert, and Delete command by using SQL or stored procedures." option to specify your own SQL statement or use stored procedures inside the database. This option takes you to the Edit Custom SQL Commands dialog box, which has the Edit Command button that can be used to add custom SQL statements, store procedures, and specify parameter sources (for example, from Query String, Cookies, Form, etc.) and their default values.
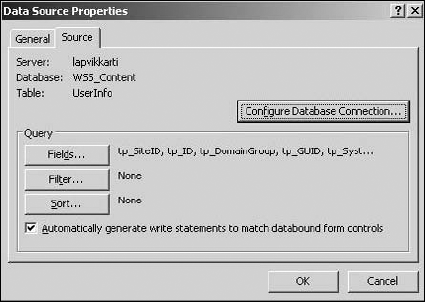
Click Finish. This takes you back to the Data Source Properties dialog box, as shown in Figure 15.14, where you see options for selecting fields, sorting, and filtering in the Query section. The Query section allows you to further extend the query for the data connection that you have been creating in this exercise.
NOTE
The Filter and Sort buttons in the Query Section provide filtering and sorting capabilities using the Filter Criteria and Sort dialog boxes right at the data connection level. I discuss the interface for these dialog boxes in more detail in Chapter 17.
If you want to remove any fields from the connection, select them in the Displayed Fields list and then click Remove. If you try to remove any primary key fields from the list, a message warns you that the field chosen for removal is a primary field. Although you can remove a primary key field, you might want to consider keeping it because it might be useful for establishing relationships between data sources. Also, you can click Move Up and Move Down to change the order in which the fields appear.
Click the database connection and then click Show Data to see the preview of the data exposed by the database connection in the Data Source Details task pane. If you open the XML data connection file in the FPDataSources dialog box, you see your UDC connection. The following excerpt of code is from the connection file:
<asp:SqlDataSource id="SqlDataSource1" runat="server" __
designer:commandsync="true" ProviderName="System.Data.
SqlClient" ConnectionString="Data Source=sqlDataBase;User
ID=username;Password=P@ssw0rd;Initial Catalog=WSS_Content;"
SelectCommand="SELECT [tp_SiteID], [tp_ID], [tp_DomainGroup],
[tp_GUID], [tp_SystemID], [tp_Deleted], [tp_
ExternalTokenLastUpdated], [tp_Locale], [tp_CalendarType], [tp_
AdjustHijriDays], [tp_TimeZone], [tp_Time24], [tp_
AltCalendarType], [tp_CalendarViewOptions], [tp_WorkDays], [tp_
WorkDayStartHour], [tp_WorkDayEndHour] FROM [UserInfo] " />
Figure 15.14. The Data Source Properties dialog box of a finished database connection
The ASP.NET SqlDataSource with the ProviderName, ConnectionString, and SelectCommand attributes are set here for the database connection. If you set any filtering or sorting by using the Query Section in the Data Source Properties dialog box, you see it take effect in the SelectCommand (as a WHERE clause or an ORDER BY clause, respectively).
One important thing to notice in the Configure Database Connection dialog box is the Use Single Sign-On authentication option. SSO (Single Sign-On) is a SharePoint mechanism that provides for Web sites users to authenticate only once and then receive access to all resources associated with the Web site without being prompted again.
Using SharePoint administration tools, your SharePoint administrator can create an SSO application with a username and password. You use this application name, username, and password in SharePoint Designer to authenticate to SharePoint and create database connections. The Settings button in the Configure Database Connection dialog box allows you to specify these SSO settings in SharePoint Designer.
NOTE
SSO is only available as an option in SharePoint Designer if you have the Enterprise features enabled for SharePoint, and it requires some SharePoint server configuration.
Given that you can't use Windows Authentication to create database connections in SharePoint sites by using SharePoint Designer, SSO becomes the most secure authentication mechanism that SharePoint offers to connect to databases.
Other data sources that need mention here are the server-side scripts, Business Data Catalogs, and linked data sources.
15.4.2.3. Connecting to server-side scripts
You can use this data connection type to connect to either a server-side script, such as an ASPX page exposing information using an HTTP POST, or a Really Simple Syndication (RSS) feed.
The Data Source Library offers the use of the SharePoint XmlUrlDataSource through the Connect to a script or RSS Feed option. To understand this better, you can use this option to connect to an RSS feed of your SharePoint site's Announcements list, assuming that you're using a Team Site template for this exercise. Follow these steps:
Determine the URL for the RSS feed of your Announcements list.
Click the Actions menu and then click View RSS Feed to display the list feed URL in the browser.
Using the address bar, copy the URL for the RSS feed — for example, http://servername/sites/myteamsite/_layouts/listfeed.aspx?List=%7BED687BBE%2DAD68%2D40B4%2D83C4%2D51683BBBBE39%7D.
Click the General tab to specify the name and description of the data connection.
Copy the RSS Feed URL in the Enter the URL to the server-side script text field and then click OK.
From the FPDataSources library in the Folder List task pane, open the newly created XML data connection to the RSS feed. The following code appears for the data connection:
<SharePoint:XmlUrlDataSource runat="server" id="XmlUrlDataSource"
   AuthType="None" HttpMethod="GET" selectcommand="http://servername/
   sites/myteamsite/_layouts/listfeed.aspx"><SelectParameters><asp:P
   arameter Name="List" __designer:runtime="yes"
   DefaultValue="{ED687BBE-AD68-40B4-83C4-51683BBBBE39}" /></
   SelectParameters></SharePoint:XmlUrlDataSource>
As indicated earlier, the SharePoint XmlUrlDataSource data source is used here to set up the data connection. The selectcommand parameter specifies the RSS feed's URL, and the DefaultValue parameter specifies the Globally Unique Identifier (GUID) of the list that corresponds to the RSS feed.
The Data Source Properties dialog box provides you with the interface to specify any parameters that you might need to pass to a server script or RSS feed. The user interface is simple: Click Add to open the Parameter dialog box and then specify the name and default value for the parameter. Select the "The value of this parameter can be set via Web Part Connection" option if you need to set the value of the parameter by using a Web part connection.
15.4.2.4. Connecting to Business Data Catalogs
Business Data Catalog (BDC) is a great feature offered by MOSS 2007 that allows for a no-code technique to present data from a range of back-end databases as well as Line of Business (LOB) applications and services. It provides a mechanism to show data from such applications into SharePoint lists and Web parts.
BDCs are only available as an option for use in the Data Source Library task pane if a Shared Services Provider (SSP) is configured for the SharePoint server you're using. BDC functionality is exposed in SharePoint through SSPs. Because SSP is an Office Server feature, you can't use BDCs on a WSS-only SharePoint site.
Although your SharePoint administrator would be responsible for most of the BDC configuration and setup on the SharePoint server, you need to be familiar with the following terms for using SharePoint Designer against BDC data sources:
Application: A computer application that runs in an enterprise environment and provides key business purposes to the organization. An application is added to the BDC by using the SharePoint SSP interface and an application definition file that describes the connection strings, authentication mechanisms, and other information needed to connect to the application.
Entity: The list of objects provided by the application. Commonly used entities could be objects such as products, orders, etc.
To create a connection to a BDC, follow these steps:
Click Create a new view inside Business Data Catalogs in the Data Source Library task pane. The Data Source Properties dialog box for BDC data connections opens.
Click the General tab and then type the name and description for the data connection.
Click the Source tab. The Select an application dropdown menu shows the list of available applications. Choose the one you want to use for the view.
Based on the application you selected, the entities are displayed in the Select an entity dropdown menu. Select the entity you want to use for your view.
Click the Filter button in the Query section to specify any filter criteria for this view.
Click OK. Use the Show Data menu option to preview the data from the BDC.
15.4.2.5. Connecting to linked data sources
Linked data sources provide a mechanism to link two or more existing data sources to aggregate the data provided by them in a consolidated view of data. They can be very useful when you want to display data from multiple data sources in a single view.
You can link any of the data sources available to use in the Data Source Library. You can even link two linked data sources to combine their data into a single view. Follow these steps:
To link two data sources, either click one of them in the Data Source Library and then click Link to another Data Source or simply click Create a new Linked Source. The Data Source Properties dialog box opens. If you selected the first method, you see that one data source already exists in the Component source properties list.
Click the General tab to set the name and description of the data connection.
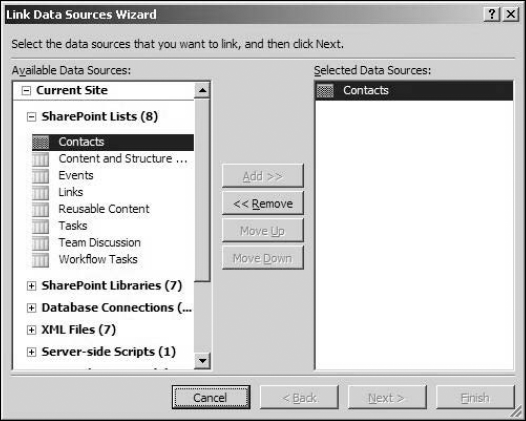
Click the Source tab and then click Configure Linked Source. The Link Data Sources Wizard, as shown in Figure 15.15, opens.
If you want to sort, group, or filter on the resulting dataset as one long list option, click the Merge the contents of the data sources radio button. This option simply merges the data from the chosen data sources into a single large list irrespective of any field or column matches.
To display the data in a parent-child subview appearance, click the Join the contents of the data sources by using the Data Source Details to insert data views and joined subviews radio button. This option allows for selecting fields or columns that contain matching data to join the data sources based on a relationship. The Link Data Sources Wizard shows you an interface for selecting columns containing matching data and choosing the displayed fields.
Click Finish and then click OK to complete the creation of the linked data source.
Figure 15.15. The Link Data Sources Wizard
NOTE
One of the primary reasons for creating linked data sources is to be able to create subviews and joined subviews. Linked or aggregate data sources can only be used to create views (read only) of data. SharePoint Designer currently doesn't support form (read/write) capabilities for linked data sources. I discuss creating these views in Chapter 17.
15.4.2.6. Connecting to other data source libraries
One really cool feature that the Data Source Library task pane offers for SharePoint sites is the ability to connect to and use data connections in data source libraries from other SharePoint sites. Follow these steps:
Type a Display name for this data source library and the location of the site (in the format http://servername/sitename) whose data source library you want to connect to.
Click OK twice to exit the Manage Library dialog box. The Data Source Library from the other site is listed in the Data Source Library task pane.
You can now perform all the Data Source Library operations, such as showing data, creating linked data sources, etc., on these available data connections in a single interface.
The expand/collapse signs (+/− signs next to the Display name of the data source library) become handy because the list of available data source libraries increases in the Data Source Library task pane.
|