
7.3. Using Advanced Controls
SharePoint Designer's Insert Web Component dialog box allows you to insert a number of advanced controls that are commonly used by Web site designers. These include java applets, plug-ins, ActiveX controls, etc. In this section, I take you through the process of inserting such controls on Web pages by using SharePoint Designer.
7.3.1. Inserting Java applets and ActiveX controls
Applets are small applications that perform specific operations when inserted on a Web page. To insert a Java applet on your Web page, follow these steps:
In the Design view, open the Web page on which you want to insert an applet.
Choose Insert
 Web Component to open the Insert Web Component dialog box and then click Advanced Controls.
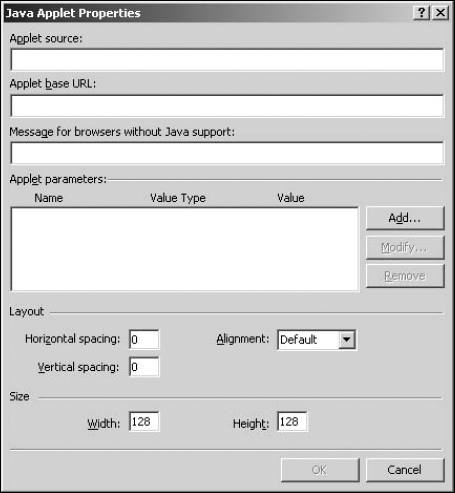
In the Choose a control list, choose Java Applet and then click OK. The Java Applet Properties dialog box opens, as shown in Figure 7.10, where you can specify the source and settings for the applet you want to use.
Specify the Applet source (usually a class file) and Applet base URL in the text fields provided.
If the applet that you're using requires parameters to be passed to it, you can specify them in the Applet Parameters section in this dialog box.
Figure 7.10. The Java Applet Properties dialog box
If you click the Code view tab after you insert the applet on the Web page, the Java Applet Properties dialog box merely becomes the interface to set attributes for the <applet> tag.
Similar to applets, ActiveX controls are predeveloped controls and applications that can be inserted on Web pages to provide specific functions. SharePoint Designer allows you to insert a number of Microsoft ActiveX controls usually available with the operating system. When you elect to insert an ActiveX control by using the Insert Web Component dialog box, you're provided with a list of ActiveX controls installed on the SharePoint Designer machine.
NOTE
Both Applets and ActiveX controls aren't allowed to run in IE directly. When a user browses to a page that has an ActiveX control on it, he or she is prompted to confirm if he or she wants to allow the ActiveX control to run.
ActiveX controls are inserted on Web pages by using the <object> tag. SharePoint Designer provides contextual Properties dialog boxes for ActiveX controls that allow you to modify the properties of the controls by using the user interface rather than having to set them in the Code view. After the control is inserted on a Web page, right-click on the control and then choose ActiveX Control Properties from the popup menu to modify the control properties.
7.3.2. Inserting Flash controls
Inserting Flash movies on a Web page by using SharePoint Designer can be a little tricky. However, if you understand the concept involved here, you might be able to subsequently insert Flash files in a quick manner. Follow these steps to insert a Flash movie on a Web page:
Import the Flash file you want to use on your Web site. You can do this by simply dragging and dropping the file from Windows Explorer to the SharePoint Designer Folder List task pane.
Using the Insert Web Component dialog box, choose Advanced Controls
 Plug-In and then click Finish. This inserts a plug-in on the Web page and opens the Plug-in Properties dialog box.
Type the name and location of the Flash file in the Data source dialog box. Specify a text message to be shown for those browsers that don't support plug-ins.
Save the Web page and then preview it in a browser.
SharePoint Designer inserts the Flash movie by using the <embed> tag on the Web page. You can also use the <object> tag to play Flash movies on Web pages by using the following code:
<OBJECT classid="clsid:D27CDB6E-AE6D-11cf-96B8-444553540000"
codebase="http://download.macromedia.com/pub/shockwave/cabs/flash/
   swflash.cab#version=6,0,0,0">
<PARAM NAME=movie VALUE="flash.swf">
<EMBED src="flash.swf" TYPE="application/x-shockwave-flash"
   PLUGINSPAGE="http://www.macromedia.com/go/getflashplayer"></
   EMBED>
</OBJECT>
In the highlighted code, the value of the classid attribute is the CLSID (class identifier) of the Flash player ActiveX control.
7.3.3. Using MSN Web components
SharePoint Designer allows you to insert MSN components for creating and linking to maps, show stock quotes, and use MSN Search. These components are available in the Insert Web Component dialog box under MSN Mapping Components and MSN Components.
To insert an MSN map on your Web page by using the MSN mapping component provided by SharePoint Designer, follow these steps:
In the list of Web components in the Insert Web Component dialog box, click MSN Mapping Components.
Choose Insert a map in the list of components and then click Finish. The Insert a map Properties dialog box opens.
Click Next to preview the map, click Next, and then click Finish to insert the map on the Web page at the location of the cursor.
|
