13.2. Implementing Master Pages
Master pages is an ASP.NET 2.0 feature for implementing template-based Web site design. Like a DWT, you design a master page in SharePoint Designer that holds the common elements for your Web pages, identifies the locations you want to keep unique, and inserts unique areas at those locations on the master pages. Then, you can either create new Web pages based on the master page or attach the master page to existing Web pages.
Although the process that you follow to create and attach master pages in SharePoint Designer is similar to DWTs, the internal implementation of master pages is very different from that of DWTs. The major difference is that while the content of a DWT is copied over to the attached Web page, a master page is displayed with the unique content of the attached Web page at runtime when a Web page is rendered for display in a browser.
However, the concept described in the beginning of this chapter still holds true. The unique areas in a master page are defined by using ASP.NET 2.0 controls called content placeholders. So, on a master page that you design by using SharePoint Designer, you place content placeholder controls at the locations where you want to bring unique content from the attached Web page. If the attached Web page has unique content that needs to be displayed at the location of the content placeholder controls present in the master page, you have to place ASP.NET content controls on the Web page and then associate them with the target content placeholder controls.
In summary, a master page has a number of ASP.NET content placeholder controls, and the attached Web page can have ASP.NET content controls associated with the content placeholder controls placed on a master page.
13.2.1. Managing content regions and placeholders
To understand the concept of content placeholders and content controls better, the following exercise takes you through the process of creating a master page by using SharePoint Designer and then creating a new page based on that master page:
Open your Web site in SharePoint Designer and then choose File
 New to open the New dialog box.
Choose Master Page in the General section of the Page tab in the New dialog box, and using the programming language dropdown menu, choose the language you want to use for the master page.
Click OK. This creates a master page (with the file extension .master) and then opens it in the Design view in SharePoint Designer.
Design the master page according to your requirements.
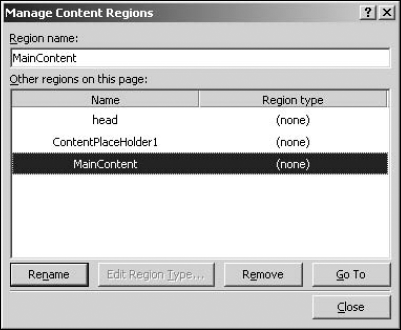
Place the cursor at the location where you want to insert a content placeholder, right-click on the master page, and then choose Manage Microsoft ASP.NET Content Regions from the popup menu. As in the case of DWTs, there are two content regions placed on the master page by default. The head content region allows you to modify the <head> section.
Type a name for the content region and then click Add. As shown in Figure 13.9, an ASP.NET content placeholder control is placed at the location of the cursor.
Click Close and then save the master page at the location of your choice inside the Web site.
Figure 13.9. Inserting content regions on a master page by using SharePoint Designer
You have just created a master page with a content region (an ASP.NET content placeholder control) on it. If you switch to the Code view of the master page, the following code appears for the content region you just inserted:
<asp:ContentPlaceHolder runat="Server" id="MainContent">
   <p>(MainContent)</p>
</asp:ContentPlaceHolder>
Notice the id attribute of the content placeholder control. This id is used to match the ASP.NET control on the Web page attached to the master page.
NOTE
Notice the dummy content <p>(MainContent)</p> placed in the content placeholder control. This content facilitates the display of the control in the Design view. If the content placeholder control doesn't have this dummy content, it might not be easily locatable in the Design view in the attached Web pages. This is particularly true for Web pages created by using SharePoint Designer's master pages. When creating Web pages based on SharePoint master pages, ensure that the master page has some dummy content in the PlaceHolderMain content placeholder control. This facilitates the display of the control in the attached page's Design view.
Now that you've created a master page, follow these steps to create a new Web page based on the master page:
Choose File
 New
New  Create from Master Page. The Select a Master Page dialog box, as shown in Figure 13.10, opens.
Figure 13.10. Creating a Web page based on a master page
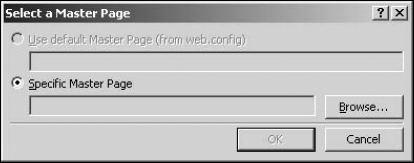
Click the Specific Master Page radio button and then click Browse to locate the master page you want to use to create the new Web page.
Click OK. A new Web page is created for you. If you go to the Code view of the Web page, the following code appears:
<%@ Page masterpagefile="MyMaster.master" language="C#" title="Header
   Goes here" %>
Unlike a Web page attached to a DWT, a Web page attached to a master page doesn't have the content of the master page. The Page directive shown in the previous code defines the location of the master page file at runtime when the page is rendered for display.
If you switch to the Design view of the attached Web page, the name and location of the master page file attached to the Web page are displayed in the top-right section. As shown in Figure 13.11, to add unique content to the Web page, click the arrow toward the right of the content region and then choose Create Custom Content from the popup menu.
Figure 13.11. Creating custom content on the attached Web page
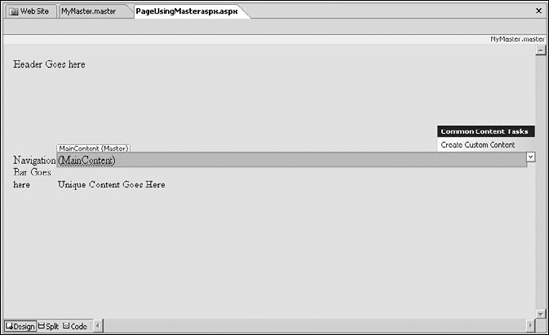
After you click the Create Custom Content link, the content region on the Web page becomes editable, and you can use the SharePoint Designer tools to place content in the region. If you switch back to the Code view of the Web page, the following code appears:
<asp:Content id="Content1" runat="server" contentplaceholderid="MainC
   ontent">
   <p>(MainContent)</p>
</asp:Content>
This is the ASP.NET content control that holds the unique content of the Web page. The value of the contentplaceholderid attribute of this control is the same as the id attribute of the content placeholder control placed in the master page. This way, the content control in the attached Web page is associated with the content placeholder control in the master page.
NOTE
It's not necessary for the attached Web page to have a content control associated with a master page content placeholder control. However, if the Web page has a content control, the contentplaceholderid of which can't be matched to a content placeholder control on the attached master page, an update message, as shown in Figure 13.12, appears in the Design view.
Figure 13.12. A master page error due to mismatched content regions
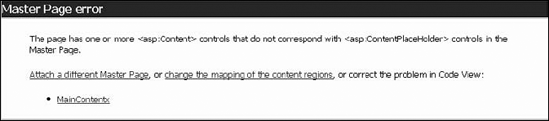
The message shows the list of problematic content controls. You can click the change the mappings of the content regions link to match the content control to an appropriate existing content placeholder control in the attached master page.
13.2.2. Attaching master pages to Web pages
Like the DWTs, choosing Format ![]() Master Pages also offers a number of menu options for performing master page-related operations on Web pages:
Master Pages also offers a number of menu options for performing master page-related operations on Web pages:
Attach Master Page: Opens the Select a Master Page dialog box, which allows you to choose a master page that you want to attach to a Web page
Detach from Master Page: Detaches the master page from the Web page. The content of the master page is placed directly on the Web page, and the ASP.NET content controls are removed.
Open Attached Master Page: Opens the attached master page in SharePoint Designer
Manage Content Regions: Opens the Manage Content Regions dialog box for the active master page, which allows you to add, modify, or remove content placeholders on the master page
NOTE
You can't attach DWTs to master pages or Web pages that have master pages attached to them. Also, you can't attach master pages to DWTs and Web pages that have DWTs attached to them.
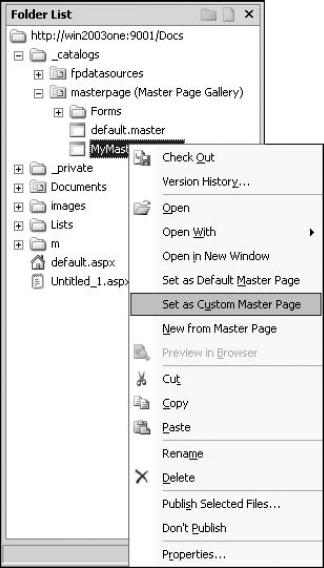
By default, SharePoint Web sites have out-of-the-box master pages associated with their Web pages. These master pages are stored in the Master Page Gallery of SharePoint sites, which is accessible by using the Site Settings Web page. In SharePoint Designer, you can view the master pages of a SharePoint site by expanding _catalogs ![]() masterpage (Master Page Gallery) in the Folder List task pane, as shown in Figure 13.13.
masterpage (Master Page Gallery) in the Folder List task pane, as shown in Figure 13.13.
Figure 13.13. Viewing SharePoint master pages in SharePoint Designer
SharePoint sites have two categories of master pages:
Site Master Page: This master page applies to all the publishing pages of the SharePoint site. In SharePoint Designer, this is called the Custom Master Page.
System Master Page: Called the Default Master Page, this master page applies to all forms and view pages of the SharePoint Web site.
To set a master page to be the SharePoint site's site or system master page, simply right-click on the master page in the Folder List task pane in SharePoint Designer and then choose the associated master page setting from the popup menu.
|
|

13.2.3. Understanding nested master pages
Master pages can be nested, which means that you can attach a master page to another master page and then attach the child master page to your Web pages. This feature provides you the ability to further refine the layout implementation on your Web pages.
The application of nested master pages is no different than directly attaching master pages to Web pages. It's just that now you attach a parent master page to a child master page; the parent and child master pages have the content-to-content placeholder mappings. While attaching a master page to another master page, the existing content of the child master page has to be mapped to a single content placeholder on the parent master page.
NOTE
You can only attach one master page to another master page or Web page in SharePoint Designer.
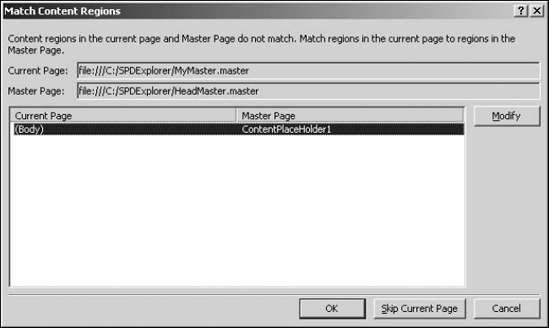
As shown in Figure 13.14, the Match Content Regions dialog box opens when you attached a master page to another master page (or a master page to a Web page that already has content on it).
Using this dialog box, you specify which content placeholder on the parent master page the existing content of the child master page (or the attached Web page) should be matched with. After you choose the content placeholder on the parent master page, a content control is placed on the child master page (or the attached Web page), with the contentplaceholderid matching the id attribute of the content placeholder control on the parent master page.
Figure 13.14. The Match Content Regions dialog box