5.3. Creating Hyperlinks and Bookmarks
One of the most common operations that you perform on a Web page is to create hyperlinks to content. Hyperlinks provide navigation for Web sites and link content placed at different locations inside a Web site. The basic attributes of a hyperlink include display text and a URL that the hyperlink points to. When you click hyperlinked display text, the Web browser directs you to the URL connected to that hyperlink. You can create hyperlinks to almost any type of content, including pictures, Web pages, documents, executables (.exe, .dll, etc.), and bookmarks.
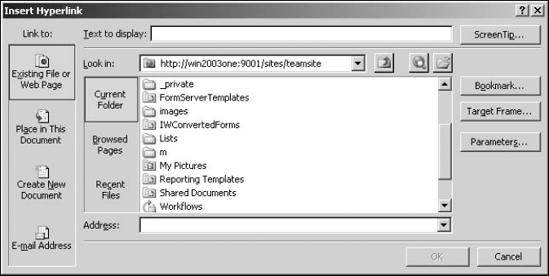
You create hyperlinks in SharePoint Designer by using the Insert Hyperlink dialog box, as shown in Figure 5.15. You access this dialog box by choosing Insert ![]() Hyperlink or pressing Ctrl+K. This dialog box is also used for editing hyperlinks (although the name changes to Edit Hyperlink).
Hyperlink or pressing Ctrl+K. This dialog box is also used for editing hyperlinks (although the name changes to Edit Hyperlink).
The Insert Hyperlink dialog box allows you to create hyperlinks by using these panes:
Existing File or Web Page: The default pane allows you to choose a file from the Current Folder, Browsed Pages, or the Recent Files list. The files or Web pages that are currently open in SharePoint Designer show up with (open) at the end of the filename. You can use the Look in dropdown menu to locate the content you want to create a hyperlink for.
Place in This Document: Allows you to create hyperlinks to bookmarks on the Web page you currently have open in SharePoint Designer. If no bookmarks have been created, the list is empty.
Create New Document: Allows you to create a hyperlink to a new document. The interface allows you to change the location of the new document and then specify a target frame for the hyperlink. You can also choose whether you want to edit the newly created document right after creation or later.
E-mail Address: This option allows you to create a hyperlink to an e-mail address and specify parameters.
Figure 5.15. The Insert Hyperlink dialog box

Also, there are a number of buttons in the Insert Hyperlinks dialog box that allow for these operations:
Screen Tip: Allows you to specify the screen tip displayed when you hover over a hyperlink. A screen tip can be used to display information about the content that the hyperlink points to.
Bookmark: Displays the list of bookmarks present on the document that you've chosen as the URL for the hyperlink and allows you to add the bookmark to the hyperlink
Target Frame: Allows you to choose the frame where the target document of the hyperlink should open
Parameters: Allows you to specify parameters sent along with the hyperlink. These parameters form the query string in the hyperlink and can be used by the target document for performing various operations. This is especially useful in performing form-based operations by using ASP, ASP.NET, and FrontPage components.
Remove Link: Removes the link from the Web page
Bookmarks act as anchors that you can insert on Web pages at specific locations of interest and later use hyperlinks to navigate to those locations. They're especially useful if you have a long Web page and you want a Web browser to be able to go directly to a location on the Web page rather than have a user scroll down to the location. You can create a bookmark on a Web page by following these steps:
Place the cursor at the location on the Web page where you want to create the bookmark.
Press Ctrl+G or choose Insert
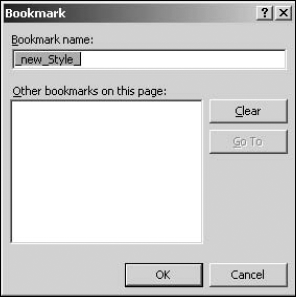
 Bookmark to open the Bookmark dialog box, as shown in Figure 5.16. You use this dialog box to manage the bookmarks on the Web page.
Figure 5.16. The Bookmark dialog box

Type the name of the bookmark and then click OK.
When you view the Code view after inserting a bookmark, the bookmark is just an <a> tag with a Name attribute specified for it. To create a hyperlink to your newly created bookmark, follow these steps:
In the Existing File or Web Page pane, choose the Web page where the bookmark exists.
Choose the bookmark you want to use with the hyperlink and then click OK. The bookmark is indicated in the hyperlink by its name after the # sign.
Click OK.
To preview the Web page in a browser, press F12. If the page is long enough (to activate scrollbars in the browser), when you click the newly created hyperlink, the page automatically scrolls to the location of the bookmark.
5.3.1. Creating parameters in hyperlinks
Sometimes, you might want to send some information with hyperlinks. This information could be used by scripts running on the target Web page to perform operations. For example, you can send values of variables that could be used by an ASP target page to retrieve information from a database.
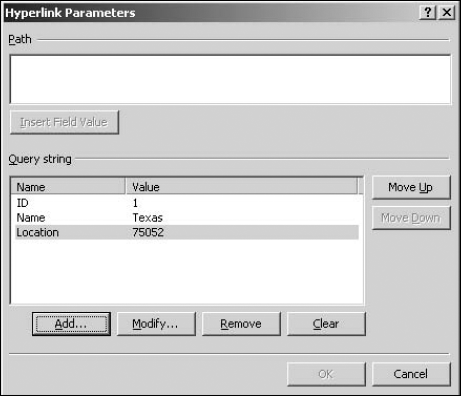
Sending parameters in a hyperlink involves creating a query string along with the hyperlink. A query string is a string concatenation of name-value pairs of variables that you want to send with the request for the target Web page. The target Web page can use these name-value pairs for operations by using client- or server-side scripts. To understand the SharePoint Designer interface for creating parameters, the following steps take you through the process of creating a hyperlink that has three parameters: ID, Name, and ZipCode:
Select the text on the Web page on which you want to create a hyperlink.
Right-click on the highlighted text and then choose Hyperlink from the popup menu to open the Insert Hyperlink dialog box.
Choose the target Web page of the hyperlink by using the Existing File or Web Page pane and then click Parameters. The Hyperlink Parameters dialog box, as shown in Figure 5.17, opens.
Repeat step 5 to add a Name parameter with value Texas and a ZipCode parameter with value 75052.
Click OK to return to the Insert Hyperlink dialog box. The complete target URL of the hyperlink is in the Address box.
Click OK.
The hyperlink that's created as a result of the previous steps has this code after the name of the target Web page:
?ID=1&Name=Texas&ZipCode=75052
This portion of the URL forms the query string that's passed on to the target Web page in the GET request for the target Web page. A script on the target Web page can retrieve parameters from this query string and then use them for performing its business.
Although in this exercise you created only static parameters with fixed values, you can create ASP or ASP.NET Web pages where these parameters can have values filled dynamically (such as from a database).
5.3.2. Targeting frames in Web pages
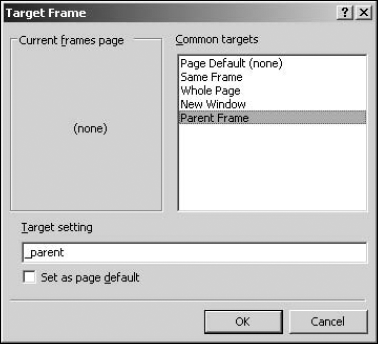
Using the Target Frame dialog box, as shown in Figure 5.18, while inserting hyperlinks, you can specify which frame window the target page should open in. You have these options available by default in the Common Targets list:
Page Default: No target frame is specified.
Same Frame: Uses target=_self attribute to indicate that the target page opens in the same frame window as the page containing the hyperlink
Whole Page: Uses target=_top to specify that the target page opens in the main browser window
New Windows: Uses target=_blank to specify that the target page opens in a new browser window
Parent Frame: Uses target=_parent to specify that the target frame opens in the parent frame of the frame in which the current Web page is open
Other than the default options, the Common Target list also displays the frames that exist in the current page where the hyperlink is being created. The Set as page default check box allows you to set a particular frame as a default frame type for all hyperlinks in a Web page. This is done by adding a <base> tag in the <head> section of the Web page, indicating that the default frame should be used.
Figure 5.18. The Target Frame dialog box


