
2.4. Introducing WSS and MOSS Technologies
The current version of SharePoint (including WSS v3 and MOSS) is the third generation of office document management, collaboration, and publishing products offered by Microsoft. As discussed earlier, this lineage started with SharePoint Team Services (supported by FPSE 2002) offered with Office XP and has now grown into a robust, scalable, and extendable platform for Web-based application development for intranet, extranet, and Internet scenarios.
Out-of-the-box installation of SharePoint provides for a large number of features that can be configured and used just as they are or exploited by application developers for custom implementation and business logic architecture.
2.4.1. Comparing WSS and MOSS offerings
When choosing between WSS and MOSS, know that WSS is freely downloadable on Microsoft's Web site (www.microsoft.com/downloads). MOSS relies on the infrastructure that WSS provides for SharePoint sites, so that when you install MOSS, the setup program first installs WSS by itself on the machine.
However, while WSS only provides you with basic collaboration features, MOSS offers a more complete collaboration and publishing feature set and includes advanced functionality for enterprise-level implementation. These features include user profiles and personal sites; audience targeting; advanced search capabilities; and add-on services, such as Excel Services, Form Services, and Business Data Catalogs.
2.4.2. Understanding basic SharePoint site interface, layout, and settings
Although discussion about the detailed setup, configuration, and architecture of SharePoint (WSS v3 and MOSS) is beyond the scope of this book, keep in mind the following about SharePoint configuration:
The SharePoint server farm consists of one or more Web Front End Web servers (WFEs), one or more application servers (servers that provide indexing, search services, and offer various SharePoint features, such as user profiles, My Sites, Excel Services, Form Services, etc.), and one or more database servers.
The SharePoint setup is a two-step process. First, you use the setup executable to install the SharePoint binaries and supporting files. Then, you use the SharePoint Configuration Wizard to set up the SharePoint farm settings, secure resources, and create the configuration database and provisions for the SharePoint Central Administration Web site.
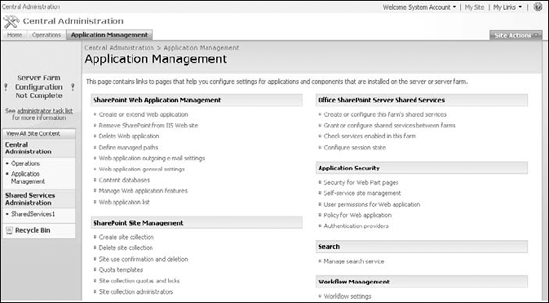
Like the FPSE 2002 Microsoft SharePoint Administration Web site, the SharePoint Central Administration Web site serves as the operations and application management console for SharePoint. You can use this Web site to create Web applications, site collections, etc., and configure settings for all SharePoint features.
Unlike non-SharePoint sites, SharePoint stores most of the Web site content (including content of Web pages, list and document library data, pictures, etc.) in the SQL Server database. Only shared templates and supporting files are stored in the file system.
In this section, I take you through the steps to set up WSS v3 in a single-server farm environment on a Windows 2003 server and create a Web application and a site collection. Later, I discuss the interface of a SharePoint site to familiarize you with the key components that later help you in customizing SharePoint Designer.
2.4.2.1. Setting up WSS v3 on a Web server
WSS v3 is available for download on the Microsoft Web site at www.microsoft.com/downloads. The setup for WSS v3 includes the installation files for SQL Server 2005 Express edition, which is used as the database back end for a single-server basic installation. You need to be an administrator to successfully install and configure WSS v3 on a Web server. Along with that, you need to ensure that IIS 6.0 is installed and running in the worker process isolation mode.
The one-click installation of WSS v3 is fairly simple and requires no specific user input except clicking on the setup executable and then clicking the Basic installation radio button. Once the setup is complete, the SharePoint Configuration Wizard automatically runs to provision the SharePoint Central Administration Web site. You perform all the SharePoint server-level Web application and operations management by using the Central Administration Web site, as shown in Figure 2.17.
The setup also installs the SQL Server 2005 Express edition and uses it as the default database server for WSS v3.
Figure 2.17. The SharePoint Central Administration Web site
2.4.2.2. Create a SharePoint Web application
After you install and configure WSS v3, you can use the SharePoint Central administration Web site to create a SharePoint Web application by using these steps:
Choose Start
 Administrative Tools
  SharePoint Central Administration to open the SharePoint Central Administration Web site.
Click the Application Management tab. The Application management Web page opens, allowing you to perform a number of operations related to Web application management.
Click Create New Web Application. The Create New Web Application Web page, as shown in Figure 2.18, opens, allowing you to create a new IIS Web site for the SharePoint Web application, create an application pool for the Web site, and define security configurations for the Web site.
Figure 2.18. The Create New Web Application Web page
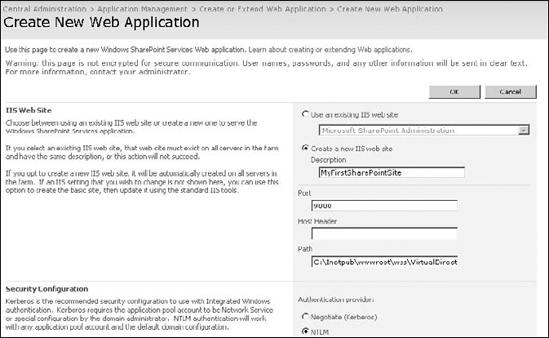
Type the name of the SharePoint Web application in the Description text field and then use the Port, Host Header, and Path text fields to specify a TCP/IP port, host header, and root folder for the Web application.
Use the default settings for the Security Configuration and the Load Balanced URL section.
Keep the defaults for the Database Name and Authentication sections.
Click OK.
When the Web application setup is complete, the new Web site and application pool are now listed in the IIS Manager. Also, the newly created SharePoint Web application is shown in the Web Application List available in the Application Management tab of the SharePoint Central Administration Web site.
2.4.2.3. Creating a site collection in the SharePoint Web application
After the SharePoint Web application is set up, you need to create a root site collection in the Web application. Simply put, a site collection is a set of SharePoint Web sites, features, and permissions that's centrally managed at the site collection level. You can create a site collection using these steps:
In the Application Management tab in the SharePoint Central Administration Web site, click Create Site Collection. The Create Site Collection page, as shown in Figure 2.19, opens, allowing you to set some general settings and choose a site template for use for the root site collection SharePoint site.
Figure 2.19. The Create Site Collection Web page
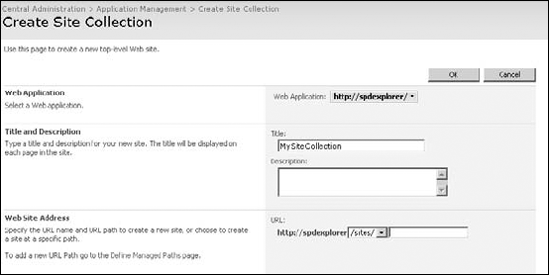
Type a title and description for the site collection.
Specify the site administrator's username in the User Name text field in the Primary Site Collection Administrator text field.
Use the defaults for the Quota Template section.
Click OK.
When your site collection is created, you can browse to the root site of the site collection by using the URL specified in the previous steps.
To be able to intelligently modify and develop SharePoint sites with SharePoint Designer, you need to understand some key components of a SharePoint Web page. The interface for a WSS v3 site based on the Team Site template is shown in Figure 2.20.
Figure 2.20. A SharePoint site based on the Team Site template
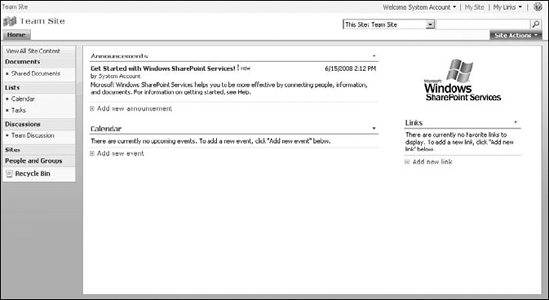
The layout of the default page of the SharePoint site based on the Team Site template consists of some key elements:
Toward the top-left corner of the Web page is a tab-based link bar (or navigation bar) that has the links to the Web sites inside the site collection. While creating new Web sites inside the site collection, you have the option to add the link for the Web site in this Top Link bar.
In the same horizontal pane, toward the right, is the Site Actions dropdown menu. This menu allows you to navigate to Web pages to allow you to create new content and change site settings. For sites using the Collaboration or Publishing templates (available with MOSS), the list of menu options in the Site Actions dropdown changes.
Just above the Site Actions menu is the search box Web part that includes a scopes dropdown.
On the left of the Web page is the Quick Launch bar that, among other selections, has the links to the lists and document libraries. You have the option to add links to this bar while creating lists, document libraries, and other SharePoint content.
In the main content region of the Web page is a set of Web parts that provide views for various lists (Announcement, Calendar, Links, etc.). An image Web part that shows the Windows SharePoint Services logo is also there.
Choose Site Actions ![]() Edit Page to see the edit mode view of the Web page. This view allows you to add or remove Web parts. Also, this Web page has two Web part zones: Left and Right. Based on the template being used to create the site, the layout changes.
Edit Page to see the edit mode view of the Web page. This view allows you to add or remove Web parts. Also, this Web page has two Web part zones: Left and Right. Based on the template being used to create the site, the layout changes.
NOTE
SharePoint 3.0 (WSS v3 and MOSS) follows the concept of context-based security trimming. Thus, all menus and interfaces that SharePoint sites expose are shown only if you have the required permissions to see and use them.
To add a Web part to the Web page by using the browser interface, simply click Add Web Parts. The Add Web Parts Web page dialog box opens, allowing you to choose from a list of Web parts available from WSS v3. Again, this list changes if you have MOSS installed or if there are any custom Web parts installed on the WFE. Clicking on the Advanced Web Part gallery and options link opens the Add Web Parts task pane in the right corner of the Web page. Here, you can search Web part galleries, choose Web parts, and add them to the Web part zone of your choice.
You exit the edit mode view by clicking on the Exit Edit Mode link just below the Site Actions menu.
2.4.3. Working with SharePoint sites and site collections
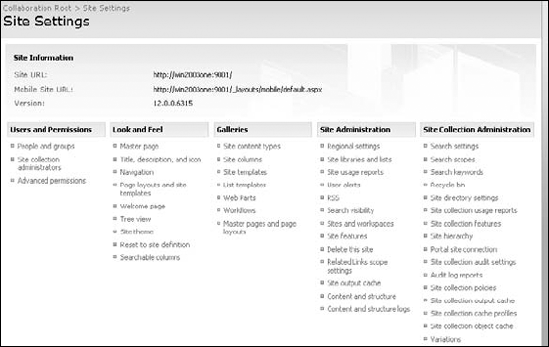
Choose Site Actions ![]() Site Settings to open the Site Settings page for the site collection, as shown in Figure 2.21. You use this page to make general settings for the site collection:
Site Settings to open the Site Settings page for the site collection, as shown in Figure 2.21. You use this page to make general settings for the site collection:
Users and Permissions: The settings in this section allow you to set up the permissions for the site collection. You can use these settings to add or remove users and groups and specify site collection administrators.
Look and Feel: Most of the settings in this section are useful while working with SharePoint Designer on the Web site. These settings allow you to change the site's theme, change settings for the Top Link bar and the Quick Launch bar, and save the SharePoint site as a template. You use these settings in later chapters, along with SharePoint Designer features, to change the look and feel of the site.
Galleries: This lists the various SharePoint content galleries, such as Master Pages, Content Types, Site Columns, Web Parts, etc.
Site Administration: The settings in this section allow you to view and set SharePoint settings for alerts, Really Simple Syndication (RSS), and site usage reports. This section also allows you to create new sites and workspaces.
Site Collection Administration: As the name indicates, the settings in this section apply at the site collection level and provide configuration settings for the SharePoint recycle bin, audit log reports, site collection features, etc.
Figure 2.21. The Site Settings Web page
To create new sites inside the site collection, you can click Sites and Workspaces in the Site Administration section of the Site Settings Web page. You can also follow these steps to create new sites inside the site collection:
Choose Site Actions
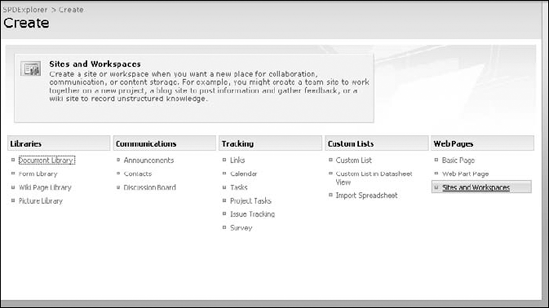
 Create. The Create Web page, as shown in Figure 2.22, opens, providing a consolidated interface for creating SharePoint content of many types. You can create custom lists, document libraries, and Web pages and sites.
Type the Title and Description as well as the URL for the new Web site.
Click the site template for the SharePoint site by using the Select a Template list in the Template Selection section.
Click Create.
You can also create SharePoint sites by using templates provided by SharePoint in SharePoint Designer by choosing File ![]() New. However, SharePoint Designer doesn't allow you to create site collections. After you create a SharePoint site or site collection, you can open the site in SharePoint Designer for customization either by using SharePoint Designer's File
New. However, SharePoint Designer doesn't allow you to create site collections. After you create a SharePoint site or site collection, you can open the site in SharePoint Designer for customization either by using SharePoint Designer's File ![]() Open Site dialog box or simply by browsing to the Web site in Internet Explorer (IE 6.0 and later) and using the IE menu option at File
Open Site dialog box or simply by browsing to the Web site in Internet Explorer (IE 6.0 and later) and using the IE menu option at File ![]() Edit with SharePoint Designer.
Edit with SharePoint Designer.
Figure 2.22. The Create Web page
2.4.4. Using SharePoint lists and libraries
You can also choose Site Actions ![]() Create to create SharePoint lists and libraries. A list in SharePoint is a container that allows you to store data and records in a flexible manner. A record inside a SharePoint list is called a list item. Lists provide the infrastructure to maintain list items in the form of views that can be used to view the list items and forms that can be used to add, edit, and delete list items. You can create new list views by using the SharePoint interface and then customize the list forms by using SharePoint Designer.
Create to create SharePoint lists and libraries. A list in SharePoint is a container that allows you to store data and records in a flexible manner. A record inside a SharePoint list is called a list item. Lists provide the infrastructure to maintain list items in the form of views that can be used to view the list items and forms that can be used to add, edit, and delete list items. You can create new list views by using the SharePoint interface and then customize the list forms by using SharePoint Designer.
Document libraries (form libraries, picture libraries, slides libraries, etc.) are special lists that can be used to store content (documents, pictures, and forms) and provide features for management of such content. They also provide special views that show the content they store in a more comprehensible manner.
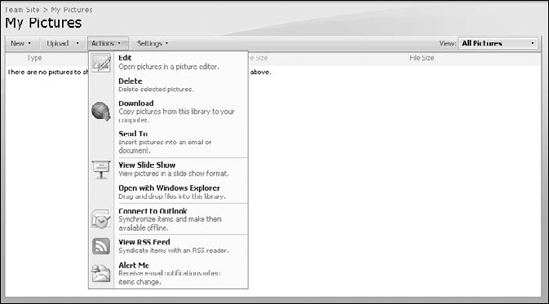
Every SharePoint list (or library) has a set of actions and settings available for it. These actions are accessible by using the Actions menu in the list (or library) views. Figure 2.23 shows the Actions menu for the My Pictures library.
The actions available might change depending on the list (or library) you're working with. Libraries also have an Upload menu that can be used to upload one or more items. The Settings menu allows you to access the settings for the list (or library) so you can set permissions and manage advanced settings, including versioning, RSS, and workflows. You can also use the Settings menu to create new columns and views for the list (or library).
NOTE
SharePoint 3.0 supports item-level permissions, which can be set by using the Actions menu, which you access by clicking on the item inside a list view.
Figure 2.23. The My Pictures library Actions menu
2.4.5. Using SharePoint Web parts
A SharePoint Web part is a Web user control that can be used to perform specific operations on SharePoint sites. SharePoint out of the box offers a number of Web parts that are available in the site's Web Parts Gallery. SharePoint application developers can use the SharePoint object model to create new Web parts and deploy them for use in SharePoint, thus providing custom Web parts to the site's users.
You can add Web parts to a SharePoint Web page in its edit mode by using the Add Web Parts interface. Also, you can use the edit mode to delete, close Web parts, and set up Web part connections. SharePoint Designer offers the interface to add Web parts and Web part zones to Web pages. It also allows you to change properties for Web parts.