
4.2. Working with Page Views
The page-editing interface of SharePoint Designer offers three main views that you can use to design and code for your Web page: the Design view, the Code view, and the Split view. Figure 4.6 shows the Split view of a Web page in SharePoint Designer. You can switch views by clicking the tabs located near the lower-left corner.
To become familiar with the page views, follow these steps to create a simple SharePoint Web page using SharePoint Designer:
Choose File
 New to open the New dialog box. Under the Page tab in the General list, click Create from Master Page. Keep C# as the Programming Language for the Web page.
Keep the defaults in the Select a Master Page dialog box and then click OK. SharePoint Designer now creates a new Web page and applies the Web site's default master page to it. When the default master page is applied to the new Web page, SharePoint Designer renders the Web page in the Design view.
Press Ctrl+S or choose File
 Save As to save the Web page inside the root folder of the Web site.
Figure 4.6. The Split view for a page in SharePoint Designer
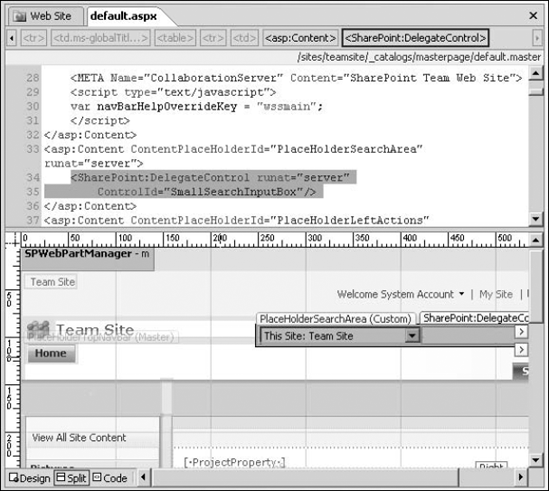
The Design view is the canvas you use to develop your Web pages and see the first preview of how your Web page would look. The Design view renders HTML tags and controls, ASP.NET 2.0, and SharePoint controls in a manner very similar to the way they would look in a Web browser (hence, WYSIWYG). It enables design features, such as visual aids and formatting marks, that assist you in managing the design and layout of a Web page, and provides the user interface to selectively access control properties and common control tasks.
To view the code associated with the Web page, open it the Code view, which you do by clicking the Code tab at the bottom-left corner of the Web page. The Code view in SharePoint Designer provides a rich, enhanced Visual Studio-like experience to aid in code writing. It supports features such as IntelliSense and auto code completion for HTML, client-side scripts, and ASP.NET 2.0. It also provides features such as code hyperlinks and incremental search that developers can use to easily manage code on their Web pages.
The Split view allows designers to view both the Design and Code views of the Web page in a single view. This view is particularly useful in quickly locating code associated with a tag or control in the Code view. Simply clicking on the control in the Design view highlights the associated code in the Code view.
To see this with the Web page that you just created in the previous exercise, follow these steps:
With the Web page open in the Design view, hover over the search box control in the top-right corner of the Web page. A button with an arrow on it is enabled for the search box control. This button is called the control's Common Tasks button and is used to open the Common Control Tasks menu, which allows you to change control properties.
Click the Common Tasks button and then click Create Custom Content. Now click the Quick Launch bar on the left to move the focus away from the search box control.
Click the Split view tab of the Web page and then click the search box control again.
The code associated with the search box control is highlighted in the Code view. This ability is very useful in locating code associated with a particular control, especially when the Code view of the Web page has a large number of lines in it.