20.2. Investigating SharePoint Designer Workflow Files
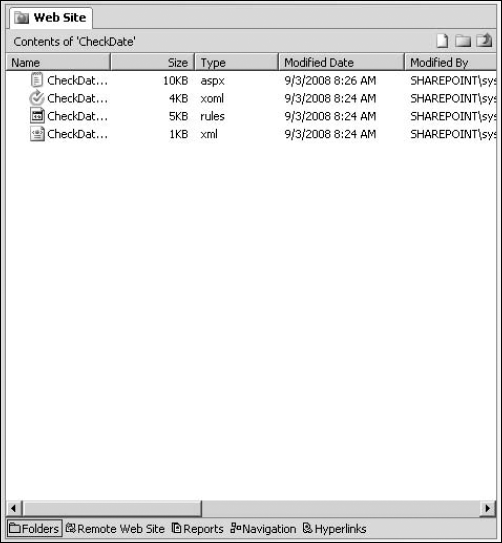
Whenever you create a workflow by using SharePoint Designer, the workflow files generated in the process are stored in a special document library called Workflows. Unlike other document libraries, this document library doesn't have any forms (for example, DispForm.aspx, EditForm.aspx, etc.) for interaction. You don't really see this library in the SharePoint user interface. However, in SharePoint Designer, you can see the Workflows document library in the Folder Lists task pane. All workflow files associated with a particular workflow are stored in a folder named after the workflow in the Workflows document library. For the CheckDate workflow you just created in the previous exercise, Figure 20.16 shows the files that now appear in the associated workflow folder.
Figure 20.16. Workflow supporting files created by Workflow Designer
Depending on the settings made for the workflow in Workflow Designer, the number of files in the associated workflow folder might change. However, the file with the .xoml extension is the key file that supports workflows.
20.2.1. Workflow markup files
Windows Workflow Foundation allows runtime compilation of workflows that have been created by declaratively specifying the workflow settings in XML files. This means that the workflows don't need to be precompiled and deployed as dynamic link libraries. Instead, developers can define workflow logic by using structured XML. At runtime, the markup files are compiled into a workflow type and then loaded into the Workflow Runtime Engine. SharePoint Designer uses this approach to let Web designers define the workflows on SharePoint sites. Designers use Workflow Designer to choose the activities, initiation, and association settings that they want to use for the workflows. Internally, Workflow Designer writes these settings into XML files by using Extensible Object Markup Language (XOML). These XOML files are then uploaded to the SharePoint site and compiled at runtime to run the workflows.
If you look at the file with the .xoml.wfconfig.xml extension, you can easily recognize that this is the binding file that stores information about all the resources needed to run the associated workflow:
<WorkflowConfig>
    <Template
        BaseID="{F36F9E51-D396-4256-A7D2-75A89B42EE86}"
        DocLibID="{3FC83390-EC82-4B2D-8E62-982B596F009D}"
        XomlHref="Workflows/CheckDate/CheckDate.xoml"
        XomlVersion="V1.0"
        RulesHref="Workflows/CheckDate/CheckDate.xoml.rules"
        RulesVersion="V1.0"
    >
    </Template>
    <Association
        ListID="{4A716163-0F6C-4931-8FA7-CFE0C7AFEC15}"
        TaskListID="{5B895DF9-D05A-4763-BEF9-83D76E064796}"
        StartManually="true"
        StartOnChange="true"
    >
    </Association>
    <ContentTypes>
    </ContentTypes>
    <Initiation URL="Workflows/CheckDate/CheckDate.aspx">
        <Fields />
        <Parameters></Parameters>
    </Initiation>
</WorkflowConfig>
As highlighted in the previous code, just by looking at the contents of this file, the workflow engine can make out the name of the list with which the workflow is associated (ListID), the task list to be used for the workflow (TaskListID), and whether the workflow should start automatically or when an item is added or changed (StartManually and StartOnChange). It also stores the reference to the URLs for the workflow XOML file (XomlHref), the workflow rules file (RulesHref), and the initiation form, if any, which are discussed here:
Workflow XOML file: The workflow XOML file is used to store all the activities (conditions and actions) and workflow variables associated with the workflows.
Workflow rules file: The workflow rules file, the file with the .xoml.rules extension, stores the operators and the operands involved in the condition activities being used in the workflow.
Workflow initiation form: This form appears whenever you start the workflow manually. In its most basic form, you click a Start button to begin the workflow.
Double-clicking the XOML file in the Folder List task pane opens Workflow Designer and lets you modify the workflow. Workflow Designer is basically the user interface provided by SharePoint Designer to modify the workflow XOML files without having to know anything about the structured XAML that's used to write these files. If you right-click on the XOML file and then choose Open with ![]() SharePoint Designer (Open as XML) from the popup menu, you can view the XAML code written by Workflow Designer:
SharePoint Designer (Open as XML) from the popup menu, you can view the XAML code written by Workflow Designer:
<ns0:RootWorkflowActivityWithData x:Class="Microsoft.SharePoint.
   Workflow.ROOT" x:Name="ROOT" xmlns="http://schemas.microsoft.com/
   winfx/2006/xaml/workflow" xmlns:x="http://schemas.microsoft.com/
   winfx/2006/xaml" xmlns:ns0="clr-namespace:Microsoft.SharePoint.Wo
   rkflowActions;Assembly=Microsoft.SharePoint.WorkflowActions,
   Version=12.0.0.0, Culture=neutral, PublicKeyToken=null">
   <ns0:RootWorkflowActivityWithData.WorkflowFields>
         <ns0:WorkflowDataField Name="__list" Type="System.String"
   />
         <ns0:WorkflowDataField Name="__item" Type="System.Int32" />
         <ns0:WorkflowDataField Name="__context" Type="Microsoft.
   SharePoint.WorkflowActions.WorkflowContext" />
         <ns0:WorkflowDataField Name="__initParams" Type="Microsoft.
   SharePoint.Workflow.SPWorkflowActivationProperties" />
         <ns0:WorkflowDataField Name="__workflowId" Type="System.
   Guid" />
         <ns0:WorkflowDataField Name="WfCurrentDate" Type="System.
   DateTime" />
         <ns0:WorkflowDataField Name="_x005f_DateTime0"
   Type="System.DateTime" />
         <ns0:WorkflowDataField Name="_x005f_String0" Type="System.
   String" />
   </ns0:RootWorkflowActivityWithData.WorkflowFields>
   <ns0:OnWorkflowActivated WorkflowProperties="{ActivityBind
   ROOT,Path=__initParams}" x:Name="ID1">
         <ns0:OnWorkflowActivated.CorrelationToken>
                <wf0:CorrelationToken Name="refObject"
   OwnerActivityName="ROOT" xmlns:wf0="http://schemas.microsoft.com/
   winfx/2006/xaml/workflow" />
         </ns0:OnWorkflowActivated.CorrelationToken>
   </ns0:OnWorkflowActivated>
   <ns0:ApplyActivation __Context="{ActivityBind ROOT,Path=__
   context}" x:Name="ID2" __WorkflowProperties="{ActivityBind
   ROOT,Path=__initParams}" />
   <SequenceActivity x:Name="ID3" Description="InitializeWFVariable
   s">
         <ns0:CurrentDateActivity x:Name="ID5"
   CurrentDate="{ActivityBind ROOT,Path=_x005f_DateTime0}" />
         <ns0:SetVariableActivity x:Name="ID4" ValueType="System.
   DateTime">
                <ns0:SetVariableActivity.Variable>
                       <ActivityBind Name="ROOT"
   Path="WfCurrentDate" />
                </ns0:SetVariableActivity.Variable>
                <ns0:SetVariableActivity.Value>
<ActivityBind Name="ROOT" Path="_x005f_
DateTime0" />
</ns0:SetVariableActivity.Value>
</ns0:SetVariableActivity>
</SequenceActivity>
<IfElseActivity x:Name="ID7" Description="CheckItemDate">
<IfElseBranchActivity x:Name="ID6">
<IfElseBranchActivity.Condition>
<RuleConditionReference ConditionName="__
Rule_ID6" />
</IfElseBranchActivity.Condition>
<ns0:LookupActivity ListId="{}{4A716163-0F6C-4931-
8FA7-CFE0C7AFEC15}" x:Name="ID10" FieldName="Created" LookupFunct
ion="LookupFriendlyString" __Context="{ActivityBind ROOT,Path=__
context}" ListItem="{ActivityBind ROOT,Path=__item}">
<ns0:LookupActivity.ReturnValue>
<ActivityBind Name="ROOT" Path="_
x005f_String0" />
</ns0:LookupActivity.ReturnValue>
</ns0:LookupActivity>
<ns0:LogToHistoryListActivity x:Name="ID9"
OtherData="{x:Null}" HistoryDescription="{ActivityBind
ROOT,Path=_x005f_String0}" HistoryOutcome="{x:Null}" UserId="0"
Duration="00:00:00" EventId="None" />
</IfElseBranchActivity>
</IfElseActivity>
</ns0:RootWorkflowActivityWithData>The XML structure of the workflow XOML file is divided into two sections:
WorkflowFields: This section stores the internal and user-defined workflow variables that are being used for the workflow. For example, as highlighted in the previous code, the user-defined workflow variable (WfCurrentDate) and its data type (System.DateTime) are stored in this section.
Activities: After the workflow variables, all the workflow steps are stored as their associated activity type. For example, the workflow step without conditions is stored as <SequenceActivity>, and the ones with conditions are stored as <IfElseActivity>. All the other actions inside these steps are stored as nested activities. The condition rules are referenced using the ConditionName. For example, <RuleConditionReference ConditionName="_Rule_ID6" />, which has the ID that's used to pick the condition from the workflow rules file.
NOTE
Developers who are well-versed with XAML can directly modify the XAML in these files to change workflow behavior. Given that the workflow associations are respected, these files can be edited in any workflow editor (for example, Visual Studio) and enhanced further. However, if you modify the workflow associated with the customized XAML file in Workflow Designer, you might lose the changes made manually to these files.
20.2.2. Workflow rules files
As indicated previously, the workflow rules files are used to store information about the conditions that are used in the <IfElseActivity> defined in the workflow XOML file. The IfElseActivity internally references the condition defined in the workflow rules file.
In the workflow rules XML file, there are multiple <RuleExpressionCondition> elements; for example, <RuleExpressionCondition Name="__Rule_ID6>, one for each condition created in the workflow. Within these elements are described the parameters and methods that define the condition. For example, for the workflow that you created in the previous section, the condition has two parameters: the current item's field (defined by_context) and the workflow variable WfCurrentDate. The method for the condition is Compare.
The same structure is repeated for multiple conditions, and each of them is distinguished by using the Name attribute defined in the <RuleExpressionCondition> elements. The value of the Name parameter is referenced by the appropriate activity in the workflow XOML file.
20.2.3. ASPX forms for initiation and customization
Workflow Designer allows you to create an initiation form that can be used to manually start a workflow associated with a list or library on the SharePoint Web site. The initiation form actually exists on an ASP.NET Web page, which is created by Workflow Designer depending on whether you chose to start the workflow manually. While the basic initiation form created by Workflow Designer contains a Start button that's used to start running a workflow instance on a particular item in a SharePoint list or library, you can design more complex initiation forms by using Workflow Designer.
To create an initiation form to request input from a user before he or she begins the workflow, follow these steps:
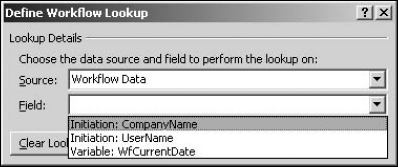
Click Add to open the Add Fields dialog box. Add the fields that you need for requesting user input. Figure 20.17 illustrates several fields added. The fields that you defined in step 1 are available as workflow initiation variables in Workflow Designer for various purposes. You can use the initiation variables to set field values using the Define Workflow Lookup dialog box, as shown in Figure 20.18.
In this manner, you can collect data from the user before the workflow begins. Internally, the user input is stored in workflow initiation variables and can then be used in various workflow actions to set column values in list items, comparisons, etc.
NOTE
The workflow initiation variables are stored for reference in the <Initiation> section of the xoml.wfconfig.xml file.
Figure 20.17. Adding fields for user input to a workflow initiation form
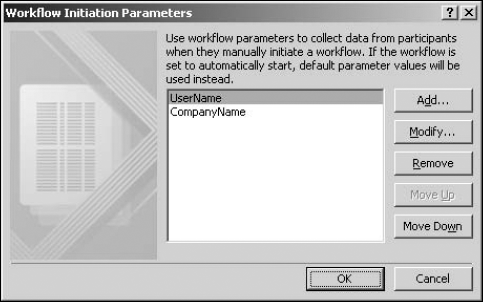
Figure 20.18. Using initiation variables in the Define Workflow Lookup dialog box
If you open the initiation Web page that Workflow Designer creates for the workflow, you see that the initiation form has been implemented by using the DataFormWebPart. As shown in Figure 20.19, the Design view allows you to open the Common Data View Tasks menu, which you could use to potentially modify the look and feel of an initiation form, such as another DataFormWebPart.
However, it's important to note that unlike other DataFormWebParts that you can insert on Web pages by using SharePoint Designer, this DataFormWebPart uses a special data source called SPWorkflowDataSource. The <DataSources> section of the DataFormWebPart inserted on the initiation Web page contains the following code:
<DataSources>
         <SharePoint:SPWorkflowDataSource BaseTemplateID="{F36F9E51-
   D396-4256-A7D2-75A89B42EE86}" ListID="{4A716163-0F6C-4931-8FA7-
CFE0C7AFEC15}" runat="server" id="SPWorkflowDataSource2"><SelectPara meters><WebPartPages:DataFormParameter Name="AssociatedTemplateID" ParameterKey="AssociatedTemplateID" PropertyName="ParameterValues "/></SelectParameters><InsertParameters><WebPartPages:DataFormPara meter Name="ItemID" ParameterKey="ItemID" PropertyName="Parameter Values"/><WebPartPages:DataFormParameter Name="AssociatedTemplateID" ParameterKey="AssociatedTemplateID" P ropertyName="ParameterValues"/></InsertParameters></SharePoint:SP WorkflowDataSource> </DataSources>
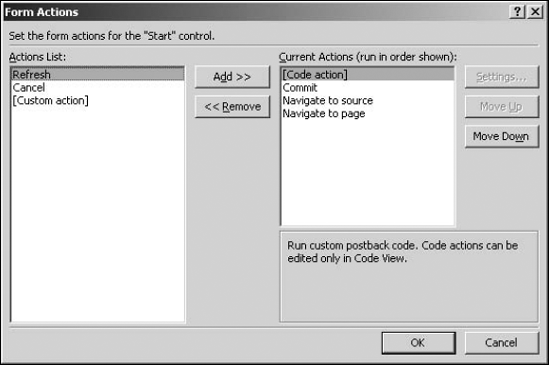
The Start button that you may see on the DataFormWebPart on the initiation Web page is a Form Action button that has a number of actions associated with it, including a custom action specifically developed for the workflow initiation pages. This is shown in Figure 20.20.
Besides these two dissimilarities, the DataFormWebPart can be modified normally by using SharePoint Designer's editing tools. You can modify the XSLT associated with the DataFormWebPart to change its look and feel, change its layout, or apply conditional formatting to it.
Figure 20.19. Viewing the initiation Web page in the Design view
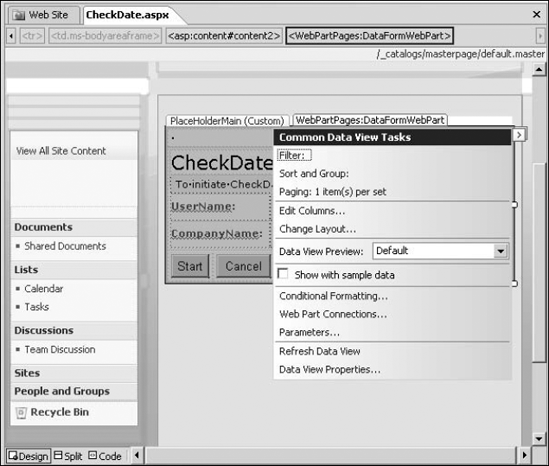
Figure 20.20. The Form Actions dialog box for the Start button on the initiation DataFormWebPart