5.2. Understanding Frames
Frames in HTML provide Web page designers with a means to divide their page layout into sections and then use these sections to manage content. A typical scenario is to divide the Web page into a header, a footer, a left navigation section, and a contents section. Hyperlinks in one section can then be used to display contents in another section. For example, you can create a navigation hyperlink set in the left section so that clicking on the hyperlinks changes the Web page displayed in the contents sections.
Frames are implemented by using a frameset page that becomes the backbone page on which the frames are laid out. Then, the Web pages for each frame within the frameset page are set. To create a new Frames Page, follow these steps:
Choose File
 New to open the New dialog box.
Click the Page tab and then click Frames Pages. Under this option, choose the Header, Footer and Contents template.
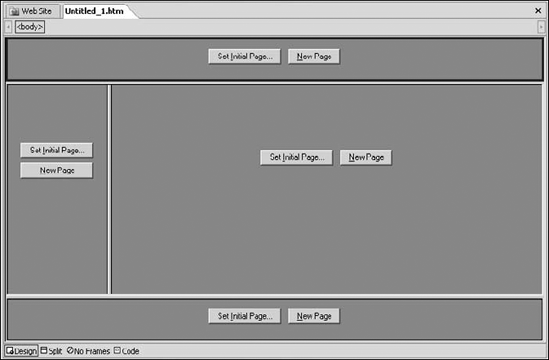
Click OK. The selected template opens in the Design view, as shown in Figure 5.11
Figure 5.11. A template open in the Design view
Along with the Design, Code, and Split views, there's now another view called No Frames view. This view indicates the display of the Web page for Web browsers that don't support frames. If you click the Code view tab, you can see the Code view of the frameset page.
As mentioned before, this page provides the frames skeleton that hosts other pages shown inside the frames. You can use the Design view to change the dimensions of the frames inside the frameset page by dragging the frame boundaries to your preferred width and height.
If you want to split a frame, press Ctrl while dragging the frame boundary to the required width or height. This splits the existing frame into two frames. You can change the width of the splitting lines by right-clicking on the frameset page and then choosing Page Properties from the popup menu. The Frames tab, as shown in Figure 5.12, then appears in the Page Properties dialog box.
Figure 5.12. The Frames tab in the Page Properties dialog box
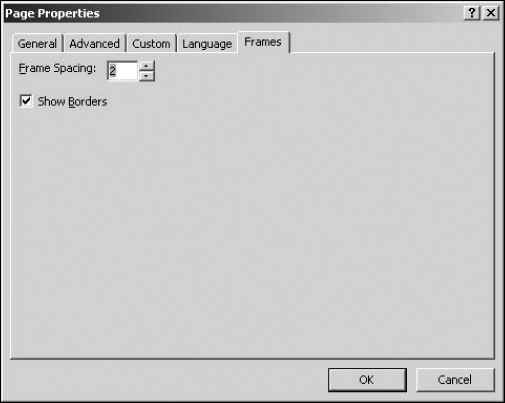
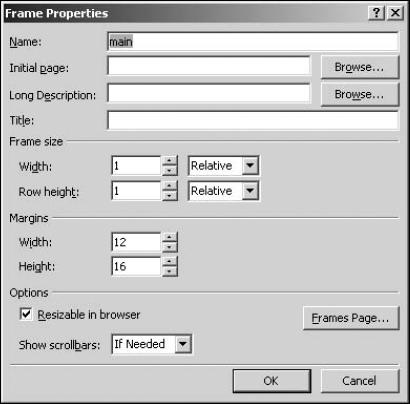
You can use the Frame Spacing box to change the width of the splitting lines. Also, you can deselect the Show Borders check box if you don't want to show the splitting lines. You can also access the Frames tab by clicking Frames Page in the Frame Properties dialog box, as shown in Figure 5.13. You access this dialog box by right-clicking on the frame in the Design view.
You can use the Frame Properties dialog box to set the name, title, initial page, and description associated with a frame. The name of a frame is used when targeting hyperlinks to specific frames inside the frameset page. You can also choose whether to show the scrollbars if the contents of the page inside the frame extend beyond the frame's width and height. Keep the Resizable in browser check box selected if you want Web page viewers to be able to resize the frame in the browser window.
Figure 5.13. The Frame Properties dialog box
5.2.1. Creating pages using frames
In this exercise, I take you through the steps for creating a navigation-based frameset page. If you completed the other exercises, you should already have at least three Web pages that can be displayed in frames:
Choose File
 New to open the New dialog box, click the Page tab, and then click Frames Pages to choose the Header template.
Click OK. The Header frame in this template hosts a page that contains hyperlinks that open the corresponding Web page in the main section. The frames page created by using the Header template has two frames: the header frame (on the top) and the main frame.
Click the Frames tab, deselect the Show Borders check box, and then click OK.
Click the New Page button in the Header frame to create a new page. You use this page to create hyperlinks for navigation.
In the Text to display box, type a display name for the hyperlink.
Type the location of the initial Web page of the main frame by using the Address text field or by choosing the Web page from the Look in box.
Click OK to finish creating the hyperlink. Clicking on this hyperlink opens the first page in the main frame.
Repeat steps 5 and 6 to create two more hyperlinks in the header for displaying the second and third Web pages.
Click Set Initial Page in the main frame to set the frame page as the page you used for creating the first hyperlink in step 8 and then click OK when you finish.
Press Ctrl+S to save the frames page and the header page.
When you browse to this page, clicking on the links in the header frame opens the corresponding Web page in the main frame. The page created by using the Header template is designed so that every hyperlink link opens in the main frame. In other words, the main frame is the target frame for all hyperlinks.
5.2.2. Using inline frames on Web pages
As discussed earlier, when you use frames for designing Web pages, you have to create a skeleton page that hosts all the frames. However, there may be cases where you might want to show the contents of a Web page inside an existing Web page without using a separate frameset page. You can accomplish this using inline frames.
Inline frames behave like standard frames except they can be placed directly inside the Web page you're designing. To insert and configure an inline frame on a Web page, follow these steps:
Create a new Web page by using SharePoint Designer.
Choose Insert
 HTML
HTML  Inline Frame to insert an inline frame on the Web page. The inline frame opens in the Design view, allowing you to set the initial page.
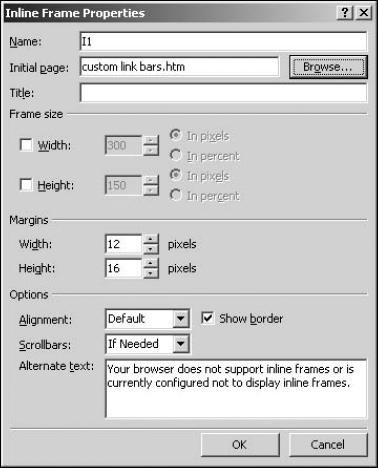
Right-click on the inline frame and then choose Inline Frame Properties from the popup menu. The Inline Frame Properties dialog box, as shown in Figure 5.14, opens, allowing you to set the name, title, initial page, and description. You can also change the display text to be shown for browsers that don't support inline frames, set the scrollbar settings, and choose whether to display a frame border.
Close the Inline Frame Properties dialog box.
Set the Web page to be displayed in the inline frame by clicking the Set Initial Page button.
Click OK.
Inline frames are implemented by using the <iframe> HTML tag. If you click the Code view tab after you set the properties, the attributes for the inline frame appear with <iframe> tags.
Figure 5.14. The Inline Frame Properties dialog box