
14.1. Designing Navigation for Non-SharePoint Sites
For non-SharePoint sites, the navigation structure has to be built from scratch, unlike SharePoint sites where you already might have a number of controls to work with. Here again, based on whether you're working with a Web site that allows hidden metadata, you can use SharePoint Designer tools in a number of ways to create your Web site's navigation.
14.1.1. Using the Navigation pane
The SharePoint Designer Navigation pane is the key interface that you use to design a Web site's structure in a very simple manner. After the structure is ready, you can have a number of components available in SharePoint Designer make use of the structure you created in the Navigation pane to display navigation links on Web pages.
NOTE
The Navigation pane can only be used with Web sites that have hidden metadata allowed for use. The structure of the Web site you create in the Navigation pane is stored in the structure.cnf file in the hidden _vti_pvt folder of the Web site.
When working with the Navigation pane, you have two options:
Add existing Web pages to the Navigation pane to form a structure.
Use the Navigation pane to form a structure with new Web pages and then later design those pages.
Whichever way you choose, creating the navigation structure is half the part of implementing your Web site navigation. The other half is to insert navigation controls on Web pages that use the structure you created in the Navigation pane.
To create a structure for your Web site by using the Navigation pane, follow these steps:
Using the Folder List task pane, simply drag and drop Web pages into the Navigation pane to form a treelike structure. Or you can choose an existing Web page by right-clicking on the parent page in the Navigation pane and then choosing Add Existing Page from the popup menu. The concept to understand while creating the navigation structure is that each node (or page) in the structure is a landing point (or href) for a hyperlink.
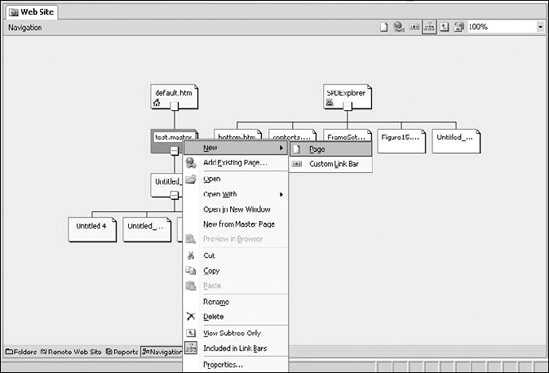
If you want to add new pages to the navigation structure instead of existing ones, simply choose the parent node by clicking on it and then choosing New
 Page. A child page is created under the selected page. As your navigation tree becomes bigger, you can expand or collapse the tree structure by clicking on a + or − sign, as shown in Figure 14.1. This allows you to quickly reach a particular node in the navigation structure and add some real estate in the Navigation pane.
By default, the home page of your Web site is listed as the top page of the navigation structure. If you want the top page to be some other page, you can start the navigation structure by creating a new top page by right-clicking on the empty space in the Navigation pane and then choosing New ![]() Top Page from the popup menu. From then on, you can use the approach detailed previously to add new or existing pages to the navigation structure.
Top Page from the popup menu. From then on, you can use the approach detailed previously to add new or existing pages to the navigation structure.
Figure 14.1. The navigation structure for a Web site by using new pages
As indicated before, the navigation structure of the Web site is stored in the structure.cnf file in the _vti_pvt folder of the Web site. Here's a sample structure.cnf file from the previous steps:
3.0.0.507
1009
1000,default.htm,0,default.htm,0,1215813469,1
vti_globalpage:BW|true
1008,toppage1.htm,0,Top Page 1,0,1215815741,1
vti_globalpage:BW|true
1002,Untitled_3.aspx,0,Untitled 3,1000,1215814347,0
1003,Untitled_2.aspx,0,Untitled 2,1000,1215814347,0
1005,Untitled_1.htm,0,Untitled 1,1000,1215815255,0
1004,Untitled_3.htm,0,Untitled 3,1003,1215814347,0
1006,Untitled_4.htm,0,Untitled 4,1003,1215815255,0
1007,Untitled_5.htm,0,Untitled 5,1006,1215815255,0
As evident in this script, the structure is maintained in a sort of a parent-child relationship of pages in this file. In this code example, pages marked 1002, 1003, and 1005 are child pages of the page marked 1000. Similarly, pages marked 1004 and 1006 are child pages of the page marked 1003. The page marked 1008 is another global top-level page, just like the page marked 1000 (signified by vti_globalpage:BW|true). The number 1009 at the top is the counter number to be used for the next page that's added to the Navigation pane.
|
If you right-click on the empty space in the Navigation page and then choose New ![]() Custom Link Bar from the popup menu, you have the option to create a linear single-level set of Web pages. These link bars serve as a source for link bar Web components that SharePoint Designer lets you insert on Web pages.
Custom Link Bar from the popup menu, you have the option to create a linear single-level set of Web pages. These link bars serve as a source for link bar Web components that SharePoint Designer lets you insert on Web pages.
After you create the navigation structure for your Web site, the next step to expose this navigation structure to your users is to use the navigation Web components provided by SharePoint Designer. SharePoint Designer has the following main Web components that make use of the navigation structure:
Bar with custom links
Bar with Next and Back links
Bar based on navigation structure
Depending on your design, you can choose from any of these link bars for your Web pages.
14.1.2. Working with link bars
To insert a link bar on your Web page, follow these steps:
Open the Web page where you want to insert the link bar.
Choose a style for your link bar and then click Next.
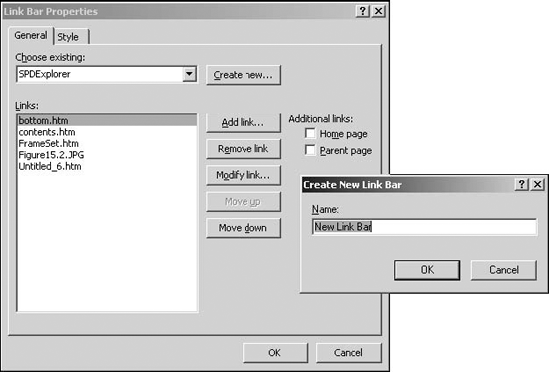
Type a name for the new link bar and then click OK.
In the General tab of the Link Bar Properties dialog box, as shown in Figure 14.2, click Add link to add new links to the link bar. You can arrange the link order by clicking Move up and Move down.
Click the Home Page and Parent Page check boxes if you want to add the links to the default home page of the Web site and the parent of the Web page.
Click the Style tab to change the theme for the link bar.
Click OK to insert the link bar on the Web page.
Figure 14.2. The Link Bar Properties dialog box
NOTE
After you insert a link bar on the Web page by using the previous method, a new custom link bar is added to the navigation structure of the Web site and can be seen in the Navigation pane. Any custom link bars that you create directly in the Navigation pane appear in the dropdown menu in the General tab of the Link Bar Properties dialog box for insertion as link bars on Web pages.
When you view the code of the Web page after the link bar is inserted, the link bar is inserted as the following comment:
<!--Webbot bot="Navigation" S-Type="sequence"
   S-Orientation="horizontal" S-Rendering="graphics" S-Theme="blends
   0110" B-Include-Home="FALSE" B-Include-Up="FALSE"
   U-Page="sid:1003" -->
Like many author time SharePoint Designer Web components, this is actually a placeholder for the HTML code associated with the link bar. The actual HTML code is not shown in the Code view to prevent unintended editing of the link bar code. If you want to view the actual code of the link bar that's interpreted by a browser, you need to open the Web page in Notepad (by right-clicking the Web page in the Folder List task pane and then choosing Open With ![]() Notepad from the popup menu). The following is sample HTML code for the link bar:
Notepad from the popup menu). The following is sample HTML code for the link bar:
<!--Webbot bot="Navigation" S-Type="sequence"
   S-Orientation="horizontal" S-Rendering="graphics" S-Theme="blends
   0110" B-Include-Home="FALSE" B-Include-Up="FALSE"
   U-Page="sid:1003" startspan --><script language="JavaScript"><!--
MSFPhover =
  (((navigator.appName == "Netscape") &&
  (parseInt(navigator.appVersion) >= 3)) ||
  ((navigator.appName == "Microsoft Internet Explorer") &&
  (parseInt(navigator.appVersion) >= 4)));
function MSFPpreload(img)
{
  var a=new Image(); a.src=img; return a;
}
// --></script><script language="JavaScript"><!--
if(MSFPhover) { MSFPnav1n=MSFPpreload("_derived/bottom.htm_cmp_
   blends110_hbtn.gif"); MSFPnav1h=MSFPpreload("_derived/bottom.htm_
   cmp_blends110_hbtn_a.gif"); }
// --></script><a href="bottom.htm" language="JavaScript"
   onmouseover="if(MSFPhover) document['MSFPnav1'].src=MSFPnav1h.
   src" onmouseout="if(MSFPhover) document['MSFPnav1'].
   src=MSFPnav1n.src"><img src="_derived/bottom.htm_cmp_blends110_
   hbtn.gif" width="140" height="60" border="0" alt="bottom.htm"
   align="middle" name="MSFPnav1"></a><!--Webbot bot="Navigation"
   i-checksum="42331" endspan -->
As shown here, the actual code that implements the link bar is rather complicated and uses a number of JavaScript functions. To avoid confusion for Web developers, this code is hidden from the Code view.
14.1.3. Using bars based on the navigation structure
Link bars don't really use the navigation structure of the Web site that you create in the Navigation pane. Instead, they just use the structure.cnf file to store their own link data. As a matter of fact, the link bars can even have hyperlinks pointed to external sites.
On the other hand, the Web component called Bar based on navigation structure, as its name suggests, is the one that allows you to place a set of hyperlinks on the Web page that exposes the site's navigation structure you created in the Navigation pane. To insert a Bar based on navigation structure on a Web page, follow these steps:
Click Link Bars, choose Bar based on navigation structure in the right pane, and then click Next.
Choose a style for the navigation bar and then click Next.
Choose an orientation (horizontal or vertical) for the navigation bar and then click Finish. The Link Bar Properties dialog box opens, as shown in Figure 14.3.
Figure 14.3. The Link Bar Properties dialog box for Bar based on navigation structure
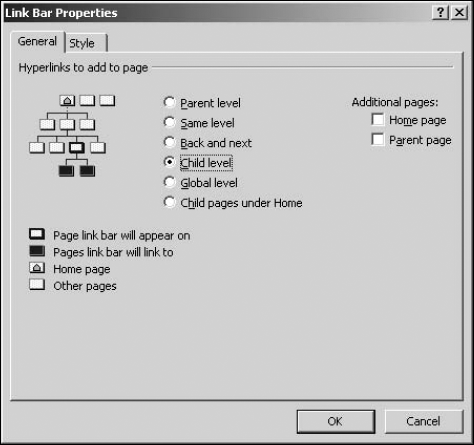
In the Link Bar Properties dialog box, you have a choice of a number of radio buttons to specify how the links appear on the link bar:
Parent level: The bar shows the links to all the pages in the parent level of the page where it's inserted.
Same level: The bar shows the links to all the pages that are in the same level as the page where it's inserted.
Back and next: The bar has Back and Next links that take you to the pages that are in the same level as the page where it's inserted.
Child level: The bar shows the links to all the pages in the child level of the page where it's inserted.
Global level: The bar shows all the top-level pages in the navigation structure.
Child pages under home: The bar shows all the child pages under the home page of the Web site.
Click the Home page and the Parent page check boxes as required. Click OK to insert the bar on the Web page.
If the page where you inserted the navigation bar is not part of the navigation structure of the Web site, you're shown the following message:
[Add this page to the Navigation view to display hyperlinks here]
After you add the Web page to the structure, the navigation bar shows the links (with the chosen style applied) based on the selection of radio buttons made in the Link Bar Properties dialog box. Like a custom link bar, the code of a Bar based on navigation structure is also hidden from the Code view. You can open the Web page in Notepad to view the actual code.
|

Also, it's important to understand that link bars are author time components. This means that they don't need FPSE to be installed on the Web server to run properly. As long as you have the hidden metadata of the Web site, you should be able to get the link bar to work in a non-SharePoint, non-FPSE environment.