
Chapter 14. Going Multimedia with Vista
In This Chapter:
- Look, play, and listen to Vista’s multimedia offerings
- Learn how Vista combines several multimedia tools into its programs
- Access all your media from one program
- Organize pictures, music, and videos
- Make your own recordings
- Edit movies and videos
- Put a media center in your living room
Computers form the heart of most multimedia experiences and those experiences are no longer limited to amusement parks and movie theaters. In your own home you now can perform the following tasks that are considered ordinary whereas just a handful of years ago they would have been amazing:
- Watch and record TV shows
- Play DVD movies
- Play CD music and save that music to your disk (called ripping the CDs) for later playback
- Enjoy pictures
- Create slideshows with sound
- Edit your movies
- Edit and touch-up digital photos
If you’ve used Windows in the past, you’re probably familiar with the Windows Media Player. Vista not only improves on the Windows Media Player with lots of new features but it also includes an updated application called the Media Center, which boosts your computer’s multimedia experience to levels only seen on standalone media center PCs in the past.
This chapter gives you an overview of all Vista’s multimedia features and ends with a more detailed focus on Vista’s Media Center application. Subsequent chapters discuss Vista’s multimedia capabilities in more detail.
Windows Vista Advances Multimedia
A computer without multimedia is like...like a computer from the Stone Age!
Since the early 1990s, almost every computer sold has supported sound, video, and CD audio. DVD-based video followed suit by the turn of the century, and now DVD-recording (and using recorded DVDs for high-volume data backups) is the norm. Although each version of Windows from Windows 3.1 forward supported some form of multimedia, Windows 95 launched true integrated multimedia support throughout its applications. More than a decade later, Windows Vista provides a multimedia experience not even dreamed of at the time of Windows 95 (such as the ability to pause live TV shows).
Multimedia Is No Longer for Geeks
Getting video to work on a computer, especially if you wanted to watch television shows or make DVDs by editing your own digital video clips used to be a time-consuming, nerve-racking process. Windows Vista is so multimedia savvy that it no longer seems like such a chore to put together a bunch of video clips and record your movie to a DVD.
Such tasks are available to all who use Windows Vista, and Vista integrates audio and video tasks into virtually every one of its nooks and crannies. Play a DVD you bought from the store in Windows Media Player without having to add a special DVD driver. Listen to sound clips from the Internet or touch-up photos from your digital camera before using them in an eBay auction. It’s all a snap in Windows Vista.
When it comes to usability, little things can mean a lot. One problem that Windows users had in the past—and this was a problem that many of us didn’t even realize was a problem until we see how Windows Vista works so much better—was the lack of an application-specific volume control.
At any one time, you might be running several Windows programs. Perhaps you’re playing some music in the background using the Windows Media Player, you’re waiting for a Microsoft Outlook alarm to sound telling you about a phone call you need to make, and you want to play a game while you wait. Before Windows Vista, you had only one volume control. Each individual application might or might not give you a volume control for that application; the only thing you could count on was that Windows had a universal volume control named Main (with a secondary one that sometimes came in handy, the Wave volume control). When you wanted to hear your game’s sounds, you turned up the volume on all programs.
Doesn’t it make more sense to have a separate volume control for each application that produces a sound? That’s a reasonable request with Windows Vista. Figure 14.1 shows the Windows Vista Volume control panel. The Main volume control still exists because there are times when you want to lower or mute the volume on all running programs. Other times during the normal course of computer use, however, you might want to adjust only one or two applications’ volume levels. With Vista, you select the running application to adjust and move its volume level. You don’t disturb the other programs’ volume levels.
Figure 14.1. When you run multiple applications with sound, Vista gives you multiple volume controls: one for each application plus a Main volume control for your computer’s overall volume level.
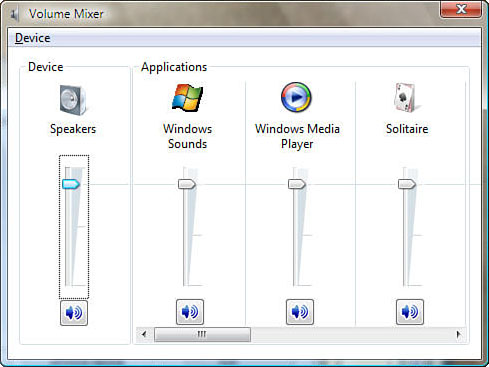
The title of this section is “Multimedia Is No Longer for Geeks.” Multiple volume controls might actually seem a little geeky. And they are really. Perhaps a better title would be “All Vista Users Can Now Be Geeks!” We’ve arrived.
By the Way
Before Windows Vista, programs that produced sound added a strain on the computer’s processor. If you played music, for example, the playing music would stress your processor, and if you also wanted to perform some calculations with a spreadsheet program, your spreadsheet program would hesitate during some of the music’s playback. Windows Vista’s sound architecture uses twice the internal memory size (32 bits, or binary digits, as opposed to 16), so sound no longer affects the performance of your running programs as much as before.
Access All Your Media
Networks used to be reserved for large corporations. Now even small homes have networks. When replacing a PC with the latest and greatest, one of the best things to do with your old one is to connect the two (with wires or wirelessly) into a network and use the old one to serve up files or perhaps give the hand-me-down PC to a young family member. By networking them, you can access all the files on both computers.
With Windows Vista, not only is setting up such a home or business network simple, sharing multimedia files is effortless as well. You can access all your photos, music, movies, and recorded TV shows from the other computers on your network.
By the Way
If you have an Xbox 360, Microsoft’s game machine, you can connect it to your home network and access its files, as well as use it to play music and videos from the other computers on your network.
Introducing Windows Vista’s Multimedia Tools
As described throughout the previous pages of this chapter, Vista’s multimedia experience goes far beyond that of other Windows operating systems and is almost ubiquitous given its embedding in the Windows environment. Therefore, one of the best ways to begin to get a handle on Vista’s multimedia elements is to review the following list of the major players in Vista’s multimedia offerings:
- Windows Photo Gallery—Organize, edit, and print your digital pictures.
- Windows Media Player—Play, watch, and manage your music, DVDs, and pictures.
- Windows Sound Recorder—Record your own digital audio from within Windows Vista.
- Windows Movie Maker—Edit, splice, and put together your own digital video with sound and special effects.
- Windows Media Center—Use your computer as the center of your entertainment universe by accessing all your multimedia files from across your network and viewing them on your family’s living room television for maximum enjoyment. The Windows Media Center also enables you to record televised broadcasts, pause live television, and other set timers for recording when you’re away.
Each of the following sections gives you an overview of these products. Some readers won’t need more detail to enjoy most of these Windows Vista multimedia offerings. If you need more detail, however, such as how to edit your photos to ensure sharp images for putting up on the Web, the next few chapters go into more detail.
Organize Your Pictures with Windows Photo Gallery
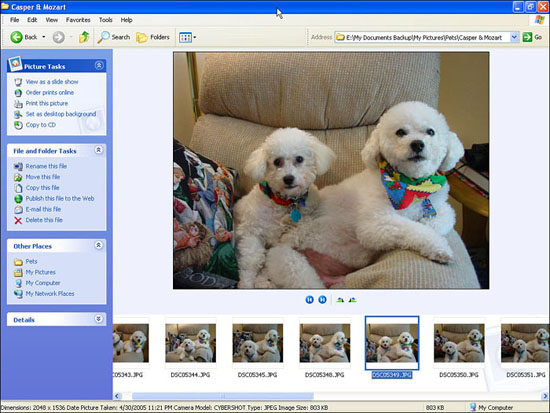
Windows users are accustomed to the Windows photo-viewing Explorer window, shown in Figure 14.2, which appears when you click My Pictures from the Windows XP menu. You couldn’t do much other than organize photos, rename files, print pictures, and send them to a CD or to an email recipient. Third-party software makers, such as Adobe, did well creating replacement photo-editing and management programs such as Photoshop Elements.
Figure 14.2. Vista’s Photo Gallery runs circles graphically around the old My Pictures Windows XP menu offering.
Windows Vista provides the Photo Gallery application. Photo Gallery doesn’t replace the extensive functionality and features of a dedicated program such as Photoshop Elements, but Photo Gallery offers enough bells and whistles that you won’t be forced to use a third-party program nearly as often as before.
Chapters 16, “Going Digital with Your Camera or Scanner,” and 17, “Modifying and Sharing Photos,” explore how to use Photo Gallery to augment your camera and scanner to create and organize your digital image collections. A quick overview here not only whets your appetite but also prepares you for the more in-depth coverage in Chapters 16 and 17. In addition, throughout this chapter you must remember that even though photos don’t move, digital images do make up an important piece of the multimedia framework. For example, you can drop a digital picture into a movie with Windows Movie Maker and use that picture as an opening shot, scene change dissolve, or put text on the picture for a fancy final credits screen with music playing in the background as the slideshow runs.
When you first start Photo Gallery from your Windows Start menu, you might see only a blank window where you’d normally expect pictures to appear. You have to click the File toolbar button to display a menu and select Add Folder to Gallery to select your primary (or top-level) pictures folder, and from there you can begin to manage and edit your current pictures.
By the Way
Photo Gallery initially looks in your Public folder’s Pictures subfolder for pictures to display. If you have pictures there, they will appear even if you don’t specifically tell Photo Gallery about them. As you add more pictures to that location, Photo Gallery constantly updates its screen to include the new pictures.
When pictures begin to appear, whether Photo Gallery finds them in your Public folder or you tell Photo Gallery where they are, Photo Gallery begins to fill its screen with thumbnail images sorted by picture date (see Figure 14.3). You will soon learn many ways to organize and group your photos.
Figure 14.3. Photo Gallery initially displays thumbnail images of your photos.
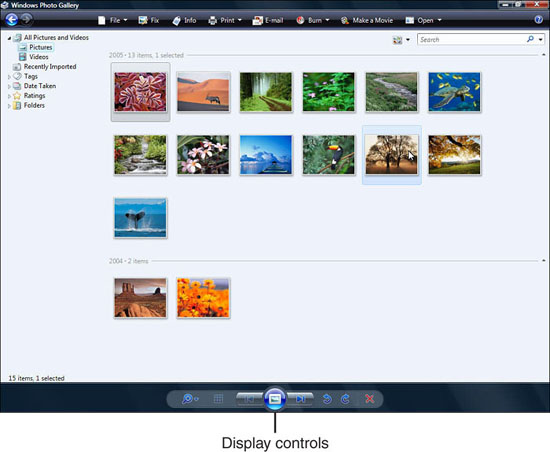
A Photo Gallery control panel appears at the bottom of the Photo Gallery program window. Using its controls quickly enables you to perform the following actions:
- Increase or decrease the zoom level of the thumbnail images that appear in Photo Gallery.
- Set the thumbnail’s default size.
- Move back through your photos one at a time, which is especially useful when viewing your images one at a time in the editing mode. How you view your photos determines the meaning of back; for example, if viewing by date, the Back button selects the next photo earlier in time.
- Play a slideshow of your photos in the current folder.
- Move forward through your photos one at a time, which is especially useful when viewing your images one at a time in the editing mode. How you view your photos determines the meaning of forward; for example, if viewing by date, the Forward button selects the next photo later in time.
- Rotate a photo 90 degrees counterclockwise (a quarter of a complete rotation).
- Rotate a photo 90 degrees clockwise.
- Delete a photo. You must confirm the deletion before Photo Gallery sends the deleted image to your Recycle Bin.
After you begin to populate Photo Gallery with photos, you will start to organize them by date, subject, or even rating, using a five-star rating system. You can also edit photo images to adjust exposure and color, crop a photo to decrease its size, and fix the red eye effect that can appear when photographing people or animals with flash photography.
By the Way
You now have enough information to get started using Photo Gallery. If you need more help, Chapters 16 and 17 explore Photo Gallery’s feature set in more detail.
Stop, Look, and Listen with Windows Media Player
Windows Media Player has been around since Windows 95. Microsoft had updated Media Player more times than Internet Explorer, showing a strong commitment to the player and a desire to improve the entertainment experience available to Windows users. Vista’s Media Player is an extraordinary player that enables you to view pictures (a feature that’s been available in Media Player for years and even some power users don’t know about it), listen to music, and watch videos.
If you’ve used Windows Media Player in the past, you’ll be pleasantly surprised at how simple to use the new features are and yet how they dramatically amplify the functionality of Media Player. Start Windows Media Player from your Start menu or by clicking the Media Player icon on your Taskbar’s Quick Launch area. From a brand new interface (see Figure 14.4) to lots of new features that take advantage of today’s entertainment needs, there’s a little for everyone.
Figure 14.4. Vista’s Media Player ups the digital player ante with a new interface and new features that take advantage of today’s entertainment environment.
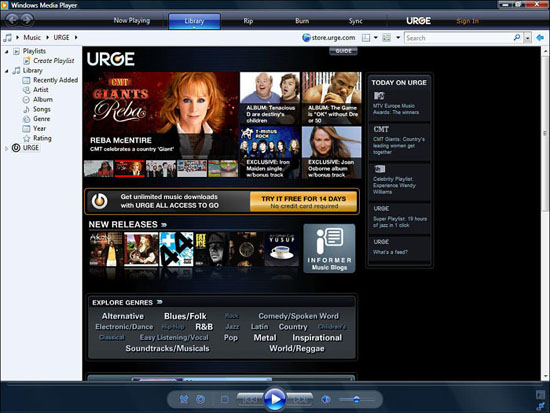
At the risk of letting this turn into something that sounds like a Microsoft-paid commercial, let me say that I’ve used Media Player for years and although I’ve bought most of the major digital media players, including MusicMatch, QuickTime, and RealPlayer, I find myself returning time and time again to Media Player. It’s always there, it loads quickly, and its feature set leaves little to be desired. In Vista’s Media Player, you can
- Easily organize your pictures, videos, and music
- Show pictures, play music, and watch videos
- Rip music from audio CDs
- Burn music to CDs and DVDs by dragging and dropping files onto the interface
- View album cover art that comes from the Internet when you rip music from CDs, and search through your music by browsing the album covers just as you might do in your CD rack
- Synchronize portable devices with your music library
- Buy music that you download from MTV’s new Urge service
Did you Know?
You will notice as you work in Media Player, Photo Gallery, and other types of Windows Vista Explorer–like windows that many new features overlap each other. For example, you can sort your music by date or by rating preference (based on a five-star rating) just as you can organize your photos in Photo Gallery. Keep in mind that Windows Vista is about as integrated as possible. By offering similar features and interfaces, you’ll create synergy as you use Windows. For example, you can display pictures in Media Player just as you can in Photo Gallery. It makes sense to retain the same five-star ratings system and organization abilities in both programs so that you can locate what you want quickly. Even the playback control at the bottom of Windows Media Player looks quite a bit like the Photo Gallery control at the bottom of the Photo Gallery window that you saw in the previous section.
Certainly, Windows Media Player is one of the programs you’ll want to start using right away if you enjoy music in the background as you work on your computer. If you start Windows Media Player and don’t see any music, video, or photo files, you’ll have to add those files to Media Player’s library. (This also holds true if you store your files on a network drive or on an external USB drive.) To add your files so that you can enjoy them in Windows Vista, click the toolbar’s Library button and select the Add to Library option to display the Add to Library dialog box shown in Figure 14.5.
Figure 14.5. You might have to tell Media Player where your video and music files are stored.
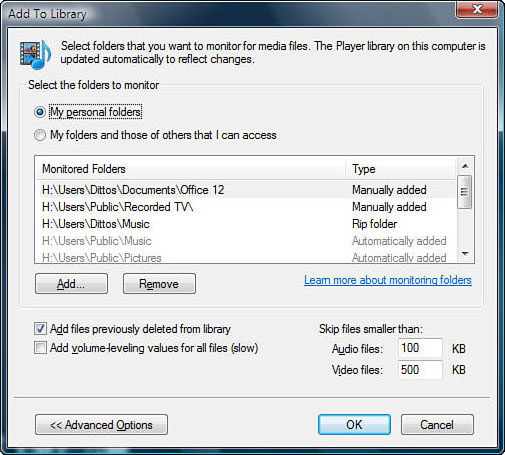
By default, Windows Media Player asks whether you want it to monitor your personal folders for the presence of music files or both your personal folders and those of other users (if you have permission to view them). If you store all your digital audio files in the default Music folder, clicking either option and selecting OK is all you need to do. However, if you store your music files elsewhere, you can click the Advanced Options button to locate your multimedia files and tell Media Player to index them.
Opening the Advanced Options portion of this dialog presents you with a list of folders that Media Player monitors for the presence of audio files. To add a folder location to that list, click the Add button and navigate to the folder you want to add (when you select a folder, any subfolder that resides within it is also monitored). After you add one or more locations, Media Player will always look to those locations in the future to update and refresh its library of multimedia files.
Did you Know?
The Windows Media menu is hidden by default. You can press Alt to select an option from the menu (such as Alt+F to open the File menu). In addition, you can display the menu by pressing Ctrl+M or select Classic Menus from the View menu if you wish to see the menu.
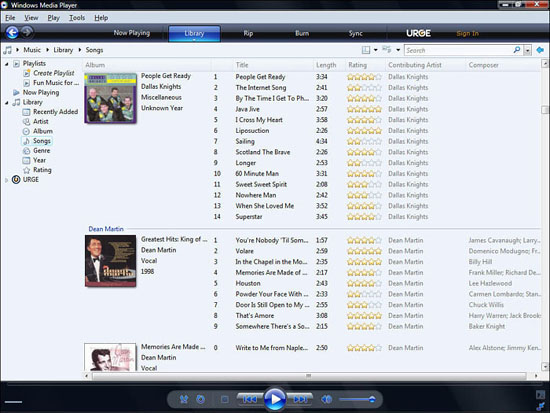
Now that you’ve added your multimedia files to Media Player’s library, click the Library button to browse through your music. You’ll see album covers for some, but not for others, depending on whether Media Player has downloaded information for each track’s albums. Figure 14.6 shows such a browsing session, although you can browse and search through your music in many different ways in addition to browsing through titles and album covers. To play a song, just double-click the file’s icon.
Figure 14.6. Browse through your online music collection by album cover, title, rating, or by song.
Did you Know?
As long as you have an active Internet connection, Media Player searches through your music library and fills in the album cover pictures when it finds a match in the online music databases. Depending on the number of music files you have, this could take a while, but you can work in Media Player and other Windows applications while Media Player collects the pictures.
By the Way
If an album cover (of course, that means CD cover today, although album cover is still the preferred term even when referring to CDs) fails to appear, you will learn how to correct that in Chapter 15, “Managing Your Entertainment Experience with Media Player."
Media Player can also display any photo in your Picture library if you happen to use Media Player to open a Picture folder. Just click the arrow at the bottom of the Library button at the top of the screen and select Pictures to view your pictures. In the same manner, you can locate video files and recorded TV shows if any exist on your computer or your networked files. Media Player uses the first frame from your video as a thumbnail picture so that you can quickly locate the video you want to watch. To play a CD or DVD, simply insert the disc into your CD or DVD drive (often the same drive); Media Player starts automatically, if you haven’t already started it, and you can begin enjoying the disc’s contents.
Did you Know?
The Library button is the primary button you will use to move between types of entertainment data in Media Player.
You might wonder why Media Player displays photos and enables you to search for them using a similar interface to Photo Gallery. Why have Photo Gallery if Media Player does the same thing? Actually, Media Player does not have Photo Gallery’s full feature set. Photo Gallery supports the editing of photos as well as gives you the ability to create a slideshow with the click of a button. Just as Media Player doesn’t support the editing of movies (Movie Maker does that) but plays movies, Media Player doesn’t support the editing of photos, but does display photos when you want to view them. Each application in Windows does what it was designed to do well, but several Windows Vista applications overlap in their features in the name of offering you more flexibility. The idea is to give you what you need when you need it.
Record Audio with Vista’s Sound Recorder
Surprisingly, Windows Media Player doesn’t provide a way for you to record from a microphone or an external sound source. One underutilized Windows program that’s been around for many years is the Sound Recorder application, shown in Figure 14.7. Chapter 18, “Recording Simple Audio,” explains how to use Sound Recorder and how to get the best sound.
Figure 14.7. Sound Recorder’s recording meter, shown here at low volume, visually shows your recording’s peaks and valleys as you record.

If you’ve seen previous versions of Sound Recorder, Vista’s Sound Recorder might seem rather lean. Microsoft stripped Sound Recorder of many of its features but its primary purpose, recording audio, is still functional and quite usable. Vista does not restrict the length of recordings you can make as previous versions of Windows did and Vista automatically compresses your recorded audio using files in the Windows Media Audio (WMA) format.
Why might you want to use Sound Recorder? One place it’s used quite extensively, for those who know to do so, is on a laptop, recording meetings and lectures. Instead of taking copious notes during a meeting, start Sound Recorder and plug an external microphone into your laptop to begin recording. Many laptops have built-in microphones, so if the sound’s volume is strong enough and you don’t need high-quality, high-fidelity recording, you’ll find that your laptop’s built-in microphone should capture what you need.
Windows Movie Maker Puts Hollywood’s Tools at Your Disposal
Windows Movie Maker, shown in Figure 14.8, is often overlooked as a video-editing tool. That’s a shame because since Microsoft released Movie Maker 2 for Windows XP, Movie Maker has had a feature set that includes all the standard video-editing tools you might want for simple movie creation, with enough extras, such as special effects, to satisfy those who want to add some pizzazz to their movies.
Figure 14.8. Movie Maker includes a feature set that enables you to put together video clips and edit movies.
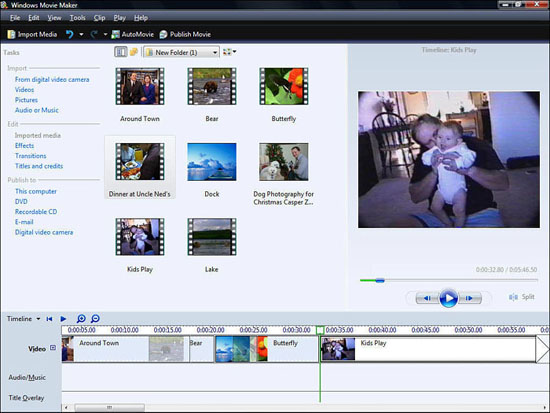
With the introduction of Windows Vista, Microsoft again updated Movie Maker with new special effects and scene transitions. Before Vista, Movie Maker previewed movies in a small 320 × 240 pixel window. Now you can preview your movies as you edit them in a much larger preview screen, enabling you to see the details you want to see. You can also add menus and chapters to your movies so that when you burn them to a DVD, your DVD’s audience members can search and scan to their heart’s content.
By the Way
In spite of its improvements, Movie Maker is no competitor to more complete video-editing applications such as Adobe Premiere Elements, but Microsoft didn’t design Movie Maker to compete with such programs. Movie Maker is a workhorse that’s always there, giving you a way to edit your videos and put them together into full-length movies using a simple interface with enough bells and whistles to satisfy many of introductory video-editing requirements. For some people, Movie Maker is the only video-editing program they need to do what they want to do.
If you’re new to editing videos but you want to put some home movies onto DVD, Movie Maker is probably the best place to begin. Chapter 19, “Making Movies with Windows Movie Maker,” teaches you how to use Movie Maker’s basics. Given that this chapter’s intent is to give you the bird’s-eye view of Windows Vista’s multimedia tools, here is a list of features Movie Maker offers:
- Import video from files or a video camera
- Combine multiple video clips from any source in a single movie
- Delete and rearrange portions of a movie
- Place movie clips on a storyboard and timeline to synchronize and arrange your movie until it’s just the way you like it
- Add sound and narration over your entire movie or parts of it with a microphone or with audio files
- Use CD or MP3 music as a background to your movie or opening and closing credits
- Add opening titles and closing credits
- Publish your movie to a DVD, recordable CD, email, or videotape
Introducing Your New Entertainment Center for the Twenty-First Century: Vista’s Media Center
Now that you’ve seen what multimedia applications await you in Windows Vista, it’s time to spend a few pages covering what might be new to some Windows users, even those who have used Windows quite extensively in the past: the Windows Vista Media Center.
Media Center, which was first released a few years ago as its own version of Windows, provides a customized user interface that’s basically glued on to of the existing Windows user interface with the intent of making your computer the center of your home’s entertainment center. At its heart, Media Center is an application, just another program as Photo Gallery and Media Player are. In addition, Media Center includes several hardware-related drivers and accessory programs that enable you to use your PC with the Media Center software in your living room to access and control all your video, music, and pictures. For some, the idea of moving the computer out of the office or bedroom and into the living room seems strange, but your computer is a great tool to organize all your entertainment from a central location.
Before Windows Vista, Microsoft licensed Media Center for use in Media Center PCs, computers that ran a special version of Windows XP with Media Center embedded throughout the operating system. Instead of the usual Windows opening screen, users saw a Media Center menu when they turned on the computer. From that menu, they could select what they wanted to do: see pictures, watch a movie, listen to music, or watch (or record) from television.
Media Center Isn’t for Everybody...Yet
Now that Media Center is included with Windows Vista instead of being a standalone product, any computer that meets its hardware requirements can become an entertainment center. Not every reader has a need for Media Center and not every reader has all the media connections, such as a television tuner, available at their computer. Media Center assumes that your computer has television access, your computer is situated close to your family television, and everybody’s ready for the computer-controlled entertainment experience.
Such an experience is nice. But we’re not all ready to put a computer in our living rooms.
Therefore, given that Media Center is not a Vista program quite ready for universal use, the rest of this chapter explores some of Media Center’s setup and operation. Instead of devoting a complete chapter to Media Center, this chapter introduces you to Media Center and shows some ways you can benefit from it. If you decide to take the Media Center plunge and use it to control your home’s primary entertainment activities, that’s great, and you’ll be ready for a more detailed step-by-step tutorial.
Setting Up Media Center
Vista requires you to set up Media Center before you can use it. The setup makes sense because each home (or business) that uses Media Center will have its own combination of entertainment devices and sources. Media Center can make no assumptions about what kind of media connections await it.
When you first start Media Center (by selecting Media Center from the Windows menu), an opening screen welcomes you, as shown in Figure 14.9. This screen begins the Setup Wizard that walks you, step-by-step, through Media Center’s setup.
Figure 14.9. Follow the Setup Wizard to inform Media Center about the entertainment sources you have connected to your PC to control.
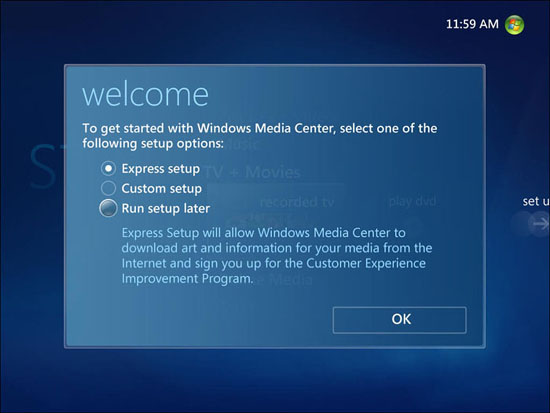
Click Next at the Welcome screen to continue the setup. The second screen informs you that the setup works in two stages: the required setup and the optional setup. The first setup is required because Media Center must know what networking and Internet connections your computer uses. To take advantage of Media Center’s features, you’ll need an always-on, high-speed Internet connection. To be able to access media content on other computers on your network, you’ll need to have a wired or wireless network that Media Center can access.
The optional setup isn’t truly optional because to use Media Center to its fullest, you have to tell it about your needs, entertainment desires, and so on. This setup is optional only in the sense that you don’t have to complete the optional setup at once. As you want to do more with Media Center, you’ll have to run the optional setup again to change and update the settings to suit your current needs.
Running Media Center’s Required Setup
The required setup is straightforward. In a way, it’s redundant. Windows Vista knows about your Internet connection, and yet Media Center asks whether you have an always-on Internet connection. (If you don’t, Media Center’s feature set is reduced dramatically—almost to the point that you should wait to set up Media Center until you do.) After you tell Media Center that you have an always-on Internet connection, Media Center runs a quick test to verify that the connection is working properly.
After verifying the Internet connection, the Media Center setup asks whether you want to read a privacy statement that describes how Microsoft and related online partners will use information you supply. Click the down arrow to read the rest of the privacy information. In today’s world many people are concerned about how and where information about them is used.
By the Way
As with software warranties, the privacy statement can be a little vague and legal-sounding. Still, by reading it, you’ll have a better idea of how Microsoft handles information about you and your activities that it learns through your Media Center use. If learning “about you and your activities” seems somewhat ominous, it’s not really that way. Microsoft has a vested interest in keeping your information anonymous and confidential, and the privacy statement is Microsoft’s attempt to reassure you that it will do so as much as it can.
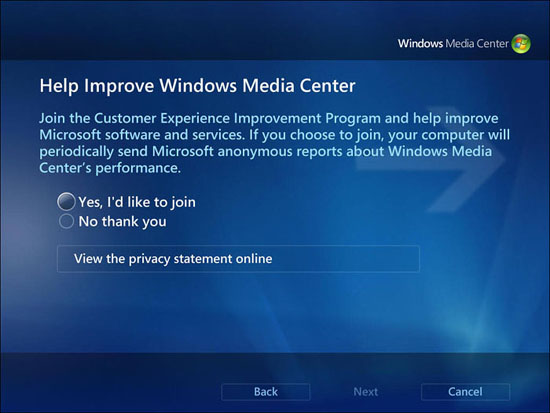
Click the Done button when you finish reading the privacy statement to continue your Media Center setup. You’ll be greeted with a screen titled Help Improve Media Center and an offer to join the Customer Experience Improvement Program. If you elect to join by selecting Yes, your computer will periodically send anonymous reports about your Media Center performance so that Microsoft can analyze the data and determine whether updates are required to Media Center to improve certain performance measures.
Did you Know?
There are times when, through your use of Media Center (the Windows Media Player also has this capability), you’ll send personal information over your Internet connection. When you subscribe to a music service, for example, and purchase songs for playback, you’ll have to give information for the transaction to go through. The privacy statement explains the steps that Microsoft takes to help guard your personal data whenever and if ever you have to send it through the Media Center.
The Customer Experience Improvement Program, which comes up next, does not monitor the same information covered in the Privacy Statement. The Customer Experience Improvement Program is a way for Microsoft to send actions (that is, the ways that people use Media Center) without receiving personal data of any kind. As Microsoft learns the ways that people use Media Center, it can issue updates to make Media Center more enjoyable, more workable, and more efficient for you and other users. Figure 14.10 shows Media Center’s request to join.
Figure 14.10. If you allow Media Center to send anonymous information about your use habits periodically, Microsoft can better analyze how you and others use Media Center and provide updates that make the software better over time.
Should you join? It’s not like a club you join and, by using the term join, Microsoft somewhat masks what you’re agreeing to. With that in mind, there are benefits to joining, although they are indirect to you. As more people join and send more usability information to Microsoft’s servers, Microsoft will improve on Media Center, and you and other users will be the beneficiaries of those improvements. If nobody agreed to send this periodic information, Microsoft would have no feedback as to how people use Media Center, or what problems they encounter, and improvements would come more slowly and be less helpful.
Joining is up to you. The data sent to Microsoft’s servers is small, so it won’t bog down your Internet connection. Therefore, don’t let that be a reason to stop you from agreeing to the program. If extreme privacy is a concern for you, you might be averse to sending such information and that’s fine, too. It’s nice that Microsoft gave us a choice.
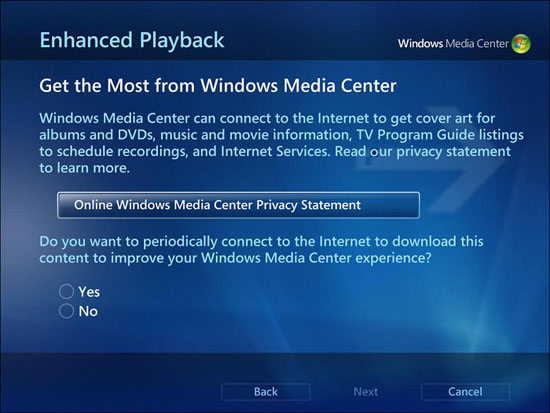
The Enhanced Playback screen now appears, as shown in Figure 14.11. Just as Media Player goes to the Internet to download album covers, so can Media Center if you allow it by selecting Yes on the Enhanced Playback screen. Most people like the album cover photos to appear when browsing or playing music and videos, and if you’re one of them, select Yes and then click Next.
Figure 14.11. If you give Media Center permission, Media Center can download album covers to accent your music’s playback and browsing.
After you inform Media Center of your decision to download album cover art, a final screen appears telling you that the required setup is finished. Click Next to move to the optional setup.
Running Media Center’s Optional Setup
Media Center’s optional setup provides the two following options:
- Optimize your Media Center’s screen output
- Set up your Media Center’s speakers for the best sound possible
Many people will elect to skip these steps and return to them if problems or adjustments must be made later. Doing so is fine, but running through the setup isn’t time-consuming.
To set up video playback, Media Center runs a short video so that you can determine whether playback on your display is adequate. A computer running Media Center often connects to a large television through some kind of digital input. Because Media Center isn’t talking to a normal computer video screen, the playback of video and photos can be somewhat off-center or perhaps off-balance in color or brightness. By watching the video, you have a chance to learn about potential video problems early and correct them now. As you play the video, the video’s narration describes ways to correct problems you might see and make your Media Center experience more enjoyable.
When the video finishes, the Setup Wizard walks you through the video setup. You’ll provide information about the type of display you use so that Media Center can send the best output for that device. For example, if you use Media Center on a traditional computer monitor or TV display, the shape of the screen differs greatly from the shape of a widescreen monitor or HDTV. In addition, but the cabling you use to connect your PC to a display can vary as well. During the video setup, you’ll supply information about the connection, including whether to use your PC’s TV tuner card (if it has one), and Media Center adjusts its display and functionality accordingly.
After setting up your video playback so that you get the most from your display, you can optionally run through a similar (and shorter) setup for your audio playback. The Audio Setup Wizard enables you to inform Media Center about speaker placement and the type of sound system you have connected to move the sound from your computer to the speakers that people ultimately hear.
Using Media Center
After you set up your Media Center program, using it is simple. Keep in mind that Microsoft designed Media Center as an entertainment-controlling program for the entire family. For that to be successful, Microsoft had to make the software simple to use. A menu such as the one in Figure 14.12 appears when you start Media Center.
Figure 14.12. Media Center’s menu gives you quick access to your entertainment options.
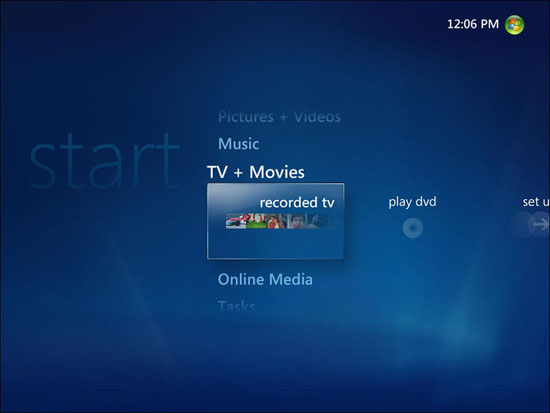
You’ll find that you can most easily scroll through the Media Center menu using your Up Arrow and Down Arrow keys. The menu includes the following options:
- Pictures + Videos—Gives you access to your digital picture and online video collection.
- TV + Movies—Enables you to play DVDs and movies you’ve saved to your disk or network. When you select a movie, Media Center displays a synopsis of that film. In addition, you can record television shows, pause live broadcasts, and watch television.
- Music—Enables you to play music from your digital music collection, from a CD, or play broadcasts from an Internet radio broadcasts.
- Online Media—Provides an online showcase of music, TV shows, movies, music, Internet radio, news, sports, games, and lifestyle-related media that you can enjoy from the Media Center.
- Tasks—Gives you the option to burn CDs or DVDs with digital content, synchronize your portable media players with your Media Center library, shut down Media Center, and adjust some options related to the optional Media Center Extender program (available by subscription). Several tools are also available so that you may adjust your Media Center settings, such as specifying startup and window behavior, electing to use visual and sound effects, adjusting parental controls to protect family members from certain rated content, adjusting your tuner and music settings, and other options that control the way Media Center operates for you.
By the Way
Some movies are available for download through Media Player’s Urge service or another download site. Some allow you to play the movies only from the computer you download them to, due to copyright restrictions.
Did you Know?
When you arrive at a Media Center menu option, such as Music, press your Left Arrow and Right Arrow keys to see additional options, such as selecting music from your saved music library or playing a radio broadcast from an Internet radio station.
As you move through the menu and select options, move your mouse to the top-left corner of your screen to click the Back button. The Back button works somewhat like a web browser’s Back button by taking you back one menu option at a time. (There is no Forward button to return to where you were before clicking Back.) If you have a keyboard with Internet-related buttons, your keyboard’s Back button will return you through Media Center’s menus.
Did you Know?
You’ll find that your Media Center’s experience is richer if you use a wireless mouse and keyboard so you’re not tethered to your computer while you enjoy your entertainment selections.
One of the best ways to learn your way around Media Center is to use it. You’ll find that many elements overlap each other. For example, from the Music menu, you can locate Internet-fed TV shows and movies that you can watch or download to your computer, many of which are free.
Media Center will usually recognize your Media Player’s library contents and add your media to its library. When you first enter the Music Library section, Media Center asks if you have additional folders you want to add to the library (see Figure 14.13). If you do, you’ll have to go through the same add-to-library process that you do with Media Player by telling Media Center where additional music files are stored.
Figure 14.13. You’ll need to tell Media Center where your music folders are so that it adds those titles to its library.

After you add music to your Media Center library, Media Center gives you all sorts of ways to access your music. You can search by album cover, artist, genre, song title, and so on. As expected of a Windows Vista application, Media Center makes locating your music and other entertainment files easy.
You must have some television connection attached to your computer to use the television features. For example, you can connect an antenna or cable television cable (this won’t include any pay or digital cable channels to which you subscribe) to a PC tuner card to access the television-related features. When you watch a show, Media Center offers VCR-like controls that enable you to pause the show or to start recording it. In addition, you’ll find a VCR-like timer that enables you to record shows that will play some time in the future.
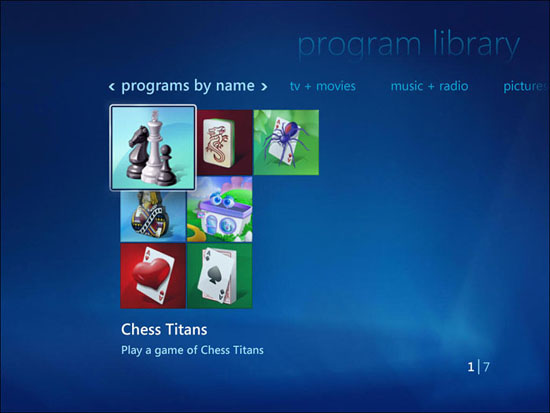
The Online Media provides an interesting catch-all Media Center menu option. When you select the Online Media option and scroll through it, you’ll see that you can access games located in your Vista Games folder (refer to Chapter 11, “Taking Time Out with Windows Vista Games”) and select to run those games on your Media Center display, as Figure 14.14 shows. Even Solitaire takes on a new life when you play it on a 42-inch plasma television!
Figure 14.14. Play games located in your Games folder from within Media Center.
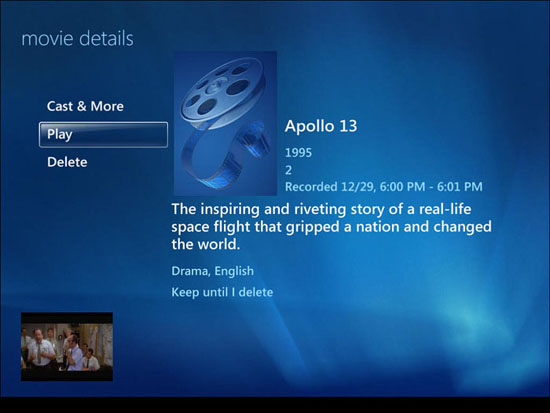
When playing movies located on your computer or network (as opposed to playing DVD movies, which is also possible from the Movie menu option), Media Center can display information about the movie, such as the title, the date and time you recorded it, a summary, the cast and crew, and more. You can even access this information while playing a video. (Useful when your friend asks, “Who’s that actor? I forget his name!”) Move your mouse to the top-left corner of the movie and the Back arrow will appear. Click the arrow to see the movie summary. If you don’t pause the movie first, the movie still plays in a small screen at the bottom of the summary to ensure that you don’t miss anything as Figure 14.15 shows.
Figure 14.15. Media Center can display summary information about movies you’re watching.
By the Way
Some people might wonder, when do I use Media Player and when do I use Media Center? Both have their place. Media Player is better suited for a PC user who wants to listen to music or watch a movie while using the computer to do other tasks. The Media Center application consumes quite a few computer resources, even on the fast computers of today. As a result, you’ll find that running Windows programs outside of Media Center while it plays content isn’t always optimum. Your Windows program will be slow to respond. Media Center truly is designed to be a center of your family’s entertainment control, and not necessarily your home’s primary computer. Most users who begin to utilize Media Center find that dedicating a computer solely for Media Center operations and using another computer for regular computing is the best option.
Chapter Wrap-Up
You just got a whirlwind tour of Vista’s multimedia offerings. It was a quick run-through, but it was enough to give you an overall impression of Vista. If you don’t want to dedicate your computer to Media Center, you’ll find that Media Player and Photo Gallery will serve your entertainment needs just fine in most cases. To utilize Media Center fully requires a constant television signal connection to ensure that you get the shows you want to record. That implies that your Media Center–dedicated computer stays with your family TV, while you use another computer to perform routine computer tasks, and watch an occasional movie or listen to music while doing so.
This chapter only introduced Media Player, Photo Gallery, Sound Recorder, and Movie Maker; the next several chapters more fully cover those Windows Vista programs.