
Black and White in Lightroom Classic
Many photographers enjoy using Adobe Lightroom Classic for post-processing their photos because Lightroom Classic provides a simplified workflow and environment specifically designed for digital photography—the program can also produce great black and white images from RAW originals with relatively minimal effort. Please note that everything is relative—and the Lightroom Classic interface is sophisticated, powerful, and with many bells and whistles. So when I call this application “simplified,” it is in comparison to Photoshop only, and by no means am I minimizing the effort that it takes to truly master Lightroom Classic.
In fact, Lightroom Classic combines the power of the ACR RAW converter (the same ACR conversion software that runs with Photoshop is running “under-the-hood” in Lightroom Classic) with a streamlined user interface. Additional tools in the Develop module, and a sophisticated image cataloging system and image repository help turn Lightroom Classic into what many photographers feel is the best application software for processing their photos.
The trade-off is that Lightroom Classic doesn’t provide the complete pixel-level control of Photoshop. Specifically, Lightroom Classic does not provide the layer and layer masking tools that are at the core of Photoshop. Nor does it provide channel-level control over color spaces. However, there’s plenty of ability to process RAW captures into black and white in Lightroom Classic with a variety of adjustments that can produce custom affects in specific areas. Also, if necessary, you can edit the results in Photoshop for further work. Maybe the best approach is to choose the features you need from each program, and to use both.
Lightroom CC versus Lightroom Classic CC
Somewhat confusingly, these days Lightroom comes in two flavors. You need to be careful about understanding the differences between these two similarly named applications, because they are very different and have very different purposes and functionality. One uses a cloud-based interface and the other uses a desktop interface. This has implications of where your images are stored (the cloud vs. your computer) and what tools are available in each product.
Lightroom CC is an application that is perhaps most comparable to Apple Photo, and is a cloud-based photo service that works across desktop, mobile, and the internet. This is a lightweight, intuitive, streamlined application that lets you work quickly with a cloud-based interface.
Lightroom Classic CC, usually referred to simply as Lightroom Classic, is a desktop application that has been through many iterations and includes a powerful and substantial toolset for organizing and editing your photos.
Both flavors of Lightroom are available for download if you have an Adobe Creative Cloud subscription.
For the most part, unless I am processing a great many photos at one time, I use Photoshop to keep complete control of my black and white creative process. However, there are times where the convenient workflow features (Lightroom Classic makes it very easy to keep track of different versions of an image) and the simplicity of obtaining good black and white results makes me sigh with relief when I use Lightroom Classic.
If Lightroom Classic is already part of your digital workflow, as it is for many photographers, then by all means you should incorporate it into your process of black and white conversion. If you are new to black and white image rendition from RAW originals, then Lightroom Classic may be a great place for you to start with your creative monochromatic digital photography.
Grayscale Conversion Using Presets
The easiest way to convert an image to black and white using Lightroom Classic is to simply use the Lightroom Classic grayscale conversion features. This can be done using the Develop module (see Black & White Mix starting on page 108) or when in the process of importing a RAW image. By way of comparison, the RAW image processed at default “As Shot” color values is shown on page 103.
When I inspected this image before importing it, I felt it would be a good candidate for preset conversion because of the overall acceptable exposure with a smooth tonal range. Even though it was a color image, there was really very little color. As I thought about the image, I realized I wanted to give it an intentionally grainy look.
You can use the Develop module shown below to fine-tune an image that has been imported in black and white.
There are many other approaches to creating black and white images besides the simple two-or-three click approach I’ve shown you here. For instance, you can select one of the Presets on the left of the Lightroom Classic window and use it as a starting place for your black and white conversion. After selecting the Preset, you can use the sliders on the right to make custom adjustments. Over the next few pages, you’ll see some other ways to go about monochromatic interpretation, and how to apply them to your images.

When you import a RAW file into Lightroom Classic you can apply a preset using the Develop Settings drop-down list.
I converted the image to black and white using the B&W High Contrast Lightroom Classic preset.
Once you convert an image to black and white using a Preset, the Treatment setting on the Basic panel switches from Color to Black & White. You can then use the sliders to create a custom look for your photo by adjusting Temperature, Tint, Exposure, Highlights, and Shadows to name a few.

Lightroom Classic ships with a number of really cool presets; in addition, you can create your own custom presets or download them from the web.
However, you don’t have to use the import process to apply presets. Once an image has been imported into Lightroom Classic, you can apply presets and further tweak the image in the Develop module.
Silver Efex Pro and Lightroom Classic
Silver Efex Pro can be configured to work in conjunction with Lightroom Classic. This elegant black and white filter set is explained in the context of Photoshop on pages 150–154, and works pretty much the same way with Lightroom Classic. You don’t need to buy two versions of Silver Efex Pro; the same software works with both Lightroom Classic and Photoshop.
If you have any difficulties installing the Silver Efex Pro plug-in with Lightroom Classic, you can do a web search for “Silver Efex Pro in Lightroom Classic” to find resources.
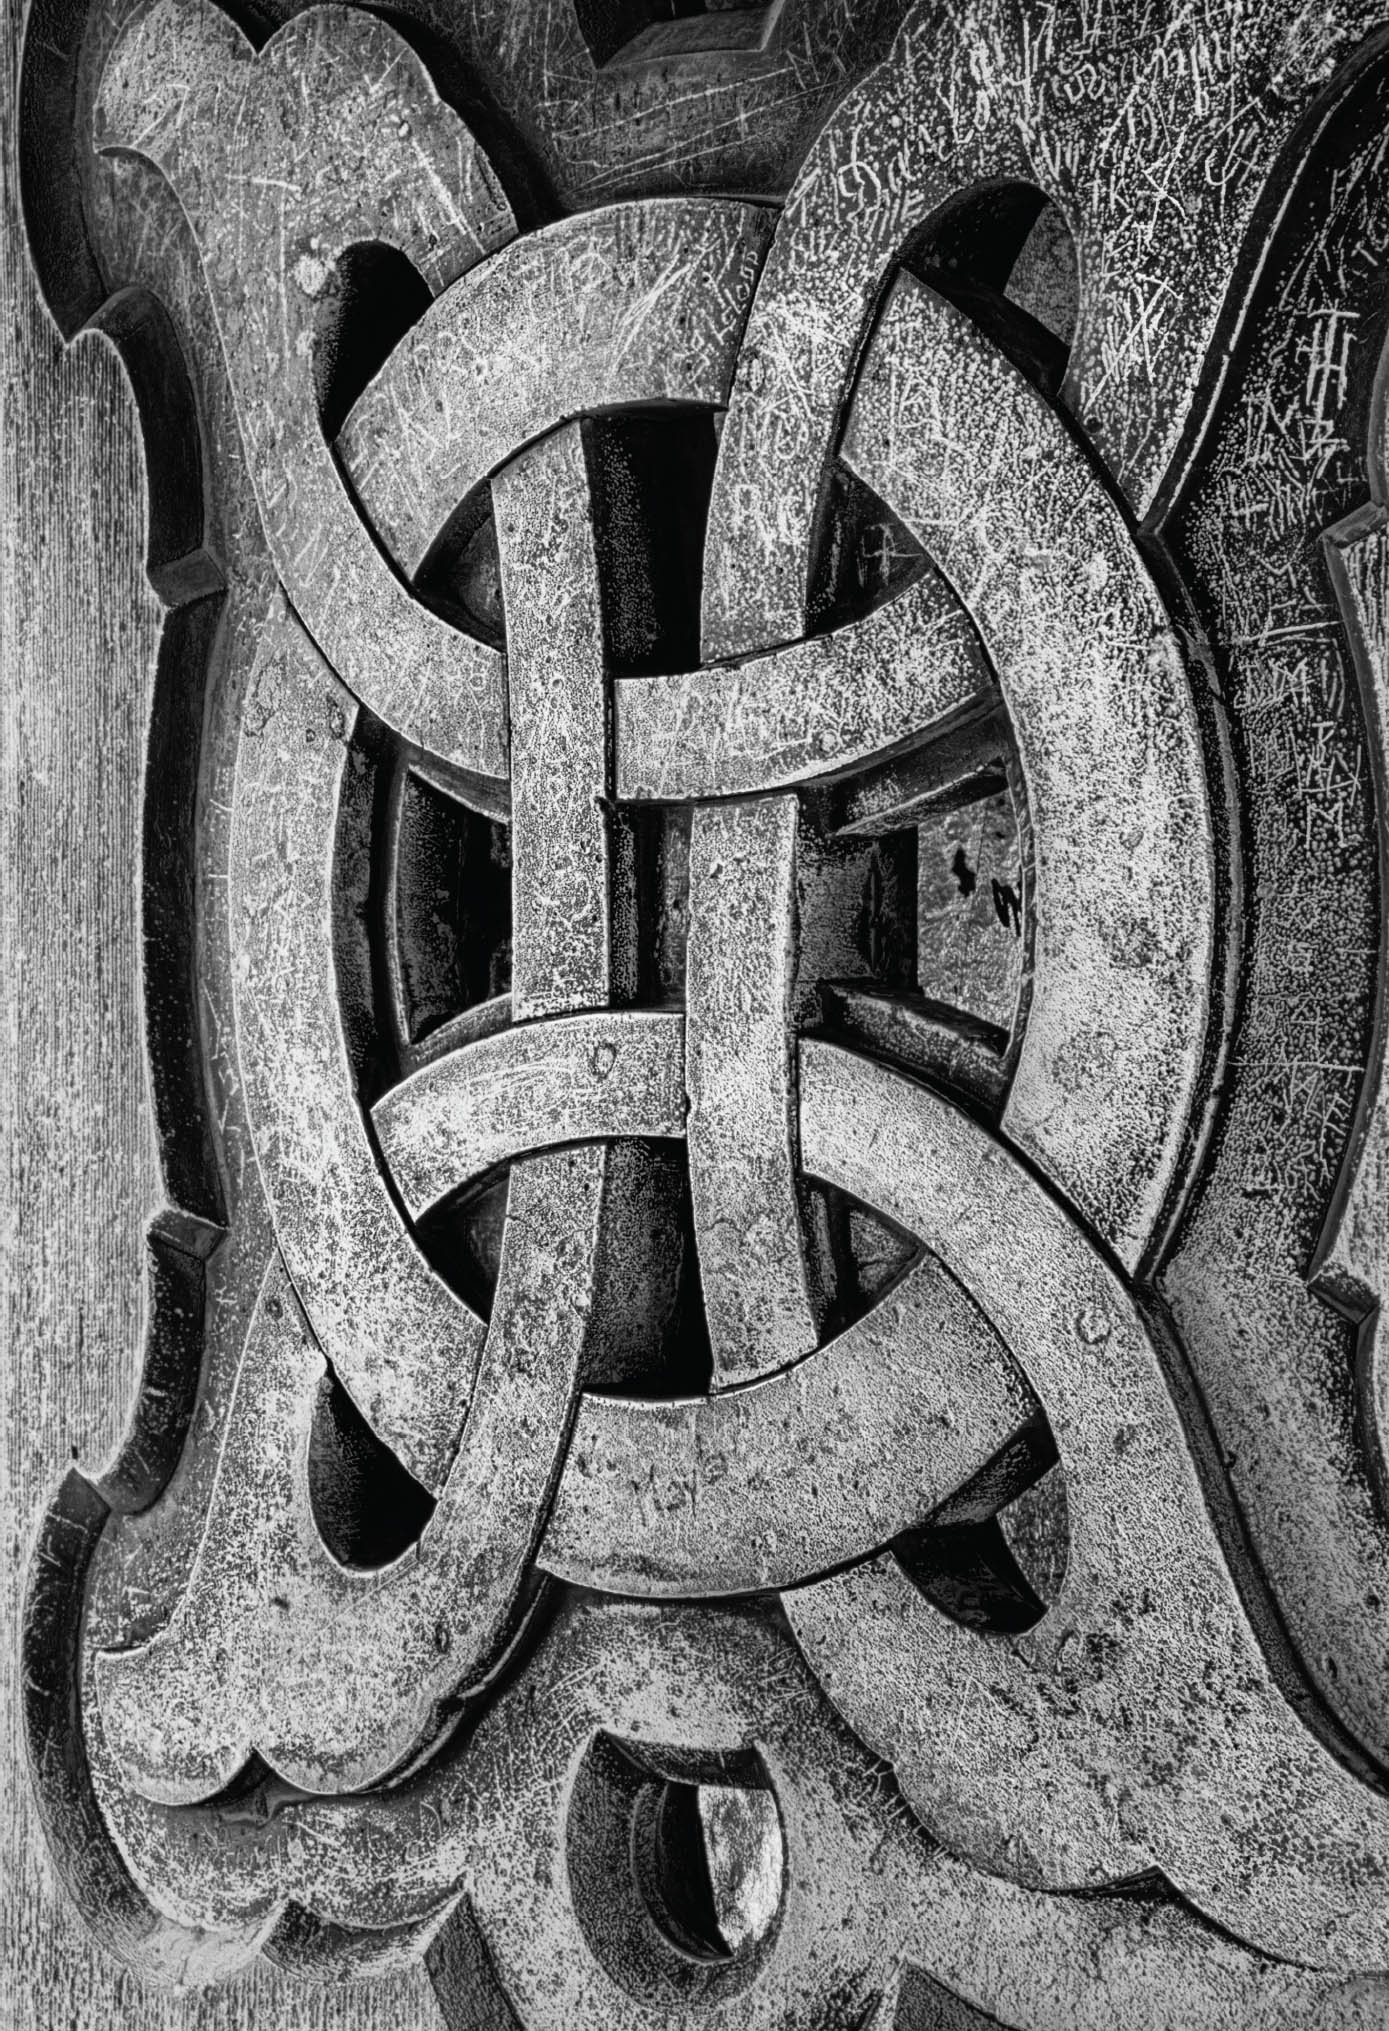
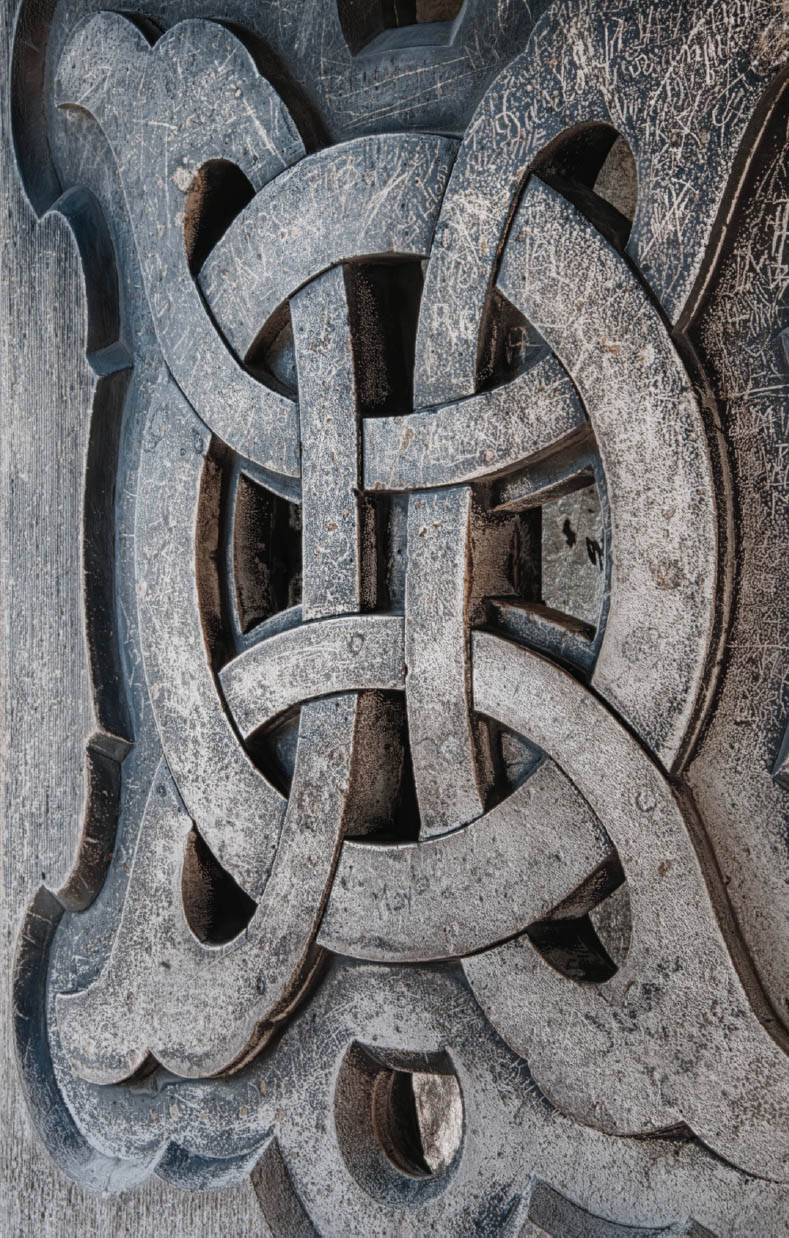
Patina of Time—Visited by millions of people every year, the Cathedral of Sacré-Coeur, gets surprisingly little traffic in the passage that circles the top of the grand dome. Perhaps the narrow and twisting stairs—all 280 of them!—inhibits a few sightseers! In any case, traffic up there is primarily local rather than touristic, and it’s not uncommon to find affectionate Parisian couples in the shadows. It’s also the case that this neglected area has been used as a canvas by generations of graffiti artists—so much so that the overlays of graffiti have come to look like an almost intentional patina on the surface of the decorative architectural elements.
Nikon D300, 82mm, 2 seconds at f/25 and ISO 200, tripod mounted; processed to black and white using Lightroom Classic.
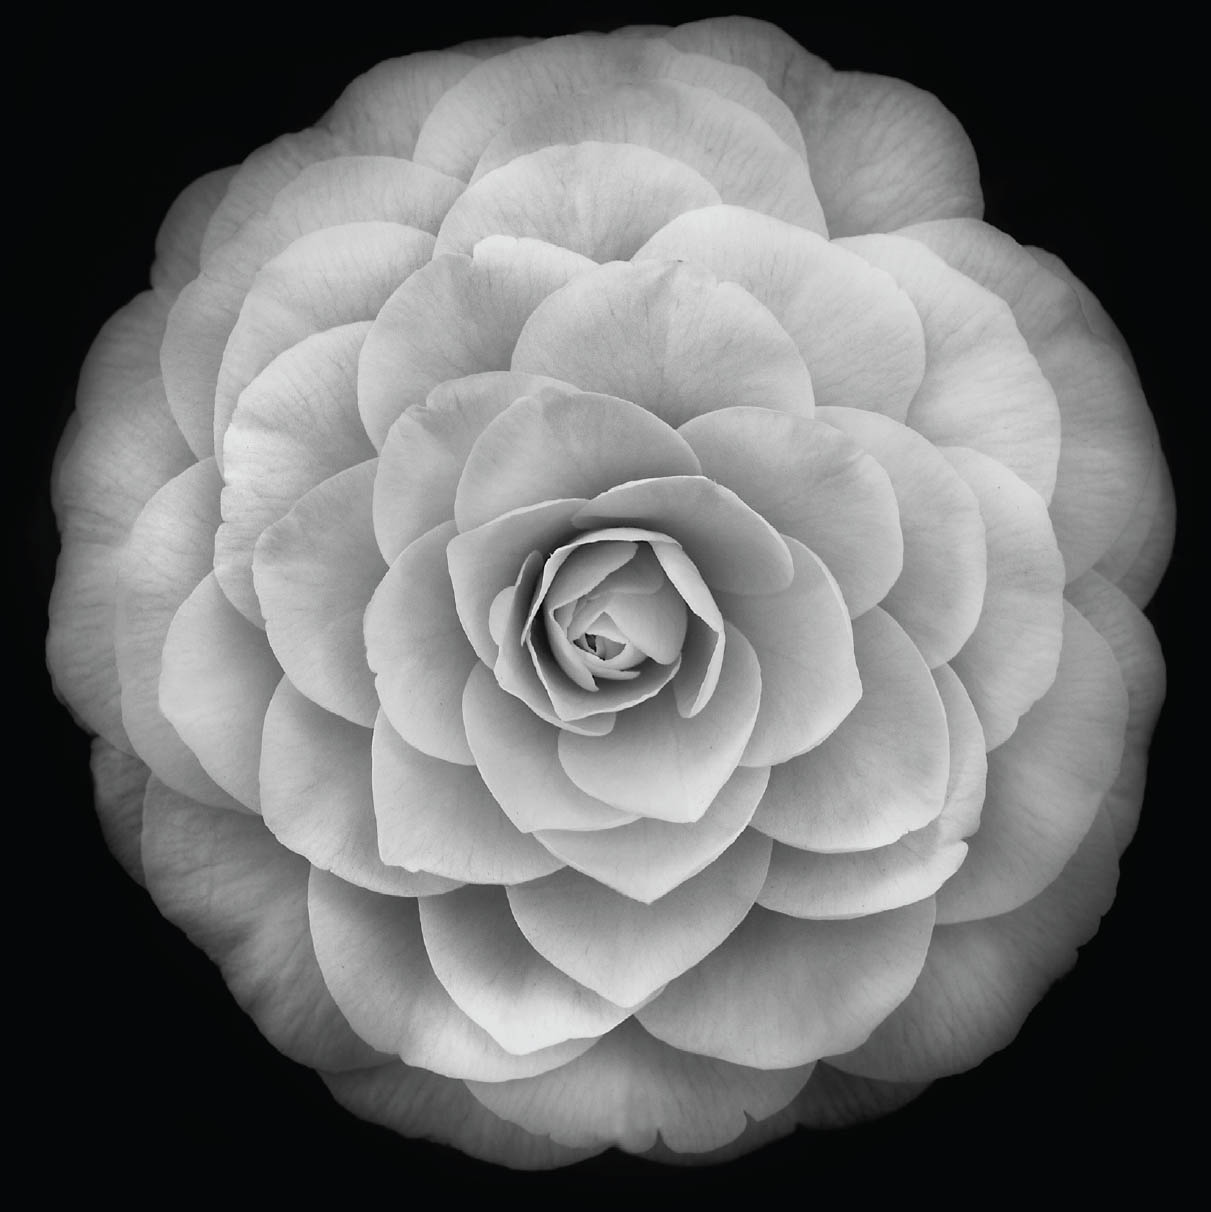
Camellia japonica—I photographed this pink camellia japonica on a black background, and intentionally underexposed (relative to my light meter settings) to render all the detail in the petals. This flower looked good in the color version, and it also works for me in black and white—hence, a “twofer.”
Nikon D300, 200mm macro, 1/100 of a second at f/9 and ISO 100, tripod mounted; processed to black and white using Lightroom Classic and Silver Efex Pro.
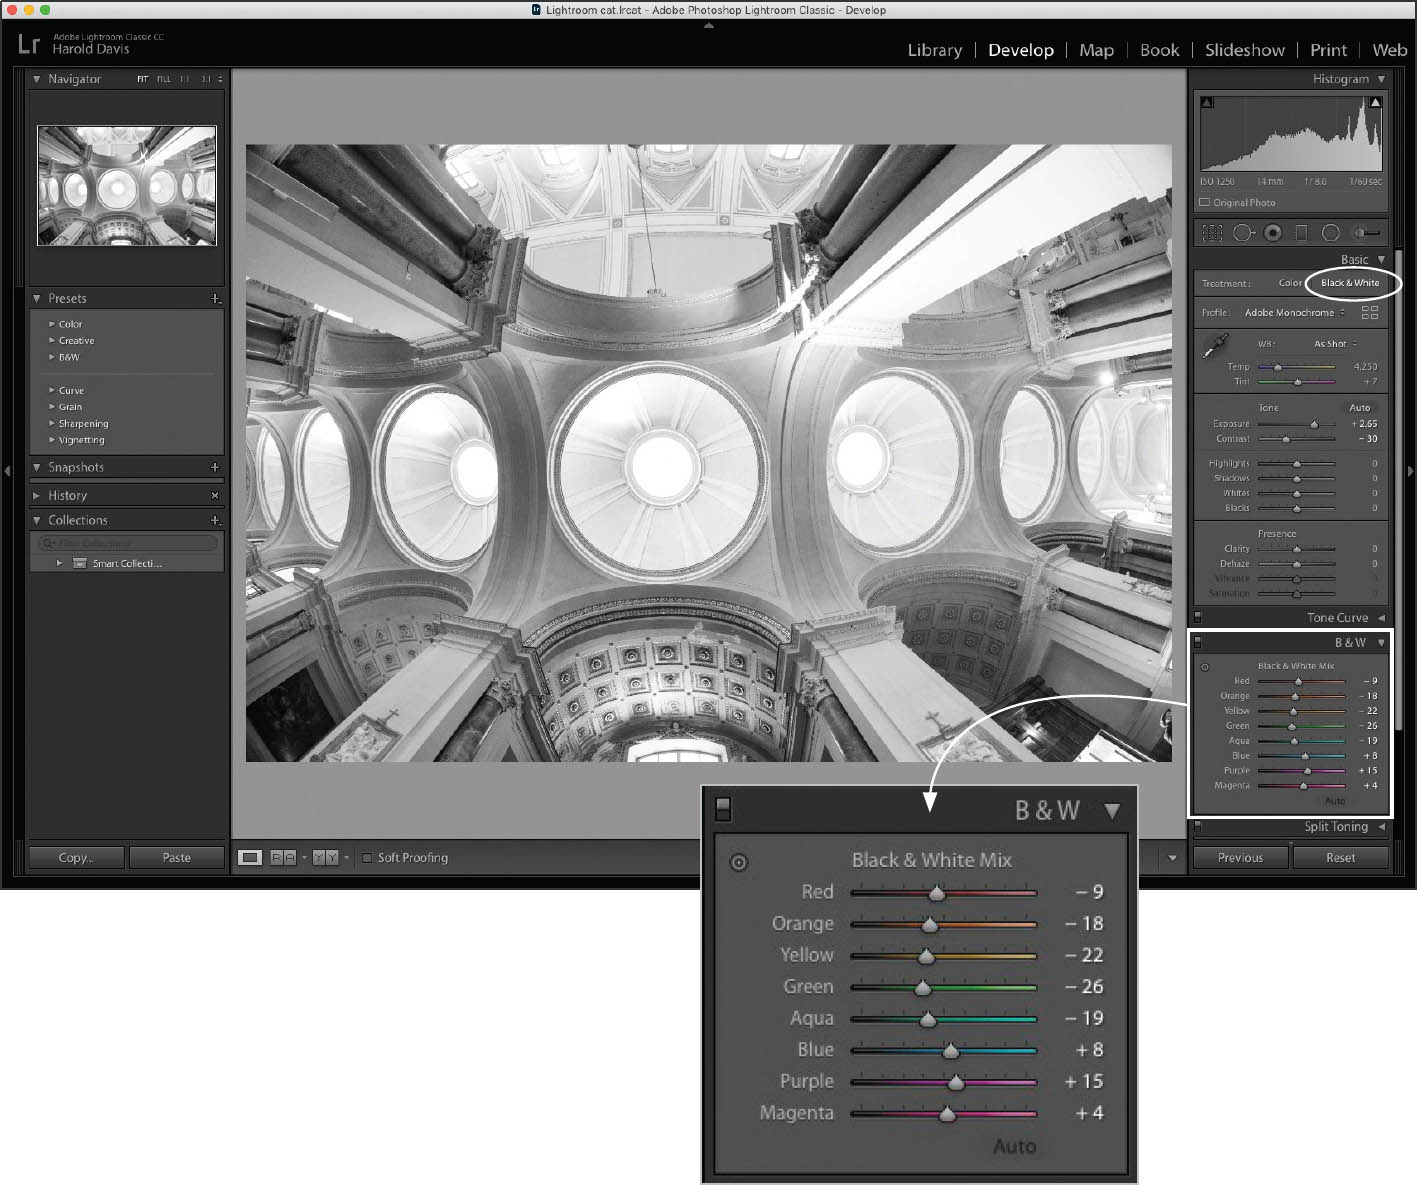
Black & White Mix
You can get a bit more control over your black and white interpretation if you import your RAW file into Lightroom Classic without applying a preset.
Once you’ve imported your image, in the Develop module you’ll find controls on the Basic panel that can be used to set White Balance, Tint, Exposure, and so on. If this reminds you of the comparable controls in ACR, it should come as no shock—they are the same.
As with the Black & White Treatment option in the ACR window, you can use the Black & White Mix panel in the Develop module to determine the way in which the colors in your image are used to blend to grayscale.
Some images require different kinds of work in different areas, as explained on pages 168–173. But perhaps your image is fairly equally distributed in terms of lights and darks across the image. This kind of photographic image, without a great deal of contrast, is sometimes described as “monotonic.” There’s nothing to say that a monotonic image can’t be very satisfying. If you don’t need a great deal of contrast, you can get very satisfactory black and white results quite quickly by importing your RAW photo into Lightroom, then tweaking the settings on the Basic panel and the Black & White Mix panel. When I am in a hurry, this is one of my go-to conversion choices.
First select a B&W Preset, and then use the Black & White Treatment on the Basic panel to adjust the look of your image.
The Black & White Mix panel lets you set how the different colors in your photo are used to create a grayscale image. You can play with the sliders to see their impact on your conversion.
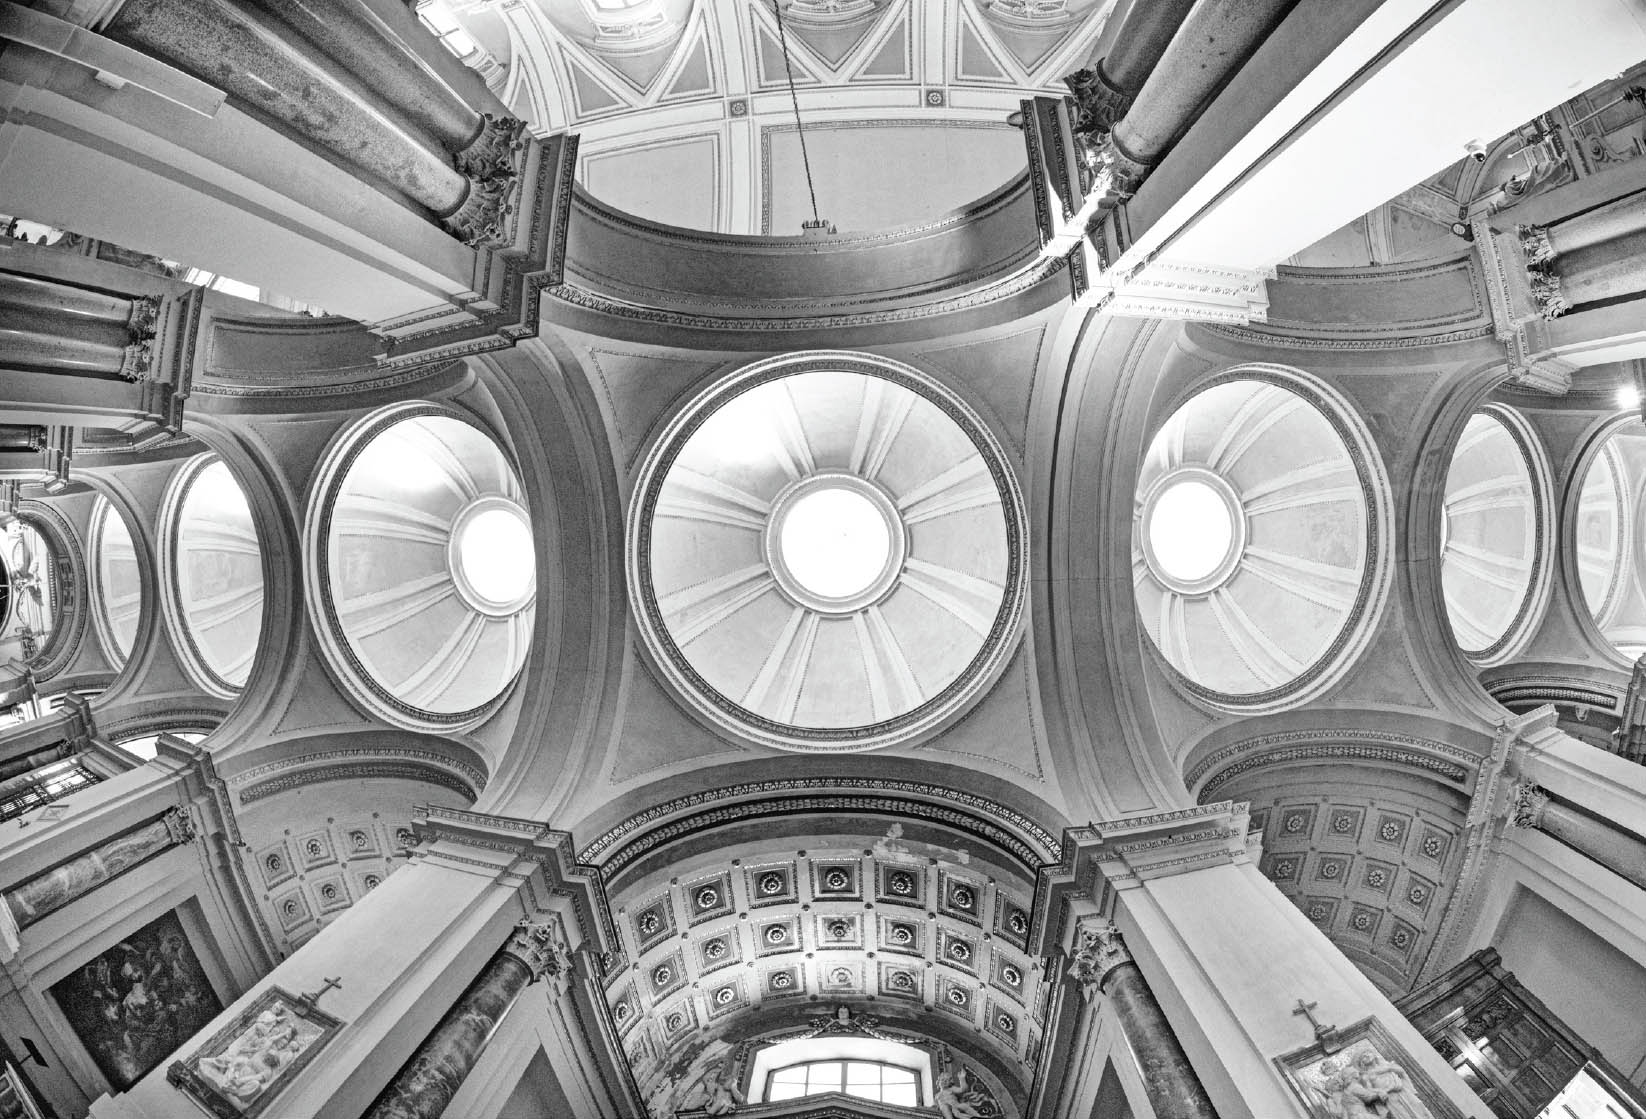
Domes, Palermo Sicily—In Sicily, particularly Palermo, the historical and architectural heritage is a blend of Islam, Byzantium, and the Norman strain of Catholicism. This was really clear to me on a walking tour of downtown old Palermo when I pointed my wide-angle lens (a rectilinear digital fisheye), at the interior ceiling of the 12th century Palermo Cathedral.
Nikon D850, 14mm digital fisheye, 1/60 of a second at f/8 and ISO 1,250, hand held; processed to black and white in Adobe Lightroom Classic.
Exposure Gradients and Adjustments
Photographers are often confronted with exposure challenges in which part of a scene is considerably brighter than the other part. In the days before digital photography, such situations could be met by using a graduated neutral density (GND) filter—for example, darker on the upper part for the bright sky and lighter beneath for the dark earth. GND filters can still be used to achieve this goal, but it is often easier to make the simple adjustment in post-production.
In the chemical darkroom, if portions of the photo were still too dark or too light, they could be “burned” or “dodged.” Burning made a print darker by exposing selected areas longer; dodging made the print lighter in selected places by withholding exposure of the enlarger from specific areas.
Using Lightroom Classic, RAW photos can be easily adjusted for the kinds of exposure problems that were historically treated with graduated neutral density filters or burning and dodging.
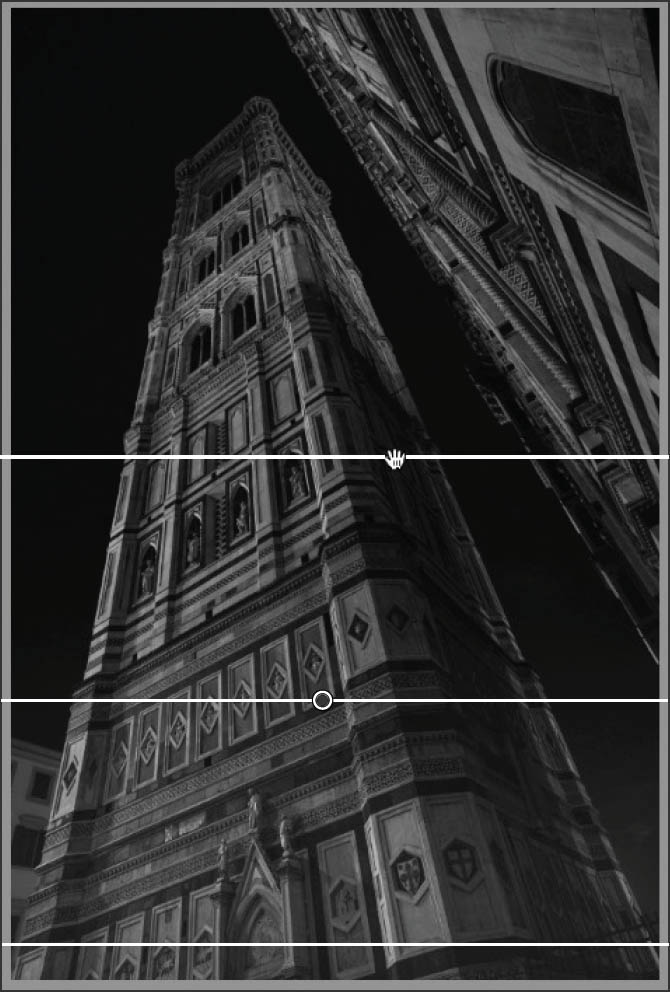
For example, I opened the image shown below in the Lightroom Classic Develop module using the B&W High Contrast preset. You can see that the lower part of the photo is too dark, and that some detail has been lost in the shadow area at the top of the tower.

Once open in Lightroom Classic, I converted this photo of a bell tower in Florence, Italy using the B&W Landscape Preset. If you look at this image, though, you’ll notice that the lower part appears much too dark and some of the detail has been lost in the shadow areas at the top. A great way to fix this is to use the Graduated Filter tool.

Step 1: To adjust the exposure of the top part of the image using a gradient, choose the Graduated Filter tool, found fourth from the left, right under the Histogram. The Graduated Filter allows you to apply changes in exposure using a gradient.
Step 2: Choose the exposure adjustment you want. For example, to make the top part of the photo lighter, choose a positive value for the Exposure slider.
Step 3: Click and drag the mouse up from the bottom of the image to draw the gradient. Notice that as you drag the mouse, lines appear representing the gradient. A circle on the center line shows where the middle of the gradient is. The gradient controls how the exposure is applied—from most at the bottom of the image to the least where you release the mouse. Note that you can view the impact of your changes in the main photo window of the Develop module, and adjust as necessary.
Step 4: When your exposure adjustment is just right, click Close.

Step 5: To darken or lighten specific areas in your photo as if you were burning or dodging, choose the Adjustment Brush tool.
The Adjustment Brush tool lets you “paint” in areas with different exposure values so that they become lighter or darker.
Step 6: In the Effect area use the Exposure slider to set how light or dark the painting will be. Moving the Exposure slider to the left towards the negative side will result in darker areas just like burning. Moving the Exposure slider to the right towards positive values will make the areas painted lighter, like dodging.
Step 7: Use the Size slider in the Brush area to choose a brush size that lets you paint in the areas you want to adjust.
Step 8: Paint in the adjustments. You can adjust the brush size as you paint, if you need more or less coverage on a particular area.
Step 9: Click Close when you are finished.
With very little effort, the finished photo shown opposite is a great deal more satisfactory than where it started. The overly bright areas are toned down and the details cloaked in shadow are revealed.
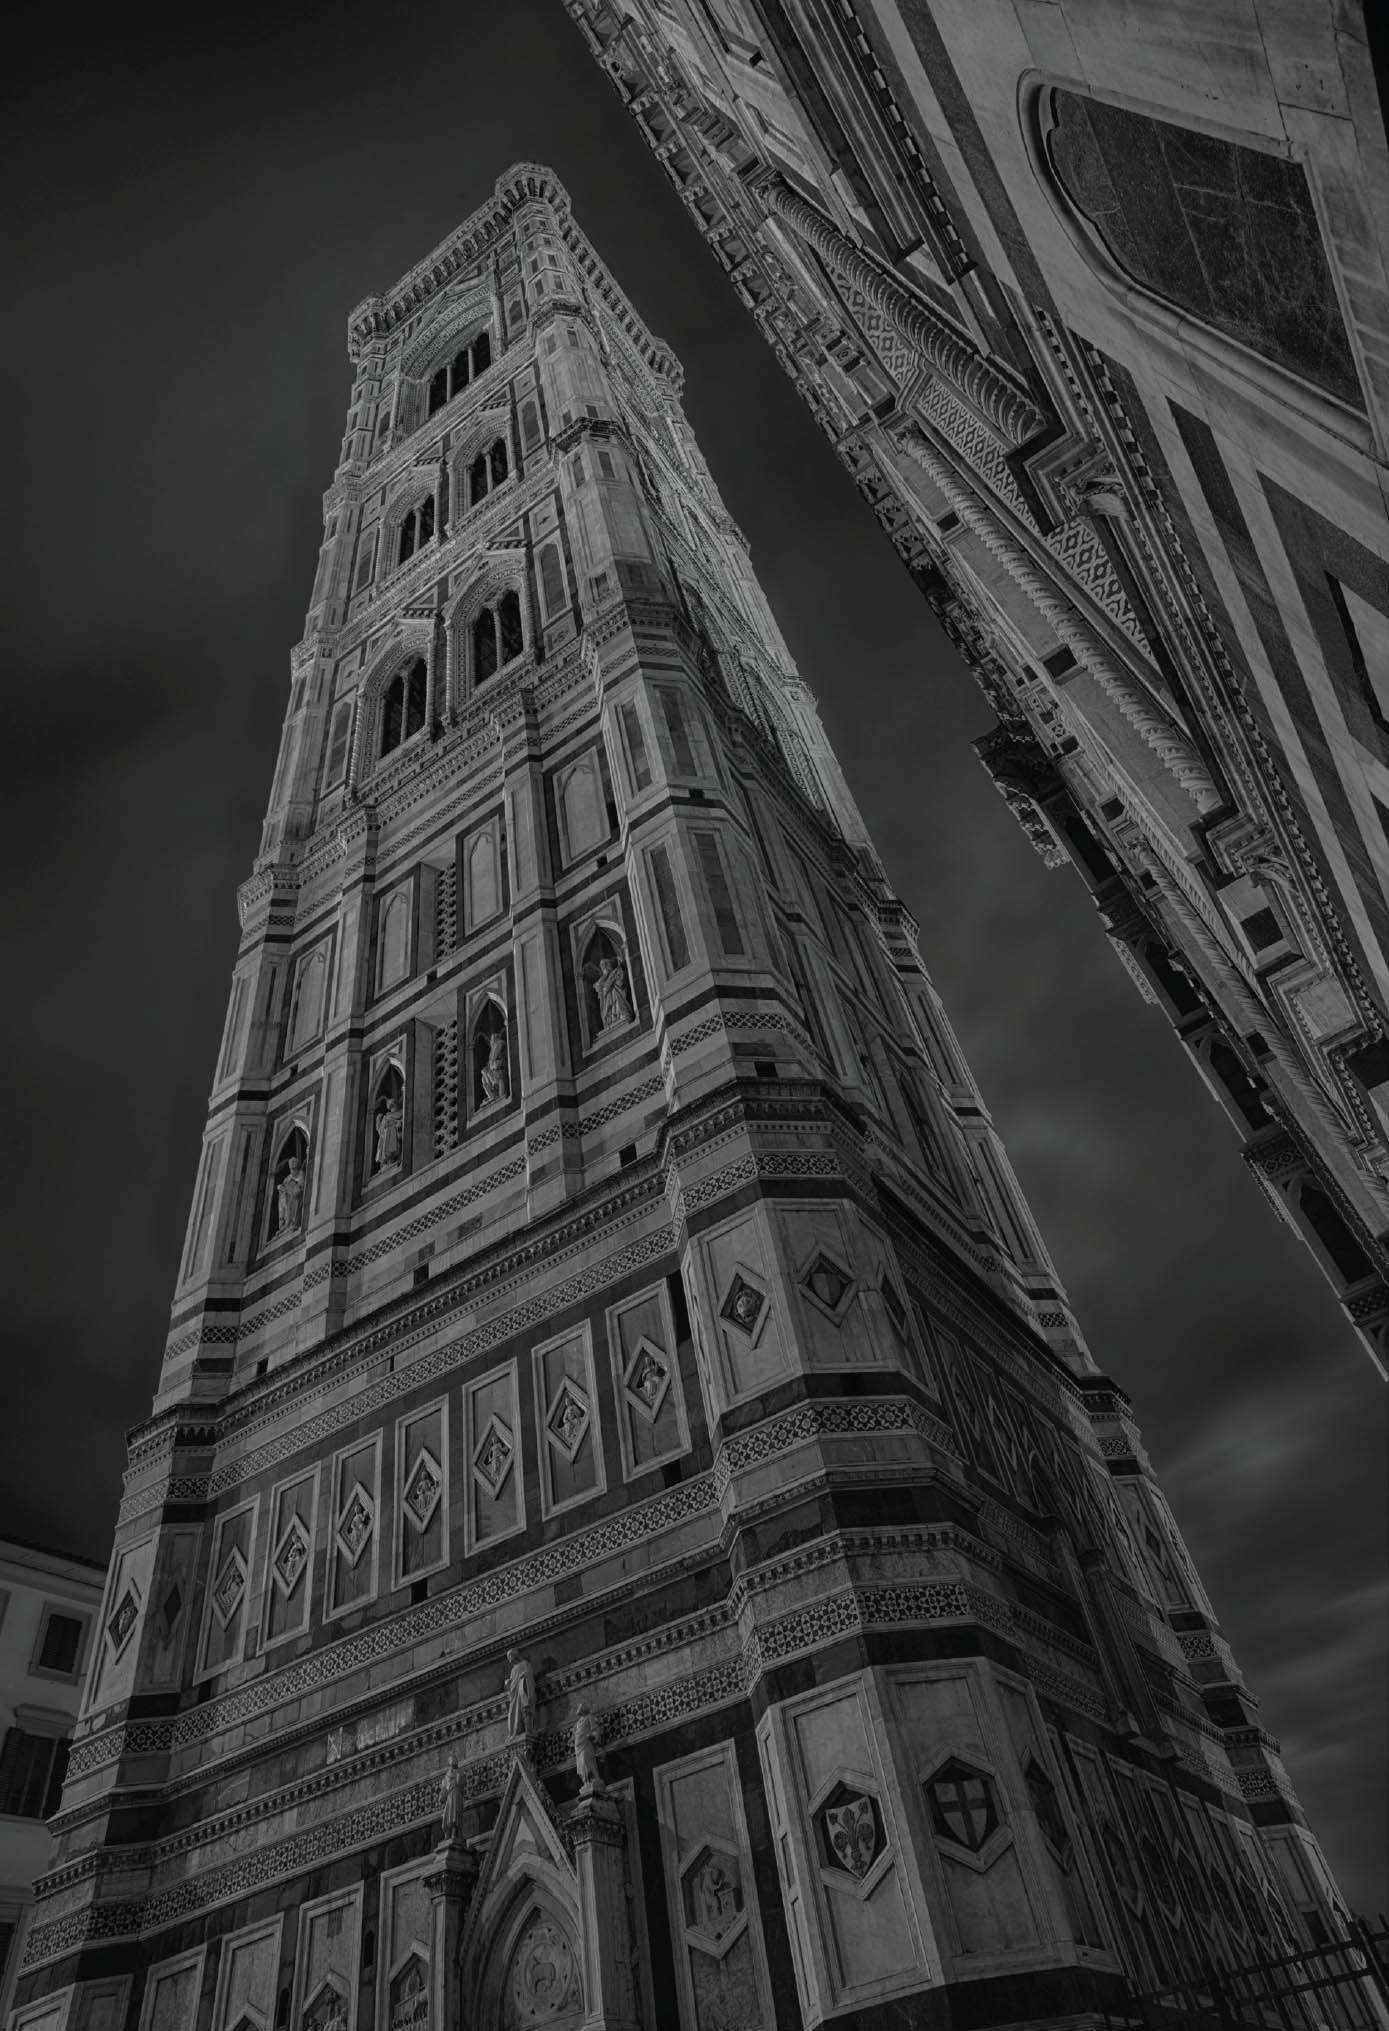
Florence Bell Tower—When visiting popular tourist destinations, I often like to photograph at night. This is for two reasons: There are fewer people to get in my way, and often nocturnal lighting is very interesting. Interesting lighting was indeed the case at Giotto’s Bell Tower, one of the four principle monuments on the Piazza del Duomo in Florence, Italy. Often considered the most beautiful campanile in Italy, this majestic square bell tower was designed by Giotto, starting in 1334.
With the interesting light used to illuminate this spectacular site come some challenges because of the extreme dynamic range between the light portions of the image and the shadow areas. Lightroom Classic allowed me to easily adjust the dynamic range in the photo using a Graduated Filter and the Adjustment Brush.
Nikon D810, Zeiss 21mm Distagon, 10 seconds at f/22 and ISO 64, tripod mounted; processed to black and white using Adobe Lightroom Classic.
Exporting Virtual Copies into Photoshop as Layers
Lightroom Classic Graduated Filters and the Adjustment Brush function a great deal like Photoshop layers—more precisely, like Photoshop adjustment layers. But if you really want to take advantage of the full power and precision of Photoshop layers and layer masking, you’ll need to bring your photo into Photoshop itself.
Fortunately, it’s easy to integrate Lightroom Classic with Photoshop. You can use the streamlined workflow interface provided by Lightroom Classic and then pull your work into Photoshop for the finishing touches.
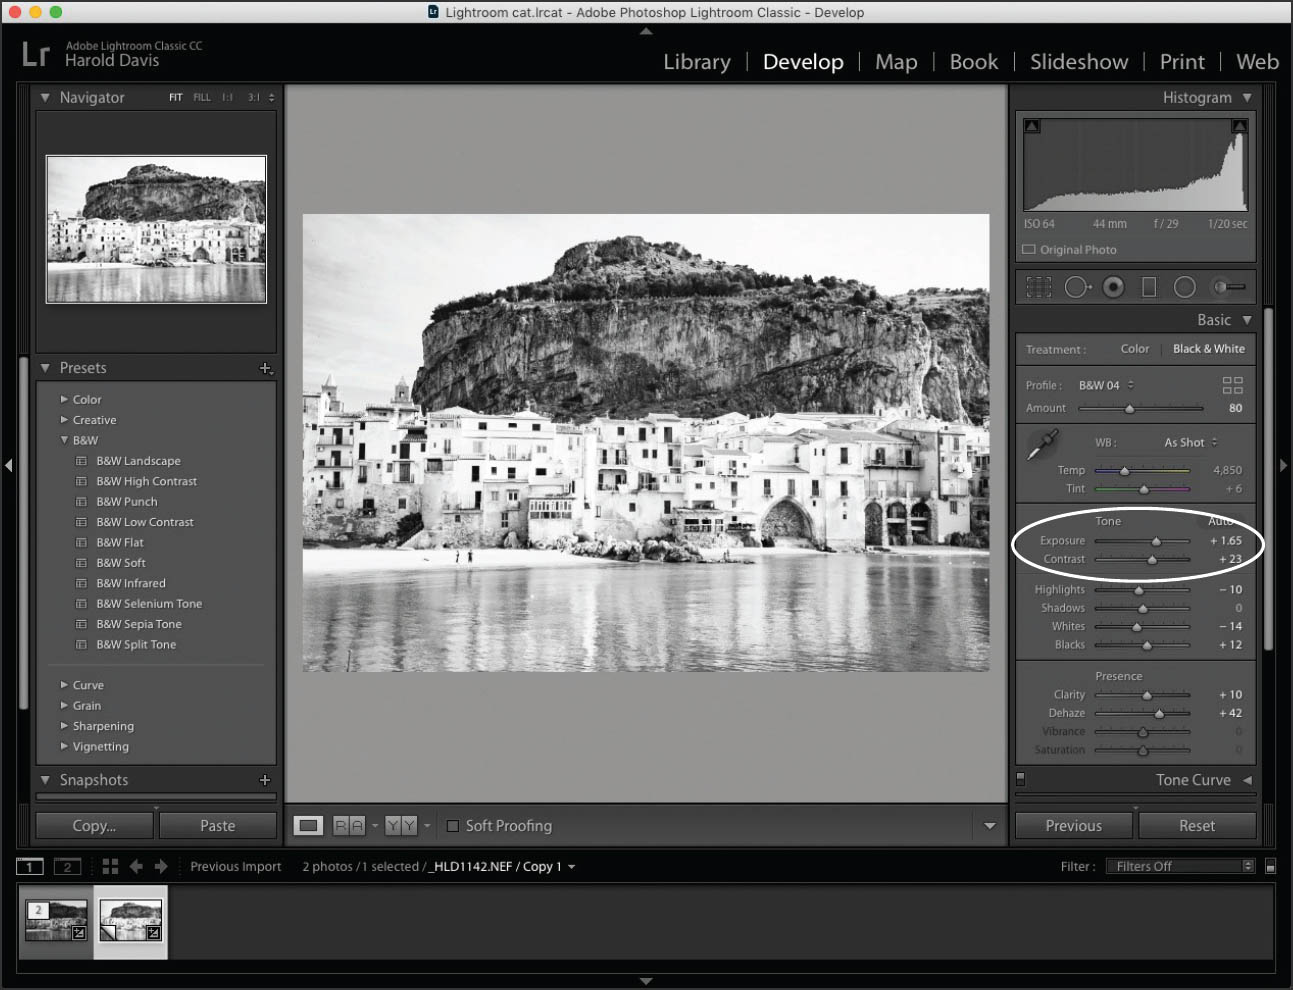
For example, I imported a photograph of the Sicilian village of Cefalu into Lightroom Classic using the B&W High Contrast preset. Looking at lights and darks in the image, I decided that I needed to make the cliff face a great deal lighter, the buildings and reflection in the water somewhat lighter, and the sky darker.
Using the Lightroom Classic tools shown in Exposure Gradients and Adjustments (pages 110–114), it would be perfectly possible to accomplish these tasks. But I decided the easiest way to get exactly the creative effect I wanted was to export three versions into Photoshop. The first version would be the default black and white conversion using the preset which would work as my background; the second version would be lighter; and the third version would be darker.
Lightroom Classic makes it easy to create these different versions using the Photo ![]() Create Virtual Copy command. Once the virtual copies have been edited, all three versions can be easily exported as Photoshop layers.
Create Virtual Copy command. Once the virtual copies have been edited, all three versions can be easily exported as Photoshop layers.

Here is the photo of the Sicilian village converted with the B&W Landscape preset.
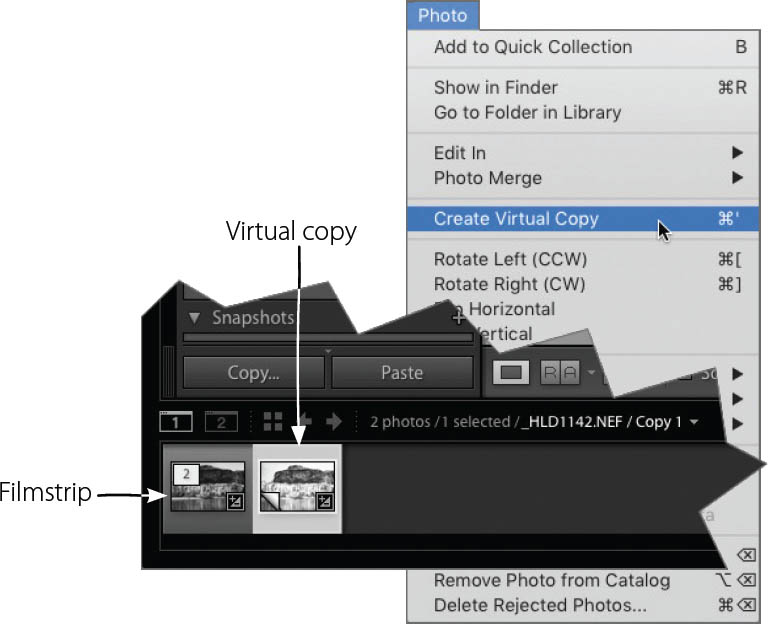
Step 1: From the Lightroom Photo menu, choose Create Virtual Copy to create a copy of the image. This copy appears selected next to the original image in the Filmstrip at the bottom of the window.
Step 2: On the Basic panel, move the Exposure slider to the right to create a lighter version.

Step 3: Make sure the lighter version you just created is selected in the Filmstrip. From the Lightroom Photo menu, choose Create Virtual Copy to create a copy of the lighter version. This copy appears selected in the Filmstrip at the bottom of the Lightroom window.
Step 4: On the Basic panel, move the Black slider to the left. Then, move the Exposure slider to the left to create the darker version.
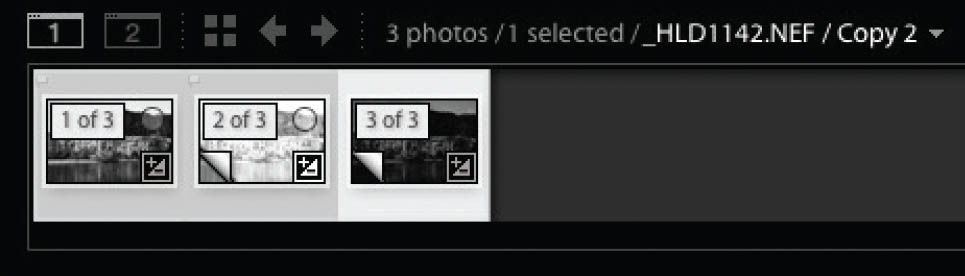
Step 5: Hold down the Shift key and click each version in the Filmstrip to select the three versions.
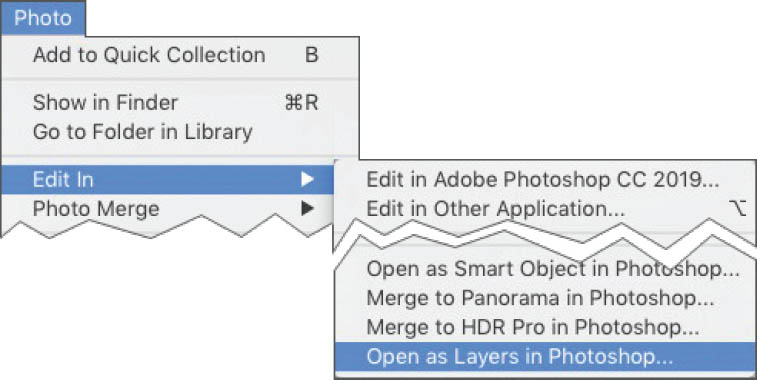
Step 6: From the Lightroom Classic Photo menu, choose Edit In ![]() Open as Layers in Photoshop . . .
Open as Layers in Photoshop . . .
The three Lightroom versions will appear in the Photoshop Layers panel.
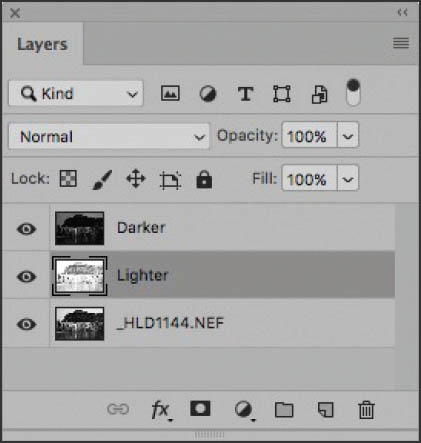
Step 7: The layers automatically appear in the Photoshop Layers panel as Background, Layer 0, and Layer 1. Rename Layer 0 as “Lighter” and Layer 1 as “Darker.”
This is now the functional equivalent of multi-RAW processing using ACR and Photoshop as explained on pages 130–133.
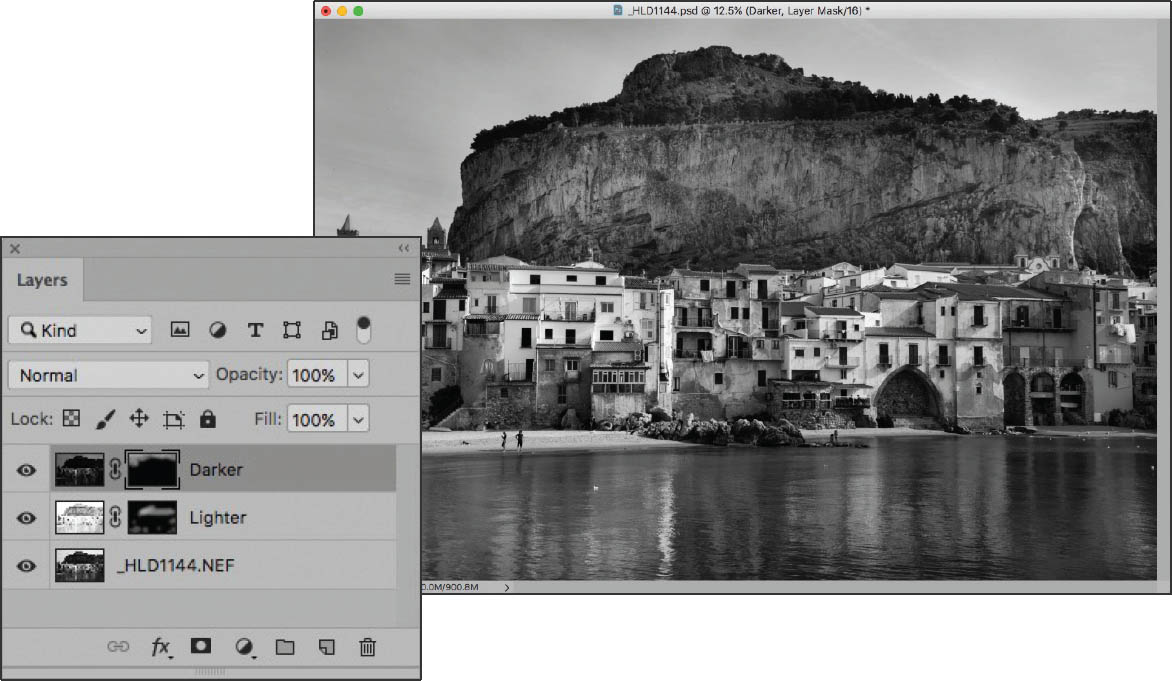
Step 8: Using layers and masking in Photoshop (as explained on pages 120–126), blend the three layers to make the sky darker and the cliff face lighter.
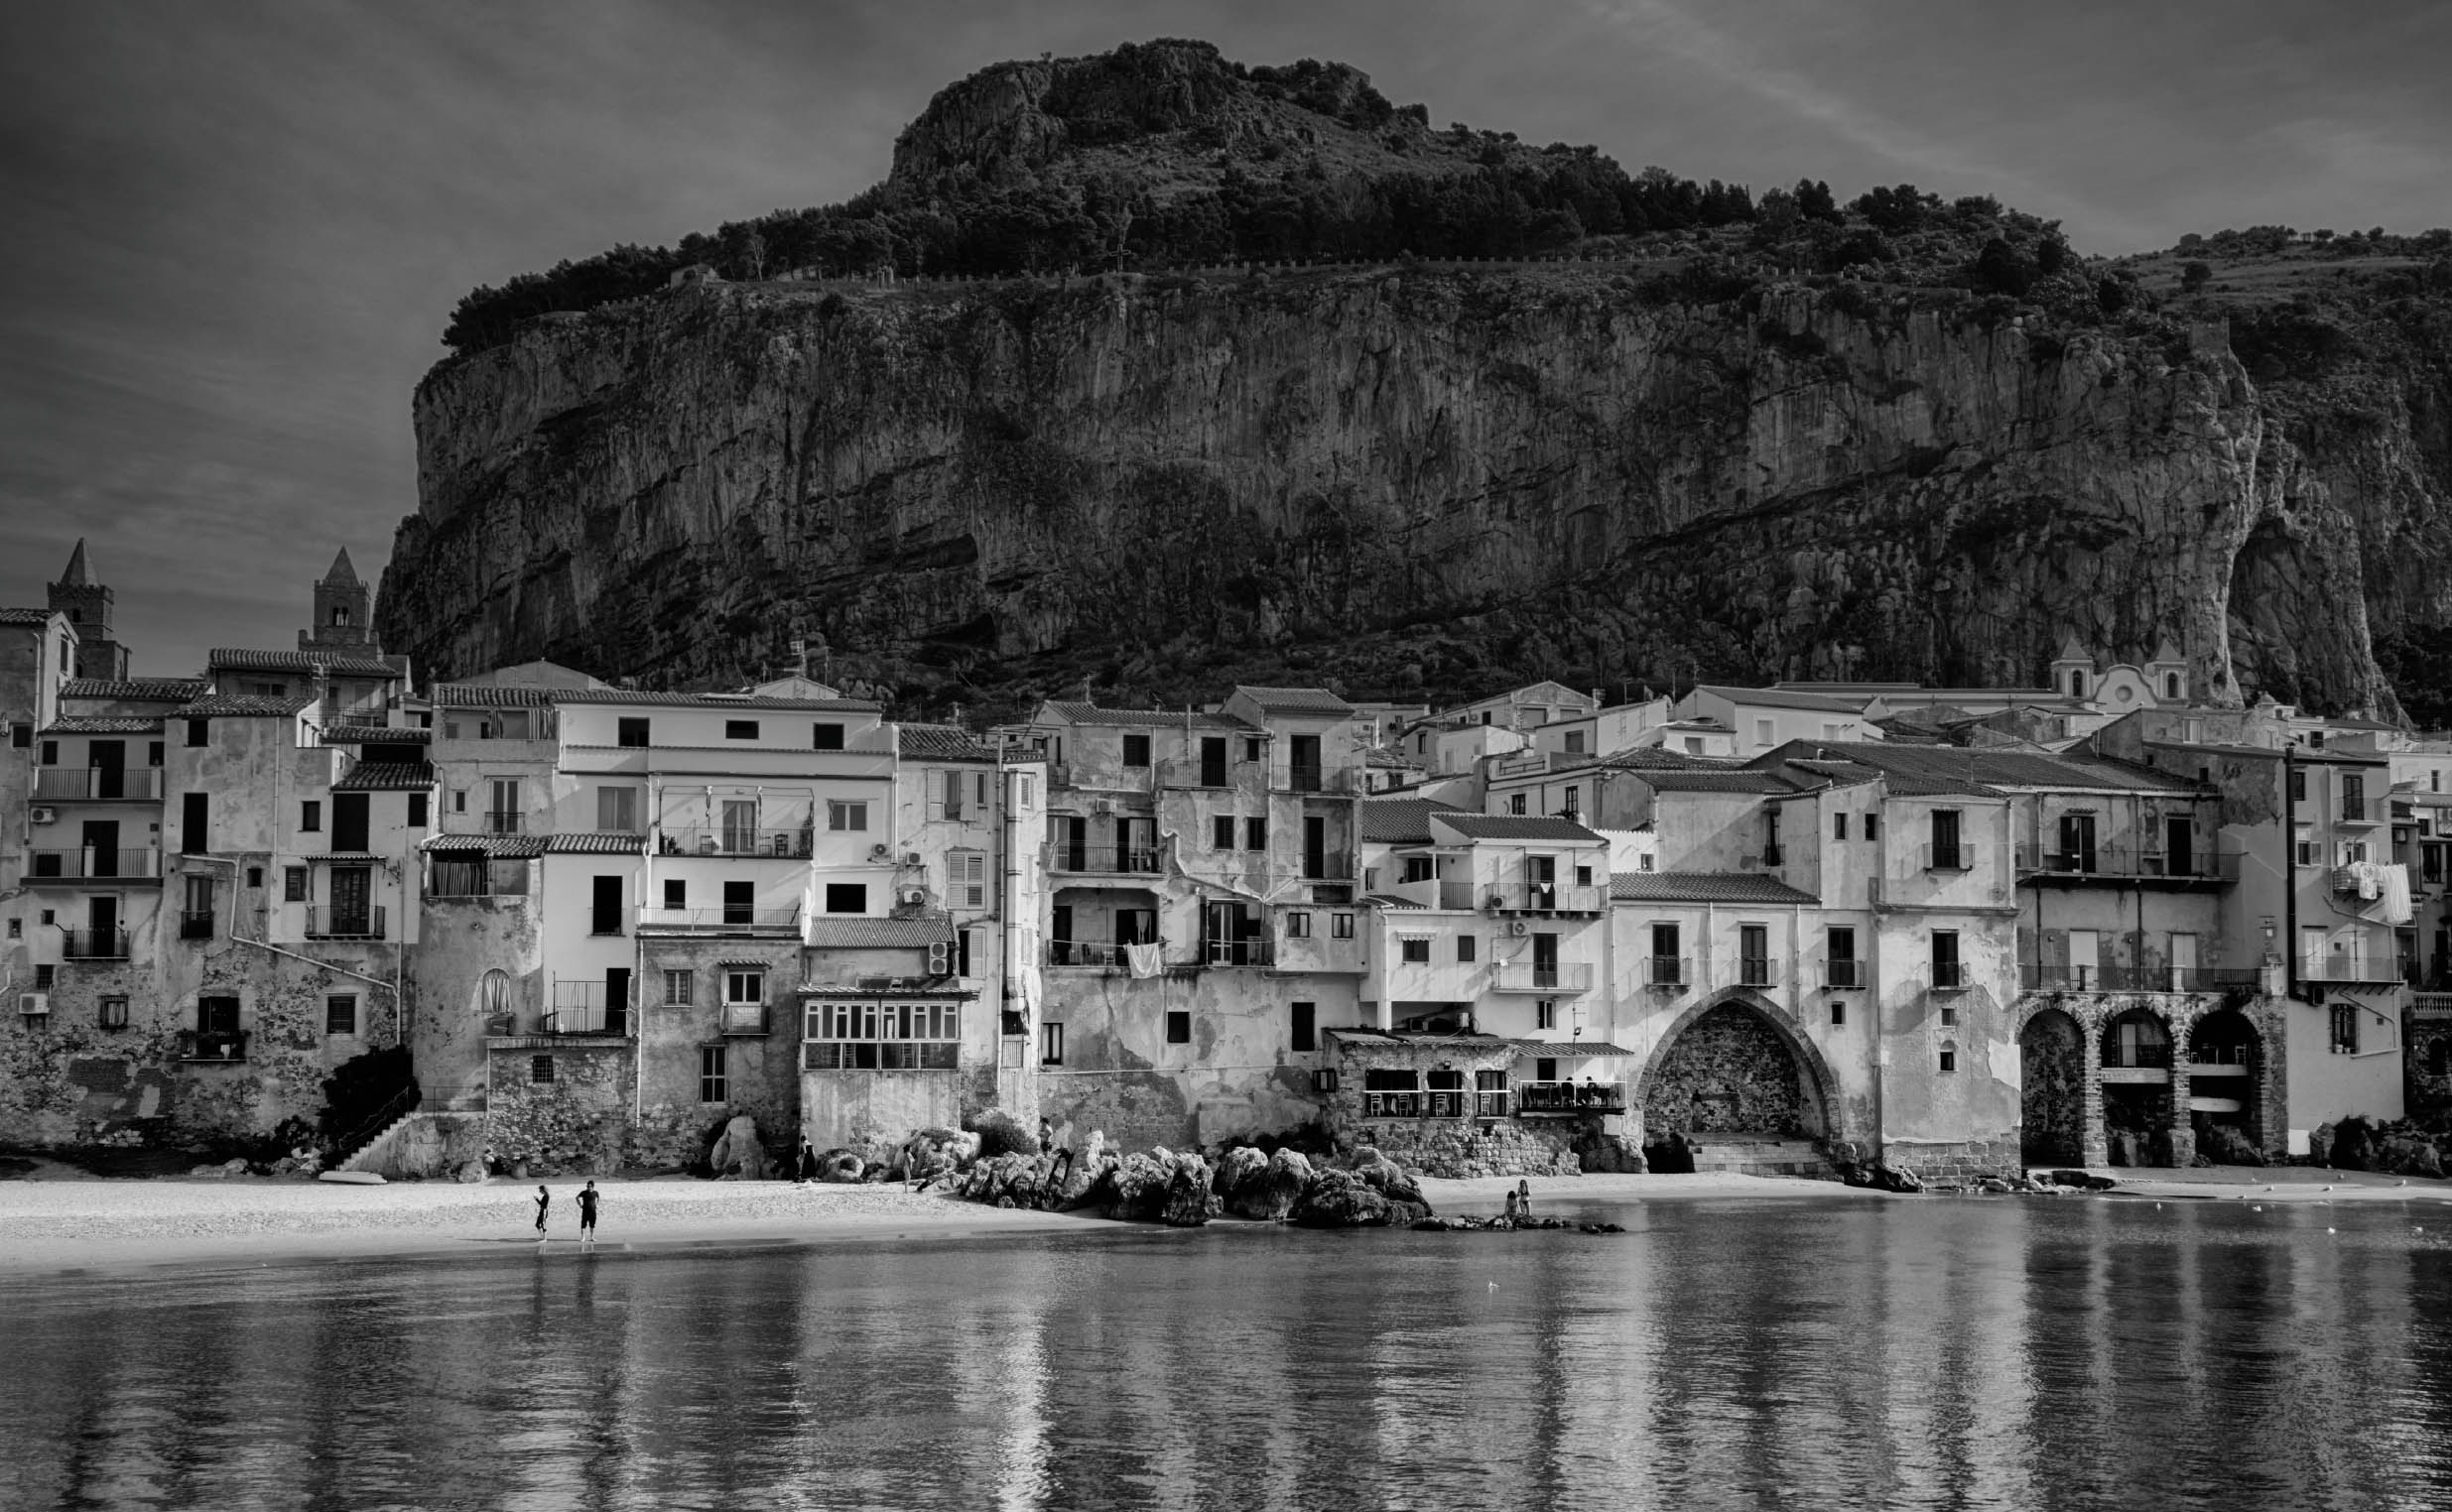
Cefalu—Wandering through the ancient Sicilian village of Cefalu, I made my way to the harbor jetty. Looking back at the whitewashed village, it was clear that there was considerable contrast between the white buildings and the dark cliff face behind them. In ancient times, a temple first sat atop the cliff, then the heights became a refuge for villagers from marauding pirates and invading armies.
I knew as I made my exposure that I would need to work in post-production to tame the extreme dynamic range of the white village in the sunshine and the dark cliff in the shadows. It’s good news for photographers that using the Lightroom Classic-Photoshop combination black and white conversions that tame extreme dynamic range can be accomplished in just a few minutes.
Nikon D850, 44mm, 1/60 of a second at f/29 and ISO 64, tripod mounted; converted to black and white using Lightroom Classic with further processing in Photoshop.