
Creating High-Key Effects
When I explained high-key photography from the viewpoint of shooting the images on pages 54–57, I noted that not all subjects work well for high-key photos, and that when you find a good high-key subject you should plan to overexpose.
As I described more generally (pages 18–33), when you are looking at light in the context of a black and white composition you should consider appropriateness, exposure, RAW processing, and black and white conversion. It’s best if you can learn to pre-visualize these steps as much as possible at the early stages of your creations.
With shooting with high-key in mind, look for bright, white, well-lit subjects which can be rendered in subtle shades of gray and do not require strong contrasts.
Overexpose by as much as two or three f-stops. Each successively smaller f-stop lets in 1/2 of the light of the previous f-stop—so a two f-stop overexposure means increasing the shutter speed by a factor of 4 if you keep the f-stop constant. For example, at f/32 if the exposure according to your camera’s light meter is 1 second, then 4 seconds might be the right shutter speed for a successful high-key effect. If you bracket, you’ll maximize the chances of getting the right exposure.
Process the RAW conversion in multiple layers to emphasize transparency (see pages 130–135 for more about RAW processing). This means using lighter layers for areas of the high-key image that you want to look transparent, with darker layers possibly providing information and contrast for the image’s edges.
Convert to black and white using a method that tends to lighten your image; for example the Maximum White preset available as a Black & White adjustment layer, or the Overexposure filter that is part of Silver Efex Pro. You can always add a darker conversion for areas—such as edges—that you want to emphasize.
One technique that adds apparent transparency to a high-key image is to paint with white over areas you want to lighten. For the most accuracy, use a layer and layer mask as follows:
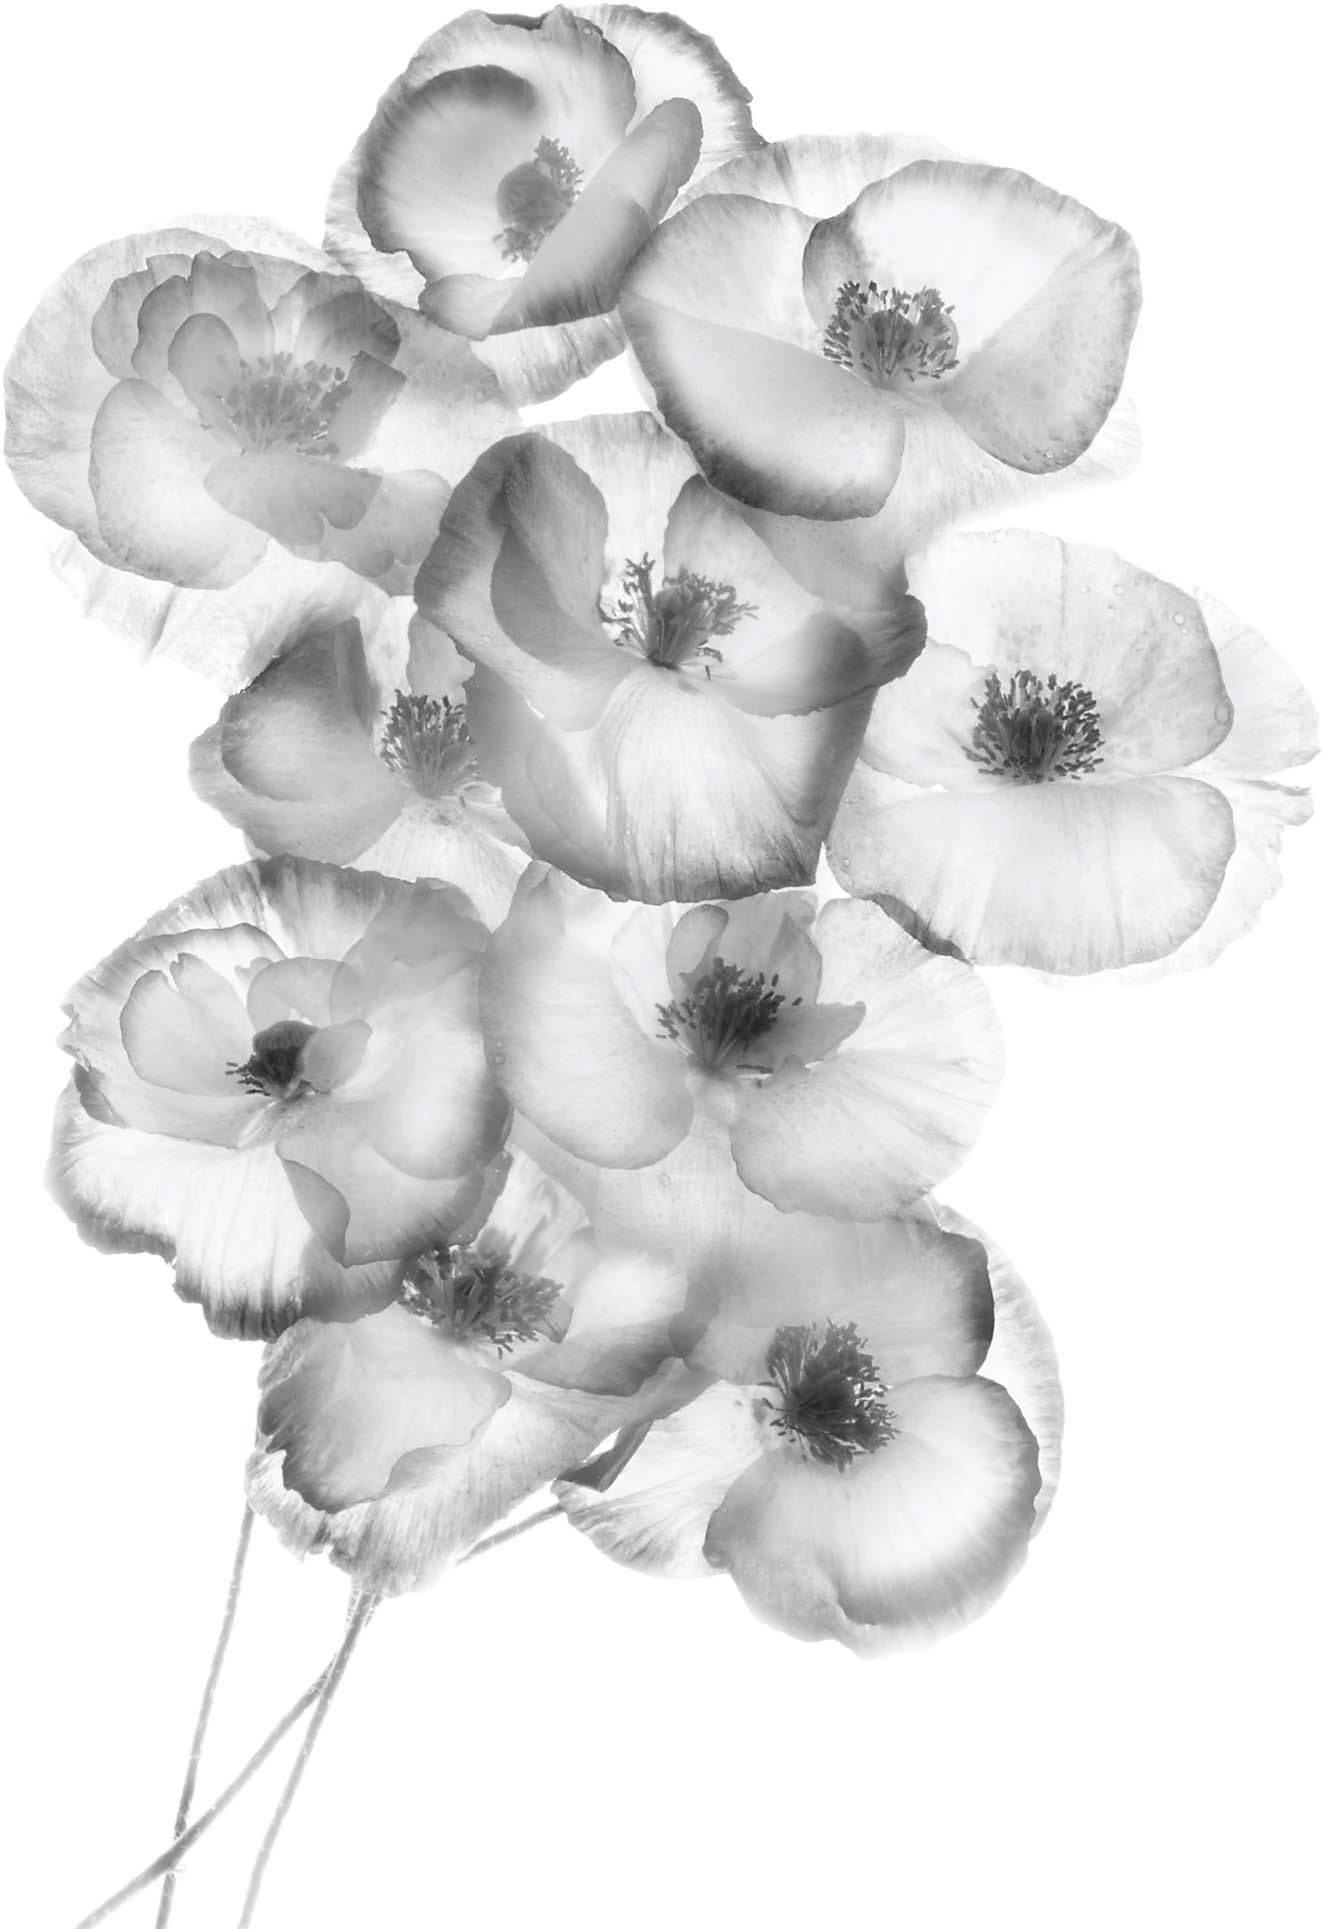
Poppies—I carefully placed these poppies from my garden on a white light box, and gently sprayed them with water to increase their transparency. I made a series of captures at different shutter speeds with the camera on a tripod, intentionally overexposing most of these captures.
Three of the captures were combined in Photoshop. I used the lightest captures for the flower petals, and darker captures for the edges of the flowers.
To convert to black and white, I used Black & White adjustment layers, with the Maximum White preset for the interior of the petals, and the Maximum Black preset for the edges.
As a final step, I used a layer and a layer mask to selectively paint in white in areas that I wanted to look more transparent (see pages 120–129).
Nikon D300, 50mm macro, three exposures combined in Photoshop at shutter speeds from 1 second to 10 seconds, each exposure at f/32 and ISO 100, tripod mounted; processed in Photoshop.
- In the Layers panel, click the Create a new layer button at the bottom of the panel to add a transparent (empty) layer on top of the layer stack. See pages 132–133 and 170–171 for more about working with layers in Photoshop.
- Press D and then X to make sure the Foreground color is set to white.
- Using the Paint Bucket Tool, fill the new layer with white. Your image will disappear, but don’t be alarmed! It will be right back in the next step.
- Choose Layer
 Layer Mask Hide All to add a black Hide All layer mask. This hides the all-white layer.
 - With the layer mask selected in the Layers panel, use the Brush Tool (set to roughly 10% opacity) to paint on the layer mask. This will make the areas you paint on more “transparent”—by adding white to them. (For more about painting on a layer mask, turn to pages 132–133.)

Cayucos Pier—Cayucos on the mid-coast of California boasts a spectacular old wooden pier. I photographed the Cayucos Pier toward the end of a foggy, dark day and used a long exposure to blur the motion of the waves beneath the pier.
Nikon D300, 120mm, 3 minutes at f/22 and ISO 100, tripod mounted; converted to black and white using the Photoshop Black & White adjustment layer Infrared Preset.