
Using LAB Color
I’ve mentioned using color information in a capture to create interesting effects in black and white. This may seem paradoxical—but it’s not because color information can be really valuable when it comes to making interesting black and white images.
Color information is used as part of the more flexible black and white conversion processes—for example, the color sliders in the Channel Mixer are used to determine the composition of a monochromatic conversion. The suggestion here is a little different: radically manipulate the image in color before conversion to get spectacular black and white following conversion.
The LAB color space is particularly useful for this kind of work because LAB separates black and white from color information. This means that you can do downright radical things to the monochromatic information in your color image, recombine the color and black and white, then convert to color—ending up with a work product that is inarguably different from your starting place, and in some cases markedly superior.
Let me back up for a little and explain what you need to know about the LAB color space. Then I’ll show you some examples of how techniques that use LAB color can improve your black and white results.
Understanding LAB
A color model—sometimes called a color space—is the mechanism used to display the colors we see in the world. You are probably familiar with two of the most common color spaces, RGB and CMYK. The RGB—Red, Green, and Blue—color space is used to display photos on a monitor. The CMYK—Cyan, Magenta, Yellow, and Black—color space is primarily used for printing books, magazines, and other materials.
You may not know as much about the LAB color space, which is structured in three channels:
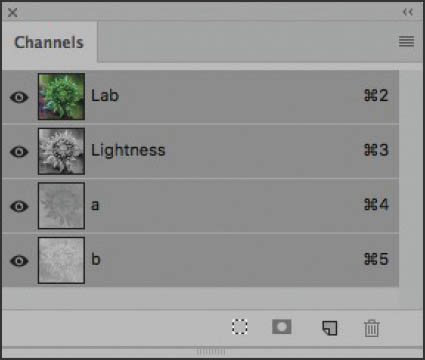
- The L channel contains luminance information. Luminance is another way of referring to the black and white data in a photo. In the Photoshop Channels panel, the L channel is called the Lightness channel.
- The A channel provides information about greens and magentas.
- The B channel provides information about yellows and blues.
I’m not going to go into the details of the theory of LAB, or many of the aspects of how best to work with LAB. You could write a book on these topics (and, in fact, books have been written).
What you need to understand is that the black and white information is completely separate from the color information. This means that you can operate on the black and white data without having any impact on the color in an image. Specifically, if you want to swap blown-out highlights for shadows—and, in some cases, you might—LAB is the way to go about it.
By the way, it is worth mentioning that you can’t actually do anything with an image in LAB. Printers aren’t calibrated for LAB, and there’s no such thing as a LAB JPEG for displaying on a photo sharing site. Before you can use a LAB image, you’ll need to convert it back to RGB or CMYK.
Converting a photo into the LAB color space only takes a second in Photoshop. There are two ways to go about it as shown below.
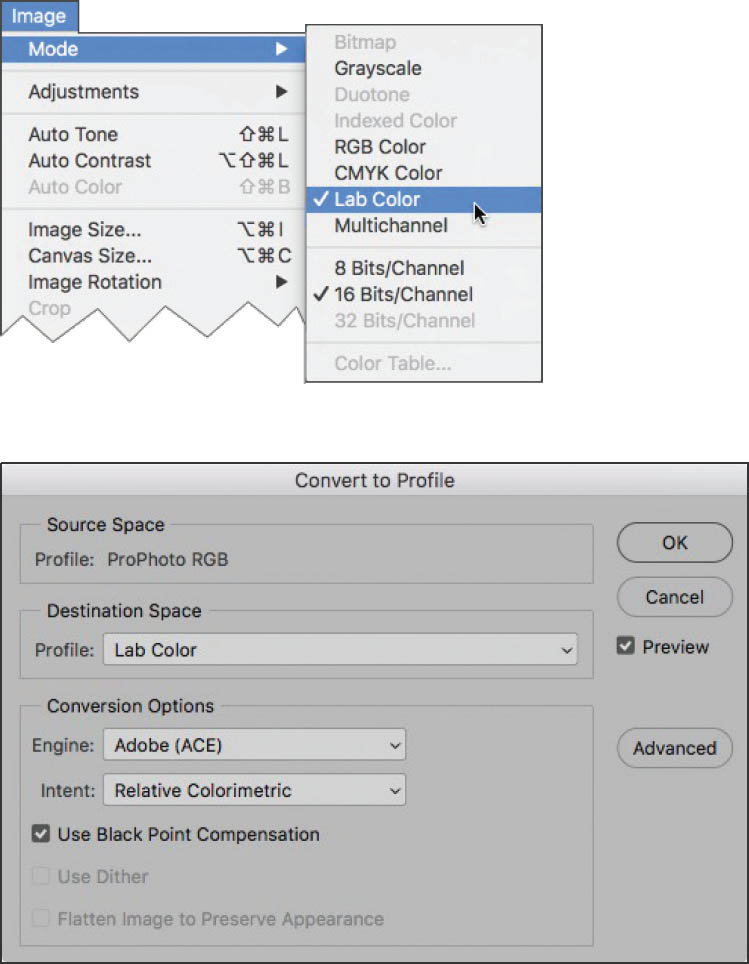
Choose Image ![]() Mode
Mode ![]() Lab Color
Lab Color
or
Choose Edit ![]() Convert to Profile. The Convert to Profile dialog will open. Select Lab Color from the Profile drop-down list in the Destination Space area. Make sure Relative Colormetric is selected from the Intent drop-down list and that Use Black Point Compensation is checked.
Convert to Profile. The Convert to Profile dialog will open. Select Lab Color from the Profile drop-down list in the Destination Space area. Make sure Relative Colormetric is selected from the Intent drop-down list and that Use Black Point Compensation is checked.
It’s a good idea to use the Edit ![]() Convert to Profile method the first time you convert to LAB because that way you can be sure the right options are selected. These settings will remain in place for subsequent conversions even if you use the Image
Convert to Profile method the first time you convert to LAB because that way you can be sure the right options are selected. These settings will remain in place for subsequent conversions even if you use the Image ![]() Mode
Mode ![]() Lab Color menu item.
Lab Color menu item.
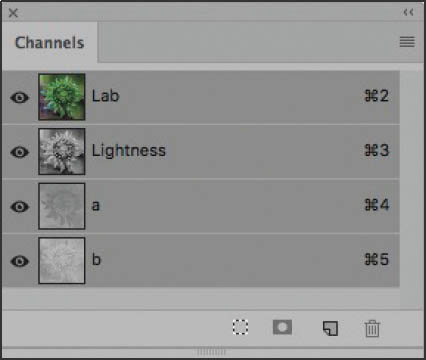
Once you’ve converted an image to LAB mode, take a look at the Channels panel. There you’ll see the three channels: Lightness, or L, containing the black and white data; and the A and B channels for the color information.
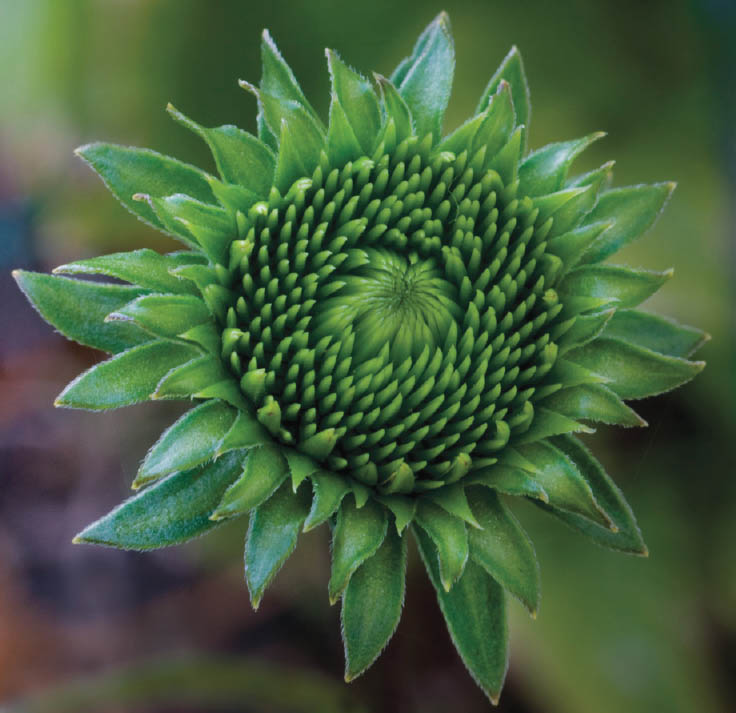
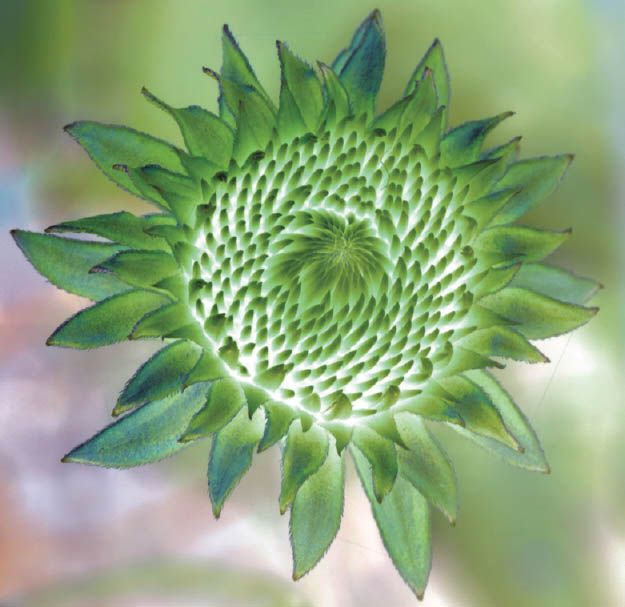
Since this capture of a green echinacea bud was essentially one color, it was a good candidate for black and white conversion.
85mm macro, 1/2 of a second at f/16, tripod mounted.

I used Black & White adjustment layers in Photoshop for a “normal” conversion of the image to black and white. However, I wanted more from this conversion.
85mm macro, 1/2 of a second at f/16, tripod mounted.
Flower Effects
The small, green flower bud to the left is a young echinacea, sometimes called a Cone flower. I planted a group of hybrid echinacea in my garden, and when I saw this one it called out to me as a photographic subject.
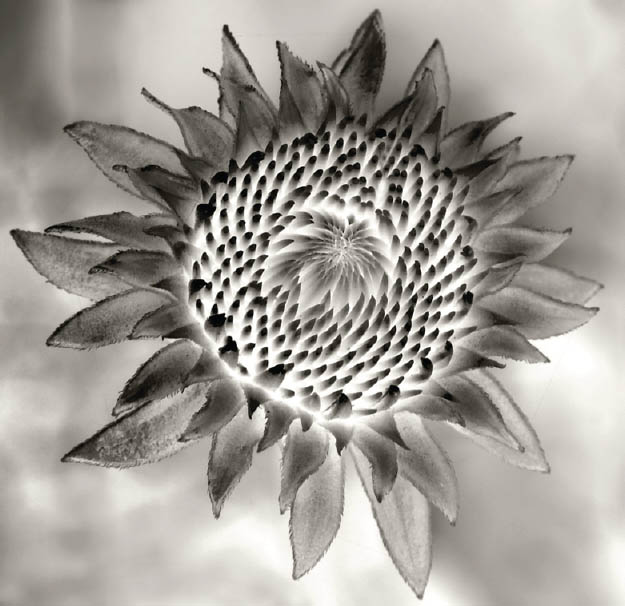
I knew I had to photograph it—but I realized that the image was essentially only one color: green. Keeping in mind the idea that a monochrome image can be colored provided that it is only one color, to me, this meant that I would end up creating a black and white photo. However, a standard conversion to black and white without further work (shown below left) using Black & White adjustment layers yielded unexciting results. This is an image that is not terrible, but it just doesn’t make me go “Wow!”
Looking at the black and white photo, as I’ve said, I thought it was acceptable, but I yearned for an image with more punch and pizzazz. When you want black and white with punch and pizzazz, the thing you are going to be concerned with is the luminance information. The luminance information is represented by the Lightness channel in LAB color in Photoshop. So working to manipulate the image in LAB color was the clear way to go.
So I decided to go back to the color photo in Photoshop to increase the contrast in LAB before even thinking about converting to black and white. With luck, the increased contrast would make for a more interesting monochromatic image—and at least I would have fun with one of my favorite pastimes, tweaking an image in LAB color.
Inverting the L Channel
Step 1: Convert the image to the LAB color space by choosing Image ![]() Mode
Mode ![]() LAB Color (see Step 1 on page 215).
LAB Color (see Step 1 on page 215).
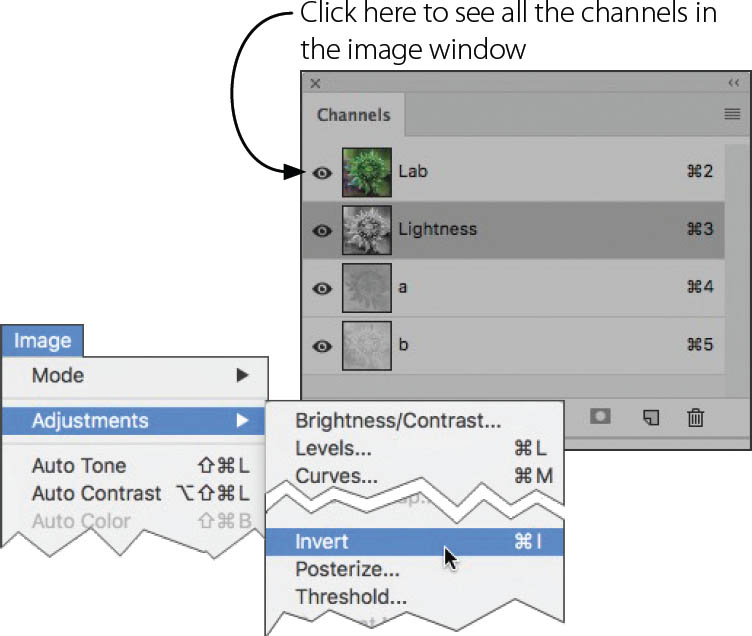
Step 2: In the Channels Panel, select the Lightness (L) channel. This channel holds all the luminance, or black and white, information in a photo.
Next, click the top eyeball next to Lab so you can see all the channels in the image window and watch the inversion in full, living color.
Step 3: With only the L channel selected, invert the black and white information in the photo by choosing Image ![]() Adjustments
Adjustments ![]() Invert.
Invert.
The color image appears with whites and blacks “inverted”—a sometimes odd look that can be quite striking.
Step 4: Convert the image back to RGB by selecting Image ![]() Mode
Mode ![]() RGB.
RGB.
Step 5: Convert the image to black and white using Black & White adjustment layers. (For more about converting using adjustment layers, turn to page 144.)
The effect here is pretty cool and a bit like solarization (see pages 242–253 for more about solarization). But looking at the result made me somewhat dizzy. I wanted a black and white effect that was striking, but maybe not quite so opposite in luminance levels to the original photo.
Equalizing LAB Channels
Step 1: Starting with the original color photo, convert the image to the LAB Color space by choosing Image ![]() Mode
Mode ![]() LAB Color (see Step 1 on page 215).
LAB Color (see Step 1 on page 215).

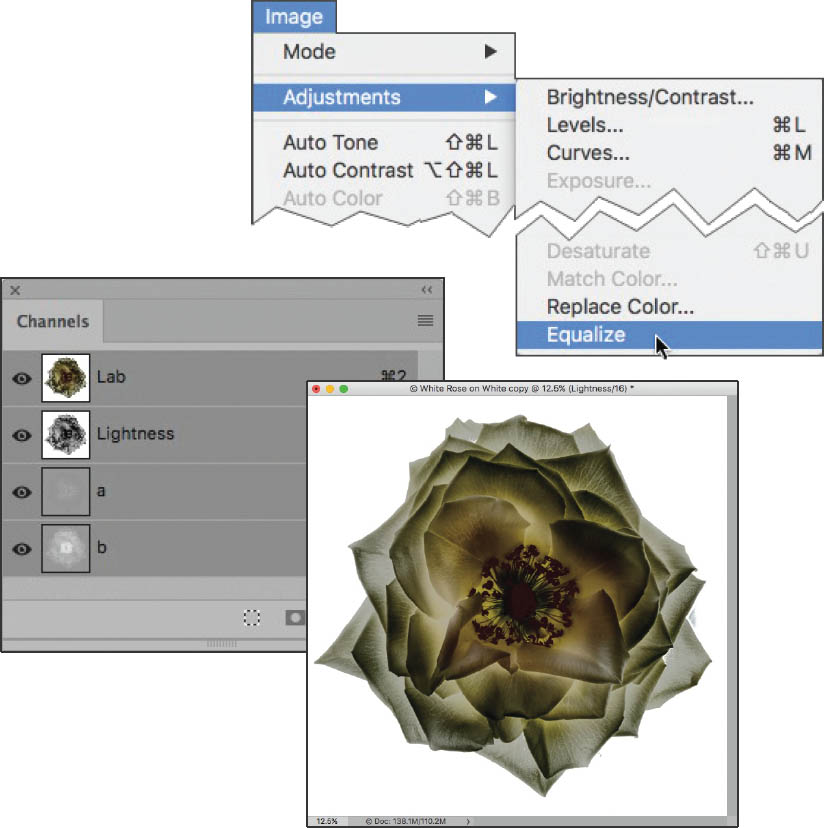
Step 2: With all the channels selected, choose Image ![]() Adjustment
Adjustment ![]() Equalize.
Equalize.
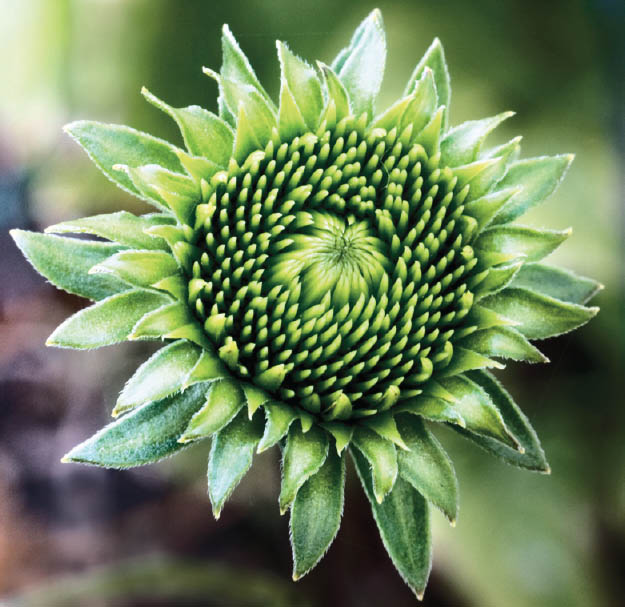
Equalization adjustments push tonal values towards the maximum so blacks become blacker and whites become whiter. The color image of the Echinacea (below right) now has more contrast.
(As a different technique, you could select just one channel and equalize it. Try it and see what effects you get.)
Step 3: Convert the image back to RGB by selecting Image ![]() Mode
Mode ![]() RGB.
RGB.
Step 4: Convert the image to black and white using Black & White adjustment layers. (For more about converting using adjustment layers, turn to page 144–149.)
The two LAB adjustments shown on pages 217 and here—inverting and equalizing—are very simple moves. A small amount of tweaking in LAB color can give you many options when you convert your photos to monochrome.

Becoming Echinacea—Here is the resulting image after equalizing the LAB channels and converting the image to black and white using a straightforward Black & White default adjustment layer for the conversion. This is the most interesting of the three black and white versions of this photo.
Nikon D300, 85mm macro, 1/2 of a second at f/16 and ISO 100, tripod mounted; processed using Photoshop Black & White adjustment layers and LAB color.
Swapping Tonalities: Creating a Monochrome Rose on Black
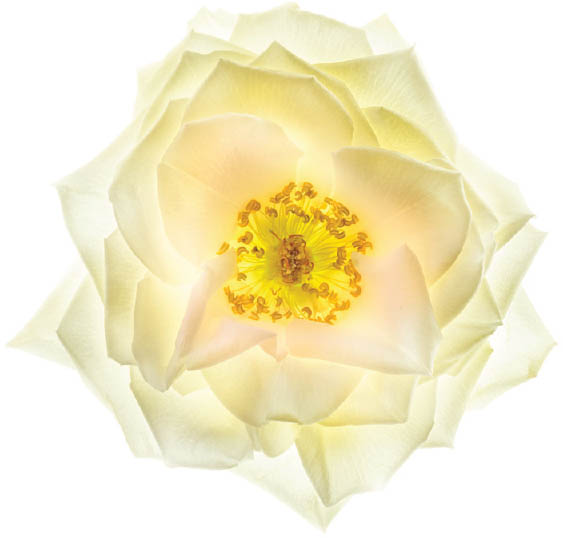
Whites not white enough? Blacks not black enough? You can use LAB color moves and blending modes to adjust your way out of these problems and avoid monochromatic blandness. In the next few pages, I’ll show you how to take a white flower photographed on a white background, and put the flower on a black background. I’ll also show you how to adjust the tonalities to create an attractive final image.

Step 1: Convert the white rose to the LAB color space by choosing Image ![]() Mode
Mode ![]() LAB Color (see Step 1 on page 215).
LAB Color (see Step 1 on page 215).
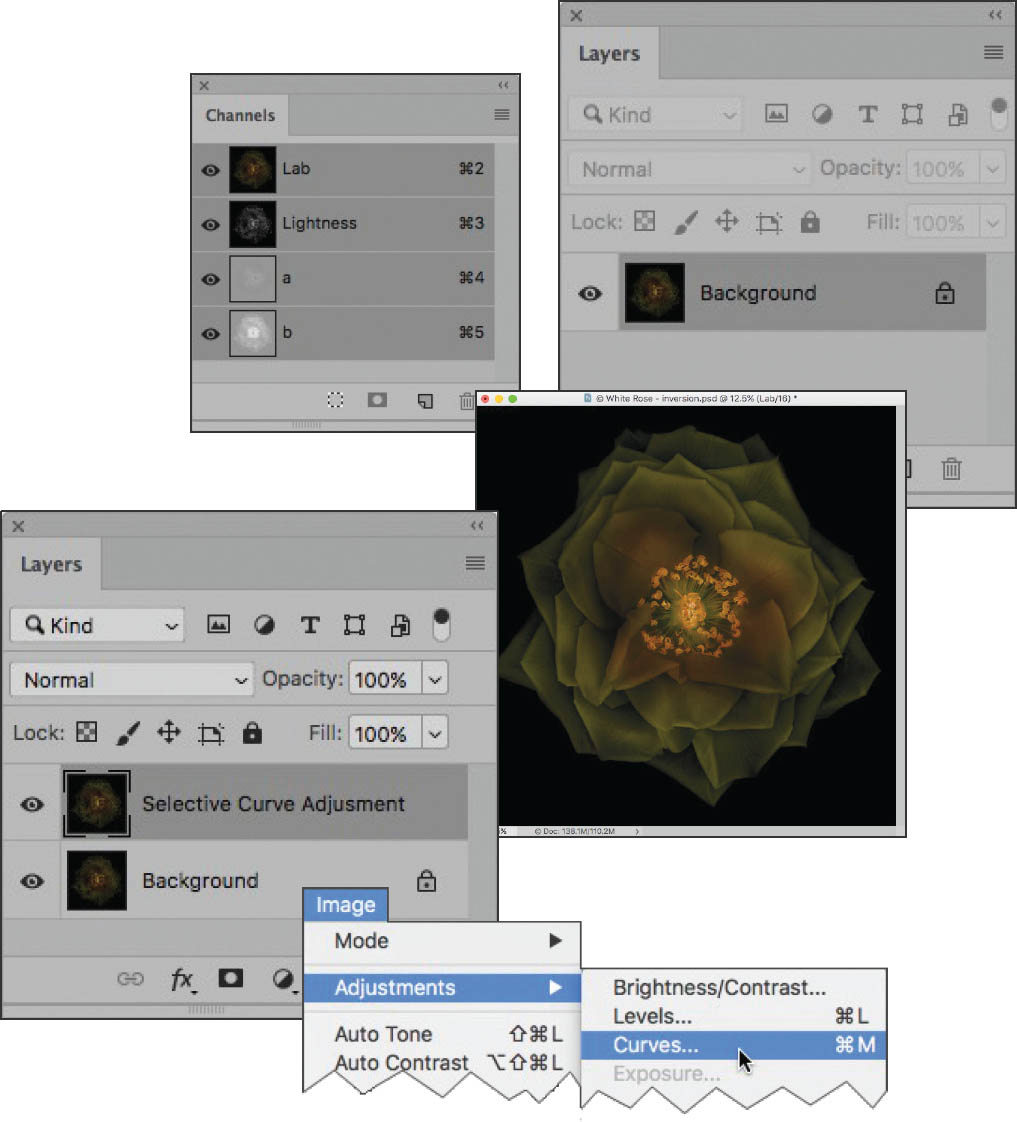
Step 2: With all the channels selected in the Channels panel, invert white rose by selecting Image ![]() Adjustments
Adjustments ![]() Invert.
Invert.
The white rose and background change to black. This is a little too dark, so we’ll bring the rose back a bit using a curves adjustment.
Step 3: Make a copy of the background layer by selecting Layer ![]() Duplicate layer. The duplicate will appear at the top of the layer stack. Rename the layer “Selective Curve Adjustment.”
Duplicate layer. The duplicate will appear at the top of the layer stack. Rename the layer “Selective Curve Adjustment.”
Next, select Image ![]() Adjustments
Adjustments ![]() Curves to open the Curves dialog box.
Curves to open the Curves dialog box.

Step 4: There are a lot of options in the Curves dialog box. Before you start working on the curve, make sure that Preview is checked so you can see the adjustment in the image window as you make it. For this example, we’re going to be working on the black and white information in the image, so make sure Lightness is selected from the Channel drop-down list.

Step 5: Drag the curve to bring back the lightness. If you aren’t happy with it, hold down the Alt key and the Cancel button will change to Reset. Then, you can try again. Click OK when you are satisfied. In this example, the center is too bright, but we can deal with that in the next step.
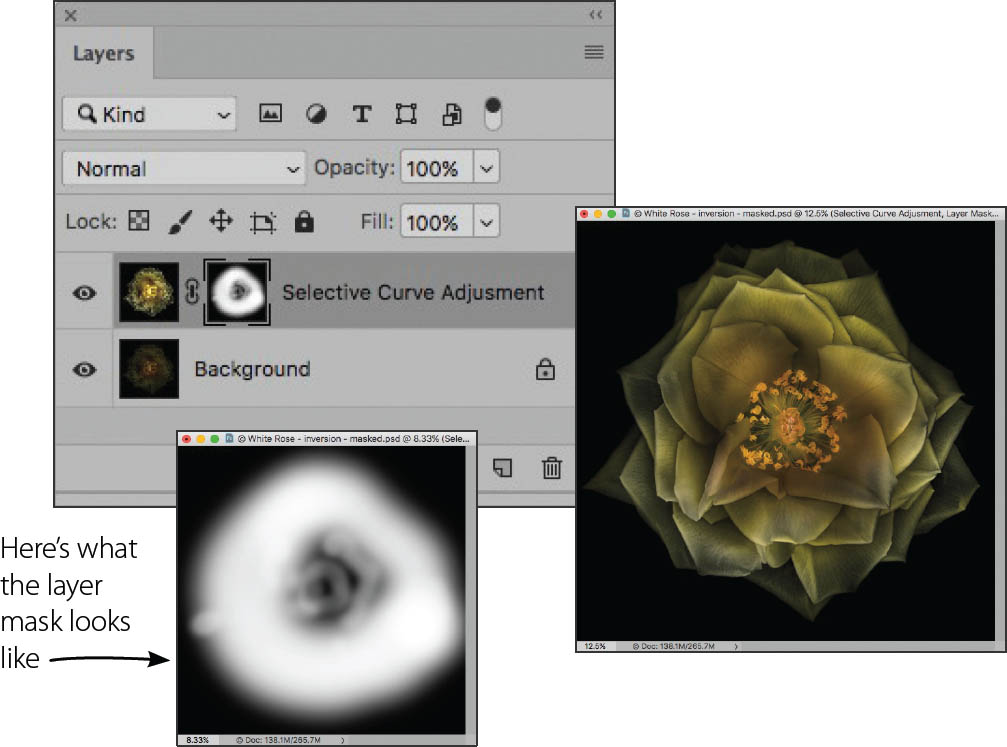
Step 6: Add a black Hide All layer mask, select the Brush Tool from the Tools panel and set white as the Foreground color. With the layer mask selected, brush in petals at 100% brush opacity. Change the brush opacity to 40% and gently paint in the center of the flower.

Step 7: Flatten the layers by selecting Layer ![]() Flatten Image to get ready for the next step.
Flatten Image to get ready for the next step.
Step 8: Duplicate the Background layer, rename duplicate “Screen Mode” and select the Screen blending mode. Add a Hide All layer mask and brush in the petals using white at 50% brush opacity.

Step 9: Convert the rose back to the RGB color space choosing Image ![]() Mode
Mode ![]() RGB Color.
RGB Color.
Step 10: Convert the image to monochrome using your favorite method. In this case, I am using Silver Efex Pro with the Neutral Preset selected (turn to pages 150–155 for more about Silver Efex Pro).

Step 11: Duplicate the color Background layer and put it at the top of the layer stack. Then, rename it “Infrared Adjustment Layer.” Convert the layer to monochrome using a Photoshop Black & White adjustment layer with the Infrared Preset selected (for more about how to do this, turn to pages 144–149). Merge the adjustment layer down. You will now have three layers.
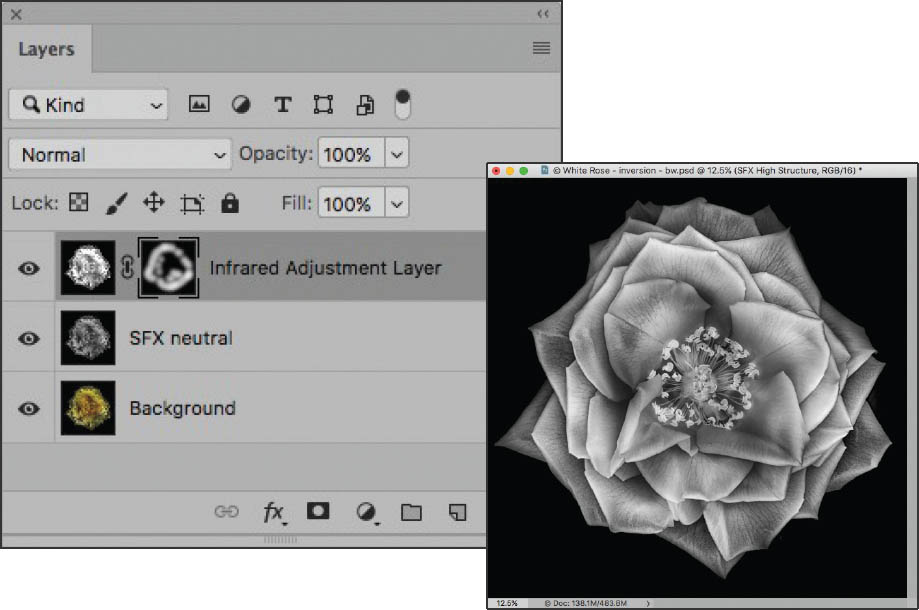
Step 12: Add a Hide All layer mask and use the Brush Tool to paint in with white on the layer mask to brush in the outer petals.
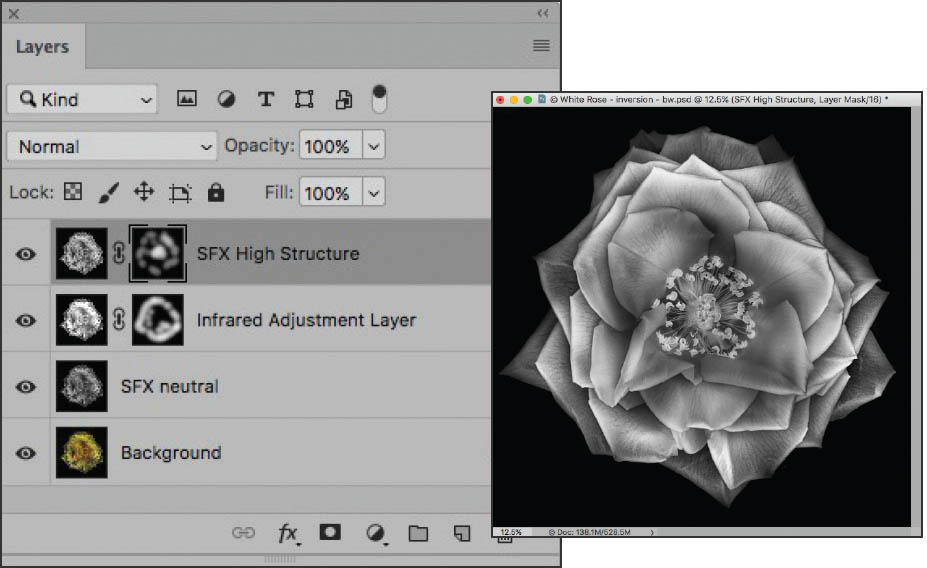
Step 13: To add more contrast to the edges of the petals, make another duplicate of the color Background layer, drag it to the top of the layer stack, and name it “SFX High Structure.” Convert the layer to monochrome using Silver Efext Pro and the High Structure Preset. Then add a Hide All layer mask, and brush in the edges of the petals with white and the Brush opacity set to 40%. Turn to page 226 for the final version.
Swapping Tonalities: Creating a Monochrome Rose on White
Inverting the background to black when a subject was photographed on a high-key white background, such as the white rose in this example, is a very useful and powerful technique. But you may also wish to leave the image on white. In this case it makes sense to amplify tonal contrast. You can use a LAB equalization to amp up the effective dynamic range of the version of this image on white. This creates an overall attractive, high-key monochromatic image.


Step 1: Use the original rose on white, and make a duplicate of the image (don’t just copy the layer). To do this choose Image ![]() Duplicate Image. You now have two image windows open.
Duplicate Image. You now have two image windows open.
Step 2: Convert the duplicate image to the LAB color space by selecting Image ![]() Mode
Mode ![]() Lab Color.
Lab Color.
Step 3: Select the Lightness channel in the Channels panel, then click the eyeball next to LAB to make sure all channels are visible so you can see the equalization as it happens.
Step 4: Choose Image ![]() Adjustments
Adjustments ![]() Equalize to equalize the duplicate image. You now have the two image windows, one with the original image and the other with the duplicate equalized image.
Equalize to equalize the duplicate image. You now have the two image windows, one with the original image and the other with the duplicate equalized image.
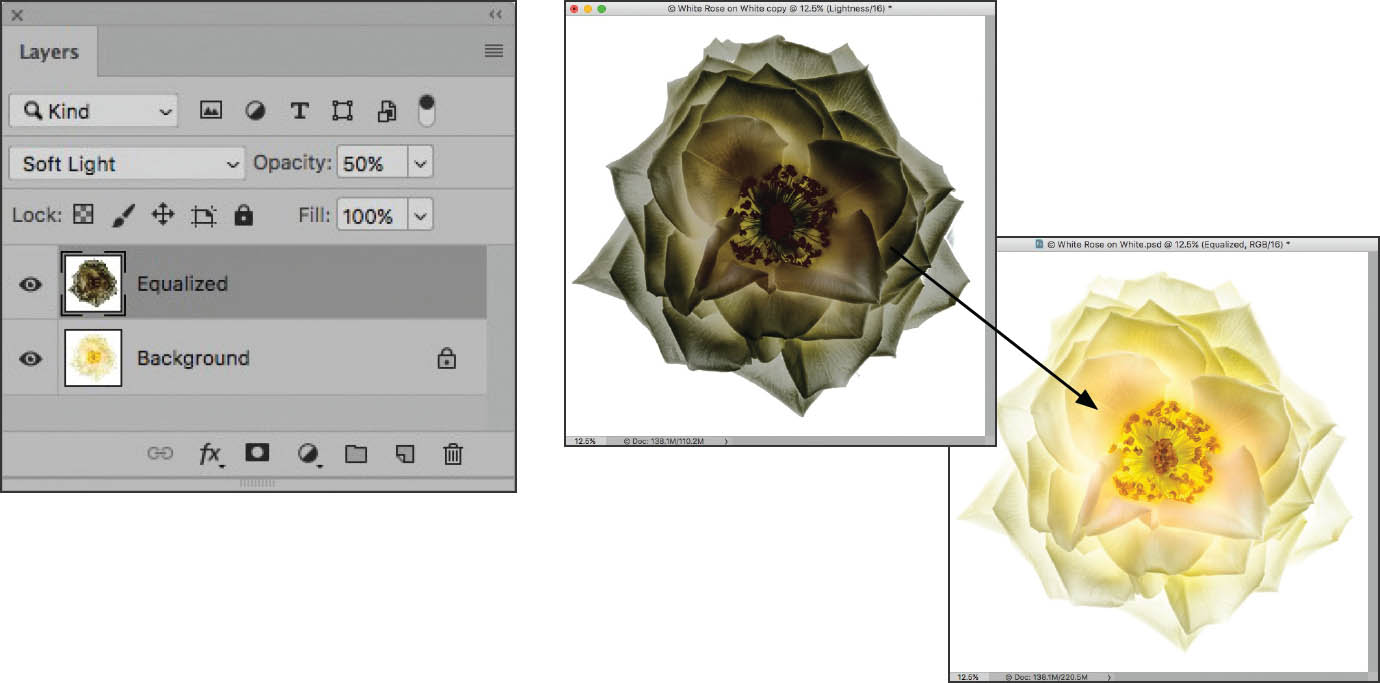
Step 5: Hold down the Shift key and drag the equalized rose image onto the original rose image. When you do this, the equalized rose will automatically convert from LAB to RGB. You will now have two layers in the Layers panel, “Background” and “Equalized.”
Step 6: With the Equalized layer selected, change the blending mode to Soft Light and change the layer opacity to 50%.
Step 7: Flatten the layers by selecting Layers ![]() Flatten. This adds contrast to the colored rose in preparation for conversion to monochrome.
Flatten. This adds contrast to the colored rose in preparation for conversion to monochrome.
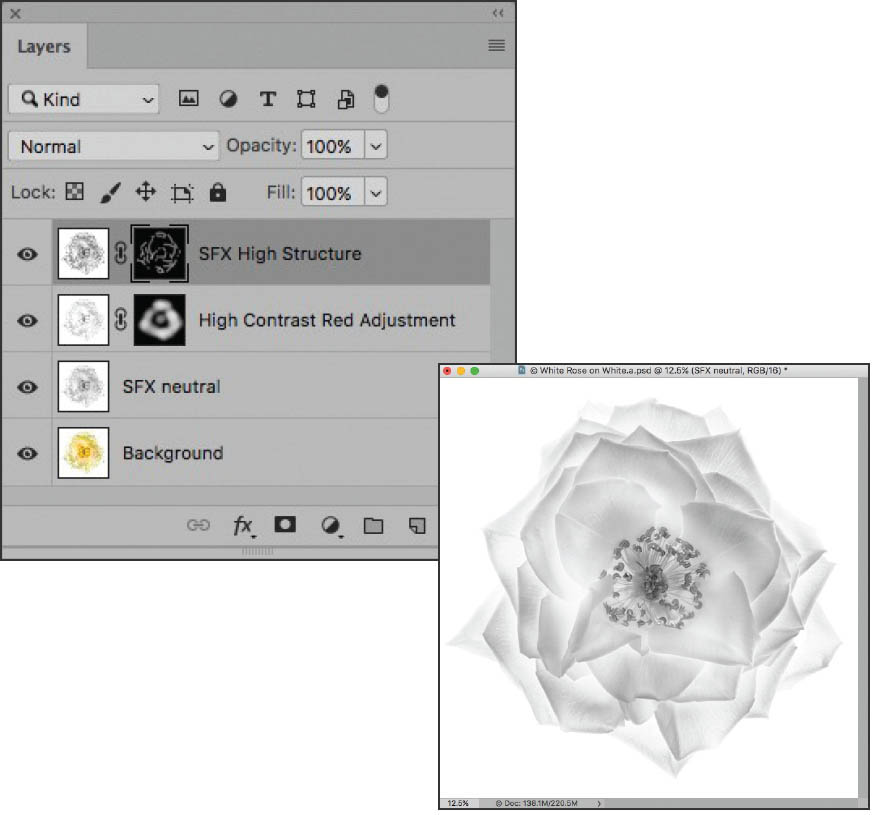
Step 8: Convert the image to black and white using your favorite method. For this rose, I first copied the color Background layer and renamed it “SFX neutral.” Then with that layer selected, I used Silver Efex Pro’s Neutral Preset.
Next, I copied the Background layer a second time, moved it to the top of the layer stack, and renamed the copy “High Contrast Red Adjustment.” I then applied a Black & White adjustment layer with the High Contrast Red preset, and using a black Hide All layer mask and the Brush Tool, I painted contrast onto the rose petals, and the center.
To finish, I copied the Background layer a third time, moved it to the top of the layer stack and renamed it “SFX High Structure.” I then applied Silver Efex Pro’s High Structure Preset to the layer. After adding a black Hide All layer mask to the layer, I used the Brush Tool to paint in the edges of the petals. The final monochrome rose on white is shown on page 227.
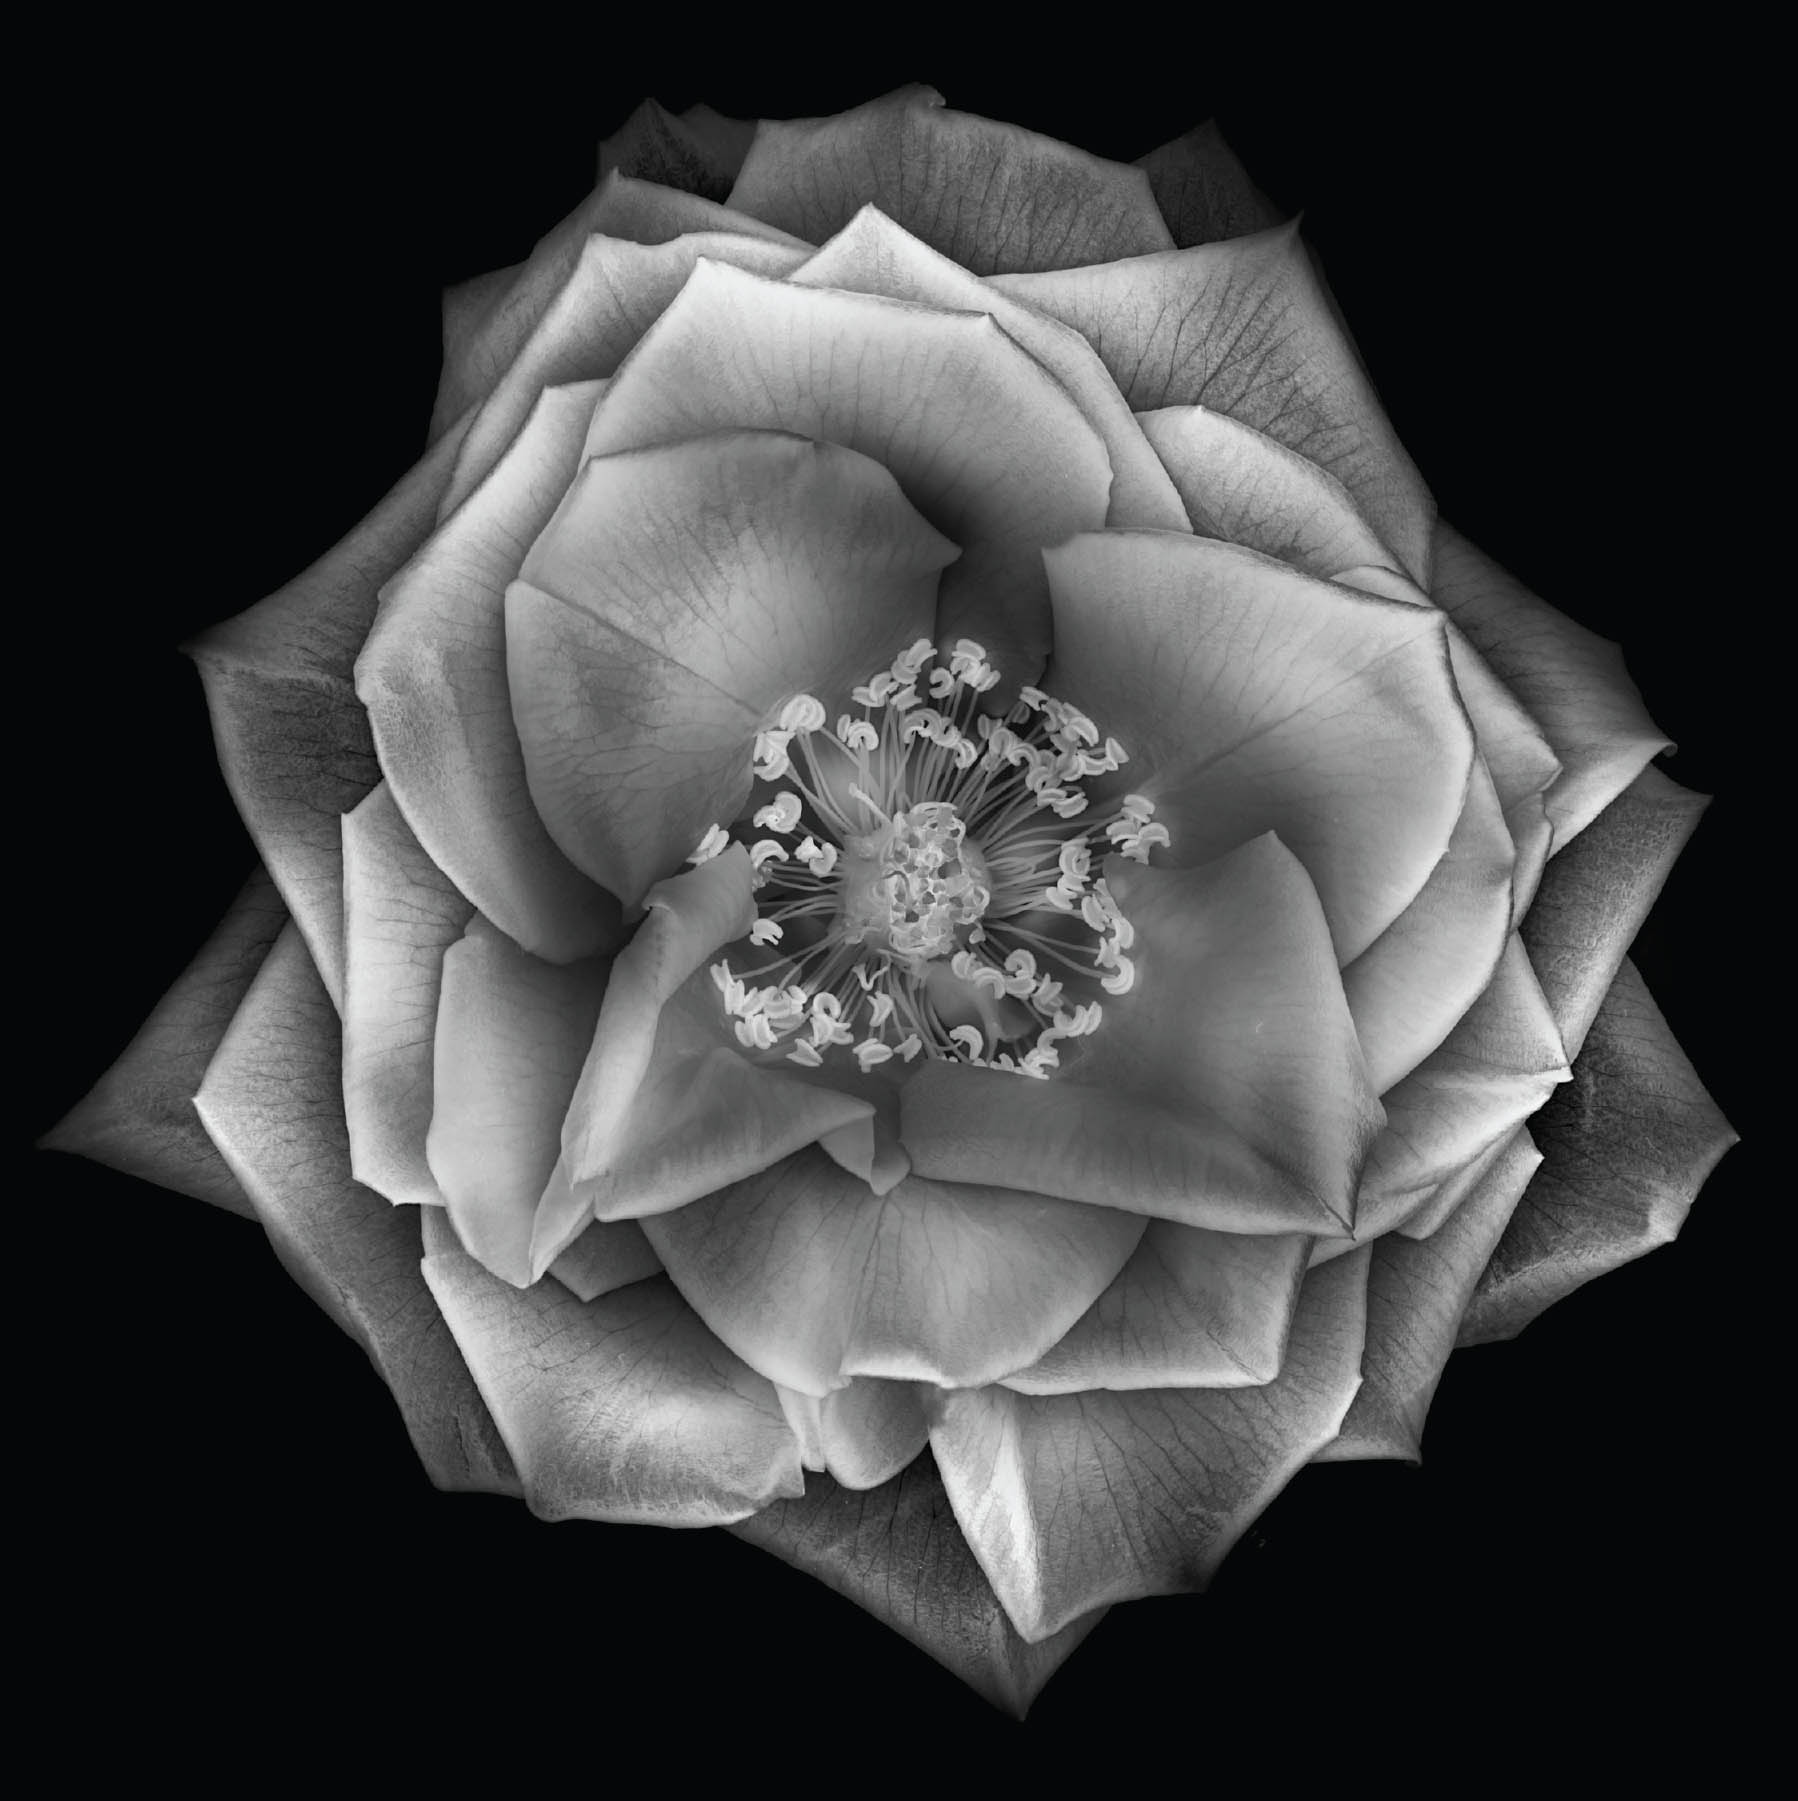
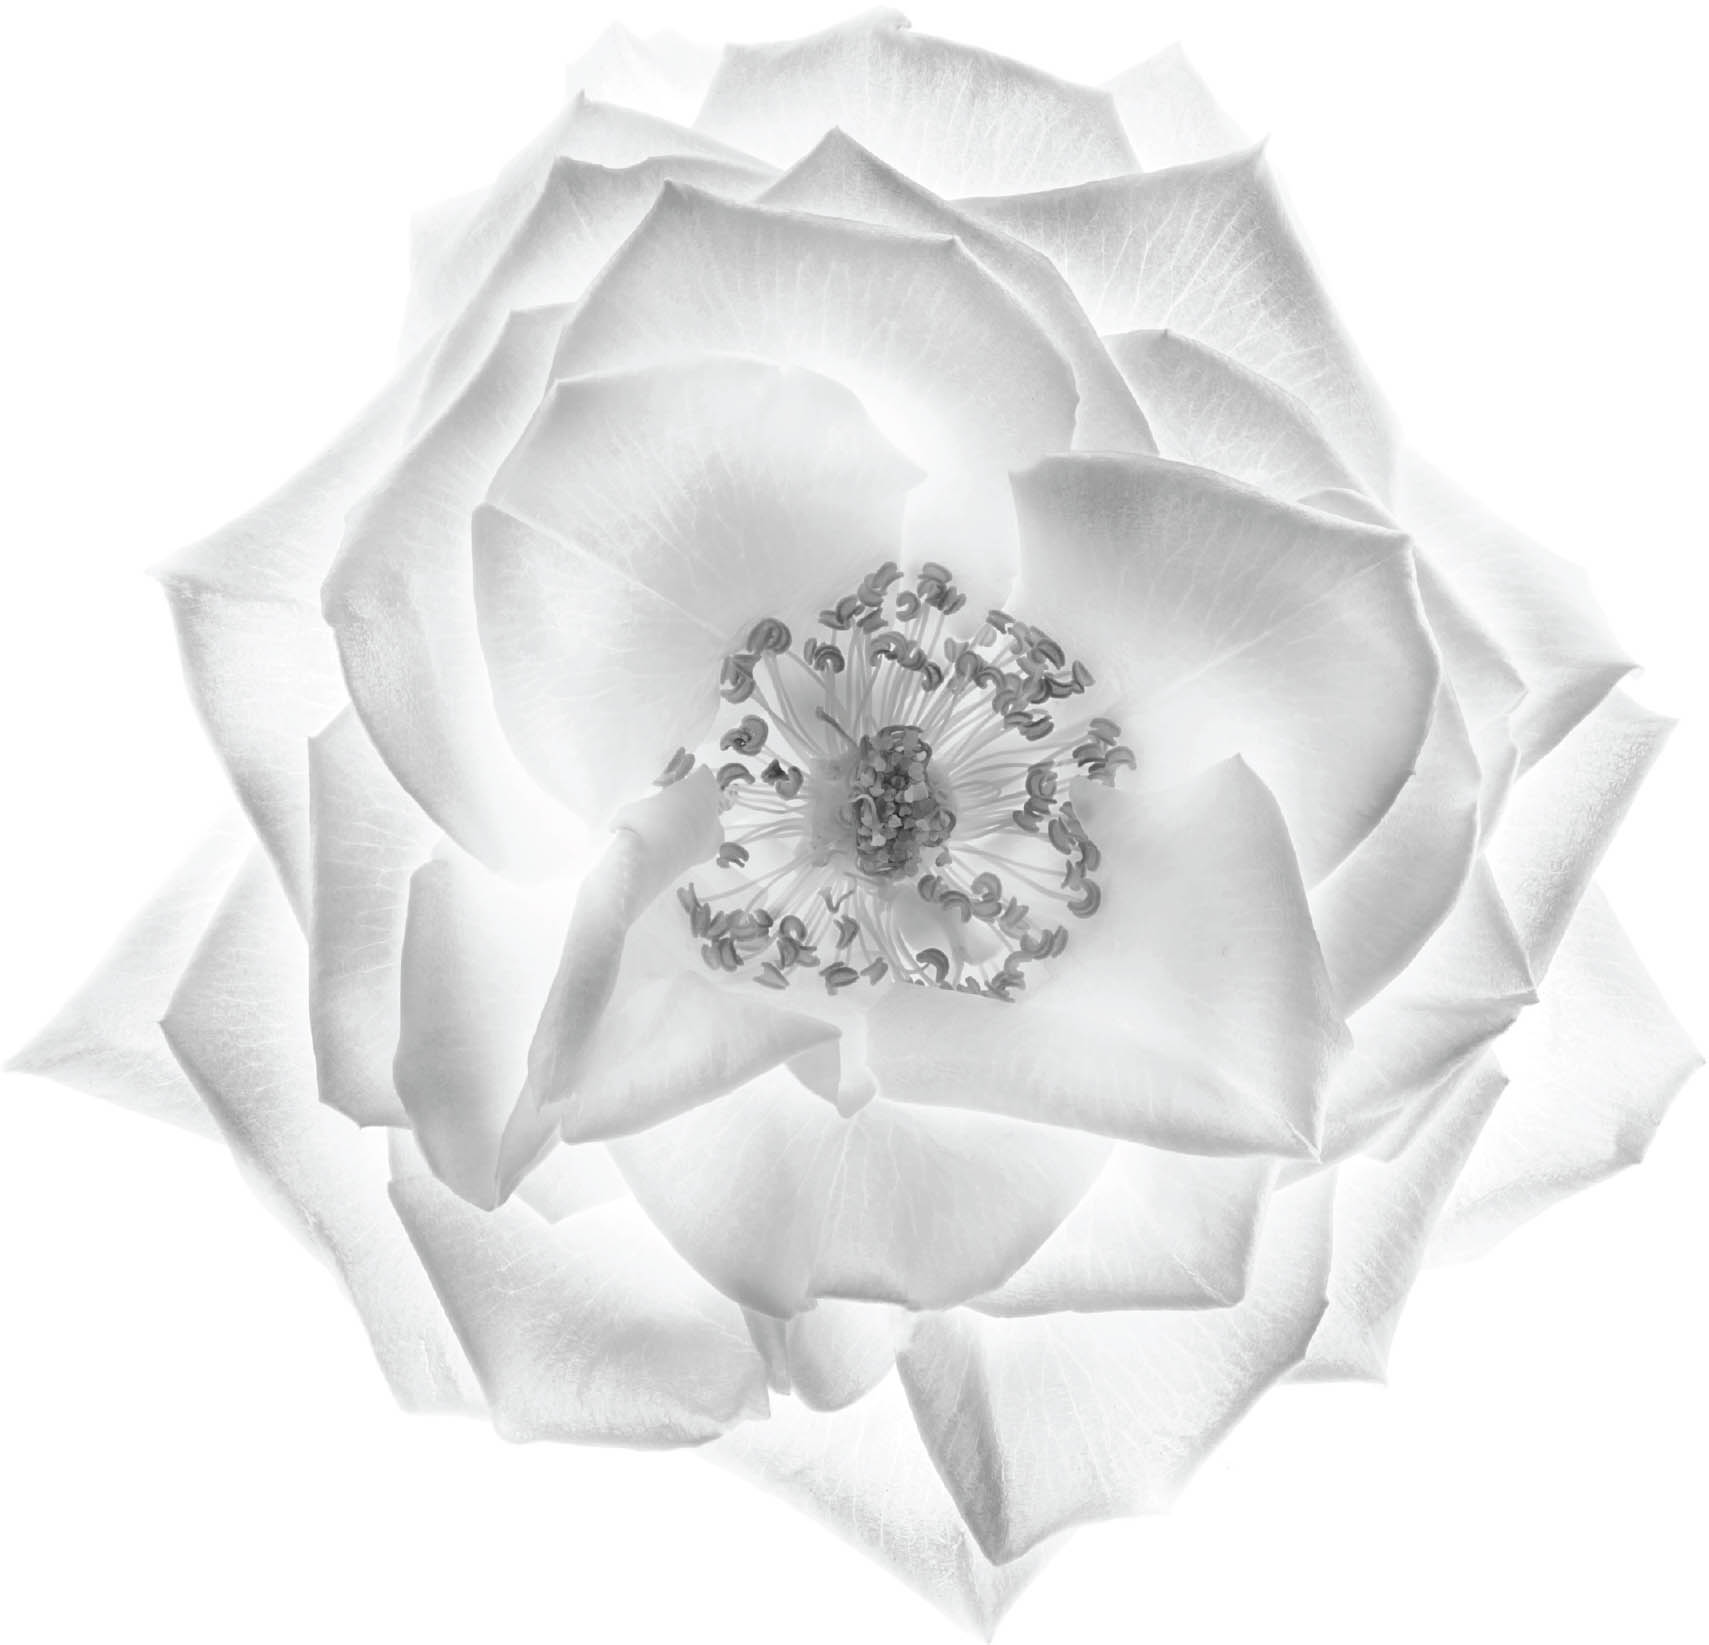
White Rose on Black and on White—I photographed an old-fashioned white rose on my light box with the intention of inverting the background to create a version of the image on black as well as the one on white.
Nikon D810, 85mm macro, 12mm extension tube, 10 seconds at f/64 and ISO 64, tripod mounted; processed in Photoshop using LAB color, and converted to black and white in Photoshop and Silver Efex Pro.
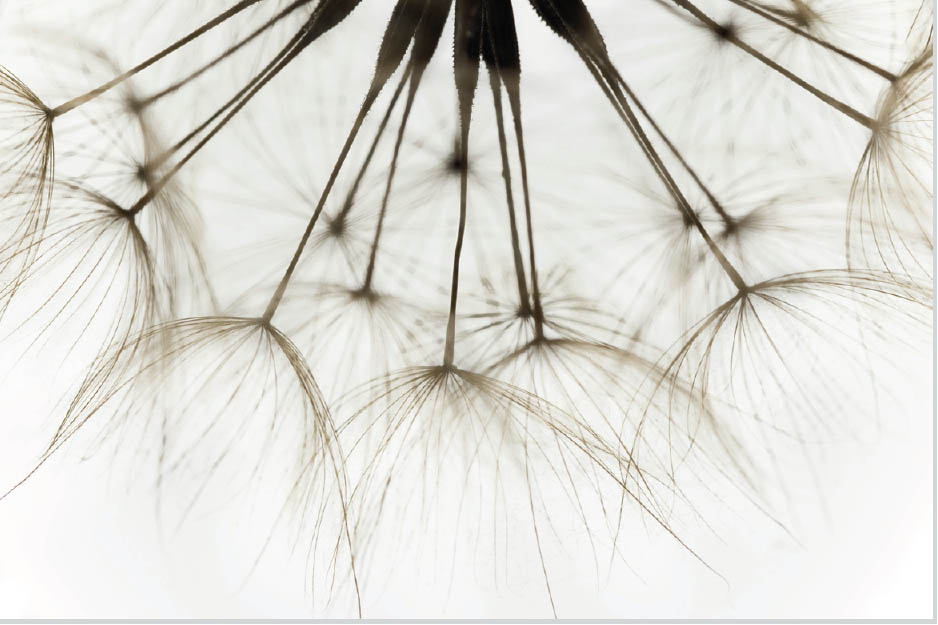
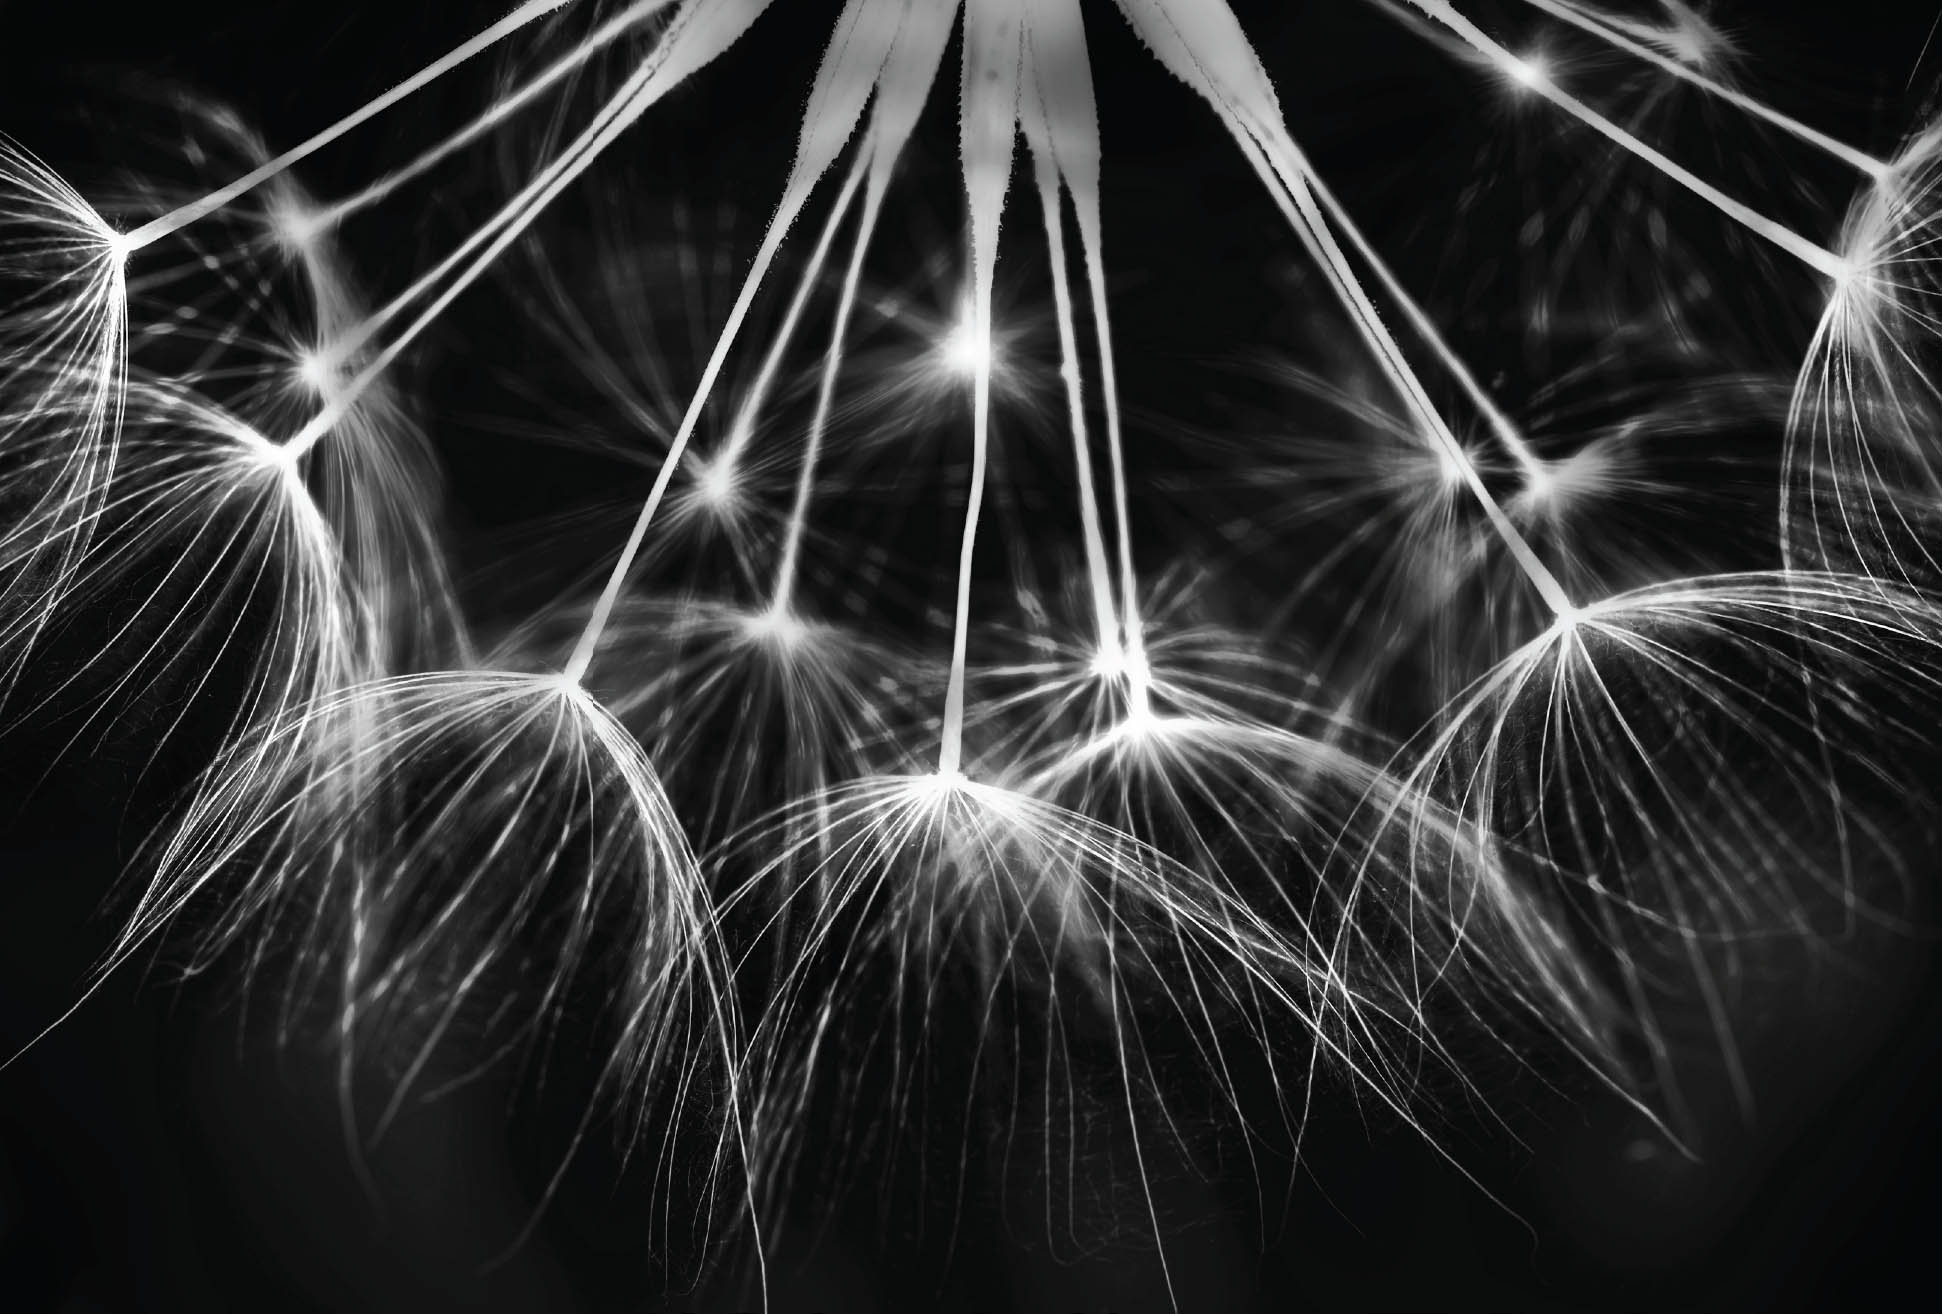
Seed Pod Umbrellas—When I photographed this dandelion on my light box, I thought the dandelion seeds looked like umbrellas—either umbrellas or ethereal and weird fireworks.
Nikon D810, 200mm macro, 36mm extension tube, four exposures at shutter speeds ranging from 1/10 of a second to 4/5 of a second, each exposure at f/16 and ISO 64, tripod mounted; right image converted to black and white in Photoshop, and inverted in LAB color using the L channel.

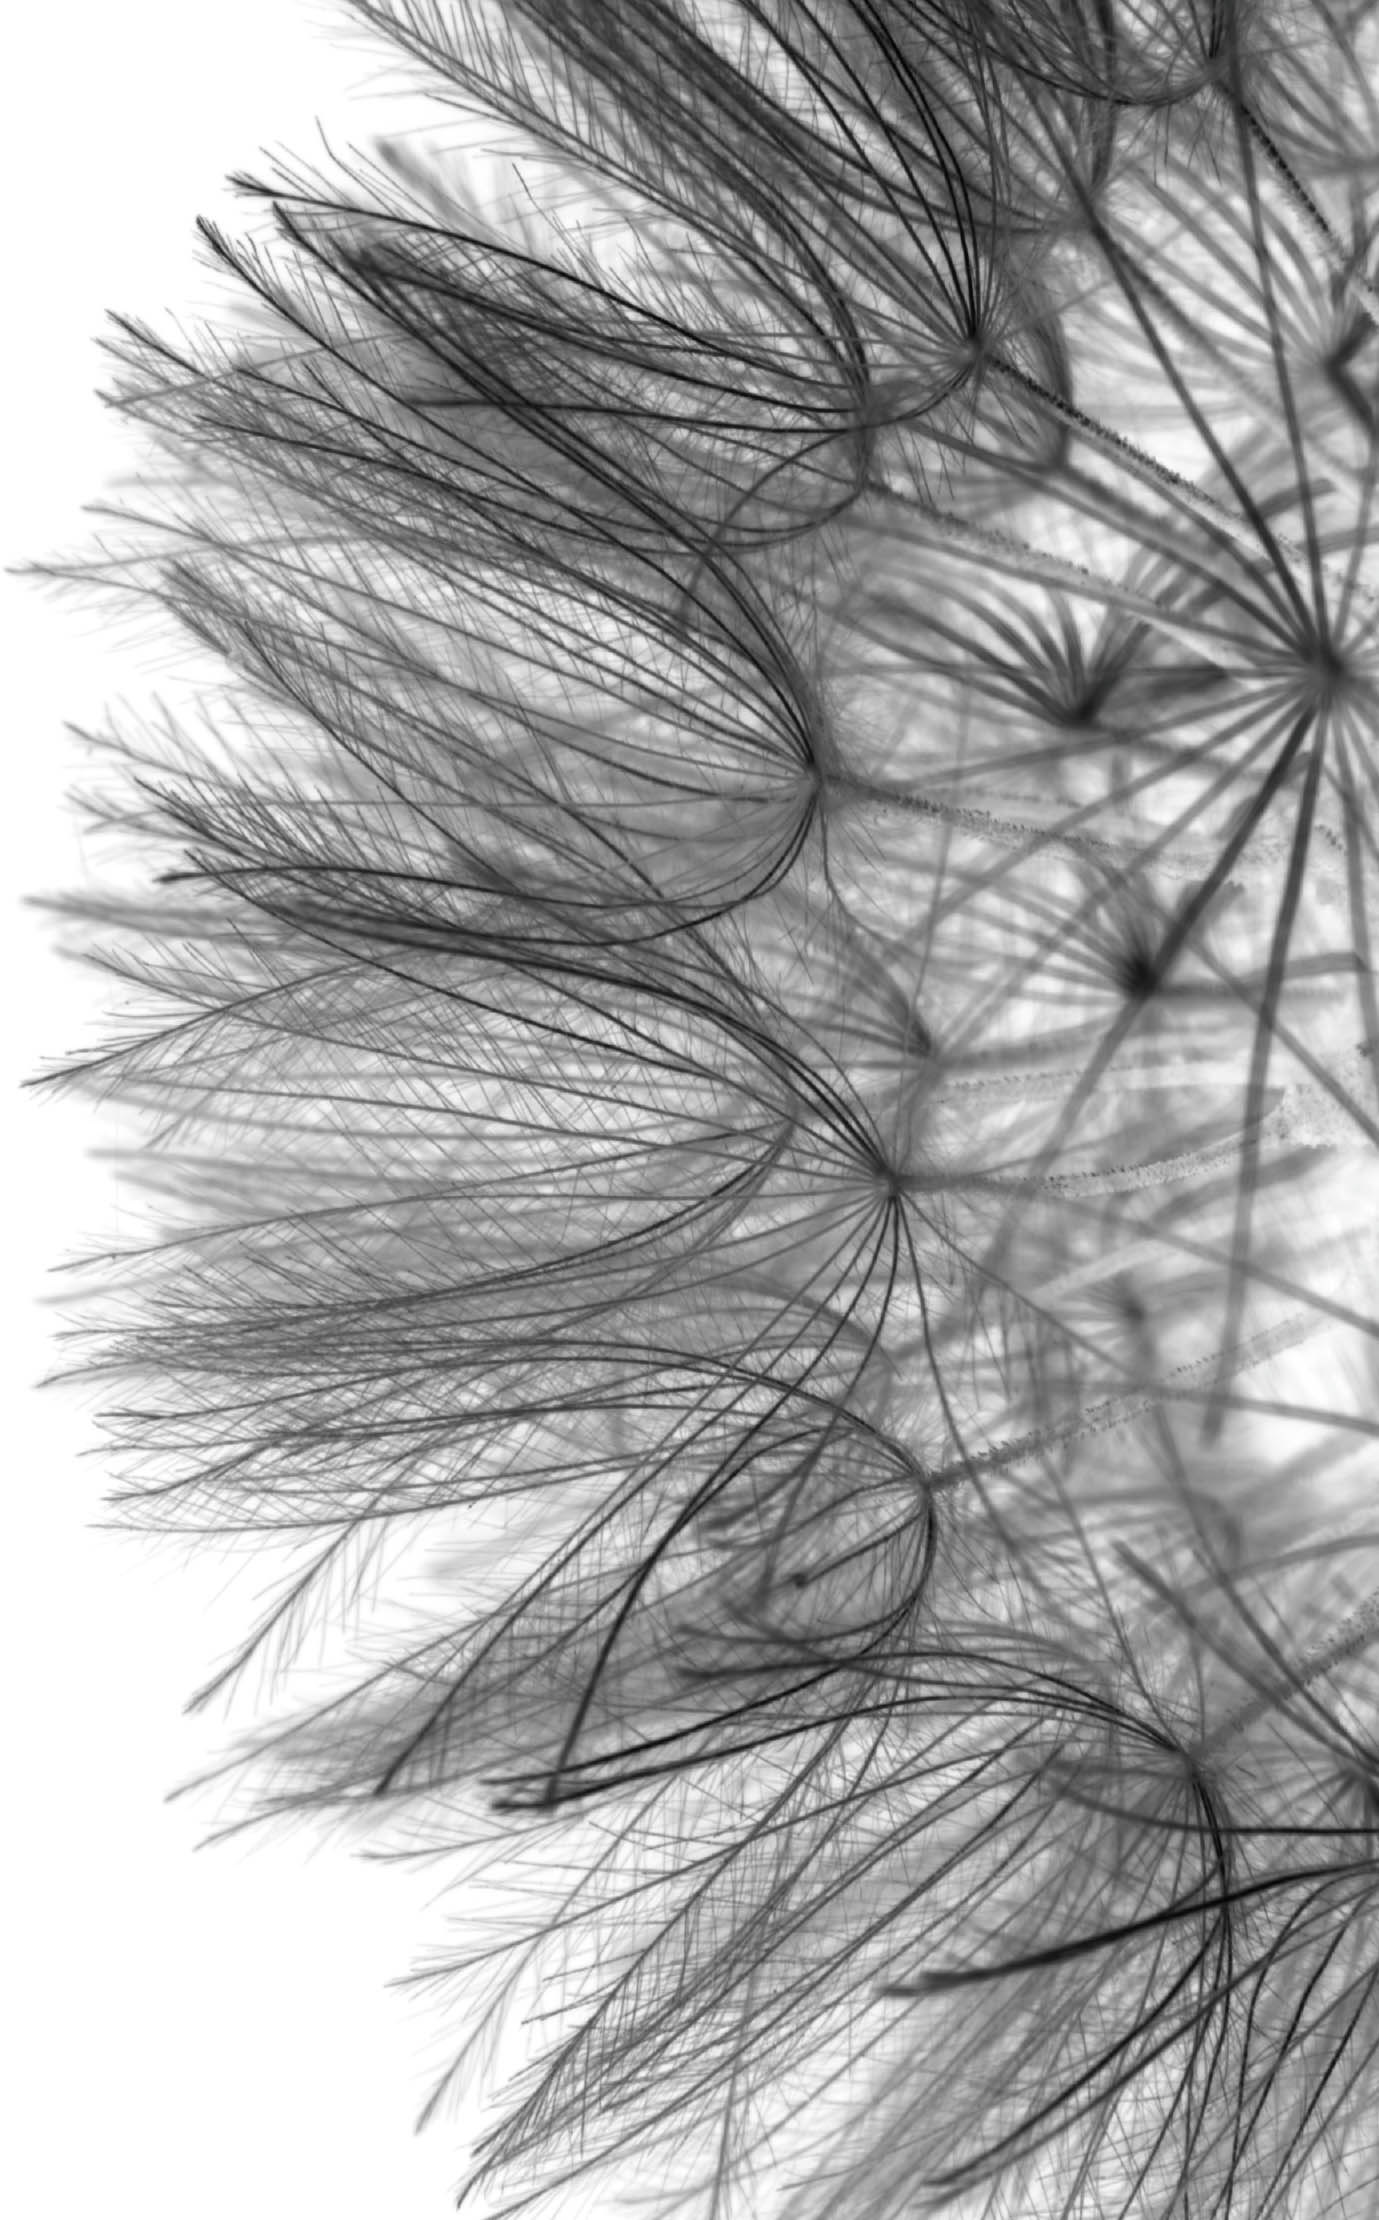
Dandelion Studies—I spent several days learning how to photograph dandelion macros on a light box. One of these studies is shown on the right; the version on the left swaps blacks for whites and whites for blacks.
Nikon D810, 200mm macro, 36mm extension tube, two exposures at 10 seconds and 20 seconds, each exposure at f/36 and ISO 64, tripod mounted; converted to black and white in Photoshop, left image L-channel inversion using LAB color.