
Creating Low-Key Effects
On pages 58–61 I explained that low-key images are predominantly very dark. The point of these compositions is to contrast the important areas that are lit with the blackness that surrounds them. It’s human nature to vest the dark negative spaces with an aura of power and mystery—so low-key compositions can be very powerful. Another feature of low-key compositions is they are effective at isolating the key elements of a composition and removing extraneous details. You can hide many sins, not to mention a great deal of clutter, behind a curtain of dense black!
With shooting with low-key in mind, look for the exact opposite of what you’d try to find with high-key. In other words, good low-key subjects are dark and black. The best low-key subjects are intermittently lit. Lighting often shows a chiaroscuro effect, meaning that there is mottled lighting with an extreme contrast between light and dark areas.
Effective use of low-key lighting involves underexposing the overall scene. That way, the highlight areas, which is what you are really interested in, will be properly exposed. There’s no substitute for trial and error, and for checking your captures using your camera’s LCD. Since you are only interested in selective areas of your composition, with a willingness to let the rest go very dark, be sure to zoom in on the parts of the photo that matter rather than relying on an overall impression.
Process the RAW conversion using multiple layers to emphasize the darkness that you’d like to have surrounding the lit areas of your composition (see pages 130–135 for more about multi-RAW processing). This often means creating a dark layer to use for background areas. You can layer in lighter areas using a mask and the Brush Tool.
Converting to black and white using a method that tends to darken your image—for example, using the Maximum Black preset available as a Black & White adjustment layer, or the Underexposure filter that is part of Silver Efex Pro—is a possible way to create a low-key image. Sometimes a High Contrast Red preset or filter works well with low-key images. You can always add a darker conversion for areas that need to be almost or entirely black.
One technique that adds darkness to a low-key image is painting with black over areas you want to darken. For the most accuracy, use a layer and layer mask as follows:

Curve #1—Using colored liquids, window light, and glassware, I spent a number of weeks happily creating shallow depth-of-field abstractions. But, alas, sunshine never lasts forever and is often followed by rain. My creative spurt was brought to an abrupt end by the arrival of a storm front that rendered the bright direct light dark and gray. Looking over the situation, I decided to see if I could create a series of black and white abstracts. This is the first image in the series.
Nikon D850, 85mm Lensbaby Velvet macro, 12mm extension tube, 1/2000 of a second at f/1.8, hand held; converted to monochrome using ACR, Photoshop, and Topaz B&W Effects.
- Choose Layer
 New Layer to add a transparent (empty) layer at the top of your layer stack. Click OK in the New Layer window to add the new empty layer.
 - Press D to set the Foreground color to black.
- Select the Paint Bucket Tool from the Tools panel. Click on the transparent layer with the Paint Bucket Tool. The layer will fill with black and your image will disappear. Don’t be alarmed, the image will be back in the next step.
- Choose Layer Layer Mask Hide All to add a black Hide All layer mask to the all-black layer. This hides the all-black layer and makes the image layer visible again.
- Select the Brush Tool from the Tools panel. Set the Brush Tool’s opacity to 50%. Make sure the Foreground color is set to white and then paint on the layer mask in the areas you want to make darker. You can vary the opacity setting of the Brush Tool as you work.
- When you finish adding black, archive your layered document, and merge it down so the file can be used for reproduction or on the web.
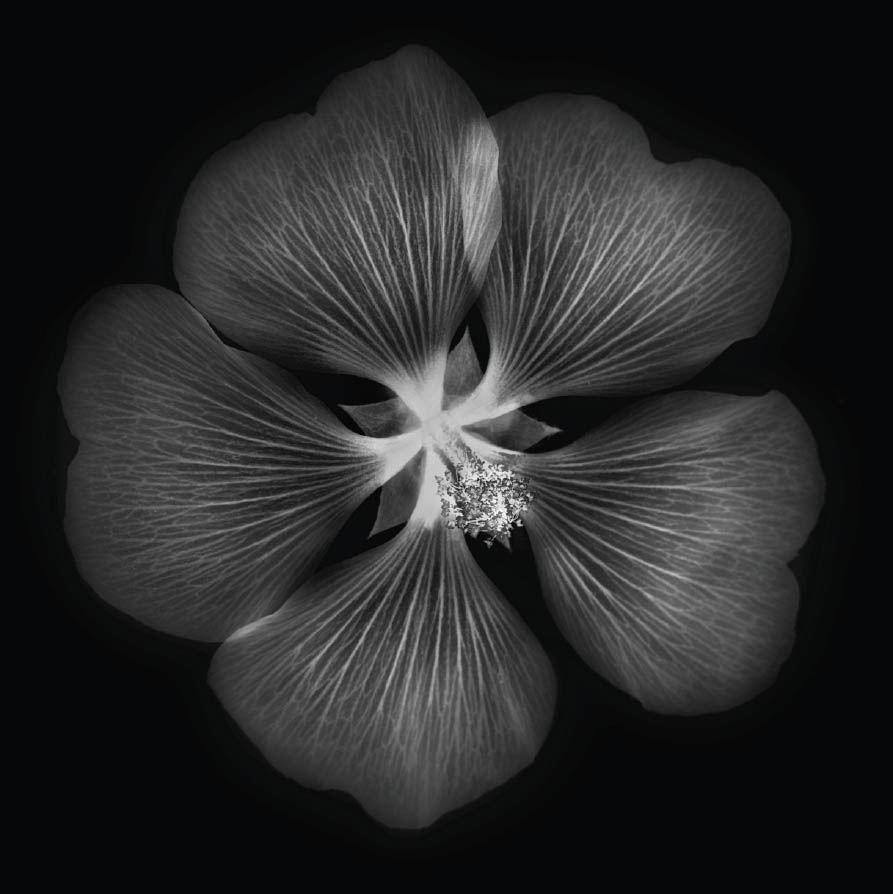
Mallow in IR—A mallow is a family of flowering plants and the original source for the beloved sticky marshmallow. I clipped this single blossom from a mallow bush in my garden, and photographed it on a light box, using an LAB inversion in Photoshop to add a black background, and simulating an infrared effect in Photoshop.
Nikon D810, Zeiss 85mm Otus, 1 second at f/16 and ISO 64, tripod mounted; processed in Photoshop using LAB color and the Black & White adjustment layer Infrared Preset.
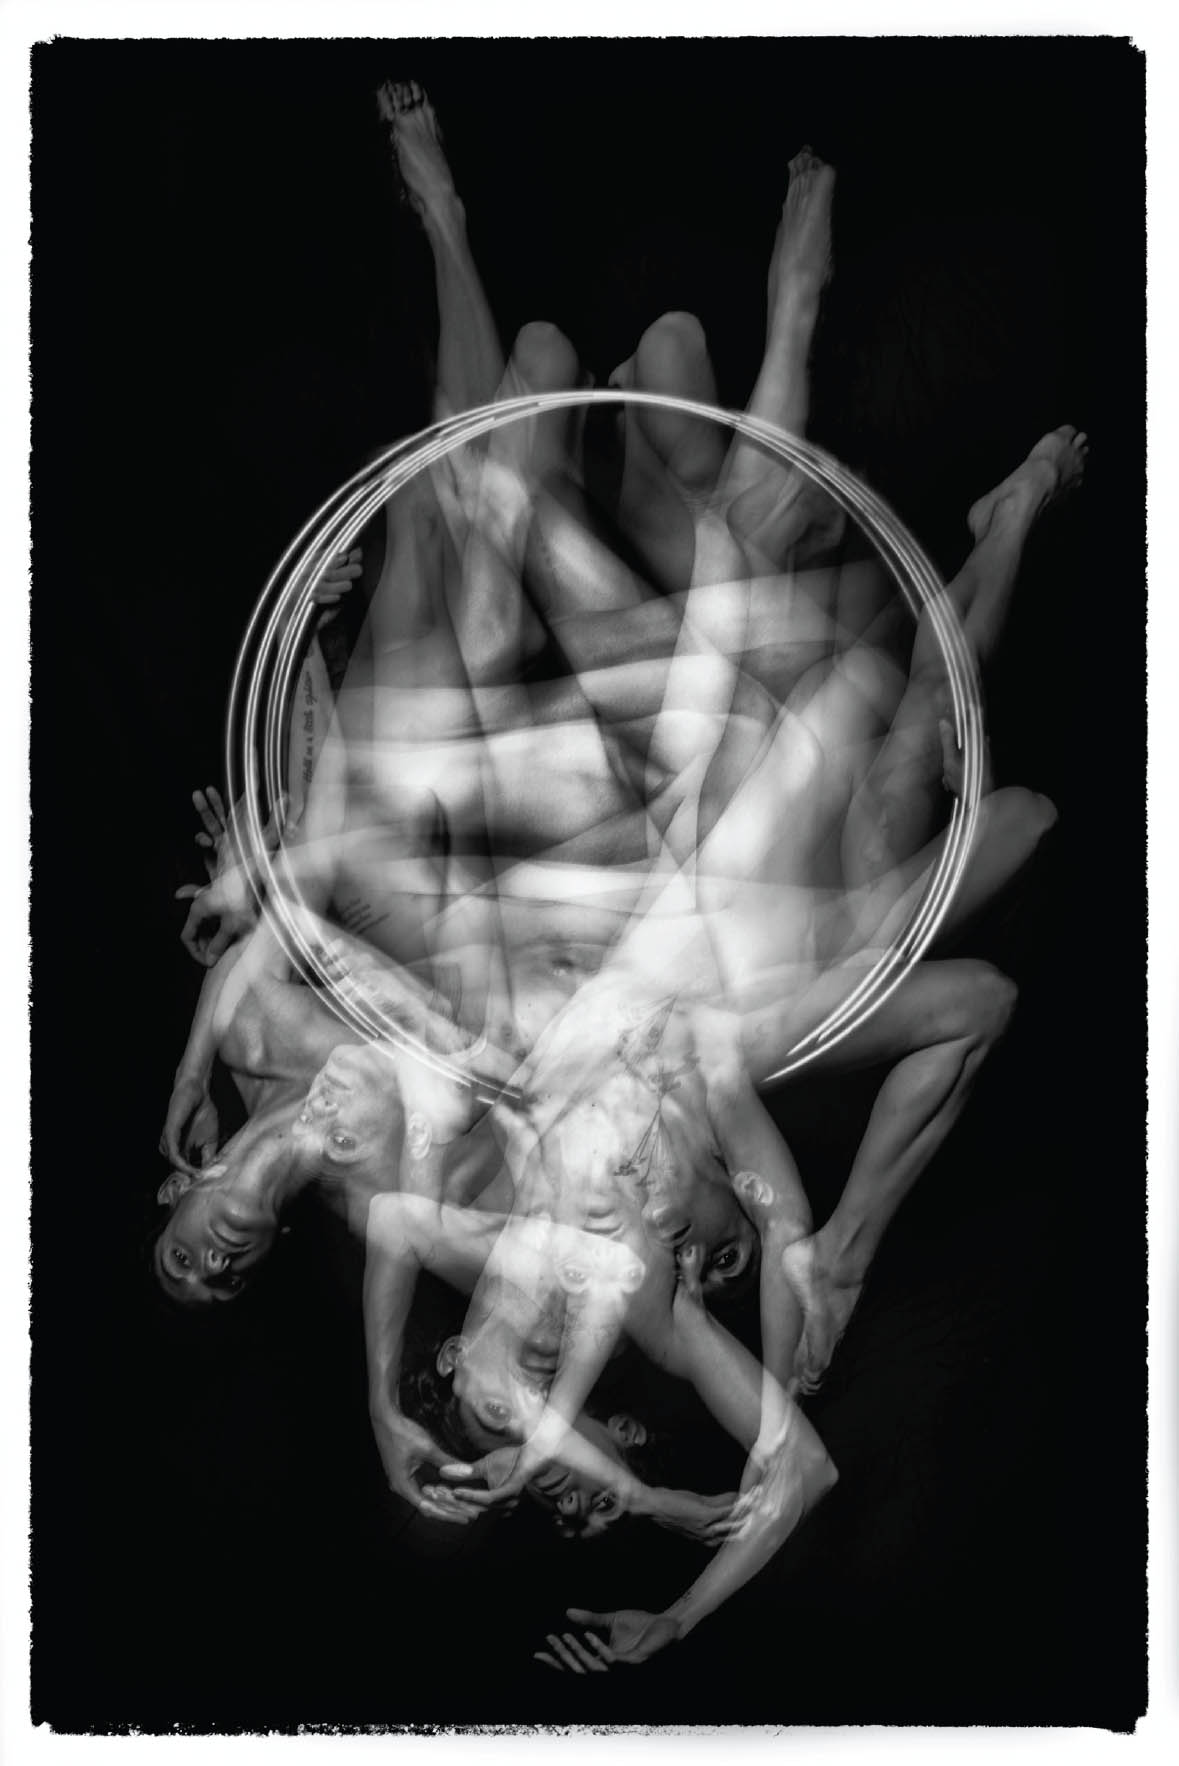
Upside Down in the Ring—My model for this image was an experienced acrobat. I hung a ring in the air, called a lyre, in front of a black background, and asked the model to pivot around the ring as I made multiple in-camera exposures. To give the illusion of the brightly lit model falling into darkness, I removed the wires supporting the lyre in post-production.
Nikon D800, Zeiss Otus 55mm, eight in-camera multiple exposures using strobes, each exposure at 1/160 of a second at f/9 and ISO 100, tripod mounted; converted to black and white using Photoshop and Silver Efex Pro, with a border added using On1 Perfect B&W.