
Soft Focus
While some schools of photography preach that everything in a photograph should be razor sharp from end-to-end, other photographers intentionally create images where the focus is soft, either in whole or part.
A great thing about the world is that it is big enough to have room for many schools of visual thought—and many different kinds of photos have aesthetic validity.
Personally, I try not to prejudge photos based on whether or not I like—or use—a given technique in my own work. Seeing a technique that I don’t use often but that’s put to good use is always inspiring for my own work. That said, I prefer soft focus photos where the absence of hard edges is integral to the composition and makes visual sense, rather than photos that use soft focus to hide flaws in the underlying subject. The choice, however, is yours: When soft focus is in your toolbox you can use it to hide wrinkles, or to create novel compositions—or both.
There are many ways to create soft focus effects with your camera. Some of these involve no special equipment, but can be tricky to get right. Throwing your lens out of focus as in the image on page 234, or moving the camera slightly, can be difficult to master.
Another approach is to add a filter to the end of your normal lens that will soften the photo (a clear filter coated with a soapy solution, vaseline, or other “schmutz” works for this), or to use a special “soft focus” lens—essentially, as I’ve joked, turning an expensive interchangeable lens camera into a cheap plastic toy.
An interesting variation is selective soft focus. This means that everything in an image is soft except a relatively small area—often the center. A crisply focused lens set to a wide open aperture (so there is low depth-of-field) can achieve this effect, as can some filters. A great tool for controlled and selective focus in the camera is to use a Lensbaby. The Lensbaby lenses are designed to alter the point of focus and the degree to which the surrounding areas are out of focus.

Apple Blossom—I used the sweet spot—the area that is in focus when creating an otherwise soft focus Lensbaby image—to highlight a single apple blossom in this selective focus image.
Nikon D300, Lensbaby Composer, standard optic, 1/8000 of a second using f/8 aperture ring at ISO 400, hand held; converted to monochrome using Photoshop.
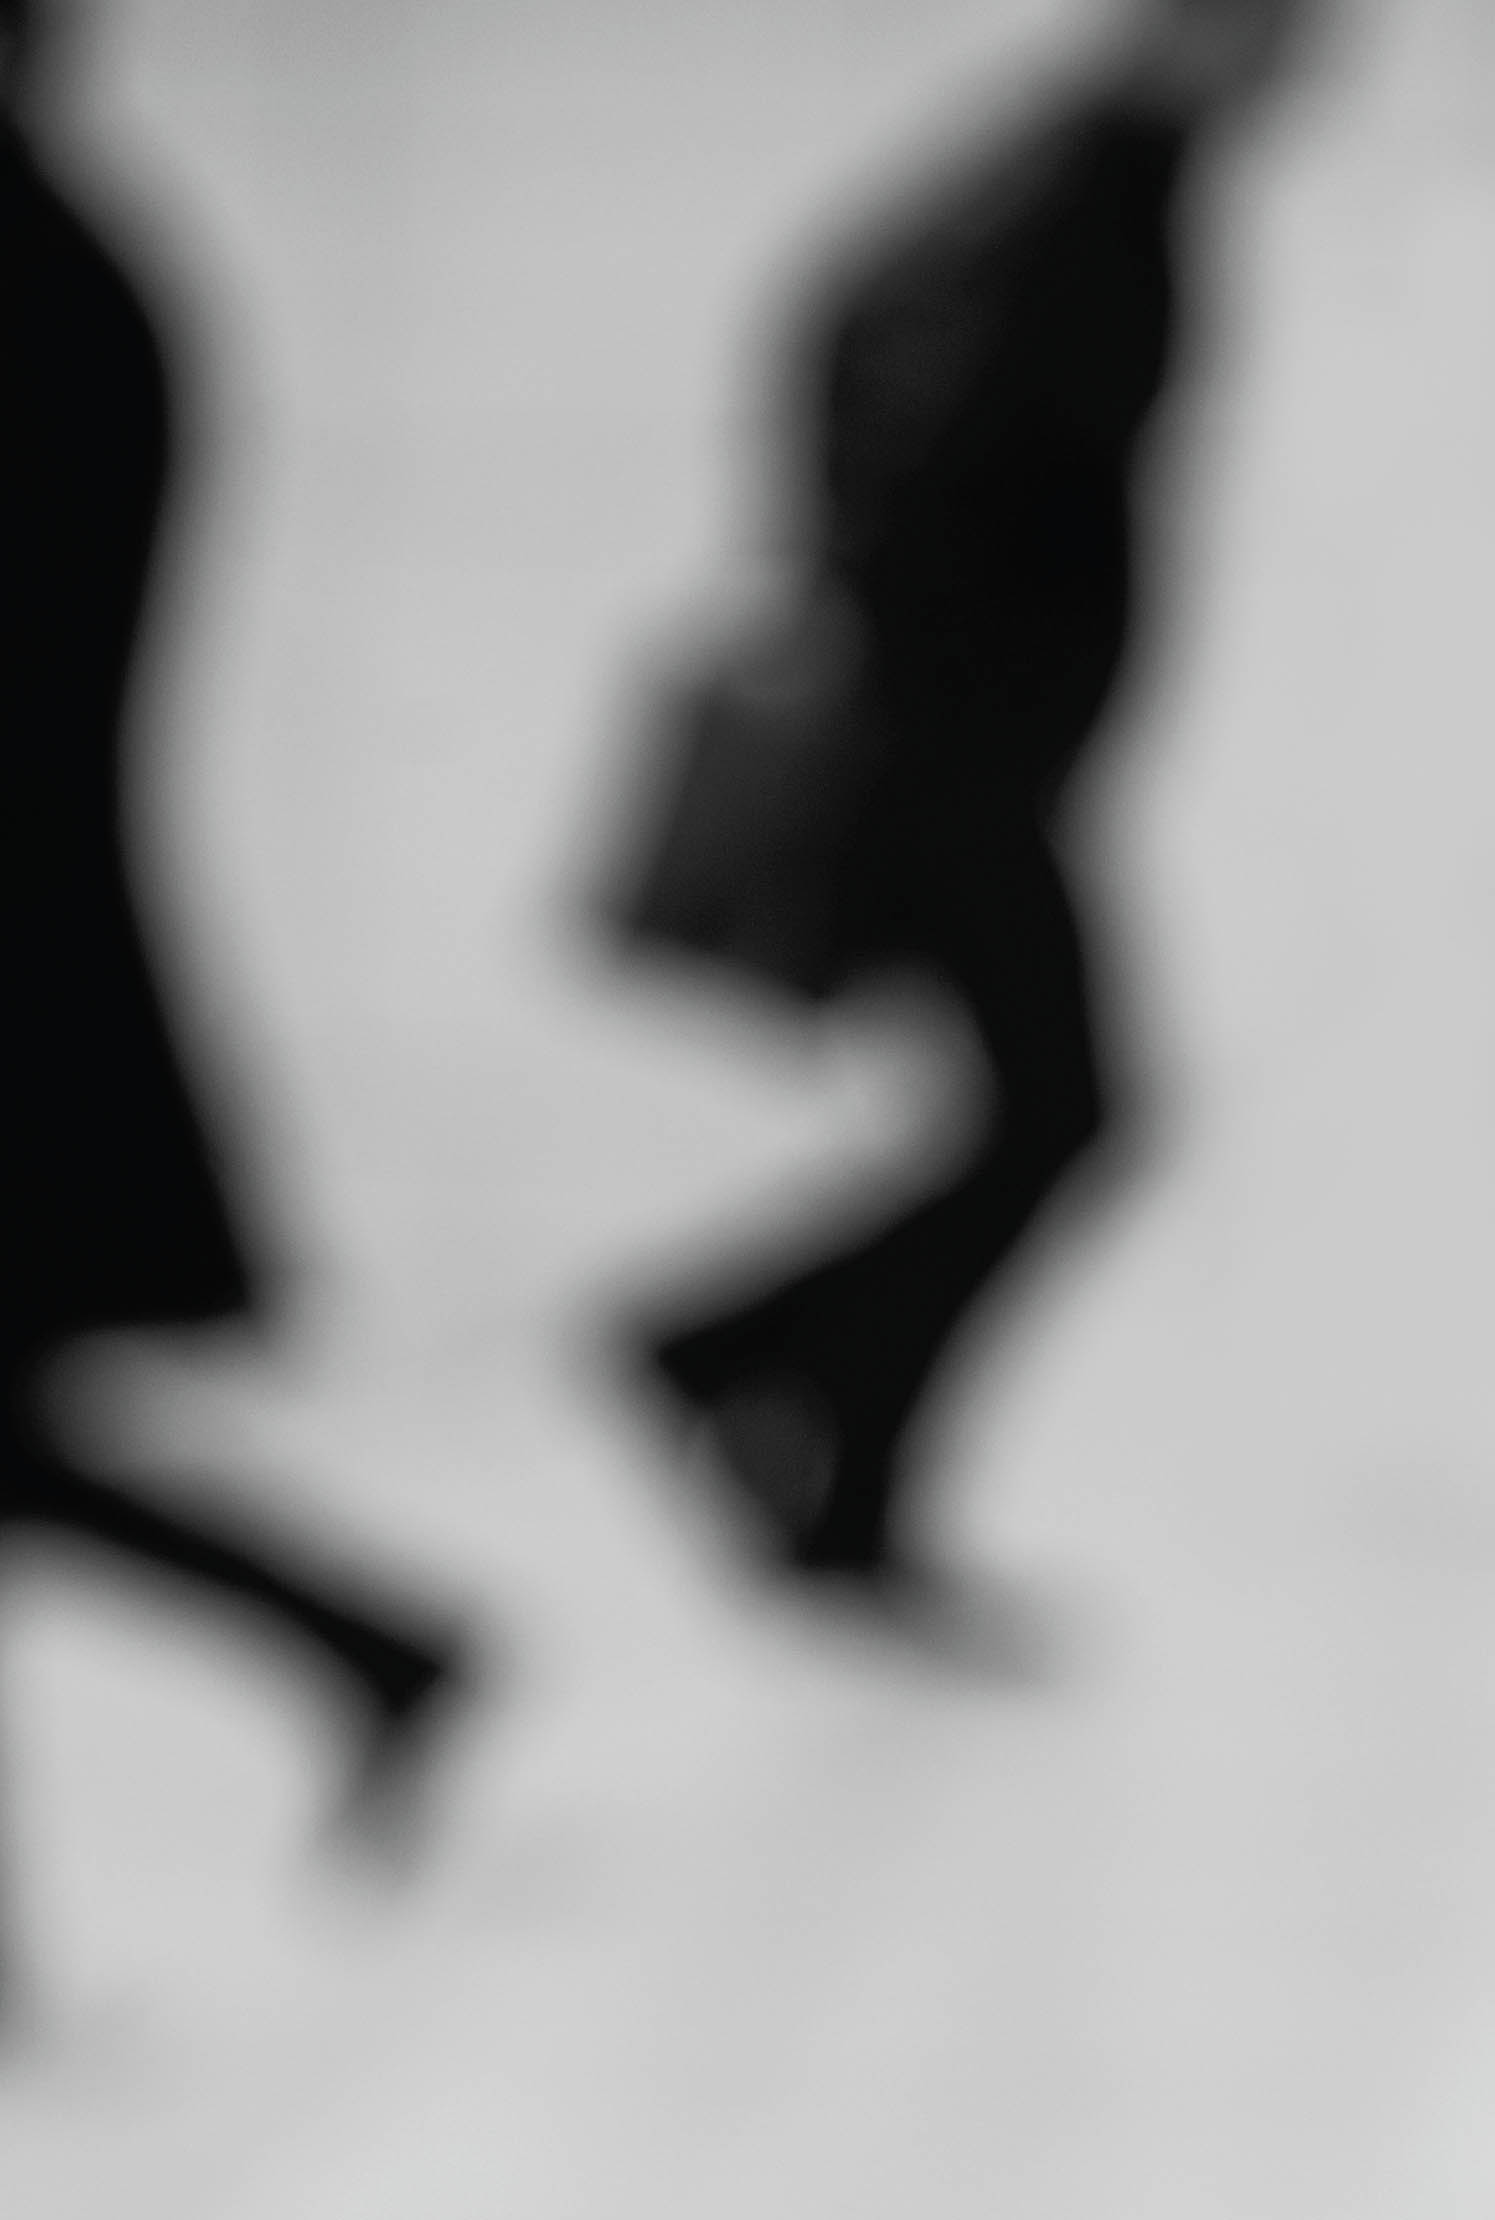
Silhouettes, La Défense—La Défense is the modern corporate district on the outskirts of Paris that houses the headquarters of many important companies. On an overcast day, I took the Metro Line 1 to its last stop at La Défense station and explored. Sitting on the stairs under the Grand Arch at La Défense, it was a little hard for me to understand how to render the architecture as I am more of a nature kind of guy. I found the throngs of business people, scurrying around like ants a bit depressing. I came up with the idea of rendering my feelings about this kind of ant-like human activity by intentionally blurring my images. I focused close up on the foreground stairs, and threw the human figures strongly out of focus in this exposure.
Nikon D300, 150mm, 1/500 of a second at f/6.3 and ISO 400, hand held; processed to black and white using Photoshop.
Adding Soft Focus
Didn’t think to create a soft focus capture when you took the photo? Don’t worry, no problem. It’s pretty easy to create soft focus effects after the fact in the Photoshop darkroom, including selective soft focus.
Of course, you can do just about anything in Photoshop—and there are usually many ways to do those many things. But it helps to know where you are headed. That’s why I’ve started this section with some examples of soft focus effects created in the camera—these provide an idea for what kind of effects you can create in post-processing that will have visual credibility.
Probably the easiest way to add a soft focus effect to a photo is to use the Gaussian Blur filter. For example, the iPhone image of two forks, shown to the right, is overall sharp—both the forks and the background tablecloth. It would make visual sense to blur the tablecloth so that the real subject of the image, the forks, stands out.
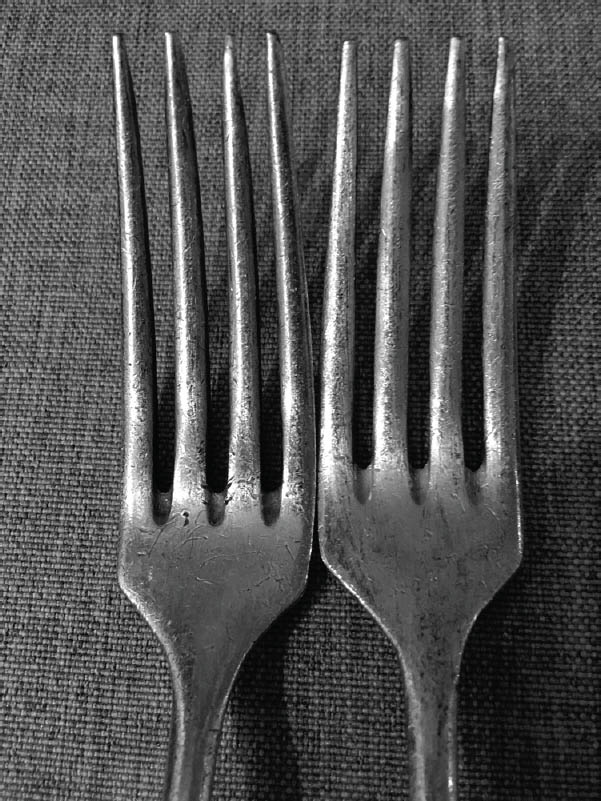
In this image of forks on a tablecloth, the background can be blurred to make the forks stand out.

Step 1: Choose Layer ![]() Duplicate Layer to create a copy of the Background layer. Name this new layer “Blur.”
Duplicate Layer to create a copy of the Background layer. Name this new layer “Blur.”
I recommend always adding blur on a duplicate layer in Photoshop. That way, you can always go back to the original Background layer if you don’t like the effect or want to start over.
Step 2: Choose Filter ![]() Blur
Blur ![]() Gaussian Blur. The Gaussian Blur dialog opens.
Gaussian Blur. The Gaussian Blur dialog opens.
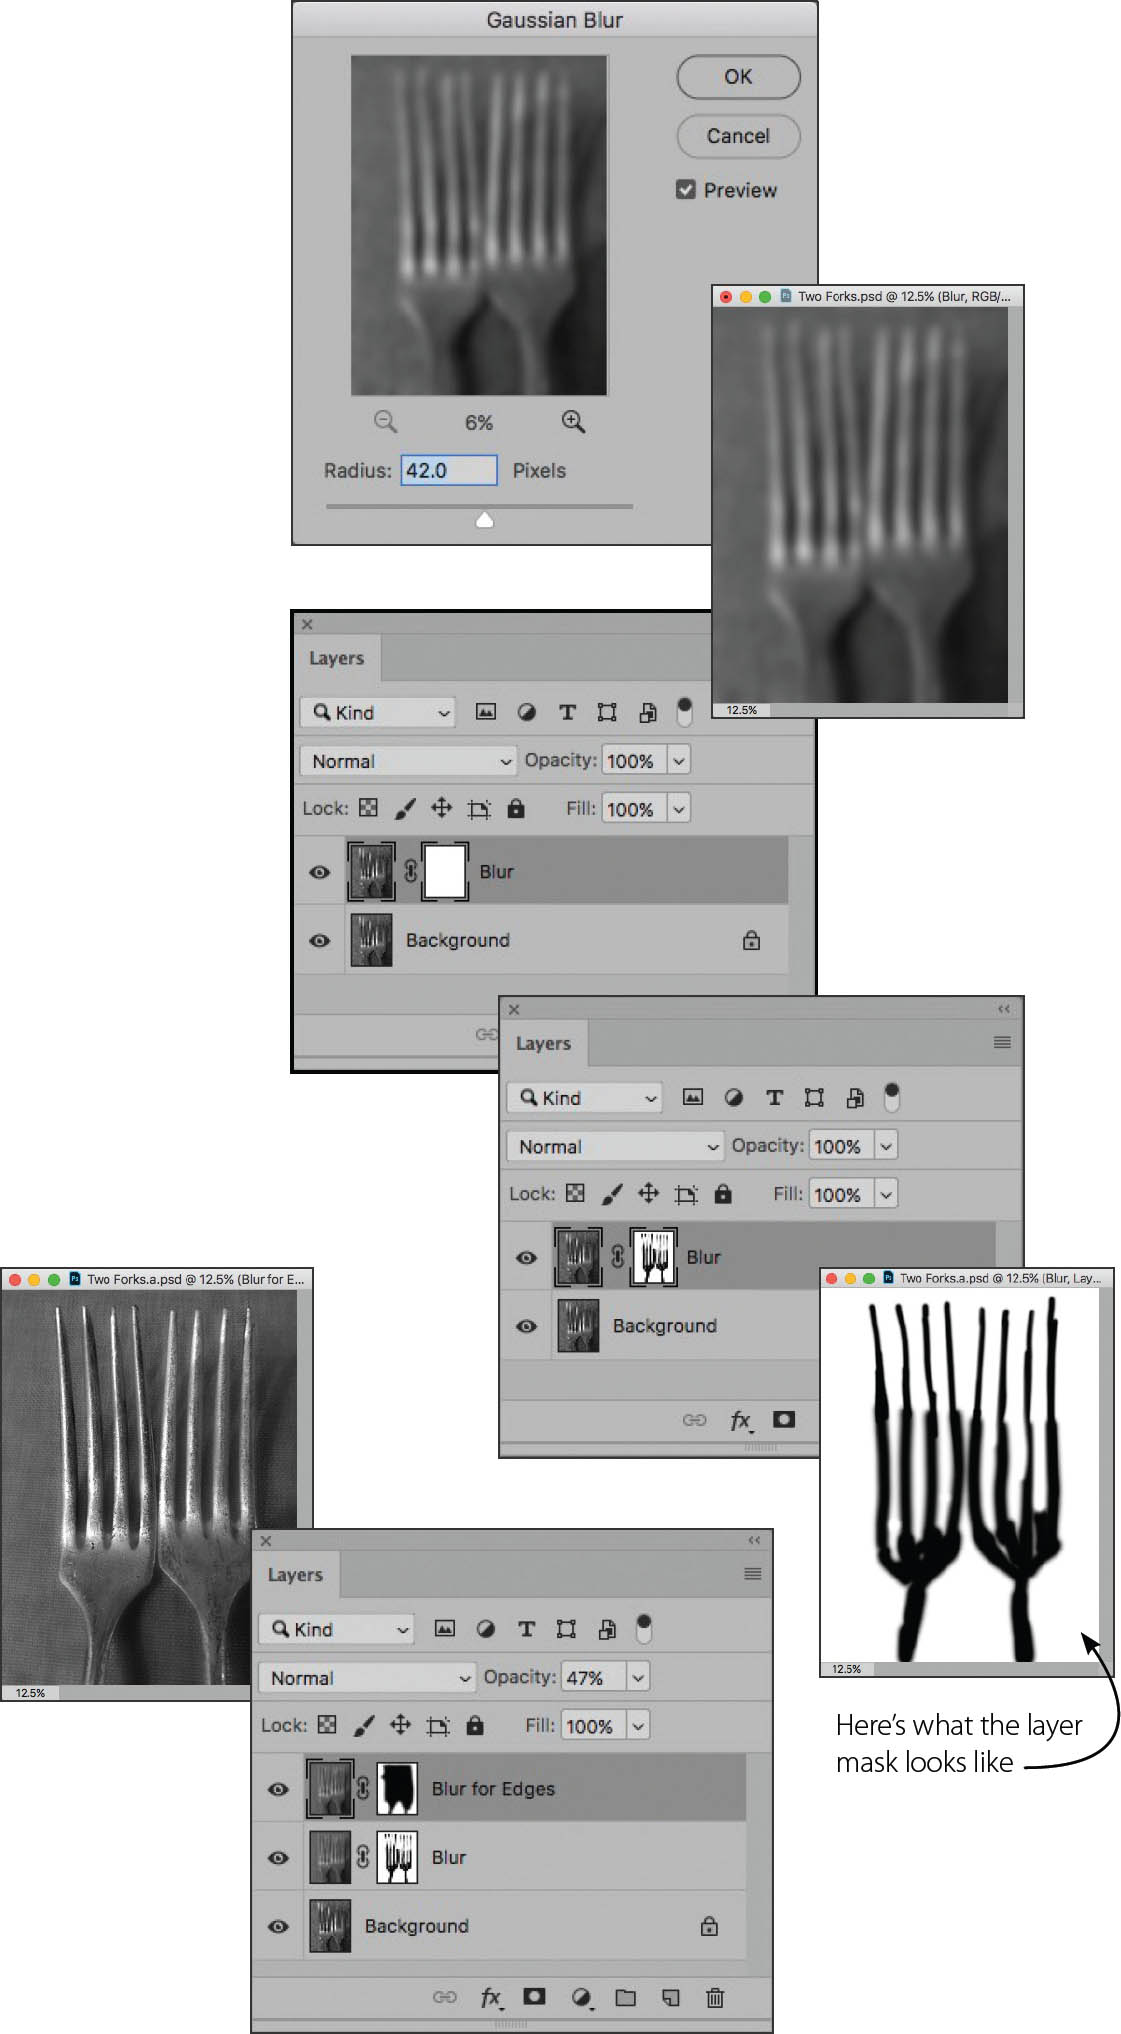
Step 3: Use the Radius slider to set the blur. The higher the Radius setting, the more blur—and blur translates to a soft focus effect. I suggest trying 42 pixels. If this proves to be too much, you can always take down the strength of the soft focus effect by reducing the opacity of the layer that is blurred using the Opacity slider in the Layers panel.
Click OK when you are satisfied with the amount of blurring.
Step 4: With the “Blur” layer selected in the Layers panel, choose Layer ![]() Layer Mask
Layer Mask ![]() Reveal All to add a white layer mask to the “Blur” layer.
Reveal All to add a white layer mask to the “Blur” layer.
Step 5: Select the Brush Tool from the Tools panel and make it soft so the edges feather as you paint. Set the Hardness to 0% and the Opacity to 50%. You can adjust these settings as you paint. Make sure black is selected as the Foreground color, so you paint on the mask with black.
Step 6: Paint on the forks to hide the “Blur” layer and reveal the sharp Background layer underneath. This reveals the sharp forks.
Step 7: If you still feel that the edges of the image aren’t blurred enough, you can add more blur by using an additional layer.

Two Forks—iPhone 6S, back camera, 4.2mm at 1/25 of a second at f/2.2 and ISO 200, hand held; converted to monochrome using Snapseed, and selectively blurred using Photoshop.
Pinhole Effect
In “real life,” pinhole photography is photography without a lens. Instead of a lens, light passes through a tiny hole; the light passing through this hole forms the image in the camera.
The optics of the pinhole effect were understood as early as the fifteenth century Renaissance, and were described by Leonardo da Vinci and others. The optical effect was used to invent the camera obscura—a literal dark room that projects an image of the surroundings on the wall using a pinhole.
The camera obscura is one of the key discoveries leading up to the invention of photography; if you get the chance, don’t miss the opportunity to visit one.
Today, it is possible to purchase pinhole cameras, or to make them from a kit. Working pinhole cameras have been constructed from shoe boxes, tin cans, and even odder materials.
If you are interested in retrofitting an interchangeable lens camera to work like a pinhole camera, a good choice is the Pinhole/Zone Plate optic associated with the Lensbaby Composer.
The general characteristics of a pinhole photo are great depth-of-field, overall softness, darkened edges, and brightness in the center of the image. To start with the simulation of this effect, I chose an image entirely in focus so depth-of-field wasn’t an issue.
Step 1: With the “Background” layer selected, choose Layer ![]() Duplicate to make a copy of the layer. Name this duplicate layer “Soft Focus.”
Duplicate to make a copy of the layer. Name this duplicate layer “Soft Focus.”
For each step in creating the pinhole effect, work on a duplicate layer. That way, you can go back to the original image if you make an adjustment you don’t like.
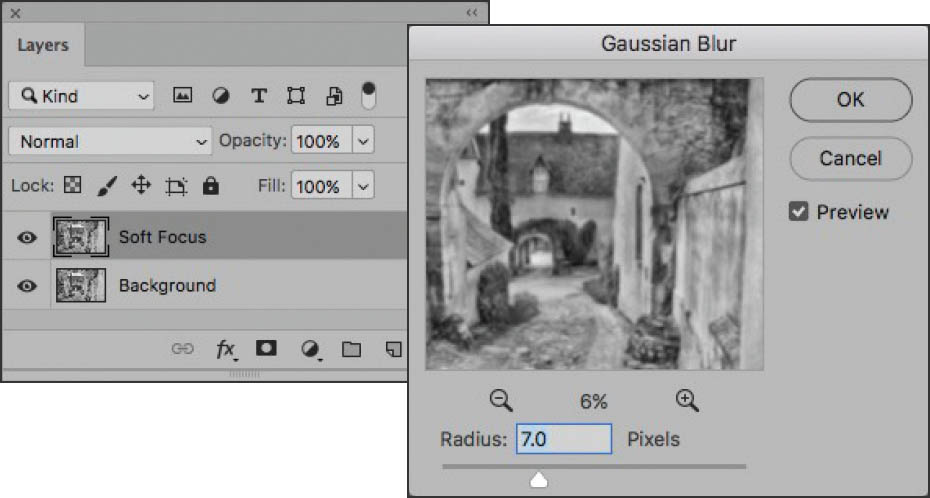
Step 2: With the “Soft Focus” layer selected in the Layers panel, choose Filter ![]() Blur
Blur ![]() Gaussian Blur to open the Gaussian Blur dialog. Set the Radius to 7 to add an overall soft focus effect, and then click OK to apply the blur to the layer. (For more about soft focus, turn to pages 232–237.)
Gaussian Blur to open the Gaussian Blur dialog. Set the Radius to 7 to add an overall soft focus effect, and then click OK to apply the blur to the layer. (For more about soft focus, turn to pages 232–237.)
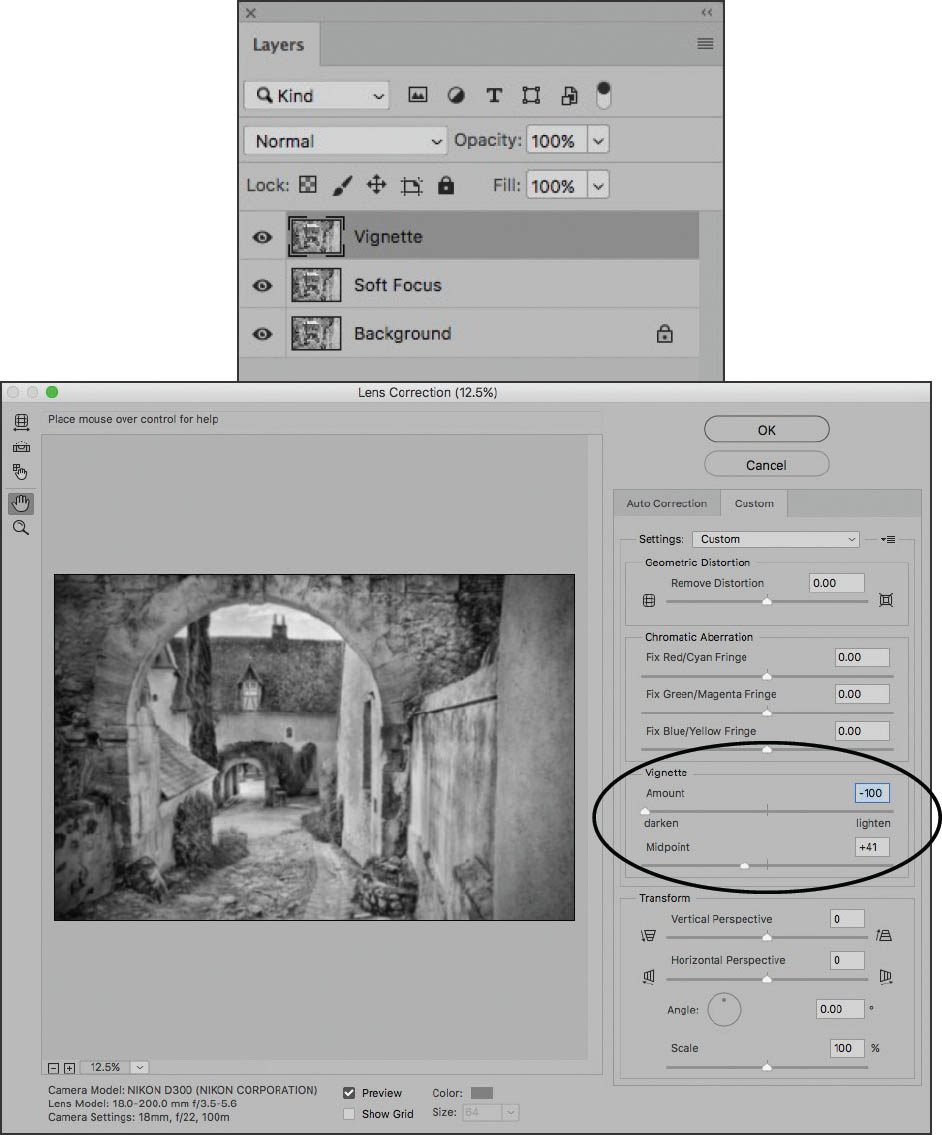
Step 3: With the “Soft Focus” layer selected in the Layers panel, choose Layer ![]() Duplicate to make a copy of the layer. Move the duplicate layer to the top of the layer stack and name this duplicate layer “Vignette.”
Duplicate to make a copy of the layer. Move the duplicate layer to the top of the layer stack and name this duplicate layer “Vignette.”
Step 4: Choose Filter ![]() Lens Correction to open the Lens Correction dialog. Click the Custom tab to see the Vignette sliders. Move the Amount slider toward darken in the Vignette area. This darkens the edges of the layer to make the edges look like an old-time pinhole photo. Click OK when you are pleased with the results.
Lens Correction to open the Lens Correction dialog. Click the Custom tab to see the Vignette sliders. Move the Amount slider toward darken in the Vignette area. This darkens the edges of the layer to make the edges look like an old-time pinhole photo. Click OK when you are pleased with the results.
Step 5: With the “Vignette” layer selected in the Layers panel, choose Layer ![]() Duplicate to make a copy of the layer. Name this duplicate layer “Brighten Center.”
Duplicate to make a copy of the layer. Name this duplicate layer “Brighten Center.”
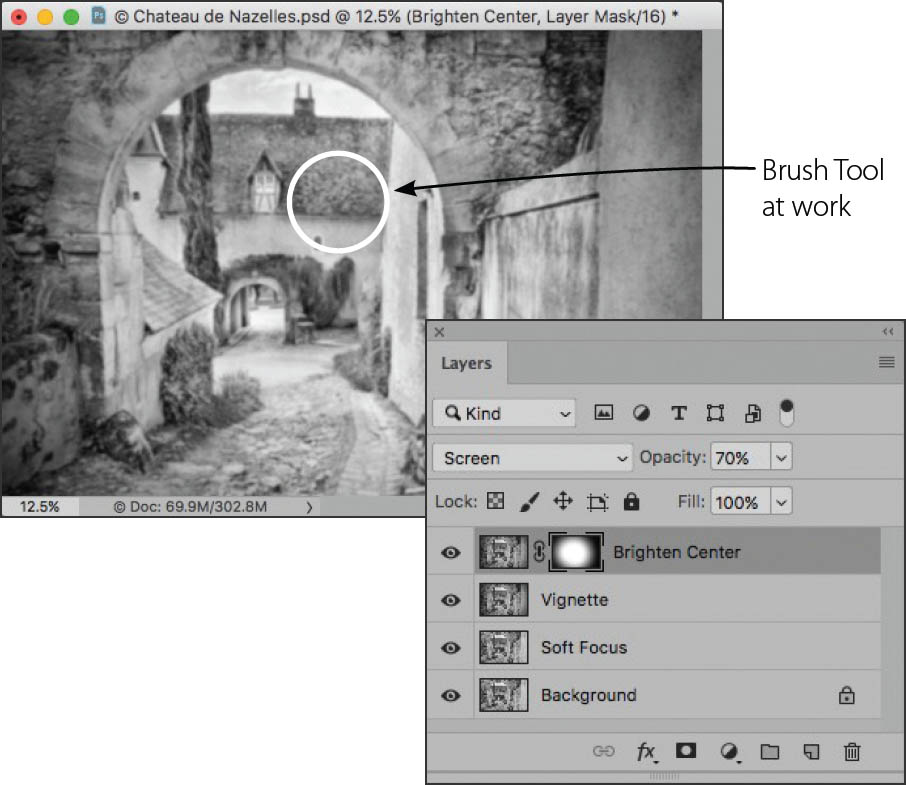
Step 6: With the “Brighten Center” layer selected, choose Layer ![]() Layer Mask
Layer Mask ![]() Hide All to add a black layer mask to that layer. In the Layers panel select Screen from the blending mode drop-down list.
Hide All to add a black layer mask to that layer. In the Layers panel select Screen from the blending mode drop-down list.
Step 7: Use the Brush Tool to paint in the central area of the image window.
This will lighten the central area of the image, just like a pinhole photo.
Step 8: Flatten the image by selecting Layer ![]() Flatten Image, then add a dark sepia tint to make the image seem antique (see pages 198–205). For an old-time look, I also added a border using Silver Efex Pro as seen in the final image (pages 240–241).
Flatten Image, then add a dark sepia tint to make the image seem antique (see pages 198–205). For an old-time look, I also added a border using Silver Efex Pro as seen in the final image (pages 240–241).
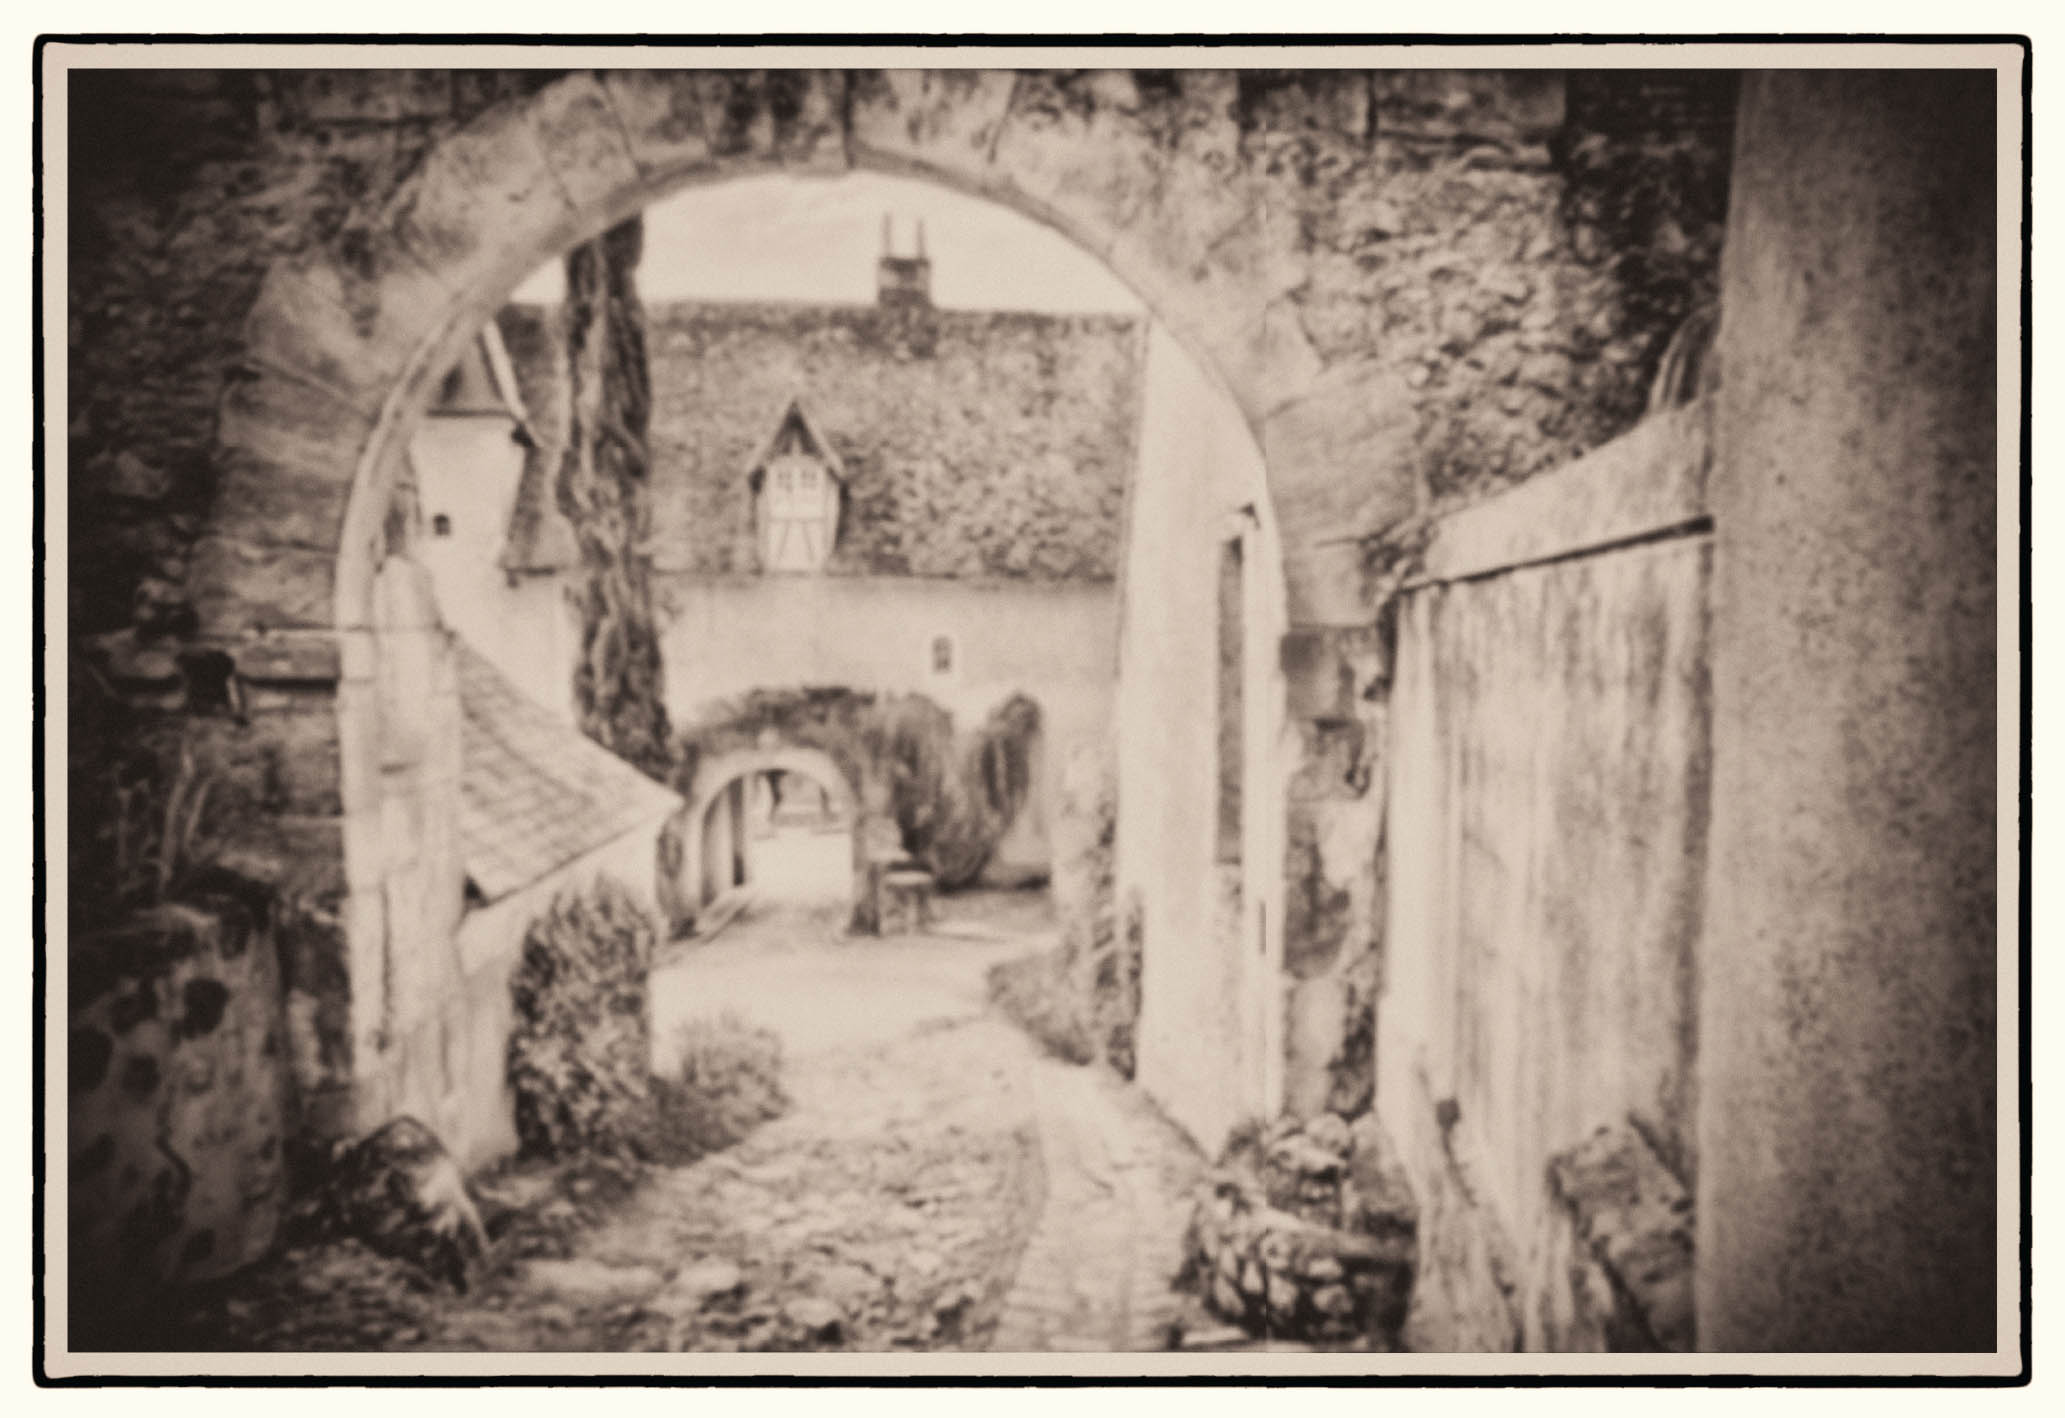
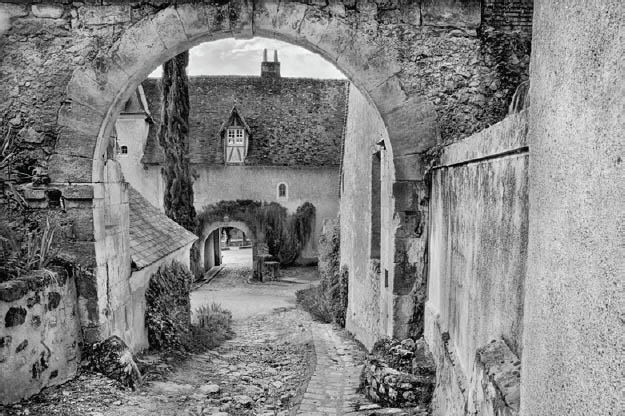
Chateau de Nazelles—Located near Ambois, France—Leonardo da Vinci’s home in the Loire Valley—the Chateau de Nazelles is a partially restored castle that is used today as a bed and breakfast.
With my camera on a tripod, I peered through an arch into the chateau’s central courtyard and through a second arch under the main building of the chateau and toward the front entrance. Try getting a car through that arch—I did! My tiny Fiat just fit.
The tonal range of the subject varied all the way from the bright courtyard and the sky to the shadows under the second arch. It was clear that no single photo could capture this extended dynamic range. So I made a bracketed sequence of photos.
With this image I tried to convey the feeling of what it might have been like to visit France before the twentieth century. This is conveyed in part by the monochromatic conversion and border. The antique effect is supplemented with the addition of the soft focus, pinhole effect.
Nikon D300, 18mm, nine exposures with shutter speeds ranging from 1/200 of a second to 1 second, all exposures at f/22 and ISO 100, tripod mounted; exposures combined using HDR Efex Pro, processed in Photoshop using Silver Efex Pro and Black & White adjustment layers, with pinhole effect added in Photoshop.