
Multiple Layers and Masking in Photoshop
Whenever possible, I photograph using RAW files. This is because in-camera JPEG black and white photos have inherent drawbacks compared to the possibilities of images processed from RAW files (see pages 90–93).
Therefore, since I start with a color RAW capture, my digital workflow for high quality black and white imagery involves the following steps:
- Looking at the world around me with an eye towards subjects that will work well in black and white (see pages 18–34).
- Coming up with a plan for conversion.
- Capturing my images in RAW format.
- Processing the image for color in Adobe Camera RAW (ACR), Lightroom Classic, or other RAW converter.
- Repeating the RAW conversion more than once at differing exposure values. This is called multi-RAW processing.
- Combining the different RAW conversions in Photoshop into a color version using layers and masking (pages 168–173).
- Converting the images to black and white in Photoshop using multiple conversion techniques depending on the image (or portion of the image), layers, and masking.
Gaining control with layers and layer masks
If you understand how to use layers, then you know how to unleash the power of Photoshop. Almost everything in Photoshop is better with layers. Using layers, you can control elements of your image with precision down to the pixel level. Effective use of layers and layer masks is key, and can be easily learned if you start with the basics explained here.
Layers are placed on top of other layers to form a layer stack. You can control the opacity of each layer, as well as the formula for how pixels in the layers are combined, called the blending mode.
A layer mask is used to hide or reveal portions of the associated layer. Black conceals the associated layer, white reveals it, and gray shades in-between pure black and full white—partially revealing or partially concealing the associated layer (depending on how you look at things). It’s important to remember that we are talking about concealing or revealing the layer that the mask is on, not the layers below it in the stack.
You can start with a layer mask that is completely black (by choosing a Hide All layer mask) or completely white (by choosing Reveal All) and then modify the layer mask. The most common tools for layer mask modification are the Brush Tool and the Gradient Tool.
Note that steps 3 and 4 are functionally equivalent to the Lightroom Classic technique shown on pages 114–119 of creating virtual copies of an image, applying different exposures, and bringing the virtual copies into Photoshop as a layer stack.
Since layers and masking are vitally important to two parts of this process, the initial color conversion and the subsequent conversion to black and white in Photoshop, it’s worth taking a look at the basics of using layers.
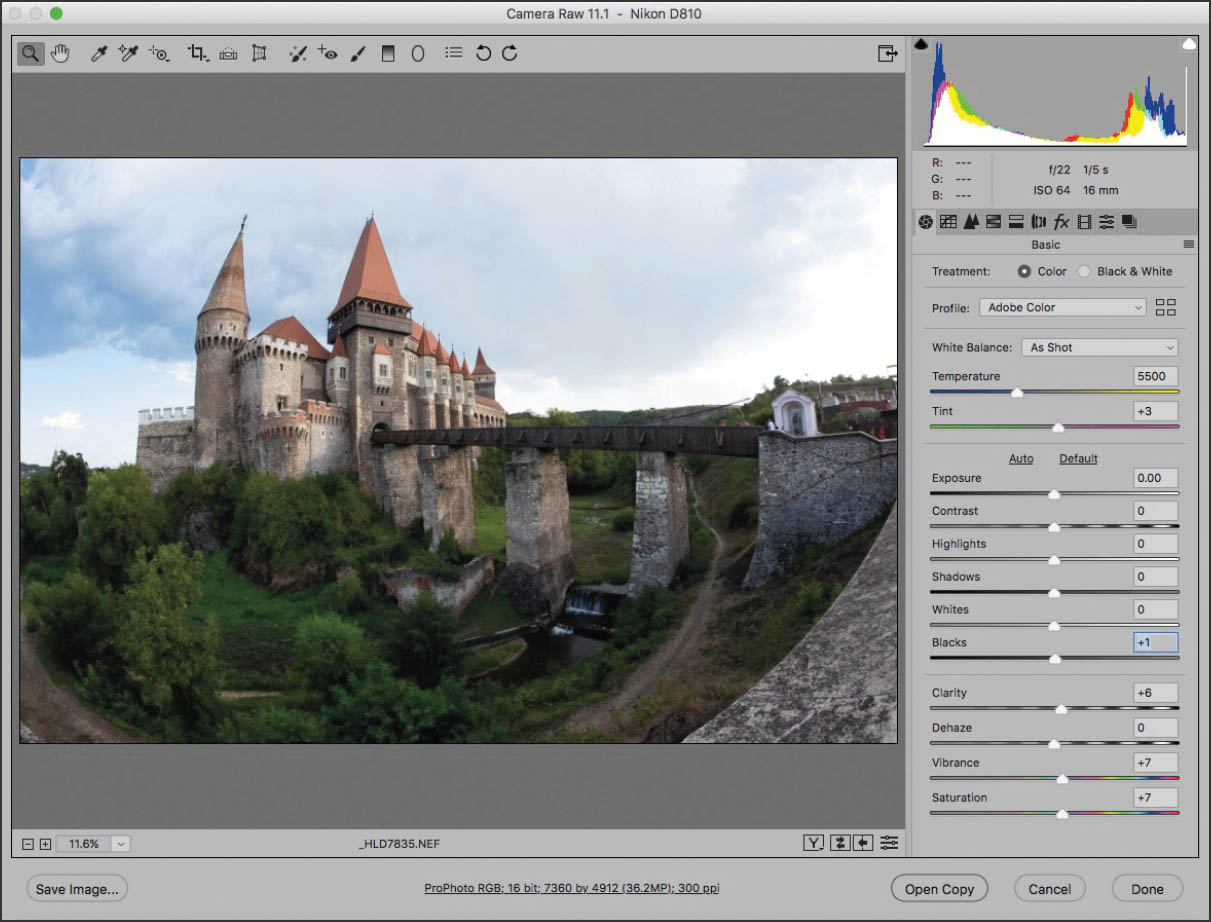
Step 1: From Adobe Bridge, double-click a RAW file to process a version for the background of the photo in ACR. Bear in mind that when planning to convert to black and white, you generally want more dramatic contrast than you would have normally in color photos, and for best results treat the image first as Color, rather than Black & White. When you are pleased with your Color settings on the Basic tab, hold down the Alt key and click Open Copy to open the image in Photoshop.
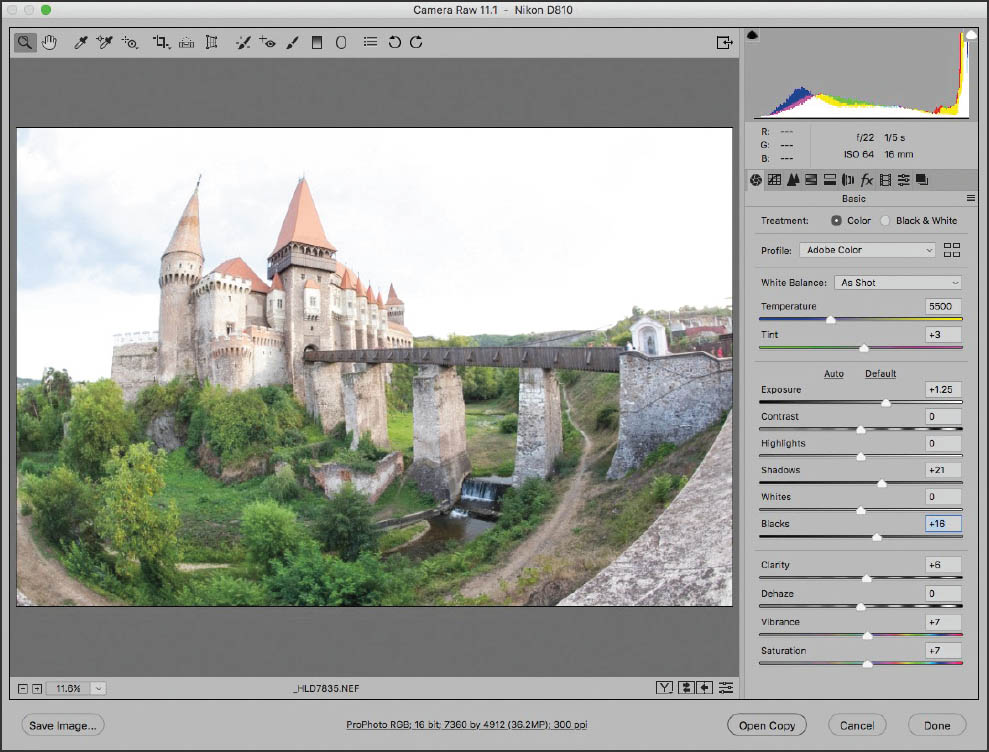
Step 2: Go back to Bridge and double-click the same file again to open it a second time in ACR. Process this version of the image so that it is brighter, to lighten the deep shadow areas. When you are pleased with the settings, hold down the Alt key and click Open Copy to open the image in Photoshop.
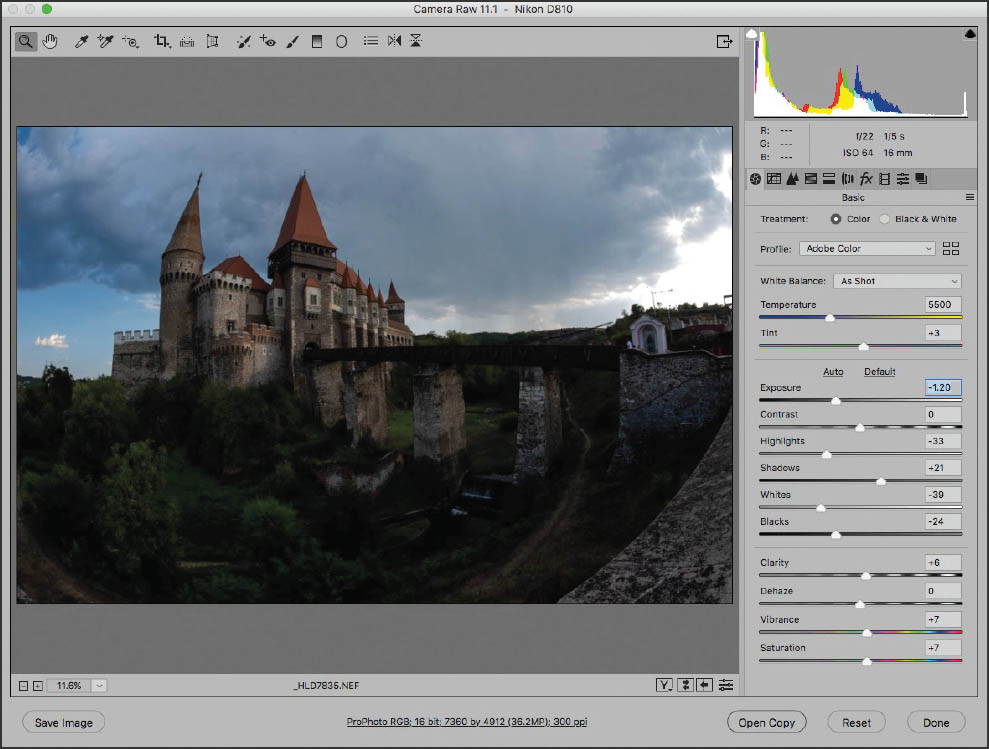
Step 3: Third time pays for all! Go back to Bridge and double-click the same file again to open it a third time in ACR. Process this version of the image so it is darker. This version will be used to tone down highlights that are too bright. When you are pleased with the settings, hold down the Alt key and click Open Copy to open the image in Photoshop.
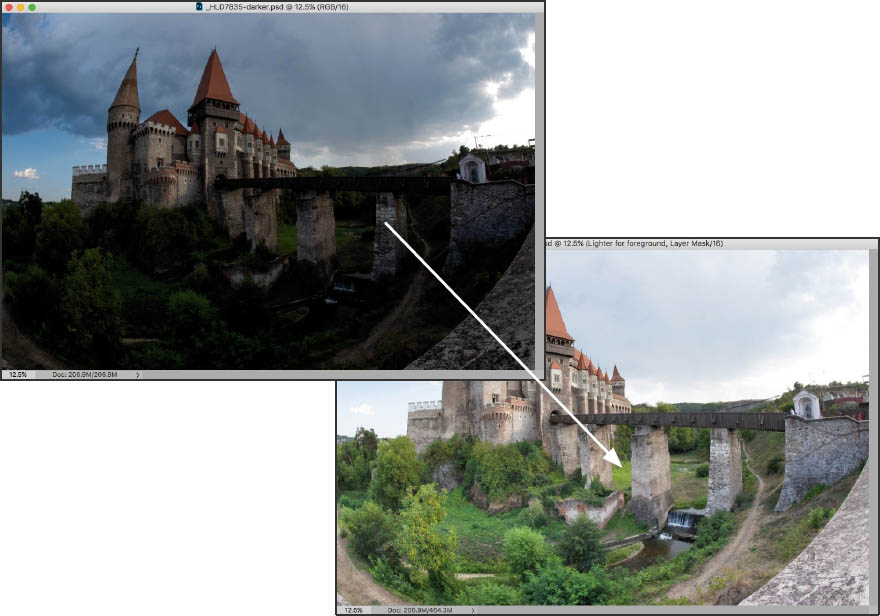
You now have three versions of the image open in Photoshop. You’ll use the background and lighter versions right away. You’ll use the darker version a bit later so just move it to one side of your monitor to get it out of the way for now.

Step 4: The next thing you want to do is align the lighter RAW conversion exactly on top of the background version in the same Photoshop window.
To do this, hold down the Shift key and use the Move tool to drag and drop the lighter version onto the original version (for another example of this, see page 132).
Make sure you release the mouse button before you release the Shift key or the versions may not be perfectly aligned. The lighter version will appear in the Layers panel. Rename this layer “Lighter for foreground.”

Step 5: With the “Lighter for forground” layer selected in the Layers panel, choose Layer ![]() Layer Mask
Layer Mask ![]() Hide All to add a layer mask to that layer.
Hide All to add a layer mask to that layer.
The Hide All layer mask hides the layer it is associated with (in this case the “Lighter for foreground” layer). It appears as a black thumbnail in the Layers panel associated with the layer.

Step 6: Make sure the layer mask on the “Lighter for foreground” layer is selected in the Layers panel. Make sure white is selected as the Foreground color in the Tools panel. Then, choose the Gradient Tool from the Tools panel and drag a white-to-black gradient from the bottom of the image window up to the middle of the image window.
This lightens the foreground in a natural way.
Step 7: The sky area of the image could use some darkening. Go back to the darker RAW conversion that you parked on one side of your monitor back in Step 3. Hold down the Shift key and drag this darker RAW conversion on top of the “Lighter for foreground” layer. Rename it “Darker for sky.”
There are now three layers: “Background,” “Lighter for foreground” and “Darker for sky.”

Step 8: With the “Darker for sky” layer selected in the Layers panel, choose Layer ![]() Layer Mask
Layer Mask ![]() Hide All to add a layer mask to that layer.
Hide All to add a layer mask to that layer.
Step 9: Make sure the layer mask on the “Darker for sky” layer is selected in the Layers panel. Choose the Gradient Tool from the Tools panel and drag a white-to-black gradient from the top of the image window down to the middle. This adds a nice darker contrast to the sky.

Step 10: When the gradient was applied to the “Darker for sky” layer, the castle towers were darkened along with the sky. In order to keep the towers from getting too dark, use the Brush tool loaded with Black to mask out the castle towers on the “Darker for sky” layer.

Step 11: I’d like to add more contrast and drama to the clouds and its easy to do that using the “Darker for sky” layer.
To get started, make sure the “Darker for sky” layer is selected in the Layers panel, then choose Layer ![]() Duplicate Layer to open the Duplicate Layer dialog box.
Duplicate Layer to open the Duplicate Layer dialog box.
Using the Duplicate Layer dialog box, you can rename the layer copy if you would like, but for this example, I’ll just leave the duplicate layer named “Darker for sky copy.”
When you click OK the “Darker for sky copy” appears in the Layers panel with the attached layer mask. I want a new layer mask to paint on, so I’ll remove the old one.
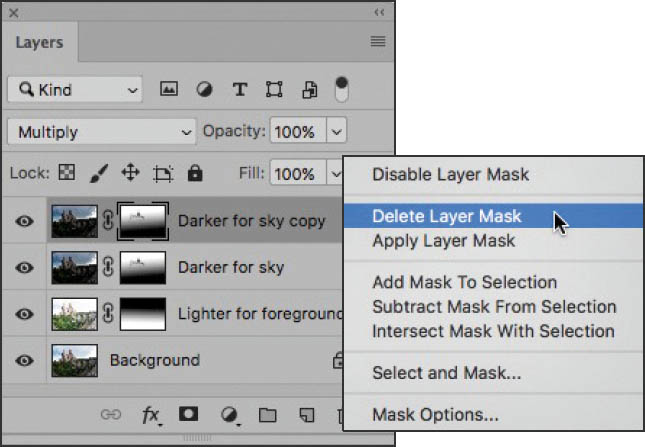
Step 12: To remove the unwanted layer mask, make sure the “Darker for sky copy” layer is selected, then right click on the layer in the Layers panel and choose Delete Layer Mask.
Step 13: Now add a new layer mask to the the “Darker for sky copy” layer by selecting Layer ![]() Layer Mask
Layer Mask ![]() Hide All like you did in Step 5 on page 123.
Hide All like you did in Step 5 on page 123.
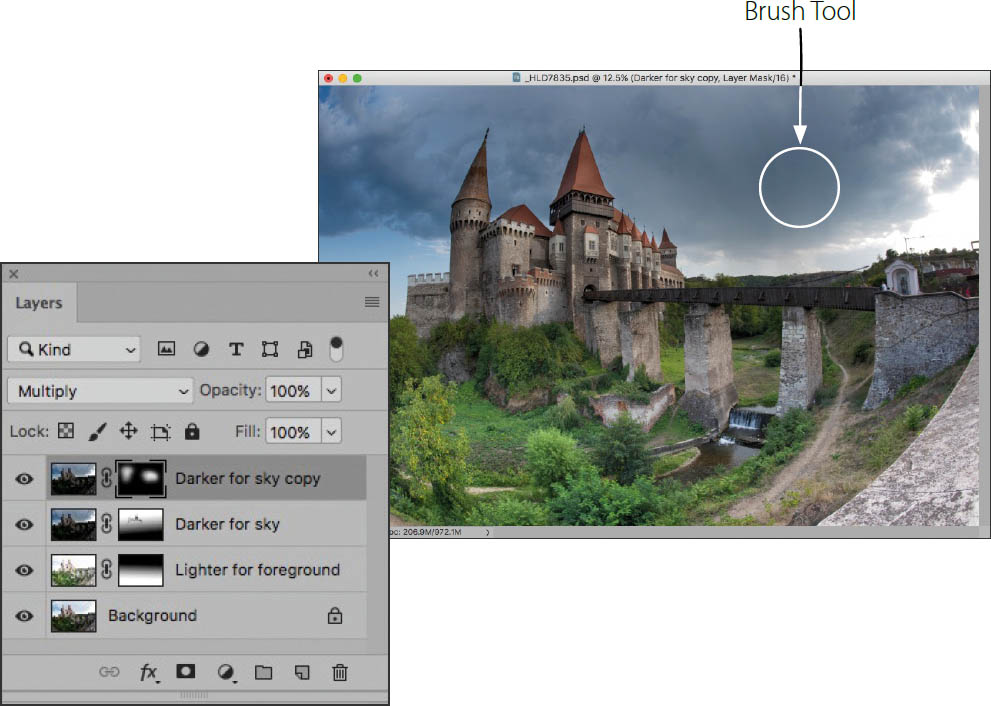
Step 14: In the Tools panel, set white as the Foreground color. Make sure the layer mask on the “Darker for sky copy” layer is selected in the Layers panel. Use the Blending Mode drop-down list to select the Multiply blending mode. Next, use the Brush tool to paint in the areas where you want to selectively darken the clouds. To start, set your brush to 50% Opacity and 50% Flow. Adjust the Brush settings as you paint.

Step 15: To convert the image to black and white, start by merging the four layers down into one layer by selecting Layer ![]() Flatten Image. The four layers will collapse into one “Background” layer.
Flatten Image. The four layers will collapse into one “Background” layer.
Step 16: Duplicate the Background layer by selecting Layer ![]() Duplicate Layer. Name the duplicate layer “Neutral black.”
Duplicate Layer. Name the duplicate layer “Neutral black.”
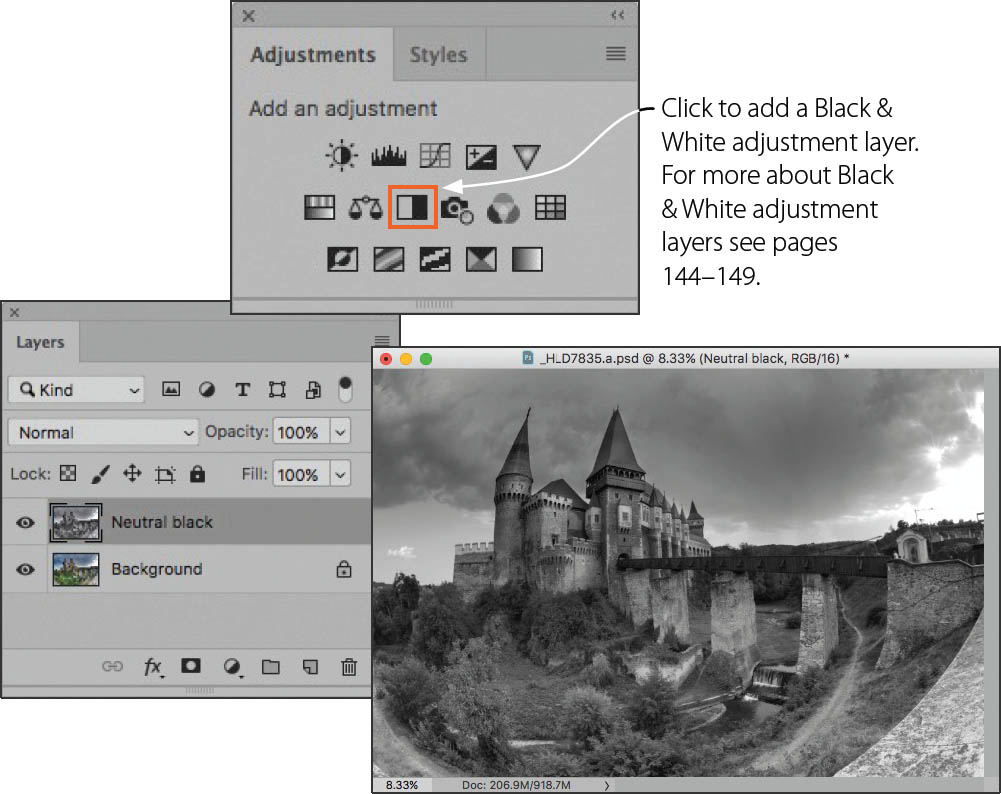
Step 17: Make sure the “Neutral black” layer is selected in the Layers panel. On the Adjustments panel, click the Create Black & White adjustment layer button to apply a default black and white adjustment. (You could also access Black & White adjustment layers by selecting Layer ![]() New Adjustment Layer
New Adjustment Layer ![]() Black & White.)
Black & White.)
With the adjustment layer selected in the Layers panel, merge the Black & White adjustment layer down onto the “B&W–Darker” layer by choosing Layer ![]() Merge Down. You will now have two layers in the Layers panel, “Background,” and “Neutral black.”
Merge Down. You will now have two layers in the Layers panel, “Background,” and “Neutral black.”
Why I merge down adjustment layers
I often decide to merge down adjustment layers, even though there are some disadvantages to this step: a normal layer takes up more space on disk than an adjustment layer, and once an adjustment layer has been merged down you can’t tweak its settings.
The reason I merge down adjustment layers despite these disadvantages is that I find it easier to see what I’m doing in a complex, multi-layered document with “actual” layers. I also want to be able to reduce the opacity of the layer that an adjustment layer is connected to—not just the opacity of the adjustment layer. But let’s face it, the choice is yours. If you prefer adjustment layers to merged-down layers, that’s fine!
Step 18: Duplicate the color “Background” layer by selecting Layer ![]() Duplicate Layer. Name the duplicate layer “High contrast red.”
Duplicate Layer. Name the duplicate layer “High contrast red.”
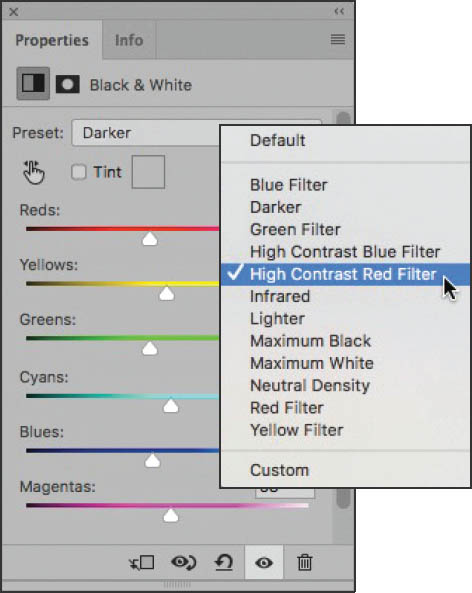
Step 19: With the “High contrast red” layer selected in the Layers panel, use the Adjustments panel to apply a Black & White adjustment layer. Use the Preset drop-down list to select the High Contrast Red Filter.
Step 20: With the adjustment layer selected in the Layers panel, merge the Black & White adjustment layer down onto the “High contrast red” layer by choosing Layer ![]() Merge Down.
Merge Down.
Step 21: With the “High contrast red” layer selected in the Layers panel, choose Layer ![]() Layer Mask
Layer Mask ![]() Hide All to add a layer mask to that layer.
Hide All to add a layer mask to that layer.
Step 22: Make sure the layer mask on the “High contrast red” layer is selected in the Layers panel. Choose the Gradient Tool from the Tools panel and drag a white-to-black gradient from the bottom of the image window up to the middle. This adds a darker contrast to the foreground.
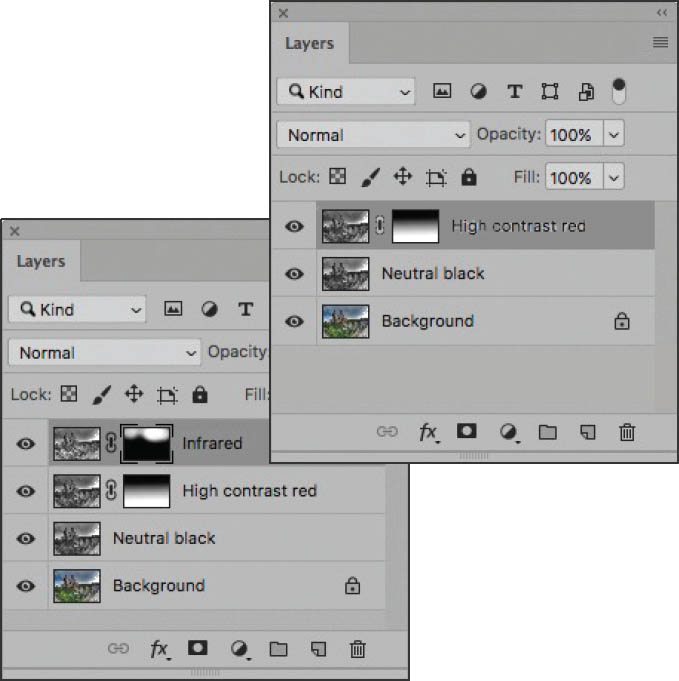
Step 23: Repeat steps 18–21 adding more black and white layers using different Black & White adjustment layer settings. As you can see in the Layers panel shown here, I ended up with three black and white layers that I used to add tone and contrast to the image. The final image is shown on pages 128–129.
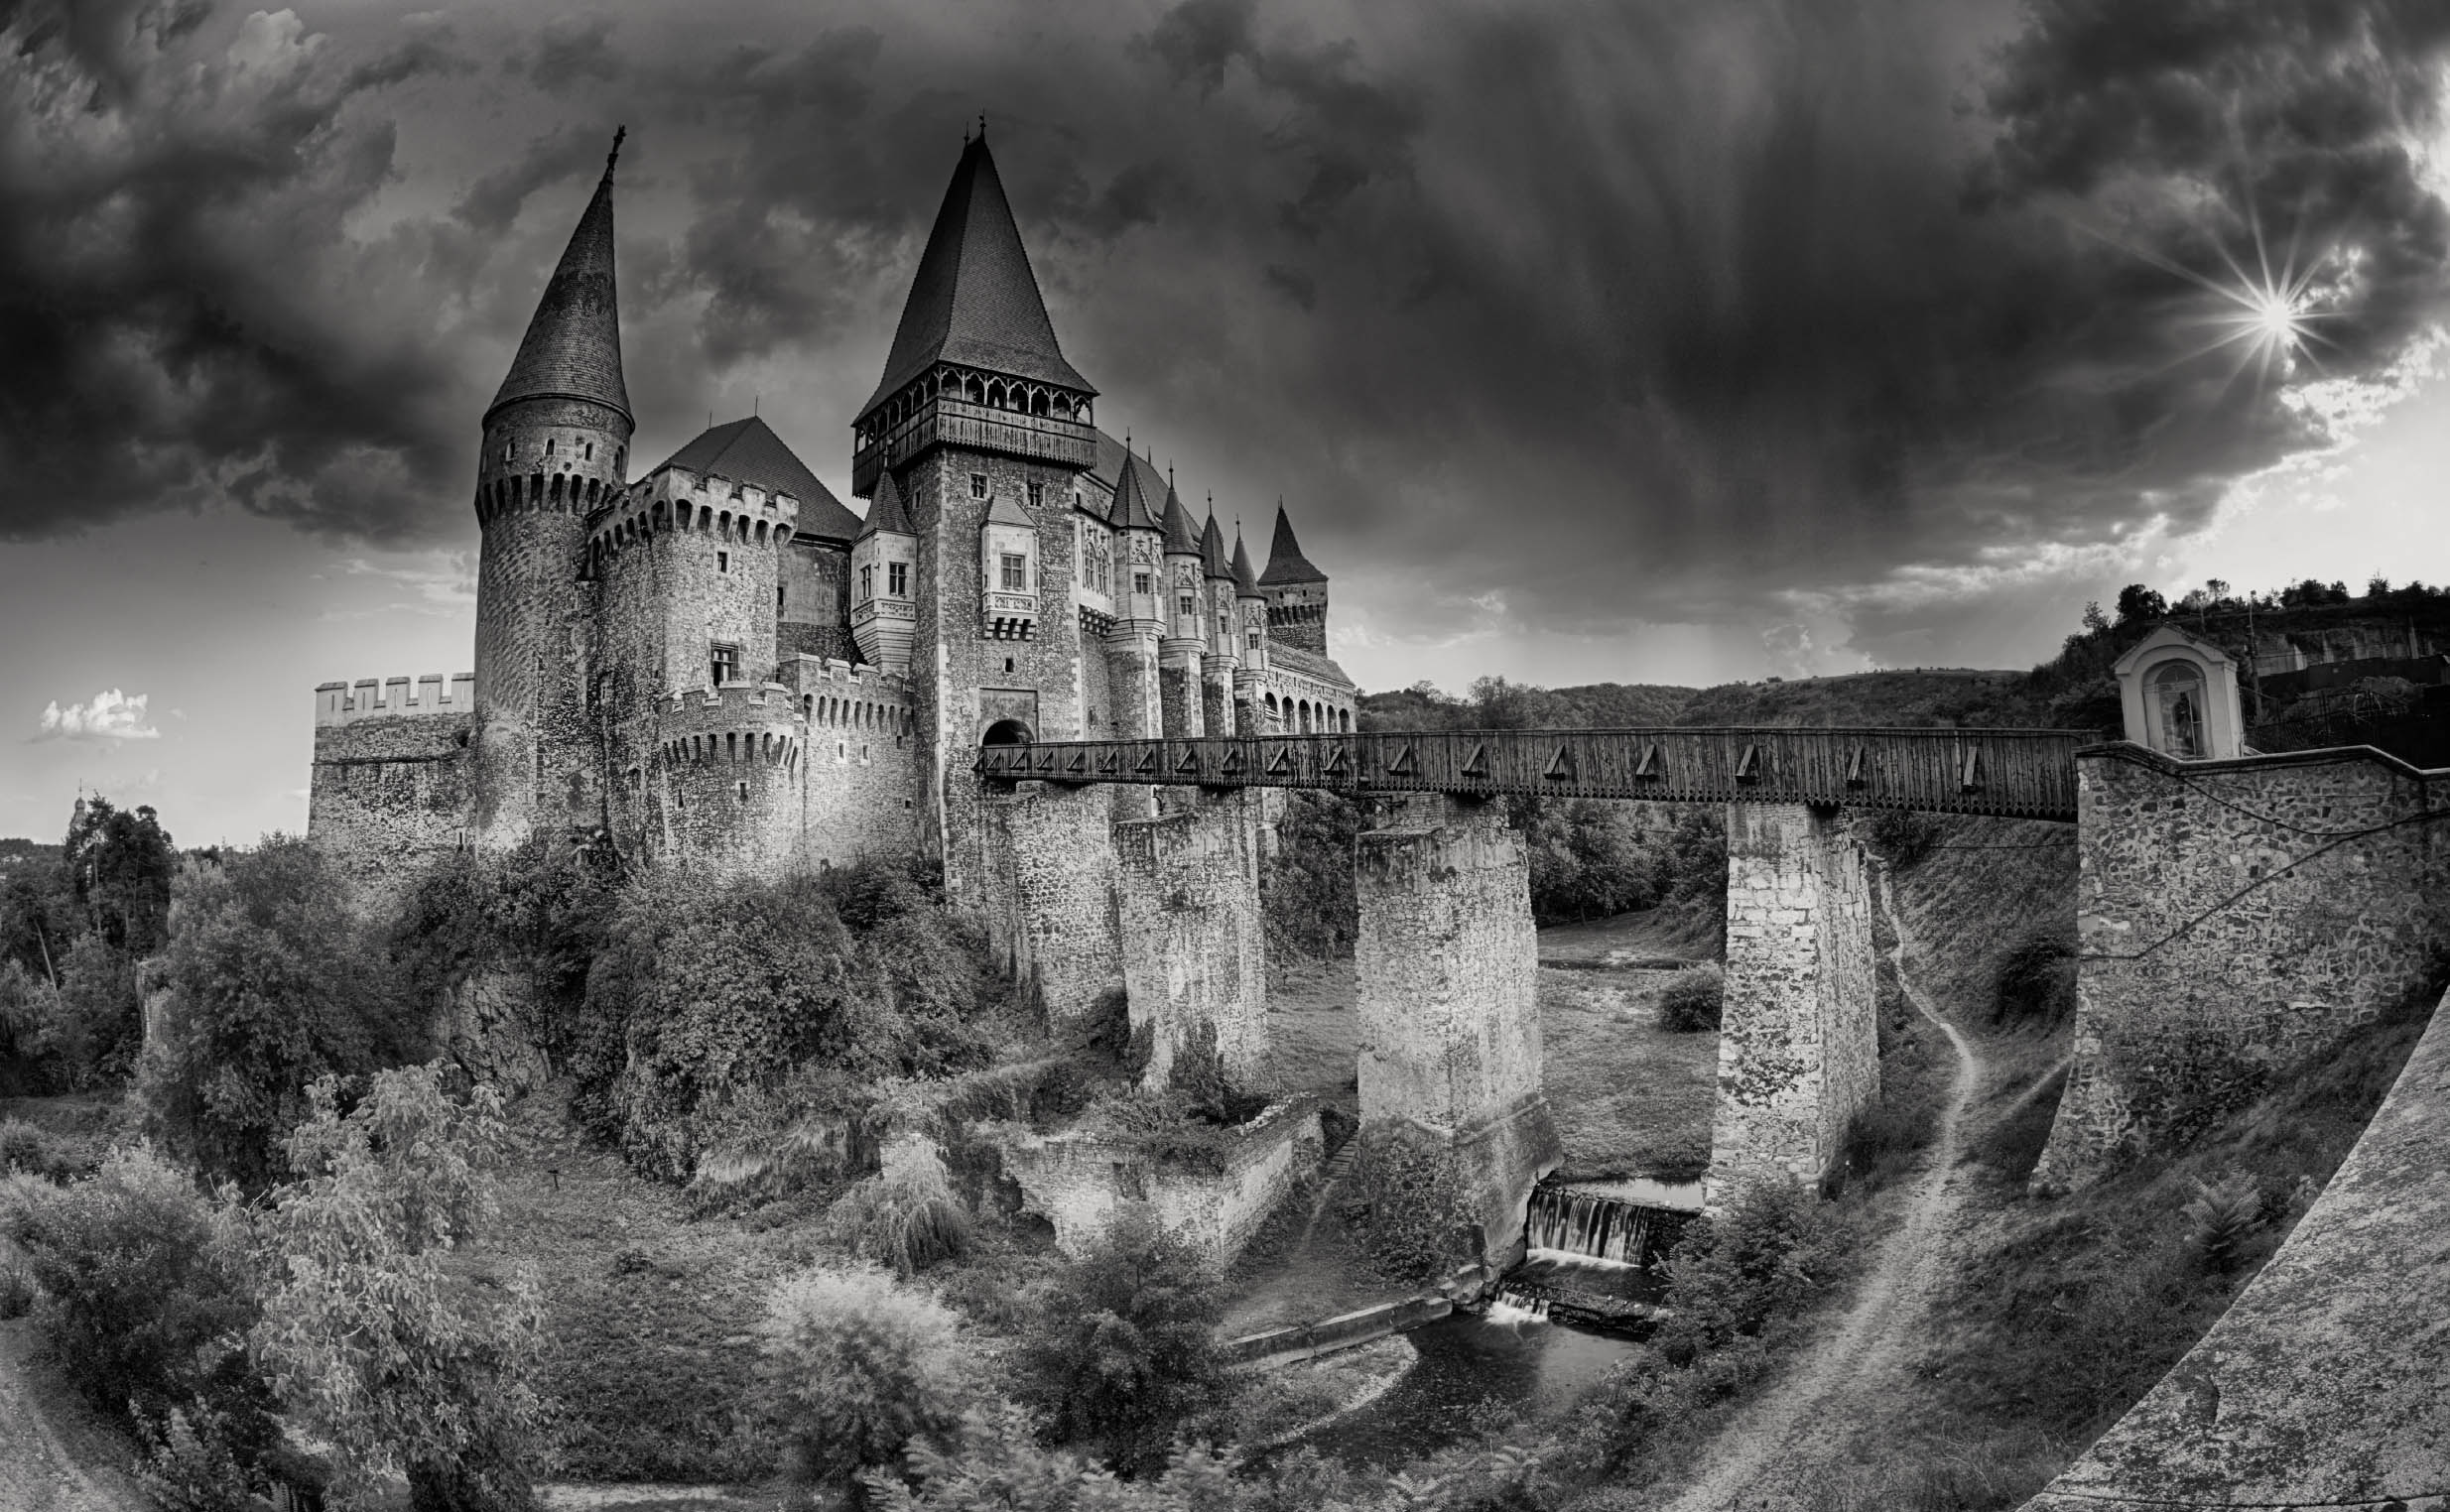
Corvin Castle—This Transylvanian Gothic-Renaissance castle in Romania is one of the largest castles in Europe. The castle combines scale, creepiness, turrets, and a wonderful bridge across the greened-in moat. It’s a hard castle to beat, and I was lucky to be in position for this photograph with my fisheye lens near sunset as a storm cleared. The only thing missing was a nestling dragon, snoring away on the top tower!
I exposed for the brighter areas in the sky. My plan was to “rescue” the overly dark areas in the foreground of the photo using multi-RAW processing. After blending multiple RAW versions of the image in Photoshop, I converted this vibrant color image to black and white to help create an antique effect using Black & White adjustment layers (see pages 144–149).
Nikon D810, 16mm rectilinear fisheye, 1/20 of a second at f/22 and ISO 64, tripod mounted; processed to monochrome using ACR and Photoshop adjustment layers and masking.