
Once you start Adobe Flash, you need to create a new project. Make sure you choose ActionScript 2.0, because CryENGINE 3 only supports AS 2.0.
To make life easier, we will do some initial setup in our new Flash asset:
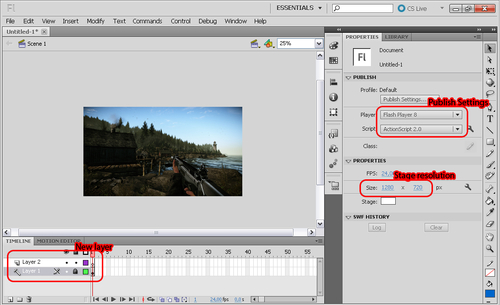
- First of all, we will change the resolution to
1280x720. This is a good resolution, because it matches the common aspect ratio of 16:9. - The next thing we will do is change the publish settings to Flash Player 8 and ActionScript 2.0.
- Lastly, we will take an in-game screenshot and place it as a guide in the Flash asset. This helps us to design the HUD that will fit to the rest of the game. To do so, we disable the demo HUD that comes with the FreeSDK and disable the debug information in the upper-right corner.
In order to make a nice screenshot:
- Start Sandbox.
- Load a level.
- Jump into the game (press Ctrl + G).
- Open the console (press ^), and disable the demo HUD and profile info via the following console variables:
r_DisplayInfo 0g_showHud 0
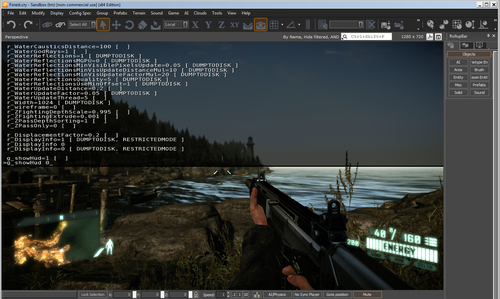
- Take a screenshot, and crop the render window, for example, in Adobe Photoshop (you should adjust the render window to 1280 x 720). Now, create a new layer in Flash and paste the screenshot of the render window. You should change the layer to be a guide layer and lock the layer.
- With this setup, we can start designing the new HUD. Save the file!
Now, let's start with an easy health and ammo bar:
- First, create a nice looking health bar. In my example, I simply created a green and blue bar in Photoshop with a bevel filter, and saved both the files as a transparent PNG file (512 x 128).

- Import both the images into the library by choosing File |Import | Import to Library....
- If you open the Library tab in the right panel, you should find your PNG file along with a new symbol.
- Rename the symbols to something like
greenBarandblueBar. Of course this is not necessary, but it always helps to name your Flash assets well, because with time you will get more and more movieclips/symbols, and it will be hard to find the correct one if your naming is weak. - I also created a new folder in my library named
picts. I will put all my images into this folder (which again helps to find the assets later).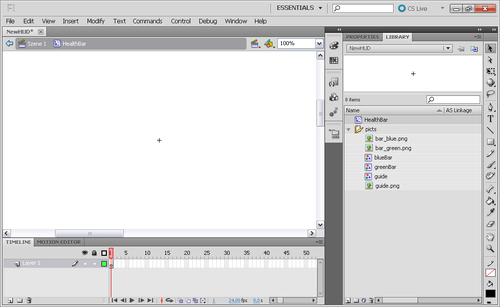
Ok, now let's start with the health bar:
- Create a new movieclip (right-click in Library and choose New Symbol). I call this one
HealthBar. - Now just drag-and-drop the
greenBarsymbol from the library into the stage of your newHealthBarmovieclip. - Select the layer in the timeline and duplicate it (right-click on layer one and choose Duplicate Layers).
- Rename the layers to something like
BarEmptyandBarFilled. - Make sure the
BarFilledlayer is on top of theBarEmptylayer.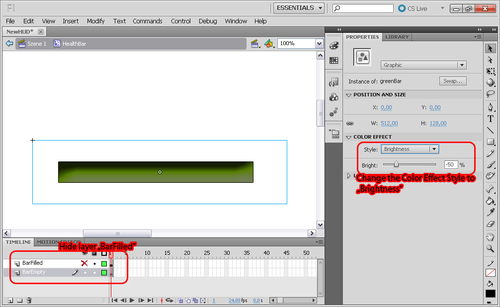
- Now, hide the
BarFilledlayer in order to be able to modify theBarEmptylayer (just click on the little dot under the eye on theBarFilledlayer). Now you can select your green bar that is on the stage, and change Style to Brightness and move the slider to something like -50. You can unhide theBarFilledlayer again. Lock both the layers, because you don't need to change them anymore (the little dot right next to the hide dot). - Next, we need to create a mask for the
BarFilledlayer. With this mask we will be able to hide parts of the filled layer later. - Create a new layer (the little icon in the lower-left corner). Make sure this layer is on top of your
BarFilledlayer. Rename the new layer toMASK. Now, draw a rectangle over your green bar that covers the green bar completely. Make sure the right border of your rectangle matches the right border of the green bar. You will find the rectangle tool in the toolbar on the right side. Right-click on theMASKlayer, and select Mask. The rectangle you just drew now acts as a mask. Everything on theBarFilledlayer that is under the rectangle is visible, and everything that is not under the rectangle is hidden. - Now, we need to animate the
MASKlayer to be able to dynamically fill your empty bar. - Select the 100th frame of all the three layers in the timeline, right-click on it, and select Insert Frame. Then, select the 100th frame of your
MASKlayer and select Convert to Keyframes. As a last step, right-click somewhere in the middle of the gray timeline of theMASKlayer, and select Create Classic Tween. An arrow from the first frame to the last frame should appear in the timeline. - Select the first frame of the
MASKlayer, unlock the layer, and move the rectangle to the left so that the right border of the rectangle matches the left border of the green bar.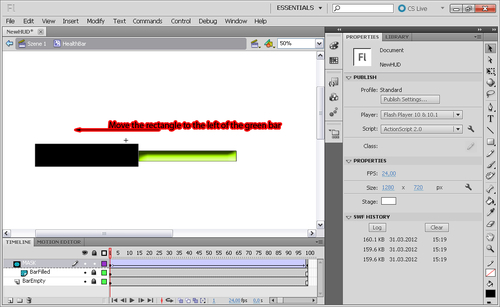
- Lock the
MASKlayer again, and move the slider in the timeline to see the result.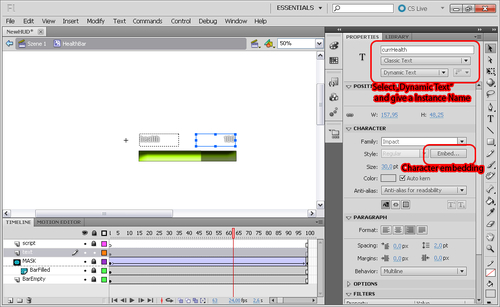
Lastly, we will add some textfields to display the current health:
- Create a new layer and name it
Text. Select the text tool from the right toolbar, and draw two textboxes. One is for the "health" title, and one is for the current value. Make sure you change the type of the current health value textfield to Dynamic Text in the PROPERTIES panel and give it the instance namecurrHealth. - You also have to embed the characters. Select your textbox and click on the Embed... button. In the dialog that shows up, enable the checkboxes—Uppercase, Lowercase, Numerals, and Punctuation—and click OK. This will make sure that all the needed glyphs are embedded into the SWF file. If you use dynamic textboxes, you always need to make sure to embed all the characters you will use in this textbox.
- Create one last layer, call it
script, and lock it. Click on the first frame of this layer, and open the script window (Window | Actions, or just press F9). Type in a simplestop();instruction into the script window and close it. This will make sure that the movieclip does not play the timeline animation automatically. We want to control the animation later via script.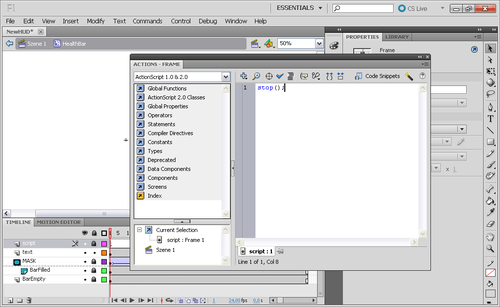
- Because we also want to have a simple ammo display, we will re-use the
HealthBarmovieclip as an ammo bar. Duplicate theHealthBarmovieclip, and name itAmmoBar. Double-click on it to open this movieclip. Unlock theBarFilledlayer. - Select the green bar and click on the swap... button in the PROPERTIES panel. Simply choose the blue bar. Repeat this step with the green bar on the
BarEmptylayer. - You should also change the text in the
healthtextbox fromhealthtoammo. - Change the instance name of the
currHealthtextfield tocurrAmmoand create two new dynamic textboxes, one for the weapon name, and one for the ammo name. Use the instance namescurrWeaponNameandcurrAmmoNameon the new textfields.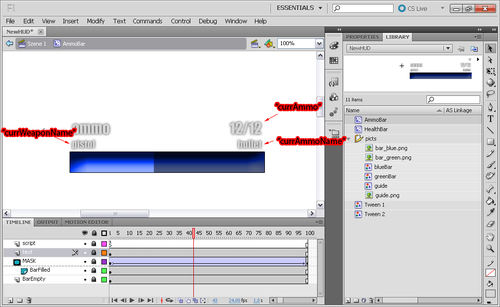
- That's it! Go to Scene 1 and place your health and ammo bars. Give them the instance names
ammoMCandhealthMC.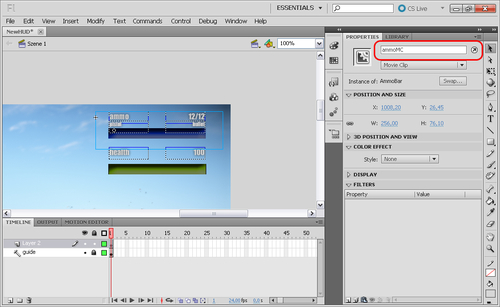
- Finally, we need to write some ActionScript code to control the values of our ammo bar. Because I want to show several ways to control flash within CryENGINE, we will control the health bar directly in our Flow Graph, without any ActionScript.
- Create a new layer in the main scene and name it
script. Lock this layer. Click on the first keyframe of the script layer and press F9 to open the script editor. - We need two functions, which are defined as follows:
setAmmo: To set the current ammosetCurrentWeapon: To set the current weapon
function setAmmo(currAmmo:Number, maxAmmo:Number)
{
  if (maxAmmo > 0) // normal weapon
  {
    ammoMC.currAmmo.text = currAmmo + "/" + maxAmmo;
    ammoMC.gotoAndStop(Math.floor((currAmmo / maxAmmo) * 99) + 1);
  }
  else // melee weapon
  {
    ammoMC.currAmmo.text = "-";
    ammoMC.gotoAndStop(100);
  }
}
function setCurrentWeapon(weaponName:String, ammoName:String){
  ammoMC.currAmmoName.text = ammoName;
  ammoMC.currWeaponName.text = weaponName;
}
- Save the
NewHUD.flafile, and publish the SWF file. In order to publish the SWF file, you need to choose File | Publish, or simply press Alt + Shift + F12.
As a first step, we created a new Flash file for our HUD. We added some textfields and an animated bar to display the current health and ammo. We also wrote some ActionScript code to control the ammo bar. Finally, we published the SWF file.
You should now find a NewHUD.swf file in the same folder where you saved your Flash asset. The SWF file we just created can now be used in CryENGINE. In the next part, we will setup everything so that we can display the new HUD in the engine, and use the health and ammo bar to show our actual health and current weapon status.