You must have created a new map to follow this example.
Having sufficiently beaten the terrain system to death through explanation, let's get on with what we are most interested in, which is creating our own heightmap to use for our game:
- As discussed in the previous example, you should now see a flat plane of terrain slightly submerged beneath the ocean.
- At the top of the Sandbox interface in the main toolbar, you will find a menu selection called Terrain; open this. The following screenshot shows the options available in the Terrain menu.

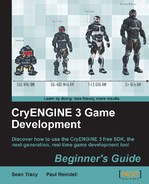
- As we want to adjust the terrain, we will select the Edit Terrain option. This will open the Terrain Editor window, which is shown in the following screenshot:
- You can zoom in and pan this window to further inspect areas within the map. Click-and-drag using the right mouse button to pan the view and use the mouse wheel to zoom in and zoom out.
- The Terrain Editor window has a multitude of options, which can be used to manipulate the heightmap of your level. Before we start painting anything, we should first set the maximum height of the map to something more manageable:
- Click on Modify.
- Click on Set Max Height.
- Set your Max Terrain Height to 256. Note that the terrain height is measured in meters.
- Having now set the Max Height parameter, we are ready to paint!
- On the right-hand side of the Terrain Editor, you will see a rollout menu named Terrain Brush. We will first use this to flatten a section of the level.
- Change the Brush Settings to Flatten, and set the following values:
- Outside Radius = 100
- Inside Radius = 100
- Hardness = 1
- Height = 20
- Now paint over the top half of the map. This will flatten the entire upper half of the terrain to 20 meters in height. You will end up with the following screenshot, where the dark portion represents the terrain, and since it is relatively low compared to our max height, it will appear black:

Note that, by default, the water is set to a height of 16 meters. Since we flattened our terrain to a height of 20 meters, we have a 4-meter difference from the terrain to the water in the center of the map. In the perspective viewport, this will look like a steep cliff going into the water.
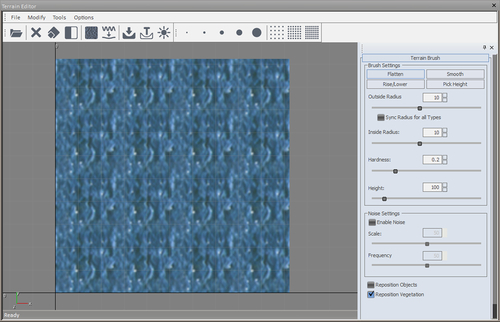
- At the location where the terrain meets the water, it would make sense to turn this into a beach, as it's the most natural way to combine terrain and water. To do this, we will smoothen the hard edge of the terrain along the water. As this is to become our beach area, let's now use the smooth tools to make it passable by the player:
- Change the Type of brush to Smooth and set the following parameters:
Outside Radius = 50
Hardness = 1
I find it significantly easier to gauge the effects of the smooth brush in the perspective viewport.
- Change the Type of brush to Smooth and set the following parameters:
- Paint the southern edge of the terrain, which will become our beach. It might be difficult to view the effects of the smooth brush simply in the terrain editor, so I recommend using the perspective viewport to paint your beach.
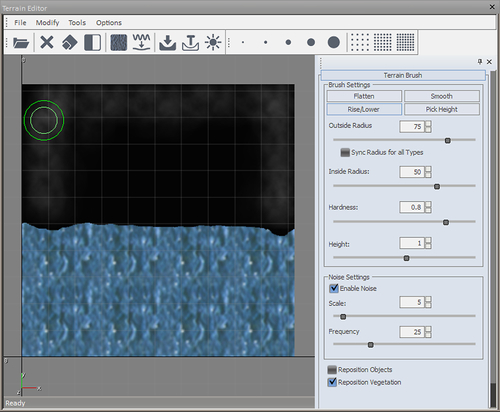
- Now that we have what will be our beach, let's sculpt some background terrain.Select the Rise/Lower brush and set the following parameters:
- Outside Radius = 75
- Inside Radius = 50
- Hardness = 0.8
- Height = 1
- Before painting, set the Noise Settings for the brush; to do so, check Enable Noise to true. Also set:
- Scale = 5
- Frequency = 25
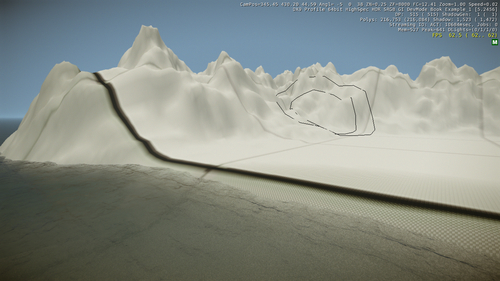
- Paint the outer edges of the terrain while keeping an eye on the perspective viewport at the actual height of the mountain type structure that this creates. You can see the results in the Terrain Editor and perspective view, as seen in the following screenshots:
- It is a good time to use the shortcut to switch to smooth brush while painting the terrain.
- While in perspective view, switch to the smooth brush using the Shift shortcut.
A good technique is to use the Rise/Lower brush and only click a few times, and then use Shift to switch to the smooth brush and do this multiple times on the same area. This will give you some nice terrain variation, which will serve us nicely when we go to texture it.
Tip
Don't forget the player's perspective
Remember to switch to game mode periodically to inspect your terrain from the players level. It is often the case that we get caught up in the appearance of a map by looking at it from our point of view while building it, rather than from the point of view of the player, which is paramount for our game to be enjoyable to anyone playing it.
- Save this map as
Book_Example_1_no_color.cry.
In this particular example, we used one of the three different techniques to create height maps within the CryENGINE sandbox:
- The first technique, which we performed here, was manually painting the heightmap with a brush directly in the sandbox.
- The second technique, which we will explore later, is generating procedural terrain using the tools provided in sandbox.
- Finally, the third technique is to import a previously created heightmap from another program.
You now have a level with some terrain that looks somewhat like a beach, a flat land area, and some mountains. This is a great place to start for any outdoor map as it allows us to use some powerful out of the box engine features like the water and the terrain. Having the mountains surrounding the map also encourages the illusion of having more terrain behind it.
With the settings we just explored, try to add some more terrain variation into the map to customize it further, as per your game's needs. Try using different settings for the brushes we explored previously. You could try adding some islands out in the water off the coast of your beach or some hills on the flat portion of the map.
Use the Inside Radius and Outside Radius, which have a falloff of the brushes settings from the inner area having the strongest effect and the outer having the least.
To create steeper hills or mountains, set the Inside Radius and Outside Radius to be relatively similar in size. To get a shallower and smoother hill set the Inside Radius and Outside Radius further apart.
Finally, try using the Hardness, which acts like the pressure applied to a brush by a painter on canvas. A good way to explain this is that if the Hardness is set to 1, then within one click you will have the desired height. If set to 0.01, then it will take 100 clicks to achieve an identical result.
You can save these variations into different .cry files should you wish to do so.