Different game engines use a different scale to represent objects; in our case, let's set up our 3ds Max application to work with the CryENGINE 3.
- Open 3ds Max.
- On the top menu bar of 3ds, locate the Customize tab. Click on it and select Units Setup from the list.
You will now see a dialog box as seen in the following screenshot:

- In the Units Setup dialog box, change the Display Unit Scale option to Metric, and in the drop-down box, select Meters.
- Next, click on the System Unit Setup button.
- In this new dialog box, change the System Unit Scale to 1 Unit = 100.0 Centimeters. This effectively matches 3ds Max to the same scale as the CryENGINE SDK.
- Click on OK to save the settings and go back to your 3ds scene.
There is a very useful function available in Sandbox for us, to test our unit setup within 3ds Max.
- Open the Sandbox application to any level.
- Create a 1 x 1 x 1 meter Solid entity.
Note
Review Chapter 3, Playable Levels in No Time if you do not know how to create CSG or white box solids within the editor application.
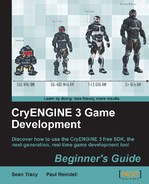
- Make sure to have the Solid selected, and then go to Menu | File | Export Selected Geometry to .OBJ, as seen in the following screenshot:
- Create a directory in your CryENGINE build under Game | Objects | Reference, and save the cube as
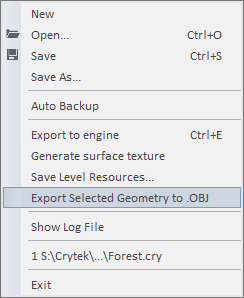
1m_cube.obj. - Next, use File | Import from within 3ds and import the
1m_cube.objto your 3ds Max's scene. - You see that you can now use this as a reference for future creations or simply follow the grid, which is now identical to the CryENGINE's grid, as seen in the following screenshot:
Now that the scale and unit size have been properly set up, we can accurately represent our models in 3ds Max the way they are meant to be rendered in CryENGINE. It is common for some artists to load a scale human model when making some assets to maintain believability. One of the major advantages of using metric with 3ds is that it makes all unit inputs and calculations; for example, when creating primitives, match the metric values.
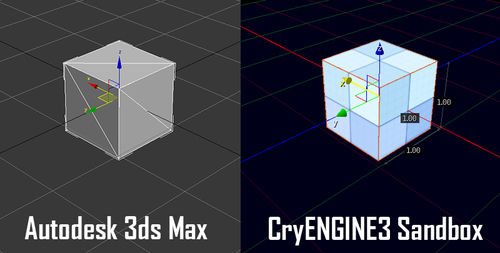
Depending on the type of asset you may be creating, it is recommended to adjust the viewport grid to a suitable setting in both 3ds Max and the editor application. Click on the Tools | Grids and Snaps | Grids and Snaps Settings. In these settings, you can change the Grid Spacing option to other values. For large objects, using a grid spacing of 1 meter is recommended. For smaller objects use 1 cm. In the editor, locate the grid icon in the edit mode toolbar and activate it by clicking on it, or set the grid size using the pull-down menu beside the grid icon, as seen in the following screenshot:
The following reference measurements were originally created for Crysis, but are useful can be used as a guide for creating new assets:
- Table height (top of the table) = 75 cm
- Seat height (top of the chair, seat) = 46 cm
- Stairs height = power of 75 cm (150 cm, 225 cm, 300 cm, 375 cm, 450 cm )
- Stair steps = 18.75 cm (4 steps will sum up to 75 cm)
- Boxes = 60 cm x 40 cm x 40 cm
- Hide Objects (which AI are prone to hide behind) = objects that are smaller than 120 cm
- Hide Objects (which AI crouch to hide behind) = objects that are bigger than 120 cm
- Hide Objects (which AI stand to hide behind and strafe left/right to leave cover) = objects that are bigger than 180 cm
- Jump over Objects (standing, without hand) = 30 - 50 cm high
- Jump over Objects (running jumps) = 50 - 100 cm high
- Jump over Objects (sideways, using hand) = 120 - 150 cm high
Before we get to exporting our own objects, let's take some time to learn how to make our own textures. There are many different avenues available online for acquiring or learning how to make textures within Photoshop online.
Some useful sites are listed as follows:
This example is designed to take you through the process of getting the texture ready for use within the CryENGINE, rather than the process of actually painting the texture.
Textures in CryENGINE are usually created with Adobe Photoshop and stored in the TIF image format by using the CryTIF Plugin. However, the TIF images are not used directly in the game but converted to a more optimized format, usually .dds, by the resource compiler. Not all textures use the same settings; normal maps, for example, require a different compression type than diffuse maps. For this reason, the resource compiler does the conversion based on presets, which can be selected by the user when saving the .tif file from Photoshop.