Having learned in the previous example how to create, export, and skeleton a character, we will now learn the basics of animating it. For this example, you can use your own custom character created in the previous example or open the example character provided.
- Open the file named
ObjectsCharactersagentSDK_Agent.max. - Now, open the
animations.cbafile with any text editor, for example Notepad. You will find this file under thegame/animationsfolder.In the
animations.cbafile, each entry is a character animated within the Free SDK. You will notice that developer comments already exist to explain each of the parameters.When creating a custom character, it is common practice to copy the definition for a similar character and set the
Model File path,Animation PathandDatabase pathto that of your own skeleton. - Make an entry in the
animations.cbafile (as seen in the example), paying special attention to theModel,Animation PathandDatabase Pathvalues:<AnimationDefinition> <!--the reference model--> <Model File="/../Objects/Characters/agent/skeleton_character.chr"/> <!--the path with ALL animation we can use on this model--> <Animation Path="human_male"/> <!--for all animations use compression level 1--> <COMPRESSION value="2"/> <RotEpsilon value="0.0000001" /> <PosEpsilon value="0.0000001" /> <Database Path="human_male/human_male.dba"/> <!--for all animations need to detect footplants--> <FOOTPLANTS value="NO"/> <!--we apply the Locomotion_Locator modification just on BIP-files. Aliens, vehicles and weapons don't need it. --> <LOCOMOTION_LOCATOR value="YES"/> <!--we apply different modifications to the weapons . Human and Aliens don't need it. --> <!--a list of animation that need special handling--> <SpecialAnimsList> <!-- AIMPOSES COMMON --> <Animation APath="Aim" footplants="NO" compression="0" autocompression="0" SkipSaveToDatabase="1" /> <Animation APath="vehicle" footplants="NO"/> </SpecialAnimsList> </AnimationDefinition>In the previous code snippet, I have left the developer comments intact; however, I have made the adjustments to use the character created in the previous example.
Having now added this character to the
.cba, we can begin animating.Let's now create a simple, arm-waving animation that will take us through the basics of exporting skeletal animation.
As this is a 3ds Max Biped, you could now apply motion capture data to the Live Deforming Skeleton. You can find such data online or in the example files provided on http://crydev.net. For now, we will assume that such data is not available for the animation we require.
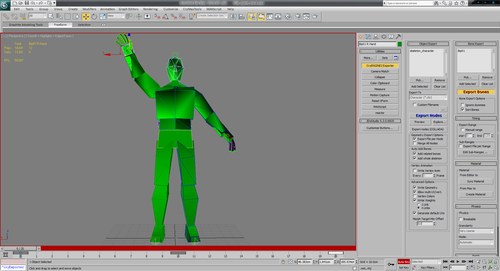
- Set the animation mode in 3ds Max to Auto Key and move the Bip01 R Hand bone into a wave position, as seen in the following screenshot. You will notice, once you move the bone, that a keyframe is automatically created.
- You may have to rotate the upper and lower arm to get a more realistic pose.
- Once you are happy with the position, move the time slider to the tenth frame and set the arm to a different pose.
As we want this animation to loop, we must set the last keyframe of our animation to the same position as the first keyframe.
- This can be done by selecting all the bones that have been keyframed, shift-clicking on the first keyframe in the time line, and then dragging the newly copied keyframe to the final frame.
For this example, copy the first keyframe to the twentieth frame.
- Since we will only be exporting a single animation, we can set the time configuration in 3ds Max to only show frames from 0 to 20.
- To export the animation, open the CryENGINE exporter in the Tools tab and ensure that the skeleton_character has been added to the export nodes list, as seen in the following screenshot.
As discussed earlier, this will automatically add the parent node of the skeleton to the export bones list.
- Clicking on the Export Bones button will open the save dialog, which will allow you to save the animation as a
.caffile. - Save our waving animation under the defined path in the animations.cba for your particular character. In this case, save it as
custom_wave.cafunder theAnimations/human_malefolder.There is one final step that we must complete before being able to view our character animation in Sandbox's character editor.
We must add this new animation to the characters parameter file or
.chrparams. - For this example, using a text editor, open the skeleton_character's
.chrparamsfile found underGameobjectsCharactersAgentskeleton_character.chrparams. - Locate the AnimationList entry:
<AnimationList> <Animation name="$AnimEventDatabase" path="animationshuman_maleevents.animevents"/> <Animation name="$Include" path="animationshuman_malemale.chrparams"/> </AnimationList> - Insert a new entry for our animation and a comment preceding it in the AnimationList, as seen below:
<AnimationList> <Animation name="$AnimEventDatabase" path="animationshuman_maleevents.animevents"/> <Animation name="$Include" path="animationshuman_malemale.chrparams"/> <Animation name="mycustom_wave" path="custom_wave.caf"/> </AnimationList> - Open the character
Objects/Characters/Agent/Agent.cdfin the Character Editor within Sandbox.Note that, on the left-hand side of the Character Editor, you can now browse into the newly created
mycustomfolder, where you will see the custom_wave animation. - Click on it to preview the animation.
Congratulations! You have created and exported your own animation to the CryENGINE. You can now start animating more complex or more extreme animation as your game might require.
When a character is loaded by the engine, it checks for a .chrparams file that defines a list of valid animations and other properties, such as IK limits, for the particular character. These animations then become accessible through code, cut scenes, and the character editor to be played back.
In this example, we dealt with the .caf animation data that is created by exporting the animation range from 3ds Max. Upon export, the resource compiler is invoked and a certain amount of compression and optimization is applied to the animation to make it ready for real-time playback.
Assigning each animation definition in the .chrparams file, line by line, can take an unacceptable amount of time and lead to very big .chrparams files.
It is only necessary if the in-game name that is supposed to be assigned to the animation is substantially different than the filename of the .caf.
Wildcard Mapping uses the asterisk (*) to represent the filename. Using the asterisk in the ingame name will replace it with the part of the actual filename that is wildcarded.
For example:
<Animation name="Custom_*" path="custom_wave_*.caf"/>
This code line will load all the animations from the folder Custom that start with the words custom_wave and have the extension .caf.
Wildcard Mapping can even be used on an entire folder. It requires, however, that these folders are kept clean of old and unused assets to not waste memory.
One important advantage of using wildcards is that, once a folder is mapped, new animations can be quickly added to that folder without the need to add an animation definition in the .chrparams file each time.
A useful entity for testing animations is the animobject entity found under Entities | Physics | animobject of the entity section in the RollupBar tab.
Once placed in a level, you can assign a model, and then enter the string of the in game animation name, as seen in the following screenshot:

A good technique is to add this animobject to a Flow Graph and assign the animation to it using the Animation:PlayAnimation flow graph node.