
Using the entities AmbientVolume and RandomSoundVolume attached to area shapes, one can create convincing sounding environments. This example will take you through the process of setting up a sound event and getting your own sound in the engine. It will also include some important interface steps, which will be used throughout the chapter. The following screenshot is an example of an ambience setup in the forest example level from the Free SDK:

To get your first sound into engine, we must first open FMOD Designer, which is the tool we will use to create our sound events for the CryENGINE.
- Open FMOD Designer, which can be found in your build directory under
ToolsFmodDesignerfmod_designer.exe. - Once opened, create a new project.
- Name the project
mygame_environment.fdpand save this project under the game directory ingame/sound/mygame_environment/.You will notice that a default event group and event will be created in your project.
- Rename the event group to Cave by typing it into the name property.
- Rename the event from event00 to cave_ambience by typing it into Property | Name.
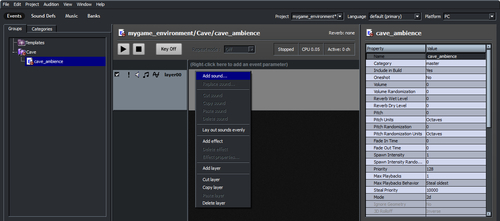
Now that we have our event, we need to give the event a sound to play.
- Right-click on the first layer of the event, and select the Add sound function, as seen in the following screenshot:
- From the New Sound dialog box, click on the Add sound file... button, and browse to the file
sounds/mygame_environment/cave_ambience.wavensuring Loop mode is set to Looping, as seen in the following screenshot: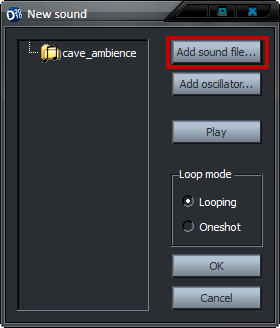
- Set the sound to be a three-dimensional sound by changing the Mode property of the sound from 2D to 3D.
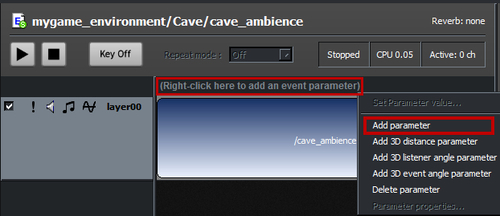
The next step is to now add some parameters to the sound. These parameters will be adjusted by the engine and will trigger different effects, which we will add onto the sound.
- Add a parameter by right-clicking just above the layer of the event that says (Right-click here to add an event paramater) and select the Add parameter function, as seen in the following screenshot:
- Right-click on the newly created param00 parameter and select Parameter properties from the context window.
- Rename the parameter from param00 to
spread.Having assigned a parameter to this sound for the engine to modify, we must now add some effects that will change the way the sound is played, depending on the values of the
spreadparameter coming from the sound system. - To add effect, right-click under layer00, as seen in the following screenshot, and select the Add effect... option:

The New Effect window will appear and a large list of effects will be available to assign to the layer.
- Add two Effects—3D Speaker Spread and 3D Pan Level.
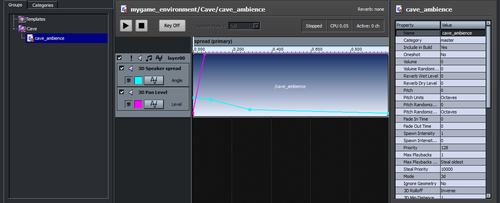
- Next, adjust the angle of the 3D Speaker Spread and the level of the 3D Pan by adding some points along the parameter values.
- In this example, I set relatively low 3D Pan Level and high 3D Speaker Spread Angle when the spread parameter is zero. Then, I increased the 3D Pan Level quickly as the spread parameter hit around 0.1. I then adjusted the 3D Speaker Spread to have a very small angle once the spread parameter was high, as seen in the following screenshot:
These effects, in combination with the spread parameter, adjust how the sound behaves as you approach or leave the area shape.
We must now build our project so that the sound is compressed and the event is created for use within the editor application or launcher.
- Click on the Project menu at the top of the FMOD interface and then select Build.
- In the Build Project dialog box, select the Select which wave banks to build: option; in this example, there will only be one. Set the Build project for: setting to PC, as seen in the following screenshot:
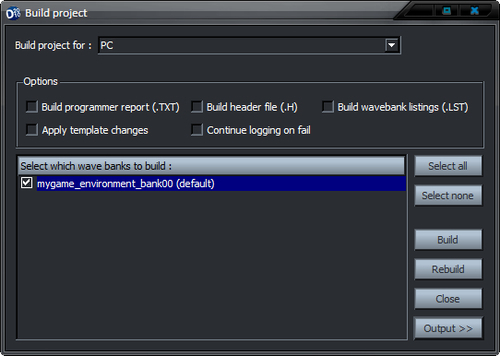
- Click on the Build button when ready.
- FMOD will then compress the
.wavaudio into a.fsbformat and the sound event into a.fevfile and will output a message when completed successfully.Now that we have the formats, we require to play back the sound within the CryENGINE. Let's place this sound into a level so that we can iterate and try different settings for effects!
- Open the level into which you'd like to add sound. For this example, the forest level will suffice.
- Under Entities | Sound in the RollupBar tab, select the AmbientVolume entity and drag this entity into the level.
- Next, draw a simple area shape by clicking on Area in the RollupBar tab and then selecting Shape. For this example, create a simple four-sided box that's big enough for the player to enter.
- Under the Entity Links of the area shape, click the PickTarget icon, and then select the AmbientVolume entity, which will link it to the area shape. You will now see that this worked, when you can see a gray line connecting the area shape to the AmbientVolume.
- In the AmbientVolume entity properties, click on the name string and then click on the browse icon, which will open the Sound Browser window.
- Browse to the directory
Sounds/mygame_environment/Cave/and select the cave_ambience event.Note that you can preview the sound as well as the way it reacts to different parameters within the Sound Browser using the sliders and Play button, as seen in the following screenshot:
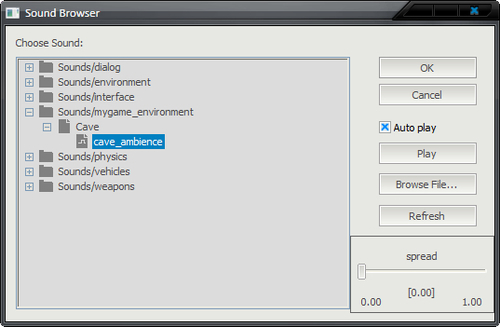
Double-click on the cave_ambience sound file, and it will then be assigned to the AmbientVolume entity. Now we are ready!
- Type the console command
s_SoundInfo=1that will display the all playing sounds and some debugging and profiling tools. - Switch to game mode and walk into the area shape.
If everything is working correctly, you will hear the sound as well as see, using
s_soundinfo, that the entry 3d sounds/mygame_environment:cave:cave_ambience is playing.You'll now notice that whenever you approach or enter that area shape, the ambient sound will play.
- As a final example, set the Height value of the area shape created earlier to
20.The area shape will now limit the vertical dimensions of the AmbientVolume entity.
Congratulations! You have learned many different skills in this example. We successfully created a new FMOD project, created an event group, added an event, assigned sound to that event, and finally added some effects and parameters for this event. We even went so far as to build our project and get our sound working in the engine!
We can use looping sound events as background ambient sounds in levels. These are typically 3D sounds, which reside within the confines of an area shape. When the player enters the area shape, the ambient sound travels with the player becoming, in effect, a surround sound. Once the player leaves the shape, the sound is left behind on the perimeter of the area shape.
Try using some of the other Entity Properties of AmbientVolume. As with any entity within the CryENGINE, AmbientVolume has some properties that can easily be adjusted in the editor, as seen in the following screenshot:
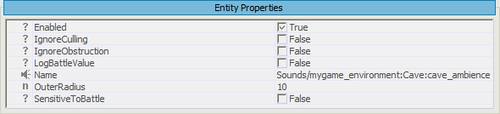
Some of these properties are:
- IgnoreCulling: This is set to
true, by default, and means that ambient volumes will be culled by distance, and if separated by VisArea. - OuterRadius: This setting will cause a falloff or ramp up in the sound as you leave or approach the area.
- IgnoreObstruction: This setting is used to enable or disable obstructions to the sound used, often in interiors, where the player might not always have a line of sight to the AmbientVolume entity.