
Follow the given steps:
- First of all, we need a simple graphic for the buttons. As you already know my programming art style, I have created three very simple images in Adobe Photoshop.

- Now, start Flash and create a new ActionScript 2.0 project. Import the three PNGs for the buttons. Create a new movieclip in the library (right-click in Library) and call it something like
MyButton. - Open the
MyButtonmovieclip and create three keyframes. Placebutton_out.pnginto the first keyframe,button_over.pnginto the second keyframe, andbutton_down.pnginto the third keyframe. Now click on each keyframe and type in the label names—outfor the first,overfor the second, anddownfor the third keyframe (you can define the label name in the PROPERTIES panel if you click on a keyframe). - Create a new layer, and add a dynamic textbox to it. Give it the instance name
btnText. Make sure you embed the font (Lowercase and Uppercase). It is also important to disable Selectable on the textfield.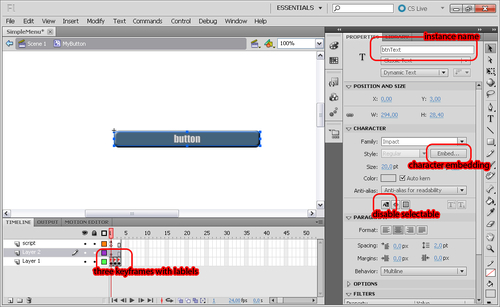
- Create a third layer for the script, and write a very simple script to handle mouse events:
stop();
onRollOver = function()
{
  gotoAndStop("over");
}
onRollOut = function()
{
  gotoAndStop("out");
}
onPress = function()
{
  gotoAndStop("down");
  fscommand("onPressed", btnText.text);
}
onRelease = function()
{
  gotoAndStop("over");
}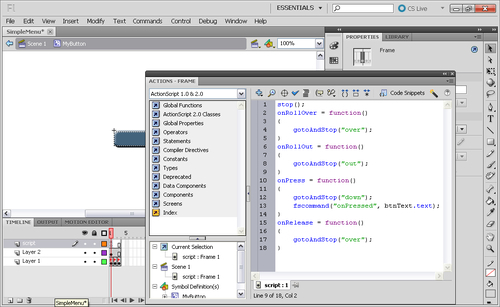
Note
There is
fscommandin theonPress()function. Withfscommand, we can send events to CryENGINE. The first parameter is a string to identify the event. The second parameter is optional, and can be used as a parameter to pass some additional information to the engine. In this case, we simply use the text that is applied to the textbox as a parameter. This parameter will be used later to identify the button that was pressed.You can also pass an array as an argument to
fscommandif you need to pass more than one parameter:var args = new Array(); args.push("arg1"); args.push("arg2"); fscommand("yourEvent", args); - Now, go to the main scene and place the button movieclip twice. The instance names for the buttons should be
btn1andbtn2. - Create a new script layer and add the following two lines to set up your buttons:
btn1.btnText.text = "open";
btn2.btnText.text = "close";
- Save the
SimpleMenu.flafile and publish theSimpleMenu.swffile. - Last but not least, we need to define a new UIElement for our simple menu. Create a new XML file—
GameLibsUIUIElementSimpleMenu.xml. - The setup is similar to the one from the
NewHUDUIElement, but we will use a top/left alignment. We will also enable mouse events and a cursor on this element. This means that if the UIElement is visible, the engine cursor is visible, and mouse events are passed to this Flash asset. - We will also add a new
<events>tag to it to define the button events. The event is mapped tofscommandand can optionally have arguments. Because we pass the button name as an argument infscommand, we add one<param>tag to it.<UIElements name="Menus"> <UIElement name="SimpleMenu" render_lockless="1" mouseevents="1" cursor="1"> <GFx file="SimpleMenu.swf" layer="1"> <Constraints> <Align mode="dynamic" valign="top" halign="left" scale="0" max="0" /> </Constraints> </GFx> <events> <event name="OnButton" fscommand="onPressed" > <param name="Name" type="string" /> </event> </events> </UIElement> </UIElements> - Now, save the XML file and start Sandbox. In this example, I will use the
SimpleMenuUIElement to open and close a door. You will find some doors in the Forest demo level. Just select one door, and create a new Flow Graph for it (right-click on the entity, and select Create Flow Graph). - Because we defined our events in the XML file, you will find a Flownode for this event under UI:Events:SimpleMenu. We will use this event with the entity:Door node to open/close it (you can add the entity:Door node by right-clicking on the Flow Graph and choosing Add Graph Default Entity).
- We will also use an Input:Key node to display the
SimpleMenuUIElement on press, and hide it again on release. We will also use the Input:ActionFilter node to enable the only_ui filter so long as the Tab key is pressed. This filter will lock all the input in the game and only pass the input to the UI.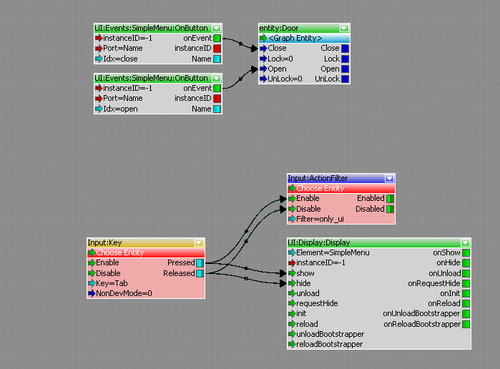
Note
All event nodes have a Port input. If this is set to
<TriggerAlways>, it will always trigger if the event is fired. In our case, we select the Name port. This means that this node is only triggered if the Name output of this node is equal to the string that is defined in the Idx input. With this setup, we can use this node to trigger only if an event is fired that has a specific value (Idx) on the chosen output (Port). In our case, we check the button text to see if the open or close button was pressed.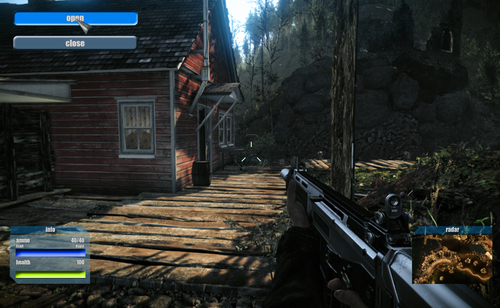
- If you now jump into the game, you can press Tab, and the menu should appear. Click on the buttons to see if they work as expected.
With fscommand and the <event> tag, it is really easy to handle Flash events in CryENGINE. You should now be able to write your own menus. Mouse events can be easily enabled for your UIElement via XML.
There is a lot more you can define in the XML files. Just have a look at CryDev.net. The full documentation about the Flash UI system can be found at http://freesdk.crydev.net/display/SDKDOC4/Flash+UI+System.