Applying a good set of terrain layers depends heavily on the environment in which you wish to create your map. In this particular example, we will use a somewhat straightforward setup of rocks, forest, grass, mud, sand, and underwater.
- Create a new map and generate some terrain, or open
Book_Example_1_no_color.crybecause we need to have some terrain loaded for us to paint onto like a blank canvas. - Open the Terrain Texture Layers window found in the main sandbox toolbar under Terrain | Texture.
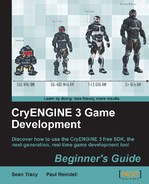
- In this window we want to create some new layers because, as we can see, it has only a single layer at present.
- Create a new layer using the Add Layer command, as shown in the following screenshot:

- Rename the new layer grass.
- Next, change the Surface texture of this layer.
- Use the Change Layer Texture command shown in the following figure, and navigate to
Book_Chapter_2_Assetslow_detail_terrain_texturesdirectoryand select the grass.tif texture. In this case, this texture is a small, 256-pixel, green image with some variations in it, which will work well tiled across our grasslands.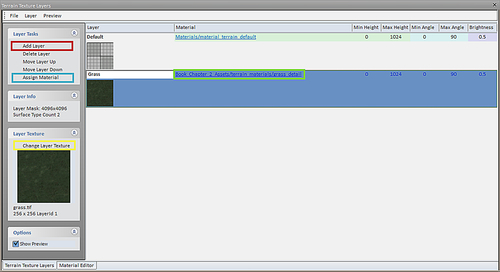
- Next, change the Detail Texture by using the Material hotlink path in the grass layer; click on the link, and the material file
Materials/material_terrain_default.matwill open in the Material Editor.By default, the terrain materials contained in the SDK are located in
materials errain. Terrain material can be identified as they must always use the Terrain.Layer Shader, as seen in the following screenshot:
- Navigate to the
Book_Chapter_2_Assets errain_materialsfolder in the Material Editor, and select the grass_detail material. - Go back to the Terrain Texture Layers window and click on Assign Material; this will assign the selected detail material from the material editor to the selected terrain texture layer.
You have made your first texture layer. You could continue adding your own texture layers but instead we will import the assets included with this book.
- Before experimenting with painting, import the sample assets provided. Use the File | Import layers command and import the file
Book_Chapter_2_Assets/Example_Base_Terrain_Layers.lay, as seen the following screenshot:
Having loaded a base set of texture layers into our level, we can now get to the fun part of painting them!
- As the layers are already set up with basic values, you can switch immediately to the layer painter under the Environment tab of the Rollupbar.
- Once in the layer painter dialog box, you can select the layers and paint them by clicking and dragging them in the viewport on the terrain. The selected layer will be painted using the Radius and Hardness settings within the layer painter.
- After experimenting with painting a layer onto your map, scroll down in the layer painter rollout to where you see the Tile Resolution along with the button Change.
- Click on Change and turn your brush into a terrain sector selection tool with which you can adjust the overall resolution of your terrain textures in certain sectors. It is recommended to maintain a 1024X1024 resolution or more in gameplay areas and where you expect the player to be, and setting exterior sectors or non-playable areas to a lower resolution.
- In our case, we have a relatively small map, so setting this to the maximum of 2048X2048 will produce the best results. To disable the Tile Resolution tool, simply click on the Change icon a second time.
- In the layer painter, select the grass material and set the Min/Max angle setting to Min:0 and Max:40. This will paint grass on any terrain that has an angle less than 40 degrees.
- Paint the grass layer onto the terrain as seen in the following screenshot:

- You can use this same technique for the rock layer. Set its Min/Max angle setting to Min 40 and Max 90, which will effectively fill up the rest of the terrain.
- Paint the rock layer onto the terrain as seen in the following screenshot:

- Don't forget the terrain under water! There is some terrain that can still be seen from above the water and as such we should enhance its color. Use the Min/Max Height to achieve this. Set the Min/Max height of the underwater layer to Min 0 Max 16. Note that the height we set exactly matches the water level; who said math isn't fun.
- Finally, painting sand or a beach can be done quite quickly by clicking and dragging a fairly large brush manually, and it will allow you to blend the texture to your liking into the grass and rocks.
- Paint the beach section of the level as in the following screenshot:

- The other two layers can later be used when painting vegetation objects as they will compliment the objects nicely.
- Once you have finished painting, you must compress the texture and generate a surface texture for the engine.
- Do this by going to File | Generate Surface Texture.
- Select a resolution and click on OK.
- When you are happy with the terrain textures, save your level.
Congratulations! You are well on your way to becoming a terrain painting master. Now, our level is starting to take shape. It's so colorful now!
Let's further explain some of the layers that this example uses:
- Grass: This layer attempts to match a natural color tone while using some variations of bright colors to break up the tiling.
- Rock: Using this for cliffs and other steep terrain will be ideal. It utilizes a 3D material to aid in an attempt to avoid obvious tiling.
- Forest: Use this layer for the vegetation layers, which we will import later, to blend them into the environment better. It is slightly brownish, to match the color of dead leaves.
- Mud: This layer has some specular and wet qualities, and uses small stones and a few different types of vegetation that blends best with the terrain.
- Sand: This layer uses some variations in bright textures to break up the tiling on the beach or in other sandy areas.
- Underwater: This layer uses a darker blue color to enhance the depth of the water when seen from above or below the surface. You can lighten this layer if you desire to achieve a coral reef-type effect.
This gives us a ton of possibilities for various types of terrain.
As we saw, these parameters can be set per layer, allowing you to paint that layer within the altitude measured in meters or the slope measured in degrees. This is especially useful for cliff-like layers (for example, 55 degrees to 90 degrees).
A tile's resolution affects how many terrain tiles there are in each terrain sector. The higher the resolution, the higher the amount of tiles used, which leads to better layer blending, as well as softer transitions in the high detail textures. It can be set from as low as 64x64 to as high as 2048x2048; this tiling resolution is an important factor when it comes to optimization, as well as high quality terrain. A good technique is to utilize only higher resolution tiles within the gameplay area of a level, and to use lower resolution tiles on the surrounding terrain for performance and memory considerations.
- A Terrain Layer consists of 2 main components. What are they?
- Surface Texture and Detail Material
- Surface Type and Detail Bump map
- Shader and Material
- What constraints can be set for a terrain texture layer to only appear in certain areas?
- Min/Max Height and Min/Max Angle
- Min/Max polygons
- Brightness and Contrast
- What shader is used for all the terrain texture layers?
- Glass
- Illum
- Water
- Terrain.Layer
The vegetation system in CryENGINE is powerful, you can utilize a small amount of assets and use procedural placement to make their placement look quite natural.
The interface for vegetation painter is similar to painting terrain textures. They are both based on a brush-like interface where you can click-and-drag directly on the terrain as if you were painting. Both the terrain painter and the vegetation painter support the same altitude and angle properties, and can be used together to achieve very realistic results.
It is important to understand though, that quite differently than painting terrain textures, painting vegetation is a placement of geometry. This geometry is then instanced, a technique used to increase performance, since the objects that are being drawn are already in memory for the entire map.
Placing geometry as vegetation allows us to use the vegetation system to its full potential, as applying the vegetation shader to these geometry objects allows for realistic physics such as touch bending simulation (where the player can physically bend branches) and also wind bending.