
An enemy that is guarding something, for example, does not just stand still. This would be very awkward and would break immersion. Usually, this can be solved by giving the AI entity some task or job in the world, which would give his presence much more sense and make him act more lifelike.
In this example, we will create an AI entity that will patrol between some predefined points. We will set this AI to start his patrol when the player enters a particular trigger:
- To begin, open a new level where you'd like to place AI, or use the level created in the previous example.
- Make sure you have generated the AI navigation for the level by using the AI menu and selecting Generate All Navigation.
- Place a SpawnPoint and Proximity Trigger into the level, as we did in the previous examples.
- Next, drag-and-drop a Grunt entity from the AI entities in the RollupBar tab.
This Grunt will be our enemy AI.
- Place a TagPoint in a location near the AI entity. TagPoint entities are under the AI button in the RollupBar tab.
This TagPoint will act as our go-to point.
- For this example, we will use our Proximity Trigger to store the Flow Graph, so create a new Flow Graph on the Proximity Trigger entity.
- In the perspective viewport of the editor, select the Proximity Trigger entity and then press Ctrl, and also select the TagPoint.
- Add both these entities to the new Flow Graph by right-clicking and selecting the Add Selected Entities entry from the context menu.
- To command our AI character, we need one of the AI component nodes. Add the AI:GotoSpeedStance node.
- Select the Grunt1 from the perspective viewport.
- Right-click on the AI:GotoSpeedStance node and select Assign Selected Entity.
Most of the AI component nodes must be assigned to a particular AI entity; this is how the component nodes are told which AI they are to affect.
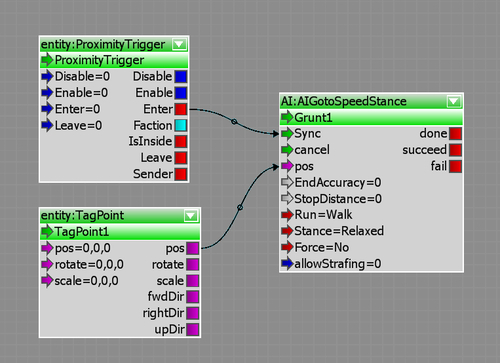
- Link the Enter output from the Proximity Trigger entity to the Sync input of the AI:GotoSpeedStance node. Finally, link the pos output of the TagPoint to the pos input of the AI:GotoSoeedStance node.
Your Flow Graph should now be set similar to the screenshot below:
- Test the first waypoint by switching to game mode and then walking into the trigger.
You may find that the AI immediately engages you and so does not walk to the position that we want. The reason for this is that the AI has a perception and attack range, which we might be in range of one or both. Let's adjust this.
- The fastest way to rectify this issue without editing the AI's properties is to set the AI:GotoSpeedStance component node's Force input to IgnoreAll.
- Upon changing the Force input, you should now, once you enter game mode and walk into the trigger, see the AI entity walk to the position of the TagPoint entity.
Let's now extend this graph to give the AI entity some more points to patrol.
- Create three more TagPoint entities and three more AI:AIGotoSpeedStance nodes.
- Finally, add a Logic:Any node.
- Link them as shown in the following screenshot:
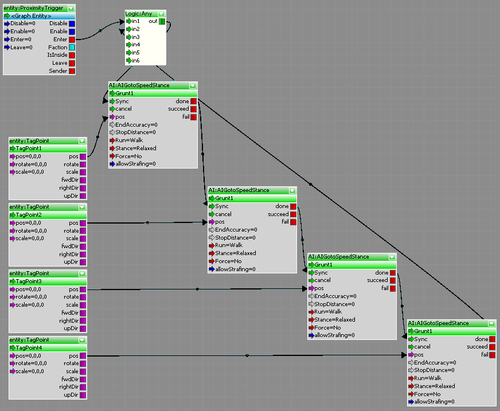
- You will notice that we have created an endless loop using the Logic:Any node to loop back the done output from our last patrol leg to the Sync input of the first patrol leg.
- This AI will infinitely patrol between these points until such a time that he is sent a new command or the player comes within the attackrange area of the particular AI. At this point, the AI behaviors take over and he will attack the player.
Having now created our scripted patrolling AI, we can use this in our own game to guard positions or set up groups of AI for our player to defeat.
You have also learned an important technique when using Flow Graph, which is using the output from multiple nodes to trigger a single node in different conditions. The first leg of the patrol route for the AI is triggered through the Proximity Trigger entity. However, it wouldn't suit to have the player constantly walking into this trigger to keep the AI walking around, so we loop the output of the last AI:GoToSpeedStance back to the start using the Logic:Any entity. In this way, it will trigger the first leg of the patrol whenever the last leg is done.
The AI:GoToSpeedStance entity is a useful node when scripting AI. It allows you to command the AI entity to execute a specific goal pipe. This is called using atomic goals, which are the simplest instructions we can send the AI entity. If the AI's behavior is not currently busy with other tasks, the AI will proceed to the defined location.