
Unlike the toolbox in the corner of your garage, Office 2008’s Toolbox is easy to get to, puts itself away with the click of a mouse, and is never missing a 9/16” socket. Better still, it can do many things your disorganized, red toolbox could never do. For example, it can store your snippets of inspiration (pictures, text, and so on), provide definitions and other research aids, check your document’s compatibility, or provide a window into Office’s Project Center. Office 2008 adds the formerly-separate Formatting Palette to the Toolbox, bringing its total number of sections to seven—and making it the one-stop location for tools of all types.
Word, Excel, and PowerPoint share the six standard Toolbox sections: Formatting Palette, Object Palette, Scrapbook, Reference Tools, Compatibility Report, and Project Center. In addition, each program adds one palette of its own. Word has Citations (Different headers (and footers) for different sections), Excel has the Formula Builder (Looking up functions with the Formula Builder), and PowerPoint has the Custom Animation palette (Adding Animations). Those program-specific palettes are discussed in each of the program chapters, and the Formatting Palette and Object Palette are covered in the Word chapters (Standard Toolbar). Entourage makes use of only three Toolbox palettes—Scrapbook, Reference Tools, and Object Palette—which you can only access via the Tools → Toolbox menu (or by adding the Toolbox button to the Entourage Standard toolbar).
What follows is a description of the remaining Office-wide Toolbox sections.
Think of the Scrapbook as, well…a scrapbook. It’s a location where you can drag copied snippets from documents or pictures, or Excel spreadsheets.
After opening the Scrapbook, as described in Figure 18-4, copy your text (or whatever) into the Scrapbook window by dragging it or using any of the conventional cut, copy, and paste methods. To reuse the material, click the Paste button (near the middle of the Scrapbook) to paste the material shown in the Scrapbook window into your cursor’s current location. There are three pasting options:
Paste. This most common option pastes the material in the exact same format that you copied it.
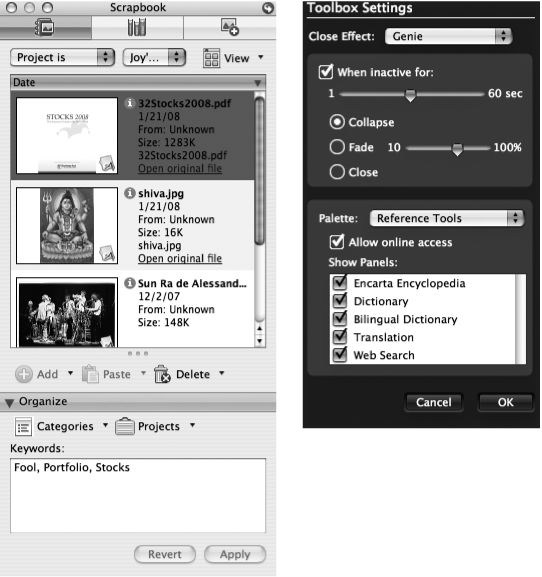
Figure 18-4. Left: You can open the Scrapbook from any Office 2008 program by selecting Tools → Toolbox → Scrapbook or clicking the Toolbox icon on the Standard toolbar (but not on the Entourage toolbar unless you add the button), and then clicking the Scrapbook icon at the top of the Toolbox. Drag or paste text, pictures, or Excel spreadsheets into the Scrapbook—and there they’ll stay until you need them. Copy a clipping from the Scrapbook by dragging it onto your document (or by using any of the usual keyboard shortcuts). Right: Click the arrow button in the upper right-hand corner to reach the Toolbox Settings, which swivel into view (right). Turn on the “When inactive for” checkbox to cause the toolbox to stash itself away after a certain period of inactivity. The bottom panel determines what you see when you use the various toolbox palettes.
Paste as Plain Text. By golly, they weren’t kidding. Use this button if you want to remove all the formatting and paste it as just plain text.
Paste as Picture. This command pastes your snippet as a picture you can format using any of Office’s picture tools like color adjustment and shadowing, as described in Chapter 20. You can use this to turn, say, a drawing object into a picture and thus avail yourself of the picture tools.
On the other hand, the Add button takes the selected text, picture, table, or whatever, and transfers it to the Scrapbook. There are four options:
Add Selection. An alternative to the Copy command, this option instantly adds your current selection to the Scrapbook. This is handy if you’ve highlighted a piece of text—a clever email joke, for example—that you wish to paste into other Office programs.
Add File. Adds the current file to the Scrapbook. It can be any Office document.
Add From Clipboard. Pastes whatever is in your clipboard to the Scrapbook.
Always Add Copy. A good one for the time-challenged or compulsive hoarders among us. After you click this, anything you copy or cut is pasted directly into the Scrapbook.
If you have a scrap you no longer need, you can delete it with the delete key or by pressing the Delete button. Three delete options exist on the Delete pop-up menu:
If you have a lot of clippings to keep track of—or you’re one of those people who has a Club card at the Container Store—you might want to click the Organize title bar. Doing so lets you place the currently selected clipping into categories and projects (by clicking the appropriate pop-up menu and selecting the desired category or project).
You may also add keywords, which is a great idea when you have tons of clippings. Assigning a Keyword lets you search for the clipping by that word. For example, you might want to add the words, Thanksgiving, apple, and hari, as keywords for the recipe to Hari’s apple pie that he brought to Thanksgiving dinner. To do so, type the words in the box and click Add. Highlighting words and clicking Revert removes them.
Use the pop-up menu at the top of the window to filter your clippings by creation date, project, category, keywords, and so on. Finally, the View pop-up menu lets you view your clippings by List or by Large Preview (if you prefer those over the standard Detail view).