
By now, you’ve undoubtedly used—and come to appreciate—Word’s time-saving templates. They range from the very simple, like the Personal Letter, to the complex, multipage Publishing Layout view templates. But whether plain or intricate, they all share a common purpose: to get you started on the document quickly, with a large part of the formatting already in place—so you can concentrate on the content instead of the layout. This section shows you how to make your own templates so you can add them to Word’s Project Gallery, where they’ll appear alongside Microsoft’s templates, ready and eager.
You can create your own templates either by starting from scratch with a blank page, or by modifying one of Word’s templates. After you make all your changes to the document, choose File → Save As and choose Word Template (.dotx) from the Format pop-up menu, give the template a name, and click Save. From now on when you open the Project Gallery you’ll find the new template listed in the My Templates section.
Open a template as a starting point for your own template-modification endeavors. For example, you might decide to use the Event Poster as a basis for a standard poster design for your band—one you could easily modify with the date and venue for each new performance.
Open a template.
Use the Project Gallery or the Elements Gallery to choose the Event Poster.
Click the Master Pages tab at the bottom of the window and make any changes you want to appear on every page of the document (see Figure 8-3).
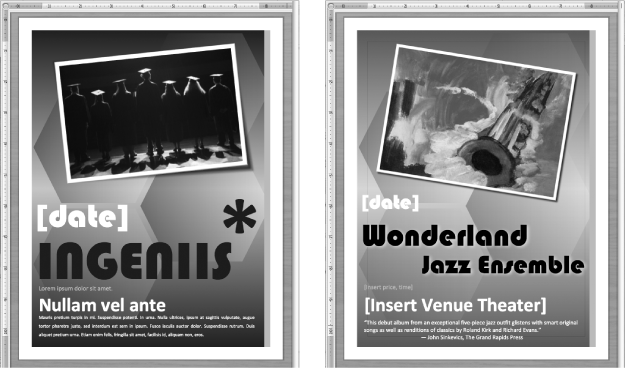
In this case, the document is only one page, but perhaps you’d like to lighten up the background image a bit to make the poster less dark and formal-looking. Select a background image and use the Transparency slider in the Colors, Weights, and Fills section of the Formatting Palette to lighten the image (Figure 8-19).
Figure 8-19. You can modify one of Word’s templates to make it your own—adding, removing, or modifying any of its elements before saving it as a template. Starting with the Event Poster (left), you can add your own picture, name, and text—including text-box reminders were you’ll fill in the appropriate event information for each concert (right).
Click the All Contents tab at the bottom of the window and change the text boxes to reflect your band’s boilerplate text: your name, description, and a blurb, for example.
Insert any text that you’d like to appear on every version of this document, and enter reminders in those text boxes that need to be filled with specific information. Change the position, font, color, shadow, anything at all. And of course, add your own picture or artwork.
Add or delete any other elements to transform the Microsoft template into your own.
Add other images, delete or resize text boxes. Use any of the object modification techniques described in the preceding pages until you’re delighted with your design.
Choose File → Save and choose Word Template (.dotx) from the Format pop-up menu, give your new template a descriptive name, and click Save.
Unless you choose a different destination, Word saves the template in your My Templates folder (Home → Library → Application Support → Microsoft → Office → User Templates → My Templates), making it available to the Project Gallery—also in the My Templates section. You can save the template in any folder and it functions just fine—it just won’t appear in the Project Gallery.
If you’re a real do-it-yourselfer, you can create templates from scratch, by starting with a blank sheet and building up a sample document exactly the way you want it. Start by opening a new blank Word Publishing Layout document from the Project Gallery or by choosing File → New Blank Publishing Layout Document if you’re already working in the Publishing Layout view. This document becomes the model document you’ll build up to create a template. Choose File → Save right off the bat and give it a title—something like Company Newsletter Model. Then as you work on it, periodically press ⌘-S to save your work. After you’re all done creating the model document, you save it as a template.
Begin by choosing File → Page Setup and selecting the paper size and orientation, choose Format → Document → Margins to adjust your document margins (.5 inch in this example), and then begin the actual document design.
Click the Master Pages tab in the lower-right corner of the document window.
The Master tag in the upper-left corner of the window reminds you you’re now looking at the Master page—the place for any standard elements you want to appear on every page of your document (see Master Pages). Master pages are also great place for alignment guides (Resizing objects) so they’ll display on every page of the document, to help you maintain a consistent layout from page to page.
Drag the vertical alignment guides from a Left ruler onto the page to provide column guides.
Divide the page into as many columns as you like—or three columns if you’re following along with this tutorial. Use the ruler to help you create equal-width columns, placing alignment guides at 3 inches and 5.5 inches—representing the center of each column margin (Figure 8-20).
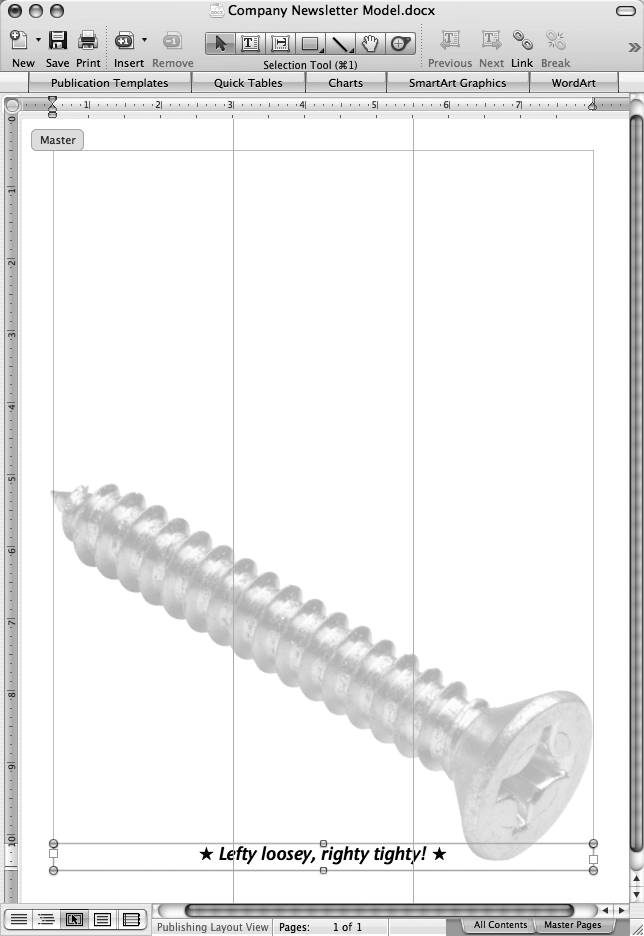
Add any background images or text you want to appear on every page, such as a company logo—in this case, a large screw—and a company motto.
You want this logo as a background image which text can flow over and still be readable, therefore set its transparency to a relatively high 75% and set the wrapping style to none (Wrapping). Follow up by adding a text box containing the company motto at the bottom of the page.
Click the All Contents tab in the lower-right corner of the document window to close the Master page view and return to the normal page view.
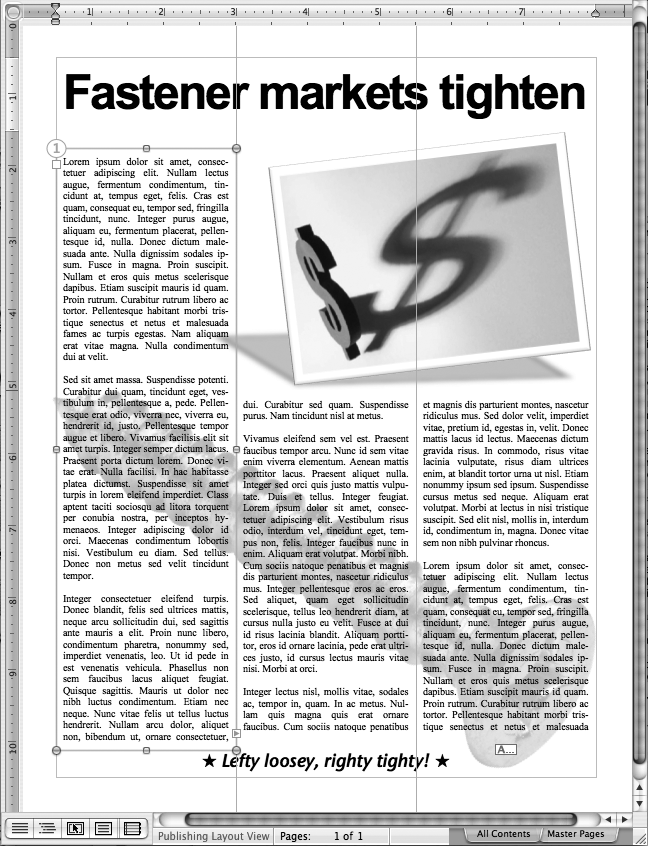
Now you can add picture drop zones and text placeholders to the document so that pictures and text you add each month will maintain a consistent appearance.
Insert a picture by dragging it from the Object Palette, for example (The Toolbox Redux).
Use any of the picture formatting techniques to reposition, resize, rotate, add shadows or borders, and so on (Rotating drawing objects).
Convert the picture into a drop zone by double-clicking the picture to open the Format Picture dialog box. Click the Layout tab and then click the Advanced button. Click the Picture Position tab and at the bottom of the window turn on the checkbox marked Picture Placeholder. Click OK twice to close both parts of the Format Picture dialog box.
By transforming the picture into a drop zone, any picture you drop onto it assumes all of its formatting attributes: the size, rotation, Borders, shadows, and so on will match from one issue of your newsletter to the next (see Figure 8-21).
Add a sample headline to the top of your document and format it with your headline style. Then transform it into a text placeholder by choosing Format→ Text Box → Layout, clicking the Advanced button, clicking the Picture Position tab, and turning on the Text Placeholder checkbox near the bottom of the window. Click OK twice to close both parts of the Format Text box dialog box.
Add more text boxes, if you like, for the columns of text for your articles. Add some sample text to each of them, or create linked text boxes filled with sample text, and transform them into text placeholders as well. Now when you use the template, anytime you click in a text box containing placeholder text, the placeholder disappears and whatever you type takes its place, assuming the formatting of the placeholder text—just like the Microsoft templates.
Tip
If you want to add your own Greek placeholder text, grab some from one of the Lorem Ipsum generators on the Web, like www.lipsum.com.
Create additional pages for your newsletter if you desire (Adding template pages).
Consider breaking your document into sections in order to have more than one master page (Master Pages) for different sections of your document.
Save your document as a template by choosing File → Save As and choosing Word Template (.dotx) from the Format pop-up menu. Give your newsletter template a unique name, and click Save.
Word offers to save the template in your My Templates folder (Home → Library → Application Support → Microsoft → Office → User Templates → My Templates), making it available to the Project Gallery—also in the My Templates section. A better choice, however, is to save it in the My Publication Templates folder (which you’ll find right next to the My Templates folder in the User Templates folder). This way your template shows up not only in the Project Gallery, but also in the Elements Gallery. (You can save the template into any folder and it functions just fine—it just won’t appear in the galleries.)
Once you start creating your own templates, sooner or later you’ll need to create new categories in the Project Gallery or delete templates you no longer need. Word doesn’t show “New Folder” or “Delete Template” commands in the Project Gallery; you have to manually make new folders and trash templates.
Word keeps all the templates you’ve created separate from its assortment of stock templates. If you save your templates in the standard location, you’ll find them in the My Templates folder by following the path Home → Library → Application Support → Microsoft → Office → User Templates → My Templates. Drag any templates you no longer need from the My Templates folder to the trash.
To add a new category to the Project Gallery, create a new folder next to My Templates in the User Templates folder. Name it for your new category, drag templates from the My Templates folder into it, or choose it when saving new templates.
You can share templates with other Word fans and let them take advantage of your hard work—and your creative brilliance—by sending a template as an email attachment, burning it on a CD-ROM, copying it to a USB flash drive, and so on.
But first you have to find the template file you want to share. One way is to dig deep into your hard drive to find Word’s template storage vault and make a copy of one of your templates. As noted previously, they’re in Home → Library → Application Support → Microsoft → Office → User Templates → My Templates.
A much easier way, however, doesn’t involve any hard drive excavation at all. Open the Project Gallery and create a new document from the template you want to share. As soon as it opens, choose File → Save As and choose Word Template (.dotx) from the Format pop-up menu. You have to rename the template, and then choose an easy-to-find destination—say your desktop—and click Save. You’ve just created an exact clone of the template which you can now easily share with others.