CHAPTER 10 Tweaking Windows for Safe and Fun Family Use
If you have children who share your computer (how brave of you!), or if you’re setting up a computer for the kids’ use, it’s wise to take precautions regarding the content and programs that they can access. Locally, this might take the form of blocking access to certain programs (such as your financial software) and setting time limits on when the computer is used. If the computer has Internet access, you might also want to allow only specific sites and prevent file downloads.
All this sounds daunting, but the Parental Controls in Windows Vista make things a bit easier by offering an easy-to-use interface that lets you set all the aforementioned options and lots more, as you’ll see in this chapter. (Note that you get Parental Controls only in the Home Basic, Home Premium, and Ultimate editions of Windows Vista.)
Get Control by Turning on Parental Controls
Before you can do anything with Parental Controls, you need to create a standard user account for each child who uses the computer:
1. Select Start, Control Panel.
2. Click Add or Remove User Accounts and then enter your UAC credentials. The Manage Accounts window appears.
3. Click Create a New Account. The Create New Account window appears.
4. Type the user’s name, be sure the Standard Account option is activated, and then click Create Account.
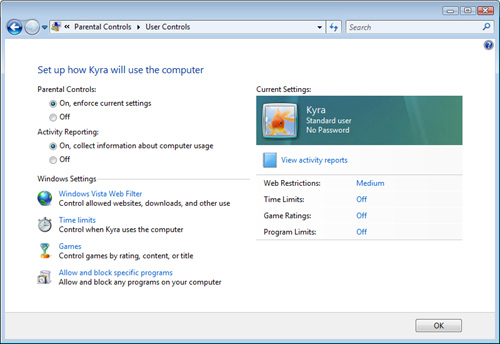
When that’s done, you get to Parental Controls by selecting Start, Control Panel, and then clicking the Set Up Parental Controls link. Enter your UAC credentials to get to the Parental Controls window, and then click the user you want to work with to get to the User Controls window.
You should activate two options here (see Figure 10.1):
• Parental Controls—Click the On, Enforce Current Settings option. This enables the Windows Vista Web Filter, and the Time Limits, Games, and Allow and Block Specific Programs links in the Settings area.
• Activity Reporting—Click the On, Collect Information About Computer Usage option. This tells Vista to track system events such as blocked logon attempts and attempted changes to user accounts, system date and time, and system settings.
FIGURE 10.1 The User Controls page enables you to set up web, time, game, and program restrictions for the selected user.
Keep Your PC Safe with a List of Allowed Programs
You set up your kids with standard user accounts, and the good news is that Vista security is structured in such a way that standard users can’t do much overall harm to a computer. However, that doesn’t mean you should give your kids the run of the PC. There are plenty of executable files lurking on a typical Windows Vista system, and the vast majority of them should be off-limits. However, anything can happen with an overly curious or fumble-fingered child at the keyboard.
To prevent mishaps or confusion caused by starting an improper program, you can configure a child’s parental controls so that he or she can start only specific programs. Here are the steps to follow:
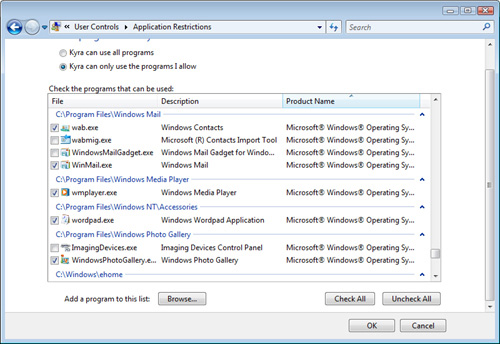
1. In the User Controls window, click Allow and Block Specific Programs to display the Application Restrictions window.
2. Activate the User Can Only Use the Programs I Allow option (where User is the name of the user you’re working with). Vista displays a list of all the executable files on the computer.
3. Activate the check box beside each program you want to allow the user to start, as shown in Figure 10.2.
FIGURE 10.2 Activate the check box beside each application that it’s okay for the user to start.
4. If Vista missed a program, click Browse, use the Open dialog box to select the application’s executable file, and then click Open. Vista adds the program to the list.
5. Click OK.
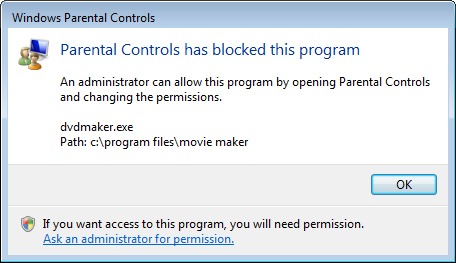
If the child attempts to start any other program, he or she sees a dialog box like the one shown in Figure 10.3.
FIGURE 10.3 If an application isn’t on the list of allowed programs, the child sees a dialog box like this.
Maintain Balance by Enforcing Computer Time Limits
As I’m sure you know, if you give a kid access to a computer, he or she will stay on the computer all day and all night. That sort of obsessive behavior doesn’t exactly lead to a balanced life, so I’m sure you nag your kids to get off the computer and go play outside (or read a book or whatever). If you’re sick of nagging, you can tweak your parental controls to let Windows Vista be the Bad Cop for a change. Specifically, you can configure time limits that determine when, in one-hour blocks, a user is allowed access to the computer. During blocked hours, the child either can’t log on, or the child is automatically logged off when the time comes.
Follow these steps to set up time limits for a child:
1. In the User Controls window, click Time Limits to display the Time Restrictions window.
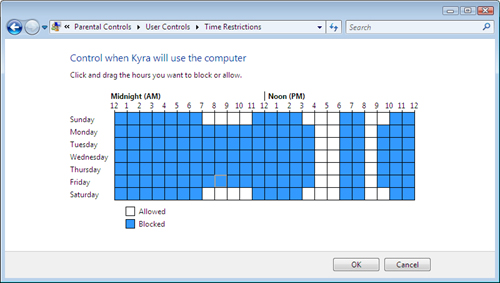
2. Click the hours that the user is not allowed to use the computer. (You can also click and drag over several consecutive time blocks.) Windows Vista uses blue to show the times when the user is blocked from using the computer, as shown in Figure 10.4.
FIGURE 10.4 Use the Time Restrictions window to specify the times that the user is blocked from using the computer.
3. Click OK.
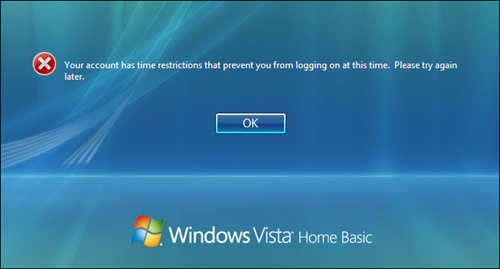
If the child attempts to log on during a restricted time, he or she sees the message shown in Figure 10.5.
FIGURE 10.5 If a user attempts to log on during a blocked time, the logon fails with the message shown here.
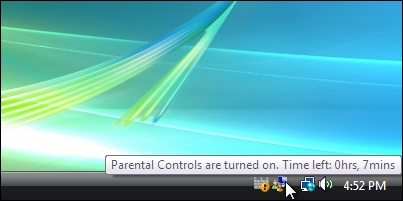
If the child is already logged on, the Parental Controls icon appears in the notification area. He or she can move the mouse pointer over the icon to see how much time is left, as shown in Figure 10.6. (When there’s a minute left, a fly-out message appears, warning the user that time is short.) When that time runs out, Windows Vista hides the user’s session and displays the logon screen.
FIGURE 10.6 The child can monitor how much time is left by hovering the mouse pointer over the Parental Controls icon in the notification area.
Let Kids Surf Safely with a List of Allowed Websites
The web is a dangerous place even for experienced users, so it’s no place to send a child without some kind of adult supervision. Of course, you can’t hover over your kids every second that they’re online, so how do you ensure they’re surfing safely? You can take advantage of the Windows Vista Web Filter that’s part of Parental Controls. Although you can use this feature to block web data based on content, for younger children it’s a lot easier to just provide them with a list of allowed websites.
Here’s how to set this up:
1. In the User Controls window, click Windows Vista Web Filter to display the Web Restrictions window.
2. Activate the Block Some Websites or Content option.
3. Click Edit the Allow and Block List link to open the Allow or Block Specific Websites window.
4. Use the Website Address text box to type in the URL of a site you want to allow.
5. Click Allow. Windows Vista adds the URL to the Allowed Websites list, as shown in Figure 10.7.
FIGURE 10.7 The sites you add appear in the Allowed Websites list.
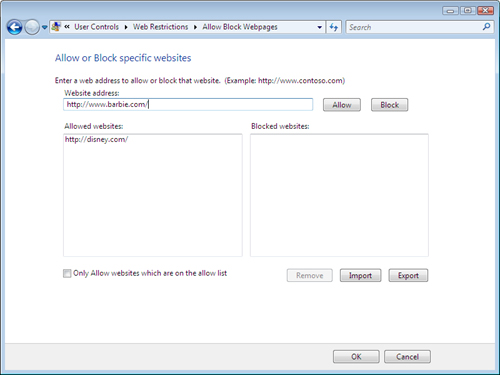
6. Repeat steps 4 and 5 for each site you want to allow.
7. Activate the Only Allow Websites Which Are on the Allow List check box.
8. Click OK to return to the Web Restrictions window.
9. Click OK.
As you can imagine, it’s a tad tedious to enter a bunch of allowed sites by hand. To make your life easier, you can import lists of allowed or blocked sites.
First, create a new text file and change the extension to Web Allow Block List (for example, MyURLs.Web Allow Block List). Open the file and add the following text to start:
<WebAddresses>
</WebAddresses>
Between these lines, add a new line for each site using the following format:
<URL AllowBlock="1">address</URL>
Replace address with the site URL. Here’s an example:
<WebAddresses>
<URL AllowBlock="1">http://www.goodcleanfun.com</URL>
<URL AllowBlock="1">http://www.wholesomestuff.com</URL>
<URL AllowBlock="1">http://www.cuteanimals.com</URL>
<URL AllowBlock="1">http://www.educationalandfun.com</URL>
</WebAddresses>
Follow these steps to import the addresses:
1. In the User Controls window, click Windows Vista Web Filter to display the Web Restrictions window.
2. Click Edit the Allow and Block List link to open the Allow or Block Specific Websites window.
3. Click Import, use the Open dialog box to select the text file, and then click Open. Windows Vista adds the sites to the Allowed Websites list.
4. Click OK to return to the Web Restrictions window.
5. Click OK.
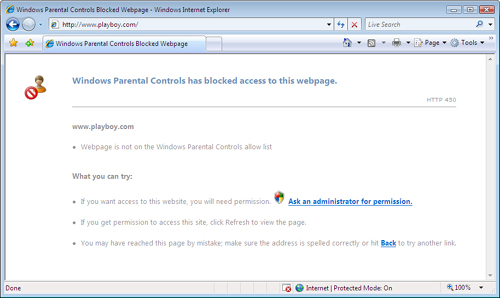
If the child tries to navigate to some other page, he or she sees the message shown in Figure 10.8.
FIGURE 10.8 If a site’s not on the Allowed Websites list, your kid can’t get there from here.
Keep the Online World at Bay by Blocking File Downloads
File downloads on the Web pose a number of problems for young users. The major concern, of course, is that a file might be harboring spyware, a virus, or some other malware. This sort of content shouldn’t make it through Vista’s regular defenses (Internet Explorer protected mode, User Account Control, and Windows Defender), but why take chances? Even if a download is benign, unrestricted downloading could fill up the computer’s hard drive or even incur extra bandwidth charges from your ISP.
To prevent these scenarios, follow these steps to use Parental Controls to prevent a user from downloading any files:
1. In the User Controls window, click Windows Vista Web Filter to display the Web Restrictions window.
2. Activate the Block File Downloads check box.
3. Click OK.
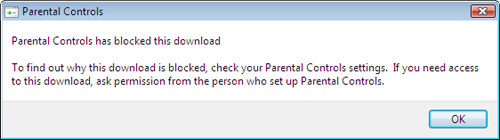
If the user clicks a download link, he or she sees the dialog box shown in Figure 10.9.
FIGURE 10.9 If the child tries to download a file from the web, Parental Controls blocks the download and displays this message.