CHAPTER W4 Customizing Windows Restarts and Shutdowns
Did you know that you can tweak Windows to restart or shut down your PC with just a single mouse click? Did you know that you can shut down any XP or Vista PC from any Windows computer on your network? Did you know that you can tweak the Windows Vista Sleep button so that it shuts down your computer instead of putting it in sleep mode?
If you answered “Nope” to any or all of these seemingly pointless questions, then read on, dear reader, because in this chapter you learn how to do all these things.
One-Click Restarts and Shutdowns
![]()
My admittedly obsessive quest to minimize clicks and keystrokes is a quirk, I know, but it’s a defensible one (I keep telling myself). After all, the fewer mouse and keyboard moves you have to make—particularly when you’re doing day-to-day system drudgery—the more time you have for being a productive member of society.
Unfortunately, this tweak isn’t a great example of this because I’m talking here about reducing the number of clicks it takes to restart and shut down Windows, and how often does anyone do that in the course of a day? Still, I really like this tweak because it just bugs me that it takes three clicks to restart or shut down Windows Vista, and three or four clicks to restart or shut down XP. Bah! In this tweak, you learn how to restart and shut down Windows with just one measly click.
At the heart of this tweak is the SHUTDOWN command, which you can use to restart or shut down your computer (or, as you see a bit later in the “Turn Off Your Windows Computer from Anywhere” section, a remote computer on your network). Here’s the full syntax:
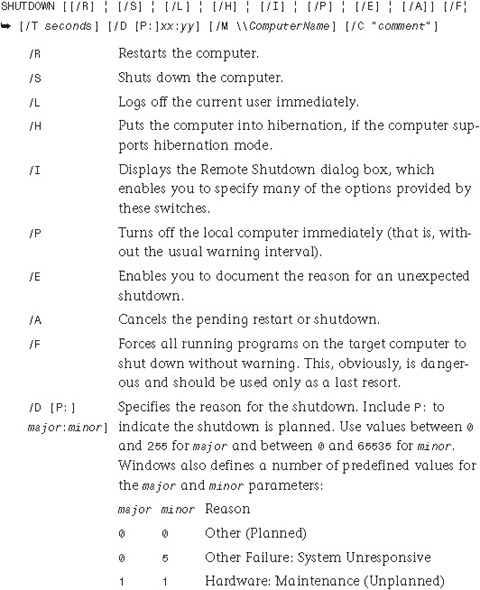
For example, to restart your computer immediately, use the following command:
shutdown /r /t 0
If you’ve launched a restart or shutdown using some nonzero value for /T, and you need to cancel the pending shutdown, run SHUTDOWN with the /A switch before the timeout interval is over:
shutdown /a
Create a Restart Shortcut
Okay, let’s use our newfound knowledge of the SHUTDOWN command to set up Windows with one-click restarts:
1. Right-click an empty section of the desktop, and then select New, Shortcut. The Create Shortcut Wizard appears.
2. In the text box, type shutdown /r /t 0, as shown in Figure W4.1.
FIGURE W4.1 Use shutdown /r /t 0 as the command for your restart shortcut.
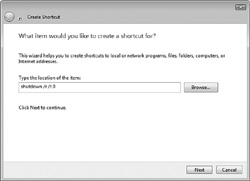
3. Click Next. The Create Shortcut wizard prompts you to enter a name for the shortcut.
4. Type a name (such as The Amazing One-Click Restart Tweak) and then click Finish.
5. Right-click the new shortcut and then click Properties. The shortcut’s property sheet appears.
6. In the Shortcut tab, click Change Icon. Windows tells you that shutdown.exe contains no icons.
7. Click OK. The Change Icon dialog box appears.
8. Click an icon that looks “restart-y” and then click OK.
9. Click OK. Windows applies the new icon to the shortcut.
10. Right-click and drag the shortcut, drop it inside the Quick Launch toolbar, and then click Move Here.
Create a Shutdown Shortcut
I think you know what comes next, right? Follow these very similar steps to add a shutdown shortcut to the Quick Launch toolbar:
1. Right-click an empty section of the desktop, and then select New, Shortcut. The Create Shortcut Wizard appears.
2. In the text box, type shutdown /s /t 0.
3. Click Next. The Create Shortcut wizard prompts you to enter a name for the shortcut.
4. Type a name (such as The Amazing One-Click Shutdown Tweak) and then click Finish.
5. Right-click the new shortcut and then click Properties. The shortcut’s property sheet appears.
6. In the Shortcut tab, click Change Icon. Windows tells you that shutdown.exe contains no icons.
7. Click OK. The Change Icon dialog box appears.
8. Click an icon that looks “shutdown-y” and then click OK.
9. Click OK. Windows applies the new icon to the shortcut.
10. Right-click and drag the shortcut, drop it inside the Quick Launch toolbar, and then click Move Here.
Turn Off Your Windows Computer from Anywhere
![]()
If you’re working at a network computer and you decide you need to shut down or restart your own PC, you can actually do it from your remote location on the network. You can do this either via the command line or via a script, as described in the next two sections.
Remote Shutdowns Using the SHUTDOWN Command
To shut down a remote computer, you must run SHUTDOWN using an account that has administrator privileges on the remote computer. If the logged on user account on your local machine also exists on the remote machine and is a member of the Administrators group, you automatically have sufficient privileges to shut down the remote PC.
You do this by running SHUTDOWN with the following general syntax:
shutdown /s /m \ComputerName
Here, ComputerName is the name of the remote PC. For example, the following command shuts down a remote PC named GAMINGPC:
shutdown /s /m \gamingpc
If the local account you’re logged on with does not exist on the remote computer, or if it does exist but doesn’t have administrator rights, you need to run the SHUTDOWN command using a remote administrator account. This requires you to use the RUNAS command-line tool:
RUNAS /user:ComputerNameUserName cmd
| ComputerName | The name of the remote computer. |
| UserName | The name of the account under which you want to run cmd. |
| cmd | The command you want to run. |
For a remote shutdown, UserName will be a remote administrator-level account and cmd will be the SHUTDOWN command, enclosed in quotation marks. Here’s an example that uses an account named Paul to shut down a remote computer named OFFICEPC in 120 seconds:
runas /user:officepcpaul “shutdown /s /m \officepc /t 120”
When you enter the RUNAS command, Windows prompts you for the account password:
Enter the password for officepcpaul:
Type the password (it doesn’t appear onscreen) and press Enter.
If you need to cancel a pending shutdown on a remote computer, run SHUTDOWN with the /A switch before the timeout interval is over:
runas /user:officepcpaul “shutdown /a /m \officepc”
Remote Shutdowns Using a Script
If you prefer a script to handle this, check out Listing W4.1.
Listing W4.1 A Script That Shuts Down a Remote PC
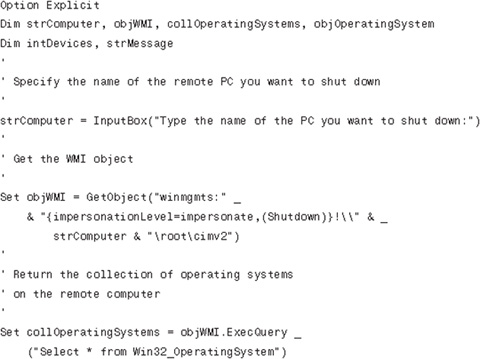
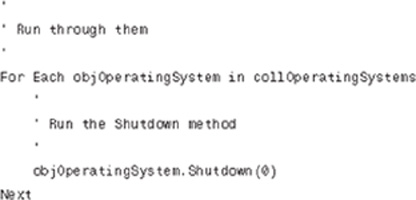
This script first prompts you for the name of the PC you want to shut down, and it then uses WMI to connect to that PC with Shutdown privileges. The WMI object returns the collection of operating systems on the PC (there’s only one), and it then uses the returned operating system object to run the Shutdown method.
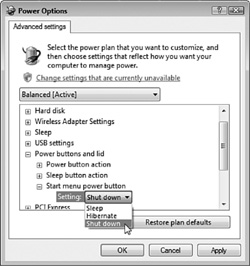
Convert Vista’s Useless Sleep Button into a Shutdown Button

I don’t know about you, but I simply have no use for the Power button that appears on Vista’s Start menu (it’s the button immediately to the right of the Search box). By default, clicking the Power button puts the Vista PC into sleep mode. However, I have all my Vista PCs set up to automatically sleep after an hour of inactivity, so having the Power button initiate sleep mode is redundant. It’s much more convenient to have the Power button do what a Power button should do: Turn off the system.
Here’s how to set that up on your Vista machine:
1. Select Start, type power, and press Enter. Vista displays the Power Options window.
2. Click the Change Plan Settings link under the currently selected power plan. The Edit Plan Settings window appears.
3. Click Change Advanced Power Settings. Vista opens the Power Options dialog box.
4. Open the Power Buttons and Lid branch.
5. Open the Start Menu Power Button branch.
6. In the Setting list, choose Shut Down, as shown in Figure W4.2.
7. Click OK.
FIGURE W4.2 In the Start Menu Power Button setting, choose Shut Down.