
CHAPTER 29 Tightening Network Security
When you join your computer to a network that contains multiple users, your setup is no longer secure. Assuming you’re sharing at least a folder or two, the nature of a network means that other people have access to that information. If you want to control not only who has access to your data, but also what those users can do with the data, you need to implement a few network security precautions. Of course, other users inadvertently seeing data they shouldn’t is one problem, but an outsider gaining unauthorized access to the network is quite another. Fortunately, you can take steps to minimize this sort of intrusion. This chapter takes you through a few useful techniques for securing your network.
Lock Down Network Shares with Advanced Security Permissions
![]()
If your Windows PC is on a network, chances are you want to share at least some of your data with at least some of the users on the network. The big question, however, is how do you do this in a way that’s easy, flexible, and secure? Hah! Pick two, as they say:
• Easy and flexible—Use the Public folder (in Vista) or the SharedDocs folder (in XP) for all your shared data, and allow anyone to access that folder.
• Easy and secure—Use the Public folder (in Vista) or the SharedDocs folder (in XP) for all your shared data, and protect it with a password.
• Flexible and secure—Share your other folders directly, as needed, protect those folders with passwords, and set security permissions on those folders.
Before getting into the details, your first network security chore on any Windows PC should be to enable advanced sharing permissions. By default, Vista and XP use a simplified form of network sharing—it’s called the Sharing Wizard in Vista, and Simple File Sharing in XP—that’s aimed at novice users. If you want secure access to the data you share, you need to disable these brain-dead sharing schemes and use the much more powerful advanced sharing permissions. Here’s how to disable the default sharing schemes:
• Windows Vista—In any folder window, select Organize, Folder and Search Options. In the Folder Options dialog box, click the View tab, deactivate the Use Sharing Wizard check box, and then click OK.
• Windows XP—In any folder window, select Tools, Folder Options. In the Folder Options dialog box, click the View tab, deactivate the Use Simple File Sharing check box, and then click OK.
Easy and Flexible Network Sharing
If the data you want to share doesn’t need to be secure, and you want to share it with anyone on the network without a lot of fuss, you need to implement the easy and flexible sharing solution:
• Windows Vista—You need to store all your shared data in the Public folder, which is located at %SystemDrive%UsersPublic (where %SystemDrive% is the drive where Vista is installed, usually C:). To enable access to this folder, click Start, type network, and then click Network and Sharing Center in the search results. (You can also click the Network icon and then click Network and Sharing Center.) In the Sharing and Discovery section, configure the following options:
Network Discovery—This setting should be On.
File Sharing—This setting should be On.
Public Folder Sharing—This setting should be On. If you don’t want people to make changes to anything in the Public folder, choose the Turn On Sharing So Anyone with Network Access Can Open Files option; otherwise, if you want people to make changes within the Public folder, choose the Turn On Sharing So Anyone with Network Access Can Open, Change, and Create Files option.
Password Protected Sharing—This setting should be Off.
• Windows XP—You need to store all your shared data in the SharedDocs folder, which is located at %SystemDrive%Documents and SettingsAll UsersDocuments (where %SystemDrive% is the drive where Vista is installed, usually C:). To enable access to this folder, select Start, My Computer, right-click Shared Documents, and then click Properties. Click the Sharing tab, click Permissions, and then click Everyone. Click Full Control and then click OK in the open dialog boxes.
Easy and Secure Network Sharing
If the data you want to share needs to be secure, but you don’t want to spend tons of time or effort securing it, you need to implement the easy and secure sharing solution. Note that this solution requires setting up one or more user accounts on your computer for the network users; see “Creating User Accounts for Sharing,” later in this chapter.
Here’s what you do:
• Windows Vista—You need to store all your shared data in the Public folder, which is located at %SystemDrive%UsersPublic (where %SystemDrive% is the drive where Vista is installed, usually C:). To enable secure access to this folder, click Start, type network, and then click Network and Sharing Center in the search results. (You can also click the Network icon and then click Network and Sharing Center.) In the Sharing and Discovery section, configure the following options:
Network Discovery—This setting should be On.
File Sharing—This setting should be On.
Public Folder Sharing—This setting should be On. If you don’t want people to make changes to anything in the Public folder, choose the Turn On Sharing So Anyone with Network Access Can Open Files option; otherwise, if you want people to make changes within the Public folder, choose the Turn On Sharing So Anyone with Network Access Can Open, Change, and Create Files option.
Password Protected Sharing—This setting should be On.
• Windows XP—You need to store all your shared data in the SharedDocs folder, which is located at %SystemDrive%Documents and SettingsAll UsersDocuments (where %SystemDrive% is the drive where Vista is installed, usually C:). To enable secure access to this folder, select Start, My Computer, right-click Shared Documents, and then click Properties. Click the Sharing tab, click Permissions, click Everyone, and then click Remove. For each user you want to access the folder, click Add, type the username, click OK, and then click the permission level: Full Control, Change, or Read.
Flexible and Secure Network Sharing
If the data you want to share needs to be secure, and you want the flexibility of controlling who gets access to it, you need to implement the flexible and secure sharing solution. Note that this solution requires setting up one or more user accounts on your computer for the network users; see “Creating User Accounts for Sharing,” later in this chapter.
Here’s what you do:
• Windows Vista—Open the Network and Sharing Center and set up the Sharing and Discovery settings as described in the previous section. For each folder you want to share, right-click the folder and then click Share. In the Sharing tab, click Advanced Sharing and enter your UAC credentials. Activate the Share This Folder check box and then click Permissions. Click Everyone, and then click Remove. For each user you want to access the folder, click Add, type the username, click OK, and then click the permission level: Full Control, Change, or Read.
• Windows XP—For each folder you want to share, right-click the folder and then click Properties. Click the Sharing tab, click Permissions, click Everyone, and then click Remove. For each user you want to access the folder, click Add, type the username, click OK, and then click the permission level: Full Control, Change, or Read.
Creating User Accounts for Sharing
If you want to use either of the secure sharing solutions, you have to do one of the following:
• Set up separate accounts for each user that you want to access a shared resource—Do this if you want to assign each user a different set of permissions, or if you want the usernames and passwords to match each user’s local username and password.
• Set up a single account for all remote users to use—Do this if you want to assign the same set of permissions for all users.
Here are some notes to bear in mind for creating users who will access your computer over a network:
• Windows does not allow users without passwords to access network resources. Therefore, you must set up your network user accounts with passwords.
• The usernames you create do not have to correspond with the names that users have on their local machines. You’re free to set up your own usernames, if you like.
• If you create a user account that has the same name and password as an account of a user on his or her local machine, that user will be able to access your shared resources directly. Otherwise, a Connect To dialog box appears so that the user can enter the username and password that you established when setting up the account on your computer.
Hide Your Shared Folders
![]()
Setting up user accounts with strong passwords and then applying shared-folder permissions on those accounts are the necessary network security tasks, and in most small networks they’re also sufficient for achieving a decent level of security. However, when it comes to securing your network, a healthy dose of paranoia is another good “tool” to have at hand. For example, the properly paranoid network administrator doesn’t assume that no one will ever infiltrate the network, just the opposite: The admin assumes that someday someone will get access, and then he or she wonders what can be done in that case to minimize the damage.
One of the first things these paranoid administrators do (or should do) is hide what’s valuable, private, or sensitive. For example, if you have a shared folder named, for instance, Confidential Documents, you’re simply begging a would-be thief to access that share. Yes, you could rename the share to something less inviting, but the thief may chance upon it anyway. To prevent this, it’s possible to share a resource and hide it at the same time.
Even better, hiding a shared folder is also extremely easy to do, as you will see in the following sections.
Hide a Shared Folder in Windows Vista
Here are the steps to follow to hide an existing shared folder in Windows Vista:
1. In Windows Explorer, select the shared folder you want to hide.
2. Click the Share button in Vista’s task pane.
3. Click Advanced Sharing. The User Account Control dialog box appears.
4. Enter your UAC credentials to continue. The Advanced Sharing dialog box appears.
5. Click Add to open the New Share dialog box.
6. Use the Share Name text box to type the name you want to use, followed by $, and then click OK.
7. In the Share Name list, select the old share name.
8. Click Remove.
9. Click OK.
Hide a Shared Folder in Windows XP
To hide an existing shared folder in Windows XP, follow these steps:
1. In Windows Explorer, select the shared folder you want to hide.
2. Click the Share This Folder link. Windows Vista displays the object’s Properties sheet with the Sharing tab selected.
3. Add a dollar sign ($) to the end of the share name.
4. Click OK.
Viewing a Hidden Share
Adding $ to the end of the share name prevents the resource from appearing in the list of resources when you open a remote computer from the Network windows (Vista) or the My Network Places window (XP). The shared resource also doesn’t show up when you type net view \computer at the command prompt, where computer is the name of the remote PC.
How do you connect to a hidden share? You need to know the name of the shared resource, of course, which enables you to use any of the following techniques:
• In the Run dialog box, type the network path for the hidden resource, and click OK. For example, to display the hidden share F$ on OfficePC, you’d enter this:
\officepcf$
• In a command prompt session, type start, a space, the network path, and then press the Enter key. For example, to launch the hidden share F$ on OfficePC, you would enter this:
start \officepcf$
• Select Start, right-click Computer (in Vista) or My Computer (in XP), and then click Map Network Drive. In the Map Network Drive dialog box, type the UNC path for the hidden share in the Folder text box.
Disable the Hidden Administrative Shares
![]()
I mentioned in the previous tweak that you can add $ to a share name to hide the share, and that it was a good idea to also modify the share name to something not easily guessable by some snoop. Note, however, that Windows sets up certain hidden shares for administrative purposes, including one for drive C: (C$) and any other hard disk partitions you have on your system. Windows Vista also sets up the following hidden shares:
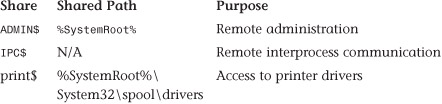
To see these shares, open a command prompt session, type net share, and press Enter. In Vista you see a listing like this (the XP listing is similar):
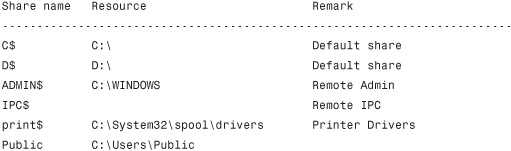
So although the C$, D$, and ADMIN$ shares are otherwise hidden, they’re well known, and they represent a small security risk should an intruder get access to your network.
To close this hole, you can force Windows to disable these shares. Here are the steps to follow:
1. Run the Registry Editor.
• To learn how to use the Registry Editor, see Chapter 34, “Tweaking Windows with the Registry Editor,” p. 401.
2. Open the HKEY_LOCAL_MACHINE branch.
3. Open the SYSTEM branch.
4. Open the CurrentControlSet branch.
5. Open the Services branch.
6. Open the LanmanServer branch.
7. Select the Parameters branch.
8. Select Edit, New, DWORD (32-bit) Value. Windows adds a new value to the Parameters key.
9. Type AutoShareWks and press Enter. (You can leave this setting with its default value of 0.)
10. Restart Windows to put the new setting into effect.
Again, select Start, All Programs, Accessories, Command Prompt to open a command prompt session, type net share, and press Enter. The output now looks like this:

Remove Stored Remote Desktop Credentials
![]()
When you log on to a network computer using Remote Desktop Connection as described in see Chapter 30, “Making Remote Connections”), you have the option of saving your credentials:
• Windows Vista—The Vista logon dialog box includes a check box named Remember My Credentials.
• Windows XP—The General tab of the Remote Desktop Connection dialog box (select Start, All Programs, Accessories, Remote Desktop Connection) has a check box named Allow Me to Save Credentials. (You may need to click the Options button to see it.) If you activate this check box, the logon dialog box includes a check box named Remember My Password.
If you activate either the Remember My Credentials or Remember My Password check box, Windows won’t prompt you to enter a password when you connect to the computer in the future.
• To learn how to log on with Remote Desktop Connection, see “Connect to a Remote Desktop,” p. 350.
That’s certainly convenient, but it’s a gaping security hole because it enables anyone who can access your computer to also access the remote computer’s desktop. Therefore, it’s never a good idea to activate the Remember My Credentials (or Remember My Password) check box.
However, what if you activated that option earlier? Fortunately, you’re not stuck because Windows gives you a way to “unremember” those credentials.
Here are the steps to follow:
1. Open the Run dialog box, type control userpasswords2, and select OK.
2. (Windows Vista only) Enter your User Account Control credentials to continue.
3. In the User Accounts dialog box, select the Advanced tab.
4. Click Manage Password. Windows displays the Stored User Names and Passwords dialog box, shown in Figure 29.1.
FIGURE 29.1 If you save your Remote Desktop Connection logon credentials, they appear in the Stored User Names and Passwords dialog box.
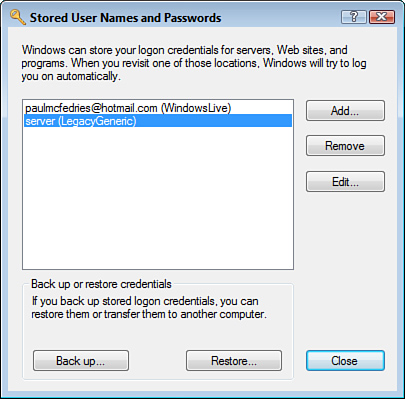
5. Select the Remote Desktop Connection credentials you want to delete.
6. Click Remove. Windows tells you that the logon information will be deleted.
7. Click OK.
8. Repeat steps 6–8 to remove other saved credentials.
9. Click Close.