
CHAPTER W2 Dealing with Devices
The name of this chapter is “Dealing with Devices,” but of course we never deal with our devices directly. Instead, we delegate that job to Windows, and it takes care of the behind-the-scenes dirty work of getting myriad devices to do we want them to do (or, at least, what they’re supposed to do).
So we always seem to deal with our devices from a certain distance, sometimes frustratingly so. I hope the tweaks in this chapter will give you a greater sense of connection to your devices or, if that’s too much to ask, that they’ll at least help you out of a jam or two.
Reprogram a Key on Your Keyboard
![]()
When you press a key on your keyboard, the device generates a number that’s unique to the key and transmits that number to Windows via the keyboard device driver. When Windows gets the number, it translates that value into the actual keypress and then performs whatever makes sense in the context (such as adding a letter to a text document).
This unique number that the keyboard generates for each key is called a scancode. Interestingly, you can tweak Windows so that it interprets a particular scancode in a different way.
For example, if your keyboard doesn’t have a Windows Logo key, you can remap an existing key to act as a Windows Logo key. Similarly, if you never use Caps Lock, you can reprogram it to act as some other key (such as the lowercase A, which effectively eliminates long runs of uppercase letters thanks to an accidental press of Caps Lock). Finally, if you have a nonfunctioning key, you might also want to remap some little-used key to generate the character associated with the nonfunctioning key.
The trick in each case is to tell Windows to take the built-in scancode of an existing key and convert it to the scancode associated with another key. For example, suppose you want to reprogram the right Alt key to act like the Windows Logo key. When you press right Alt, the hexadecimal scancode E038 is generated. The scancode associated with the right Windows Logo key is E05C. Therefore, you need to tell Vista that whenever it detects the scancode E038 after a right Alt keypress, it should send to the system the code E05C, instead. This means that pressing the right Alt key will be the same thing as pressing the Windows Logo key.
To do this, open the Registry Editor and navigate to the following key:
HKLMSYSTEMCurrentControlSetControlKeyboard Layout
Select, Edit, New, Binary Value, type Scancode Map, and press Enter. The Scancode Map setting uses the following structure:
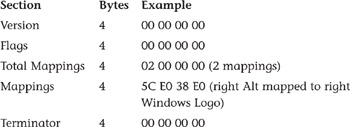
Note that some of these values are a bit odd because they reverse the order of the bytes. For example, you enter the hexadecimal value E05C as 5C E0.
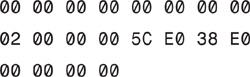
If you’re remapping just one key, set the total mappings to 2 (including the null terminator). For example, the following Scancode Map value remaps right
Alt to right Windows Logo:
To add more mappings, adjust the total mappings value and add the mappings between the Total Mappings section and the Terminator section. For example, the following Scancode Map value remaps right Alt to right Windows Logo and Caps Lock (scancode 3A) to the letter A (scancode 1E):
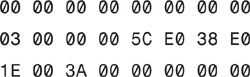
Figure W2.1 shows how this looks in the Edit Binary Value dialog box. You need to reboot your computer to put the new key mapping into effect.
FIGURE W2.1 This Scancode Map value remaps right Alt to right Windows Logo and Caps Lock to lowercase A.
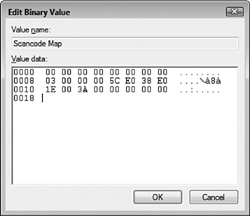
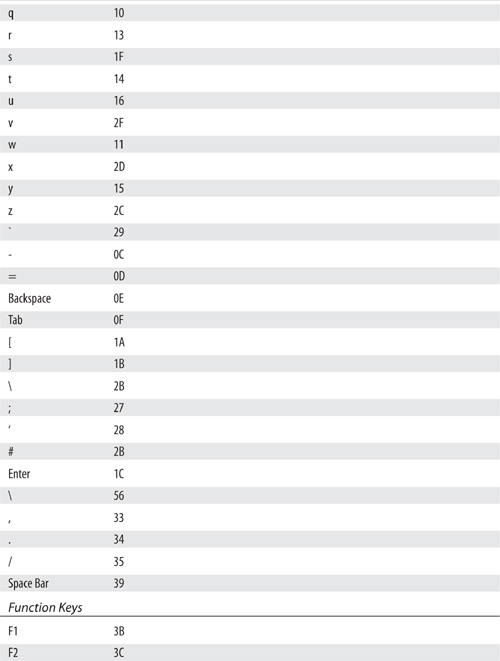
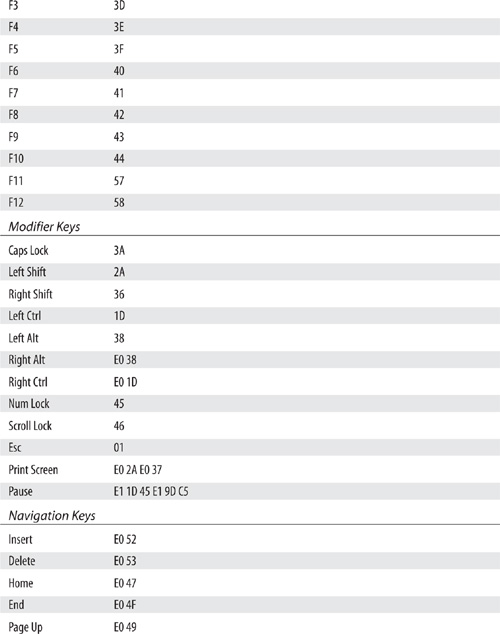
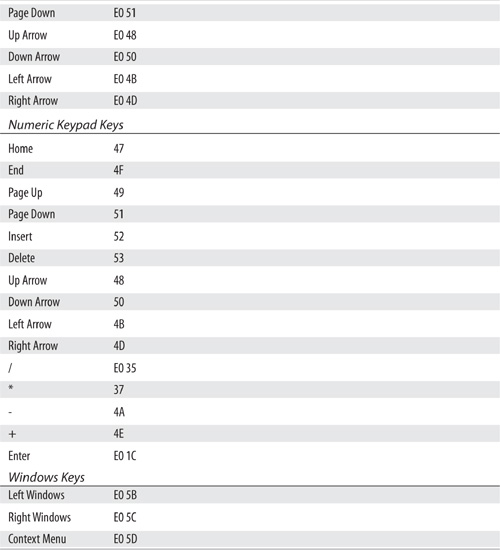
Table W2.1 lists the standard keyboard scancodes.
Table W2.1 Standard Keyboard Scancodes

Display a List of Nonworking Devices
![]()
Device Manager not only provides you with a comprehensive summary of your system’s hardware data, it also doubles as a decent troubleshooting tool. That’s because Device Manager uses three icons to give you an indication of the device’s current status:
• A black exclamation mark (!) on a yellow field tells you that there’s a problem with the device.
• A red X tells you that the device is disabled or missing.
• A blue i on a white field tells you that the device’s Use Automatic Settings check box (on the Resources tab) is deactivated and that at least one of the device’s resources was selected manually. Note that the device might be working just fine, so this icon doesn’t indicate a problem. If the device isn’t working properly, however, the manual setting might be the cause. (For example, the device might have a DIP switch or jumper set to a different resource.)
That’s great, but it’s not always convenient to fire up Device Manager to check for problems. To avoid that, use the script in Listing W2.1, which displays a list of all the problem devices on your system.
Listing W2.1 A Script That Displays a List of a PC’s Nonworking Devices
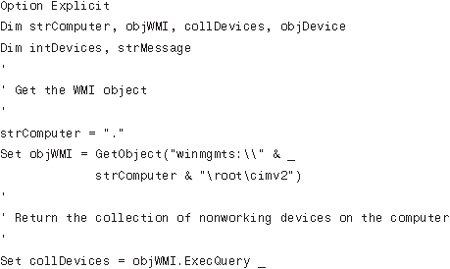
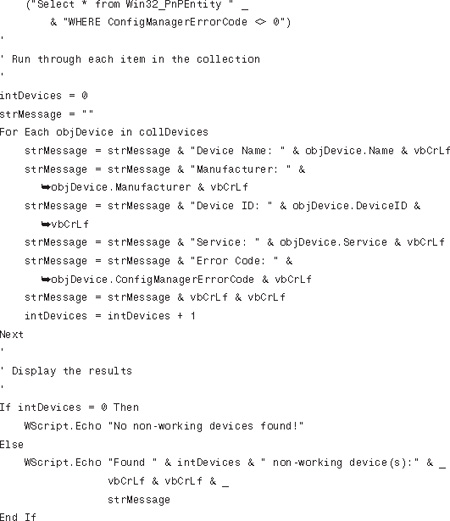
The script sets up the Windows Management Instrumentation (WMI) object and then uses WMI to return the collection of nonworking devices (that is, where the device’s ConfigManagerErrorCode property isn’t 0). A For Each...Next loop goes through each device and stores various data about the device to a string variable, including the device name and ID, and the error code. The script then displays the results, and Figure W2.2 shows an example.
FIGURE W2.2 Sample output from the script in Listing W2.1.
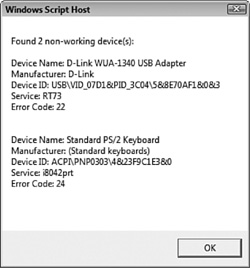
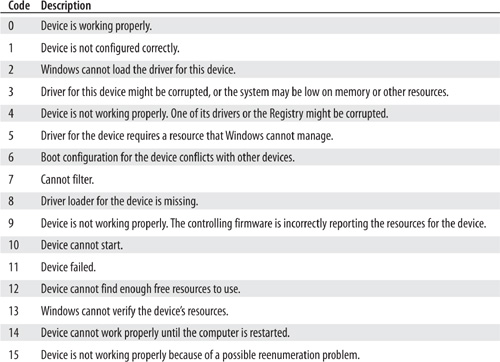
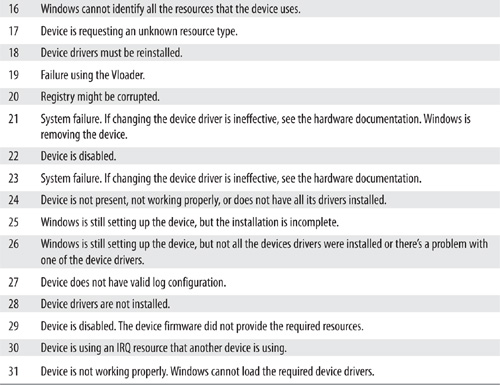
Table W2.2 lists the various error codes and what they mean.
Table W2.2 Error Codes for Nonworking Devices
Show Nonpresent Devices in Device Manager
![]()
When you open Device Manager (in Vista, select Start, type device, press Enter, and enter your UAC credentials; in XP, select Start, Run, type devmgmt.msc, and click OK), the list of devices you see includes only Plug and Play devices. If you have any non-Plug and Play devices that you want to work with, select View, Show Hidden Devices.
That works, but it doesn’t mean that Device Manager is now showing all your devices. If you have any devices that you’ve installed in Windows, but that you regularly connect and then disconnect (such as a USB digital camera), Device Manager won’t show them. (Windows describes such devices as ghosted devices.) That makes a bit of sense, because it might be confusing to see nonconnected hardware in Device Manager.
However, what if you’re having a problem with a ghosted device? For example, suppose Windows hangs or crashes every time you connect such a device. Ideally you’d like to use Device Manager to uninstall that device, but you can’t because Windows goes belly-up whenever you connect the nasty thing. What do to?
The solution to this kind of problem is to force Device Manager to show ghosted devices. Here’s how:
1. In Vista, select Start, type command, and then click Command Prompt; in XP, select Start, Run to open the Run dialog box, type cmd, and then click OK. Windows launches a new Command Prompt session.
2. Type the following command and then press Enter:
set devmgr_show_nonpresent_devices=1
3. Type the following command and then press Enter to launch Device Manager:
devmgmt.msc
4. In Device Manager, select View, Show Hidden Devices. Device Manager adds to the device list any ghosted devices that are installed on your PC.