CHAPTER 2 Crucial Security Tweaks
Do you want your computer to be perfectly secure? Sure, no problem! Just follow my simple four-step plan:
• Never connect your computer to the Internet.
• Don’t install any programs on your computer.
• Don’t let anyone else work with or even look at your computer.
• Burglar-proof your home or office.
I kid, of course, because the truth is that if you want to use your computer (and live your life) in an even remotely normal way, you open up your machine to security risks.
That may sound like a bleak assessment, but the upside of all this is that it doesn’t take a ton of effort on your part to turn your computer into a maximum security area. The security tweaks in this chapter will help you toward that goal, but first make sure you’ve nailed down the basics:
• Leave User Account Control turned on—Yes, I know Vista’s UAC is a hassle. However, UAC is the best thing that’s happened to Windows security in a long time, and it’s a fact of life that your computer is much more secure when UAC has your back.
• Be paranoid—The belief that everyone’s out to get you may be a sign of trouble in the real world, but it’s just common sense in the computer world. Assume someone will sit down at your desk when you’re not around; assume someone will try to log on to your computer when you leave for the night; assume all uninvited email attachments are viruses; assume unknown websites are malicious; assume any offer that sounds too good to be true probably is.
• Keep to yourself—We all share lots of personal info online these days, but there’s sharing and then there’s asking-for-trouble sharing. Don’t tell anybody any of your passwords. Don’t put your email address online unless it’s disguised in some way (for example, by writing it as username at yourdomain dot com). Don’t give out sensitive personal data such as your social security number, bank account number, or even your address and phone number (unless making a purchase with a reputable vendor). Only give your credit card data to online vendors that you trust implicitly or, even better, get a secure PayPal account and use that instead.
• Assume the worst—Back up your data regularly, keep your receipts, keep all email correspondence, and read the fine print.
With these basics down pat, you’re now ready to take Windows security to the next level, and the following tweaks will help you do just that.
Thwart Snoops by Locking Your Computer
![]()
In Chapter 7, “Keeping the Bad Guys at Bay,” you learn a few more security tweaks, including important measures such as advanced file permissions and encryption. These two features are great, but they each have one small flaw: They rely on the assumption that after you’ve entered a legitimate username and password to log on to your Windows user account, only you will use your computer. This means that after you log on, you become a “trusted” user and you have full access to your files, even if they’re protected by permissions and encryption.
This is certainly reasonable on the surface. After all, you wouldn’t want to have to enter your account credentials every time you want to open, edit, create, or delete a document. So while you’re logged on and at your desk, you get full access to your stuff.
But what happens when you leave your desk? If you remain logged on to Windows, any other person who sits down at your computer can take advantage of your trusted-user status to view and work with secure files (including copying them to a USB flash drive inserted by the snoop). This is what I mean by permissions and encryption having a flaw, and it’s a potentially significant security hole in large offices where it wouldn’t be hard for someone to pull up your chair while you’re stuck in yet another meeting.
One way to prevent this would be to turn off your computer every time you leave your desk. That way, any would-be snoop would have to get past your login to get to your files. This, obviously, is wildly impractical and inefficient.
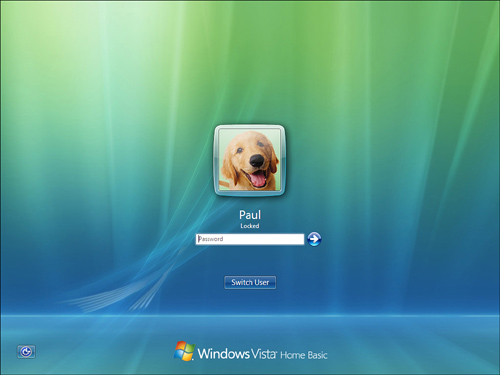
Is there a better solution? You bet: You can lock your system before leaving your desk. Anyone who tries to use your computer must enter your password to access the Windows desktop.
Windows gives you three ways to lock your computer before heading off:
• In Windows Vista, click Start and then click the Lock icon.
• In Vista or XP, press Windows Logo+L.
• In Vista or XP, press Ctrl+Alt+Delete and then click Lock Computer.
Whichever method you use, you end up at the Windows logon screen. Figure 2.1 shows the Vista logon screen. Note that is says Locked under your username.
FIGURE 2.1 You see a screen similar to this when you lock your Vista computer.
Start Your Computer More Securely
![]()
Protecting your Windows user account with a password is an excellent idea, and in Chapter 13, “Crucial Password Hacks,” you learn how to create a strong password that is all but unbreakable.
• See “Bulletproof Your Password,” p. 146.
Having a sturdy password barrier is crucial for keeping snoops at bay, but unfortunately it’s not foolproof. Crackers—hackers who use their skills for nefarious ends—are an endlessly resourceful bunch, and some of the smarter ones figured out a way to defeat the user account password system. The trick is that they install a virus or Trojan horse program, usually via an infected email message or malicious website, that loads itself when you start your computer. This program then displays a fake version of the Windows logon screen. When you type your username and password into this dialog box, the program records it and your system security is compromised.
To thwart this clever ruse, Windows enables you to configure your system so that you must press Ctrl+Alt+Delete before you can log on. This key combination ensures that the authentic logon screen appears.
To configure Windows to require that you press Ctrl+Alt+Delete before you can log on, follow these steps:
1. Display the Run dialog box.
2. Type control userpasswords2 and then click OK. (In Vista, you need to enter your UAC credentials to continue.) The User Accounts dialog box appears.
3. Display the Advanced tab.
4. Activate the Require Users to Press Ctrl+Alt+Delete check box, as shown in Figure 2.2.
FIGURE 2.2 For a secure startup, activate the Require Users to Press Ctrl+Alt+Delete check box.

5. Click OK.
Take Steps to Thwart Crackers
![]()
Crackers, as I mentioned in the previous section, are hackers who have succumbed to the Dark Side of the Force. Their specialty is breaking into systems (“cracking” system security, hence the name), and at any given time hundreds, perhaps even thousands, of crackers roam cyberspace looking for potential targets. If you’re online right now, the restless and far-seeing eyes of the crackers are bound to find you eventually.
Sounds unlikely, you say? You wish. The crackers are armed with programs that automatically search through millions of IP addresses (the addresses that uniquely identify any computer or device connected to the Internet). The crackers are specifically looking for computers that aren’t secure, and if they find one they’ll pounce on it and crack their way into the system.
Again, if all this sounds unlikely or that it would take them forever to find you, think again. Tests have shown that new and completely unprotected systems can get cracked within 20 minutes of connecting to the Internet!
Fortunately, keeping crackers away from your computer isn’t hard, but it does require a bit of effort up front. Here are the main things you need to do:
• Fire up the firewall—The first and by far the most important thing you need to do to thwart crackers is to have a software firewall running on your computer. A firewall is a security feature that blocks unauthorized attempts to send data to your computer. The best firewalls completely hide your computer from the Internet, so those dastardly crackers don’t even know you’re there! The Windows Firewall is turned on by default, but you should check this, just to be safe. Open the Run dialog box, type firewall.cpl, and click OK. If the firewall is off, turn it on immediately.
• Test the firewall—A firewall’s not much good if it leaves your computer vulnerable to attack, so you should test the firewall to make sure it’s doing its job. I show you several ways to do this in Chapter 8, “Configuring Internet Security.”
• See “Make Sure Your Firewall Is Up to Snuff,” p. 84.
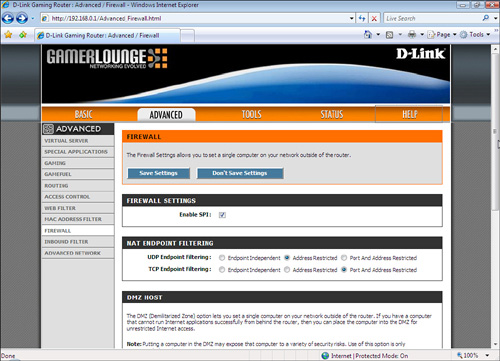
• Take advantage of your router’s firewall, too—Why have one line of defense when in all probability you can have two! If your network has a router and that router connects to the Internet, then it, too, has an IP address that crackers can scan for vulnerabilities, particularly holes that expose your network. To prevent this, most routers come with built-in hardware firewalls that provide robust security. Access your router’s setup pages, locate the firewall settings (see Figure 2.3 for an example), and then make sure the firewall is turned on.
FIGURE 2.3 If your network has a router, make sure its firewall is turned on.
• Set up real-time spyware protection—A firewall does you no good whatsoever if a spyware or other malware program sneaks through the front door when you install a program or access a malicious website. This can happen to anyone, so your next line of defense is a top-of-the-line antispyware program, such as Windows Defender, which comes with Vista. Whichever program you use, make sure its real-time protection feature is activated, which prevents any spyware that sneaks through from being installed. For Windows Defender, select Start, All Programs, Windows Defender, click Tools, click Options, and then make sure the Use Real-Time Protection check box is activated.
• Update, update, update—Many crackers take advantage of known Windows vulnerabilities to compromise a system. To avoid this, keep your PC updated with the latest patches, fixes, and service packs, many of which are designed to plug security leaks.
• Turn off file sharing—If you never need to access your computer’s resources from the network, you can bump up your anticracker security measures a notch by turning off file sharing on your computer. This way, even if a cracker somehow gained access to your network, you won’t be exposing any resources. Here’s how to turn off file sharing:
Windows Vista—Click the Network icon in the notification area and then click Network and Sharing Center. In the Sharing and Discovery Center, turn off File Sharing, Public Folder Sharing, Password Protected Sharing, and, while you’re at it, Network Discovery (see Figure 2.4). In each case, click the current setting (usually On), click the option that turns off the setting, click Apply, and then enter your UAC credentials.
FIGURE 2.4 If you don’t need to share resources with your network, turn off all Vista networking sharing features.

Windows XP—Select Start, All Programs, Accessories, Communications, Network Connections. In the Network Connections window, double-click the connection (usually named either Local Area Connection or Wireless Network Connection) to open its property sheet, display the General tab, and then deactivate the File and Printer Sharing for Microsoft Networks check box.
Take Steps to Thwart Viruses
![]()
It’s an unfortunate fact that more ways exist than ever for your PC to contract a virus: malicious websites, infected program downloads, and, most often these days, infected email file attachments. In the last case, the virus shows up as a message attachment, usually from someone you know, and when you open the attachment, the virus infects your computer. In most cases, the virus then does what viruses do: It propagates by making copies of itself using your email program and your address book to ship out messages with more copies of the virus attached. The nastier viruses also mess with your computer by deleting data or corrupting files, or they install a Trojan Horse program, which enables a remote cracker to control your computer (turning it into a zombie PC).
Viruses are a plague upon the Earth, for sure, but if you practice safe computing, chances are that your machine will never get infected. What do I mean by safe computing? That you follow a few common sense procedures and configure Windows to ensure that viruses can’t get a foothold in your system:
• Never, I repeat, never open an attachment that comes from someone you don’t know. There may be an excellent reason that a perfect stranger is sending you a file, but that’s none of your concern. Delete the message with extreme prejudice. (To be safe, permanently delete the message by pressing Shift+Delete.)
• Even if you know the sender, if the attachment isn’t something you’re expecting, assume that the sender’s system is infected. Write back and ask the sender to confirm that he or she emailed the message.
• Some viruses come packaged as scripts hidden within messages that use the Rich Text (HTML) format. This means that the virus can run just by viewing the message in the preview pane! If a message looks suspicious, don’t open it; just delete it. Note that you’ll need to turn off your email program’s preview pane before deleting the message. Otherwise, when you highlight the message, it appears in the preview pane and sets off the virus.
• What if you think the message is okay, but you’re not completely sure? In that case, you need to switch your email program to read messages in plain text, which ensures that any malicious scripts won’t run. Here’s how:
Windows Mail and Outlook Express—Select Tools, Options, click the Read tab, and then activate the Read All Messages in Plain Text check box.
Outlook 2007—Select Tools, Trust Center, click E-mail Security, and then activate the Read All Standard Messages in Plain Text check box.
Outlook 2003—Select Tools, Options, click the Preferences tab, click E-mail Options, and then activate the Read All Standard Messages in Plain Text check box.
• Install a top-of-the-line antivirus program, particularly one that checks incoming email. In addition, be sure to keep your antivirus program’s virus list up to date. As you read this, there are probably dozens, maybe even hundreds, of morally challenged scumnerds designing even nastier viruses. Regular updates will help you keep up. Here are some security suites to check out:
Norton Internet Security (www.symantec.com/index.jsp)
McAfee Internet Security Suite (http://mcafee.com/us)
Avast! Antivirus (www.avast.com)
AVG Internet Security (http://free.grisoft.com/)
• Make sure that the built-in virus protection features found in Windows Mail and Outlook Express are turned on. Select Tools, Options, and then click the Security tab. There are three virus protection settings:
Select the Internet Explorer Security Zone to Use—Internet Explorer implements different security zones, which are customized security settings for things like Internet sites and sites on your local network. From an email perspective, you use the security zones to determine whether to allow active content (such as scripts and ActiveX controls) inside an HTML-format message to run. In particular, the Restricted Sites Zone disables all active content, so make sure this option is activated.
Warn Me When Other Applications Try to Send Mail as Me—As I mentioned earlier, it’s possible for programs and scripts to send email messages without your knowledge. With this check box activated, Windows displays a warning dialog box when a program or script attempts to send a message behind the scenes.
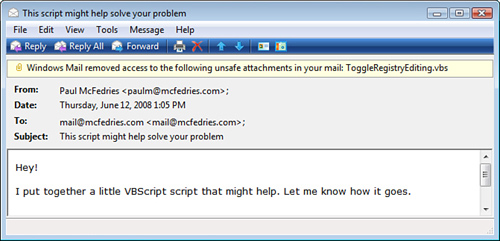
Do Not Allow Attachments to Be Saved or Opened That Could Potentially Be a Virus—With this check box activated, the email program monitors attachments to look for file types that could contain viruses or destructive code. If it detects such a file, it disables your ability to open and save that file, and it displays a note at the top of the message to let you know about the unsafe attachment, as shown in Figure 2.5.
FIGURE 2.5 If Windows Mail or Outlook Express detects an unsafe file attachment, it displays a notice at the top of the message to let you know that you can’t open the file.