
CHAPTER 23 Handy File and Folder Tweaks
File and folder chores are among the most common day-to-day activities in Windows, but they rarely pay the bills. To free up time for more productive pursuits, it helps to know your way around the file system. This chapter will help by showing a few tweaks that should speed up some file and folder chores and solve some file system problems. Don’t forget to also check out the next few chapters, too, which supply you with handy tweaks related to disk drives, searching, backups, and customizing the Windows file system.
Delete the Oldest Files in a Folder
![]()
Files have a way of sneakily adding up to significant chunks of disk real estate over time. For example, I use QuickBooks to manage my business and personal finances, and every time I make changes to my accounts, I make a backup copy of the company files. I save these backups in a separate folder, and I give each backup file a unique name so that I always have multiple backups should anything go wrong. A while back I happened to open that folder and was shocked to find that all those backup files had carved out well over 1GB of disk space!
The normal solution in such cases is to delete the oldest files because they are the least likely to be useful. However, that means sorting the folder on the Date Modified property, selecting the oldest files, deleting them, and then perhaps repeating the procedure if the remaining files still take up too much disk space.
This isn’t an onerous task, but it seems like much more work than it needs to be. In other words, this calls for a script! Listing 23.1 presents a script I wrote that examines a folder to see if it’s over a certain size. If it is, the script deletes the oldest files until the size is below the threshold.
Listing 23.1 A Script That Deletes the Oldest Files from a Folder Until That Folder Is Below a Specified Size
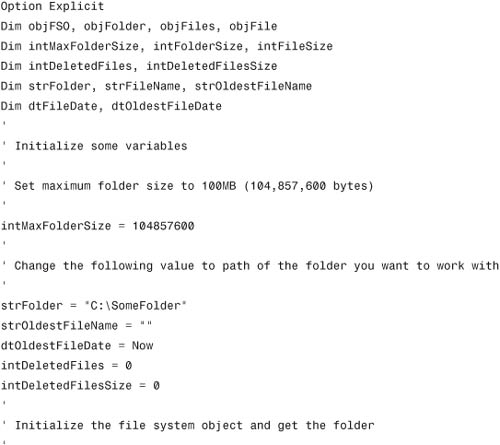

The script begins by initializing a few variables. In particular, it sets the intMaxFolderSize variable to 104857600, which is the number of bytes in 100MB. The VBScript file system works in bytes, so we need to convert megabytes to bytes. The script also initializes the strFolder variable to the full path of the folder you want to work with. Remember to change both variables to suit your needs.
The script initializes the VBScript FileSystemObject, stores the folder in the objFolder variable, and then uses the Size property to get the total size of the folder. The script then runs a Do While loop, which loops as long as the size of the folder (intFolderSize) is larger than the maximum folder size we want.
Inside the loop, the script gets the collection of files using the Files property, and then runs through the collection. Each time a file’s date is older than the currently oldest date, the script makes note of the file’s path, date, and size. When the For Each...Next loop is done, we have the oldest file in the folder, so the script uses the DeleteFile method to delete it.
Rename Multiple Files in One Fell Swoop
![]()
In a Command Prompt session, you use the REN (or RENAME) command to change the name of one or more files and folders. Here’s the syntax:
REN old_filename1 new_filename
old_filename The original filename
new_filename The new filename
For example, the following command renames Budget 2008.xlsx to Budget 2009.xlsx:
ren "Budget 2008.xlsx" "Budget 2009.xlsx"
A simple file or folder rename such as this probably isn’t something you’ll ever fire up a command-line session to do because renaming a single object is faster and easier in Windows Explorer. However, the real power of the REN command is that it accepts wildcards in the file specifications. This enables you to rename several files at once, something you can’t do in Windows Explorer.
For example, suppose you have a folder full of files, many of which contain 2008 somewhere in the filename. To rename all those files by changing 2008 to 2009, you’d use the following command:
ren *2008* *2009*
Similarly, if you have a folder full of files that use the .htm extension and you want to change each extension to .asp, you’d use the following command:
ren *.htm *.asp
Note that for these multiple-file renames to work, in most cases the original filename text and the new filename text must be the same length. For example, digital cameras often supply photos with names such as img_1234.jpg and img_5678.jpg. If you have a number of related photos in a folder, you might want to give them more meaningful names. If the photos are from a vacation in Rome, you might prefer names such as Rome_Vacation_1234.jpg and Rome_Vacation_5678.jpg. Unfortunately, the REN command can’t handle this. However, it can rename the files to Rome1234.jpg and Rome5678.jpg:
ren img_* Rome*
The exception to the same length rule is if the replacement occurs at the end of the filenames. For example, the following command renames all files with the .jpeg extension to .jpg:
ren *.jpeg *.jpg
Open a Folder at the Command Prompt
![]()
When you’re working in Windows Explorer, you might find occasionally that you need to do some work at the command prompt. For example, the current folder might contain multiple files that need to be renamed—a task that, as you saw in the previous tweak, is most easily done within a command-line session. Selecting Start, All Programs, Accessories, Command Prompt starts the session in the %UserProfile% folder, so you have to use one or more CD (change directory) commands to get to the folder you want to work in.
This is, of course, way too much work, but we can tweak Windows to make life easier. The secret behind this is that Windows keeps tracks of hundreds of different file types, from text documents to bitmap images to Excel workbooks. Each of these file types comes with one or more defined actions, which are tasks that you can perform with a file of that type. For example, most file types have actions named Open (to open the file in its associated application) and Print (to print the file using its associated application).
Windows has a Folder file type that, naturally, deals with folders. So our tweak here is to create a new action for the Folder file type that launches the command prompt and automatically displays the current Windows Explorer folder. This is one of the rare tweaks that’s actually quite a bit easier in XP than in Vista, so I’ll handle them separately.
Tweaking XP to Open a Folder at the Command Prompt
Here are the steps to follow in Windows XP:
1. In Windows Explorer, select Tools, Folder Options to display the Folder Options dialog box.
2. Select the File Types tab.
3. In the Registered File Types list, select Folder.
4. Click Advanced to display the Edit File Type dialog box.
5. Click New to display the New Action dialog box.
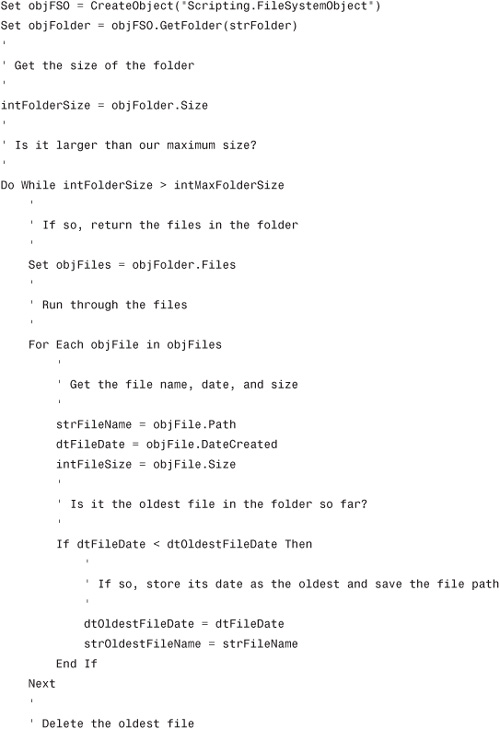
6. Type Open &With Command Prompt in the Action text box (note that the letter W is the accelerator key).
7. In the Application Used to Perform Action text box, type the following:
cmd.exe /k cd "%L"
8. Figure 23.1 shows a completed dialog box. Click OK when you’re done. Windows XP adds your new action to the Folder type’s Actions list.
FIGURE 23.1 Use the New Action dialog box to define a new action for the file type.
9. Click Close.
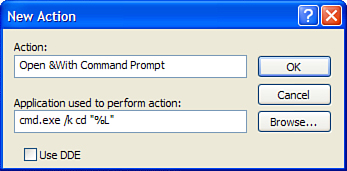
In Figure 23.2, I right-clicked a folder. Notice how the new action appears in the shortcut menu.
FIGURE 23.2 The new action appears in the file type’s shortcut menu.
Tweaking Vista to Open a Folder at the Command Prompt
Here are the steps to follow in Windows Vista:
1. Select Start, type regedit, press Enter, and then provide your UAC credentials to open the Registry Editor.
2. Navigate to the HKCRFolder key.
3. Open the key and click the shell branch.
4. Select Edit, New, Key, type Open with Command Prompt, and press Enter.
5. Select Edit, New, Key, type command, and press Enter.
6. In the command branch, double-click the Default value to open the Edit String dialog box.
7. Type the following:
cmd.exe /k cd "%L"
8. Click OK. Figure 23.3 shows the Registry Editor with the new Open with Command Prompt action added to the HKCRFoldershell key.
In Figure 23.4, I right-clicked a folder, and you can see that the new action appears in the shortcut menu.
FIGURE 23.3 In Vista, modify the HKCRFoldershell key to define a new action for the Folder file type.
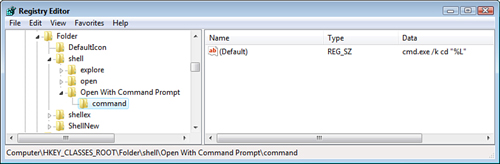
FIGURE 23.4 After you add the new action to the Folder file type’s shell key, the action appears in the Folder file type’s shortcut menu.

Fix Permission Problems by Taking Ownership of Your Files
![]()
When you’re working in Vista or XP, you may have trouble with a folder (or a file) because Windows tells you that you don’t have permission to edit (add to, delete, whatever) the folder. In XP the result is often a simple Access Denied error, whereas in Vista you get a series of annoying User Account Control dialog boxes.
You might think the solution is to give your user account Full Control permissions on the folder, but it’s not as easy as that. Why not? Because you’re not the owner of the folder. (If you were, you’d have the permissions you need automatically.) So the solution is to first take ownership of the folder, and then assign your user account full control permissions over the folder.
Here are the steps to follow:
1. Use Windows Explorer to locate the folder you want to take ownership of.
2. Right-click the folder and then click Properties to open the folder’s property sheet.
3. Display the Security tab.
4. Click Advanced to open the Advanced Security Settings dialog box.
5. Display the Owner tab.
6. In Windows Vista, click Edit and then enter your User Account Control credentials to continue.
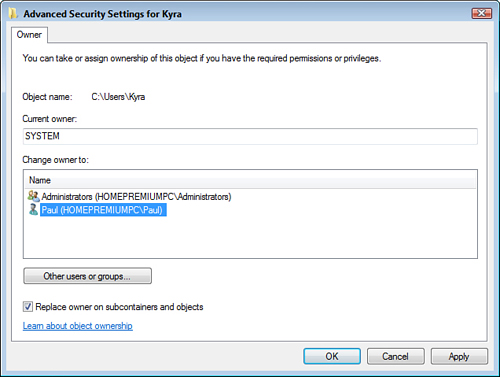
7. In the Change Owner To list, click your user account.
8. Activate the Replace Owner on Subcontainers and Objects check box, as shown in Figure 23.5.
FIGURE 23.5 Use the Owner tab to take ownership of a folder.
9. Click OK. Windows Vista warns you that you need to reopen the property sheet to change the folder’s permissions.
10. Click OK in the open dialog boxes.
11. Right-click the folder and then click Properties to open the folder’s property sheet.
12. Display the Security tab.
13. If you do not see your user account in the Group or User Names list, click Edit (Vista only), click Add, type your username, and click OK.
14. Click your username.
15. Click the Full Control check box in the Allow column.
16. Click OK in the open dialog boxes.
Note that, obviously, this is quite a bit of work. If you only have to do it every once in a while, it’s not a big thing, but if you find you have to take ownership regularly, you’ll probably want an easier way to go about it. You’ve got it! Listing 23.2 shows a Registry Editor file that modifies the Registry in such a way that you end up with a Take Ownership command in the shortcut menu that appears if you right-click any folder and any file.
Listing 23.2 A Registry Editor File That Creates a Take Ownership Command

To use the file, double-click it and then, in Vista, enter your UAC credentials when prompted. As you can see in Figure 23.6, right-clicking (in this case) a folder displays a shortcut menu with a new Take Ownership command. Click that command, enter your UAC credentials in Vista, and sit back as Windows does all the hard work for you!
FIGURE 23.6 When you install the Registry mod, you see the Take Ownership command when you right-click a file.
